Nail art has become a popular trend in the beauty industry, with people constantly seeking new and creative ways to decorate their nails.
However, elaborate and intricate designs can often be time-consuming and require a certain level of skill. This is where simple yet stylish nail designs come in. These designs are easy to create and add a touch of elegance and sophistication to your overall look.
Whether you’re a beginner or a seasoned nail enthusiast, our quick guide to 25 stylish yet simple nail designs will inspire you. From minimalist designs to bold and colorful patterns, we have curated a collection of nail designs that are both trendy and effortless to achieve. So, whether you have a special occasion coming up or want to elevate your everyday style, these nail designs are sure to make a statement.
1.Clear Nails With Golden Hearts
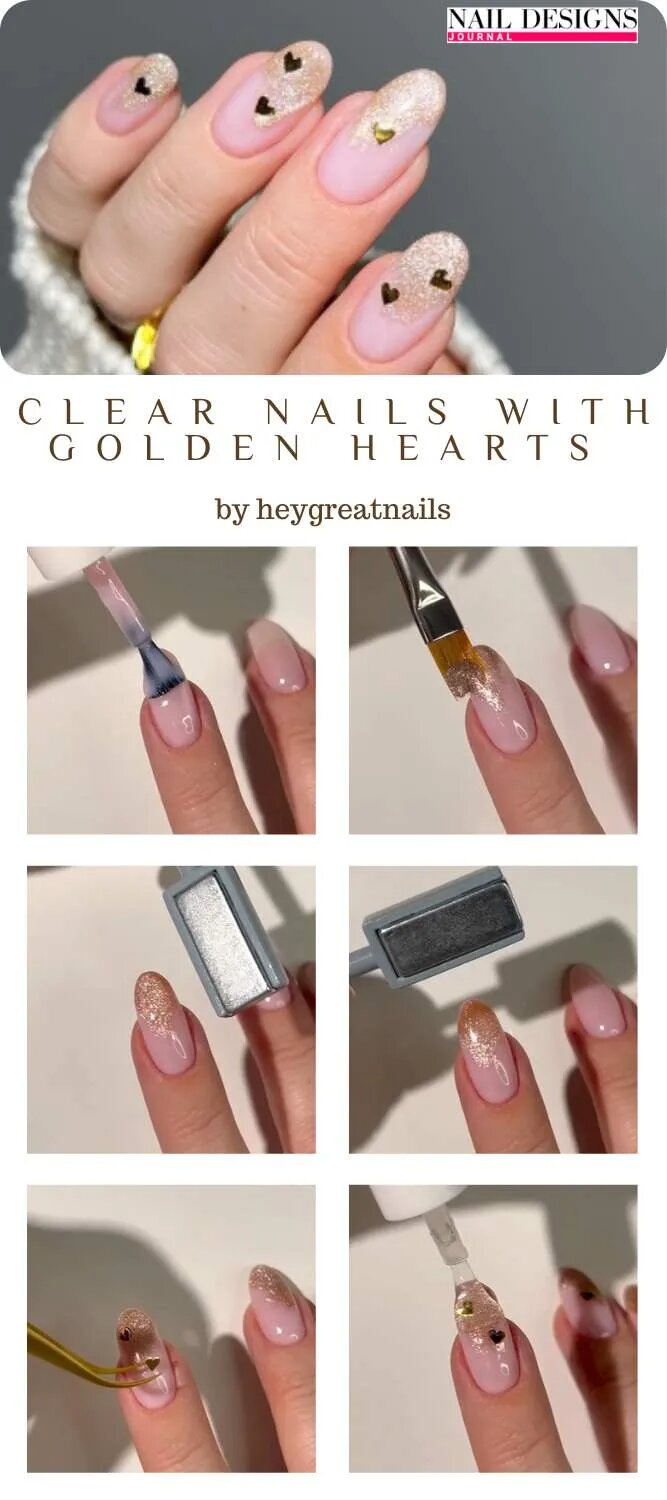
- Start by applying a pale pink nail polish layer as the base color.
- Using a flat brush, apply a magnetic gold nail polish to the tip of each nail.
- Hold a magnet over the wet gold polish at different angles to create a heart-shaped design.
- Allow the nails to dry completely before applying a clear top coat for added shine and longevity.
With these easy steps, you can achieve stylish yet simple nail designs that turn heads.
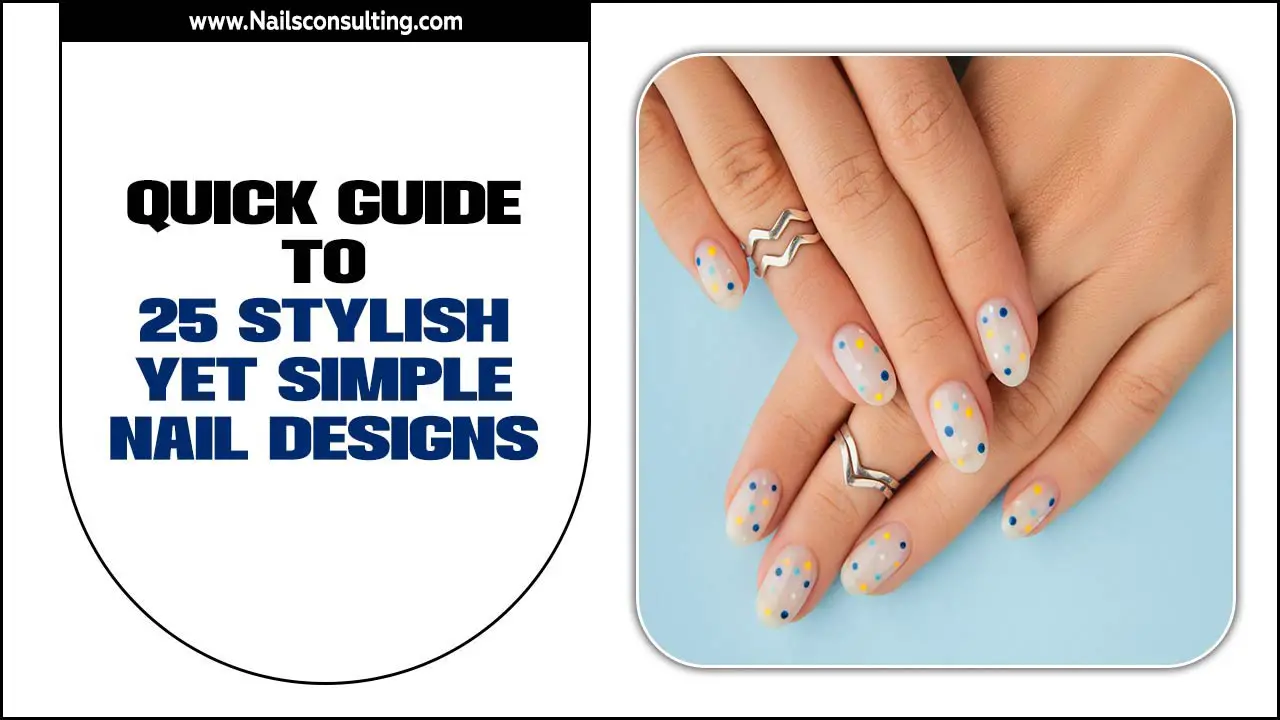
2.Bright Dots Manicure
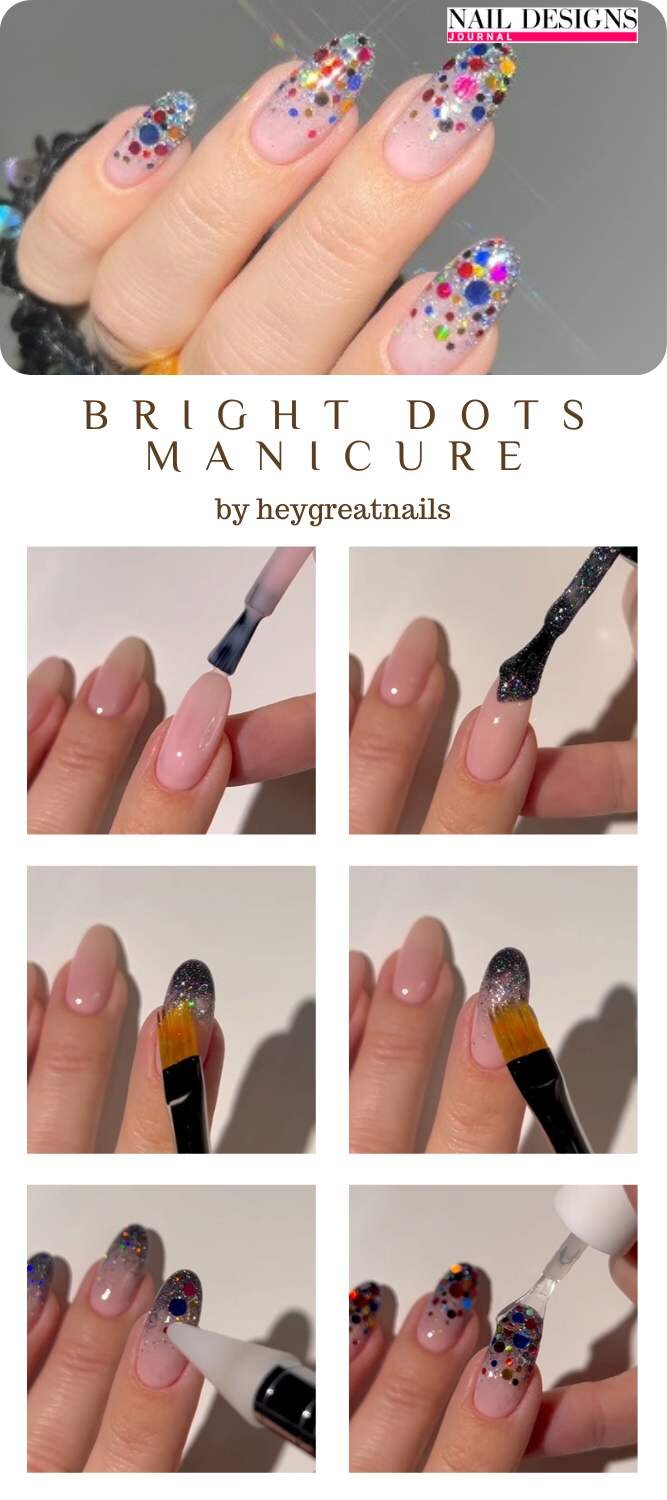
- Start by applying a base coat to protect your nails and create a smooth surface.
- Choose two or three colors of nail polish that complement each other.
- Using a dotting tool or the end of a bobby pin, dip it into one of the nail polish colors and create small dots on your nails. You can create random patterns or a more organized design, such as dots in a straight line or in a diagonal pattern.
- Repeat the process with the other nail polish colors, creating dots in different sizes and spacing them out evenly on your nails.
- Allow the dots to dry completely before applying a top coat to seal in the design and add shine.
3.Light Blue French Nails
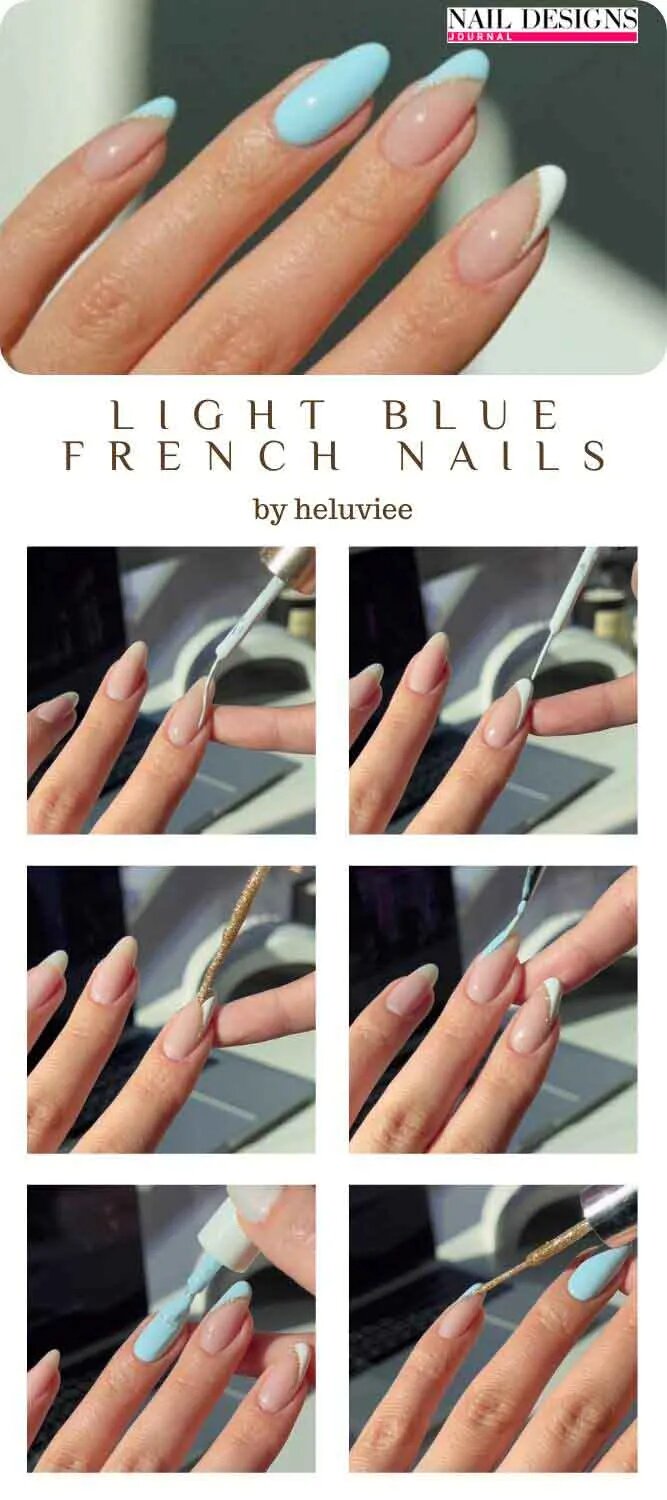
- Start by applying a clear base coat to protect your nails and help the polish adhere better.
- Once the base coat has dried, apply a light blue polish to your entire nail bed. Leave a small strip of your natural nail at the tip.
- Using white nail polish and a thin brush or a nail art pen, carefully draw a straight line across the tip of each nail, creating the classic French manicure look.
- Allow the white polish to dry completely before applying a top coat to seal in your design and add shine.
4.Bright Daisies Nail Design
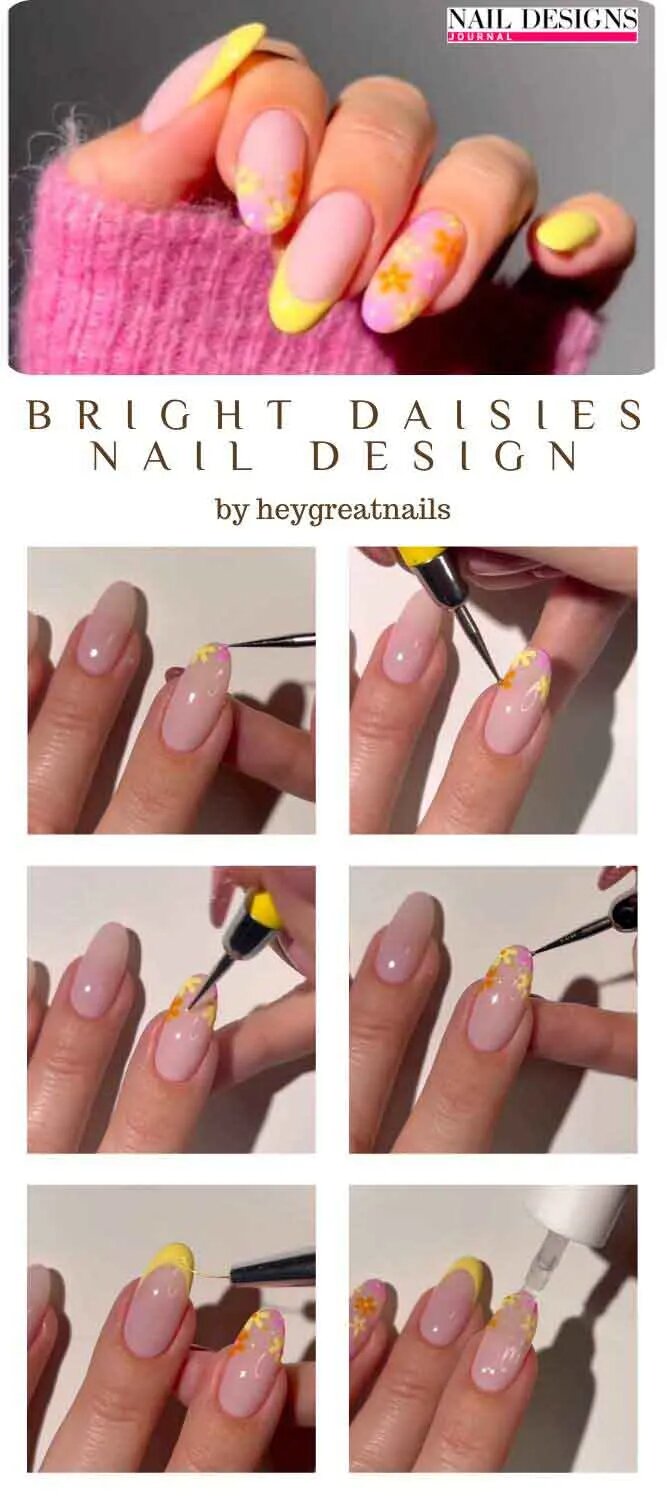
- Apply a base coat to protect your nails and ensure the polish adheres well.
- Choose a bright color as your base, such as yellow or coral, and apply two coats for full coverage.
- Once the base color is dry, use a dotting tool or toothpick to create the center of the daisies with white nail polish.
- Next, create the petals by making small dots around the center using a smaller dotting tool or toothpick.
- Repeat this process on each nail until you have achieved your desired number of daisies.
- Finish off with a top coat to seal in your design and add shine.
5.Simple Dots Nails Design
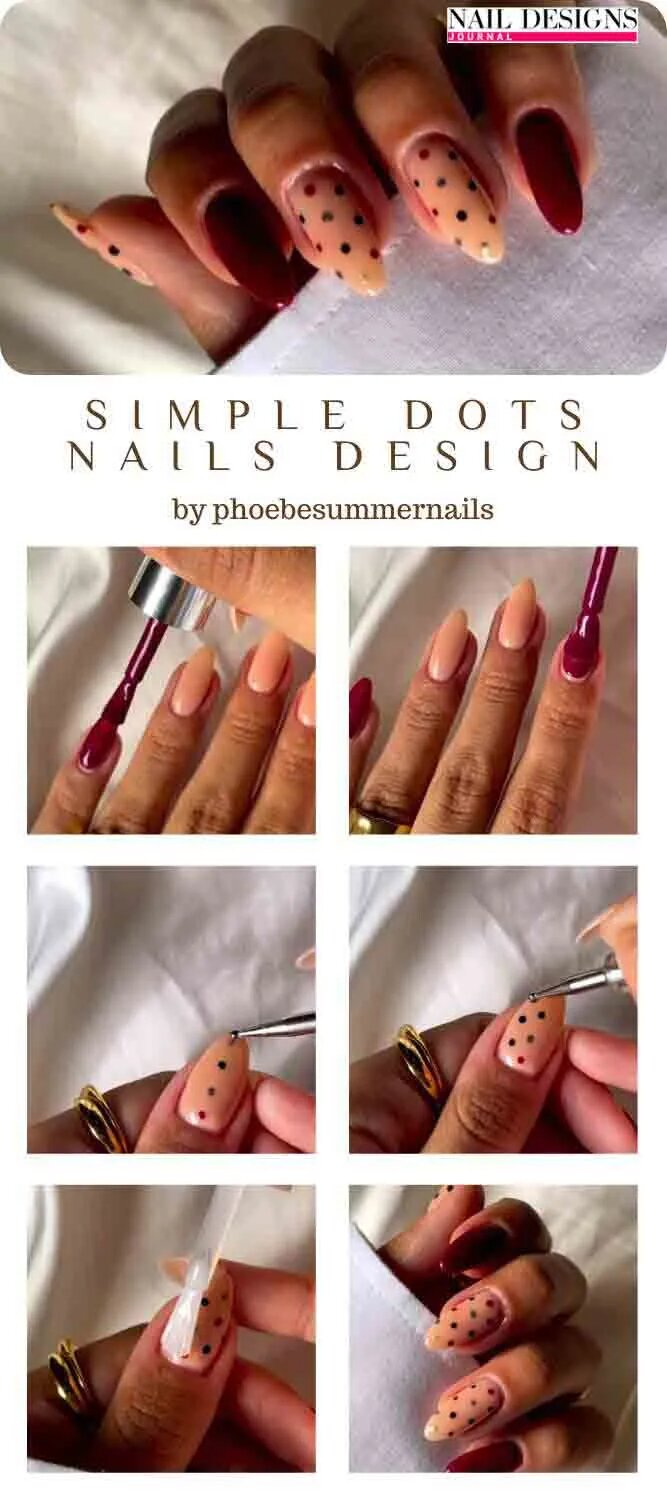
- Start applying a base coat to protect your nails and help the polish adhere better.
- Please choose a color for your base coat and apply it evenly across all your nails. Let it dry completely.
- Once the base coat is dry, dip a dotting tool or a toothpick into a contrasting nail polish color.
- Gently press the dotting tool onto your nails to create small dots. You can create different patterns or keep it simple with just one dot on each nail.
- Repeat this process on all your nails, letting each dot dry before moving on to the next one.
- Finish off with a top coat to seal the design and give your nails a glossy finish.
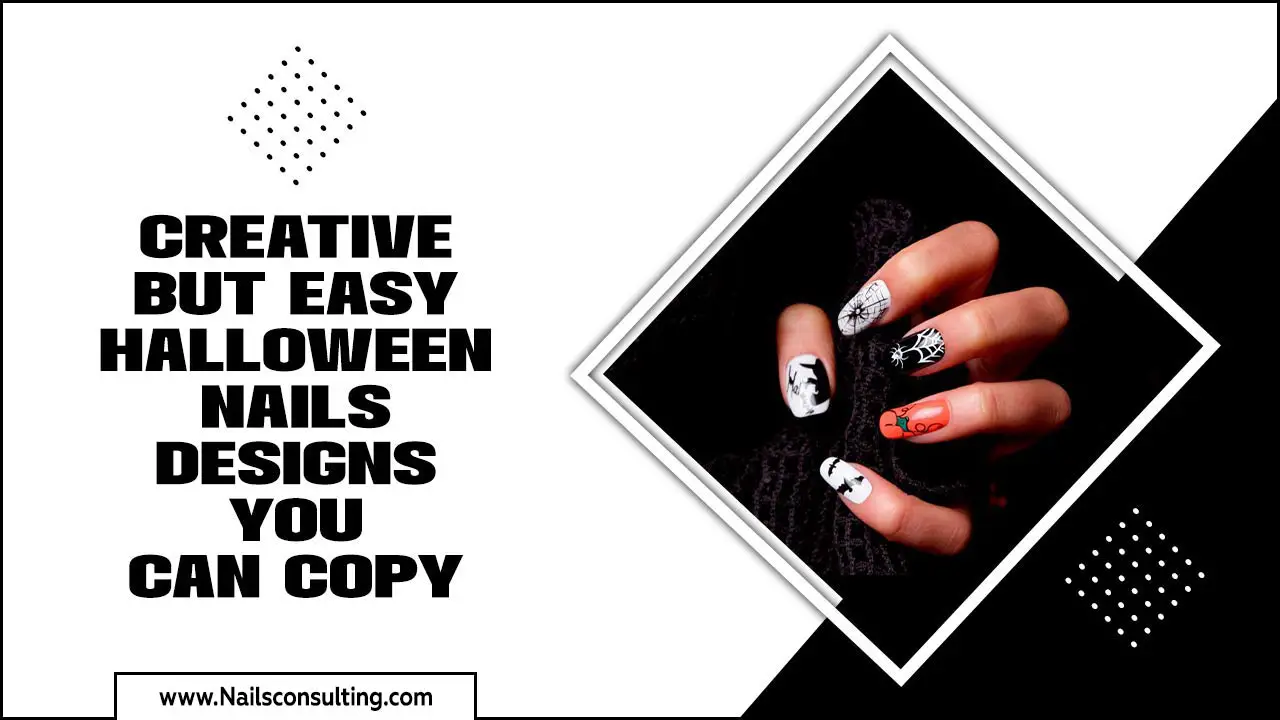
6.Black Spider Nail Accent
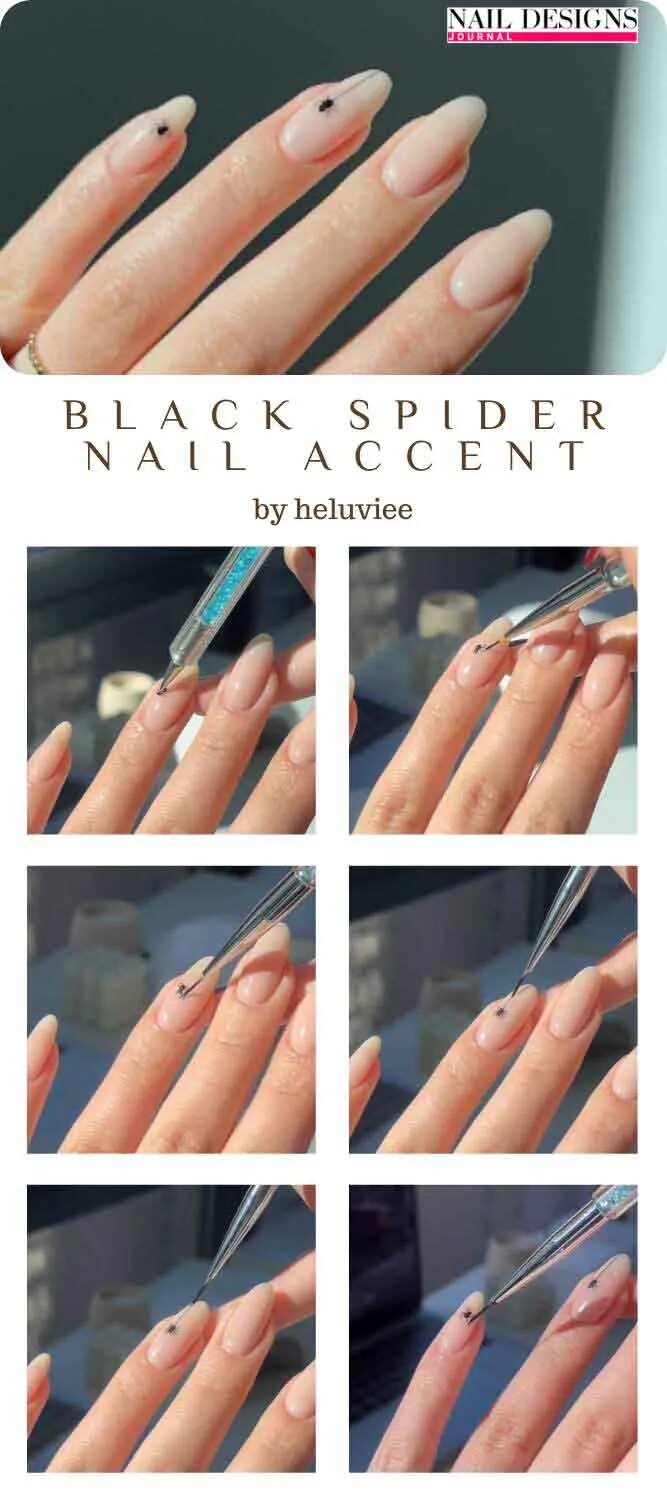
- Start by painting your nails with a black base coat.
- Once the base coat is dry, use a fine-tipped nail art brush or a toothpick to create spider legs. Start by drawing a small dot in the center of your nail, then draw four lines extending outwards. Repeat this step on each nail.
- To create the spider body, use a dotting tool or the end of a toothpick to make a larger dot near the center of each spider leg.
- Allow the design to dry completely, then finish with a clear top coat to seal in your stylish yet simple black spider nail accent.
7.Sunny Orange Nails
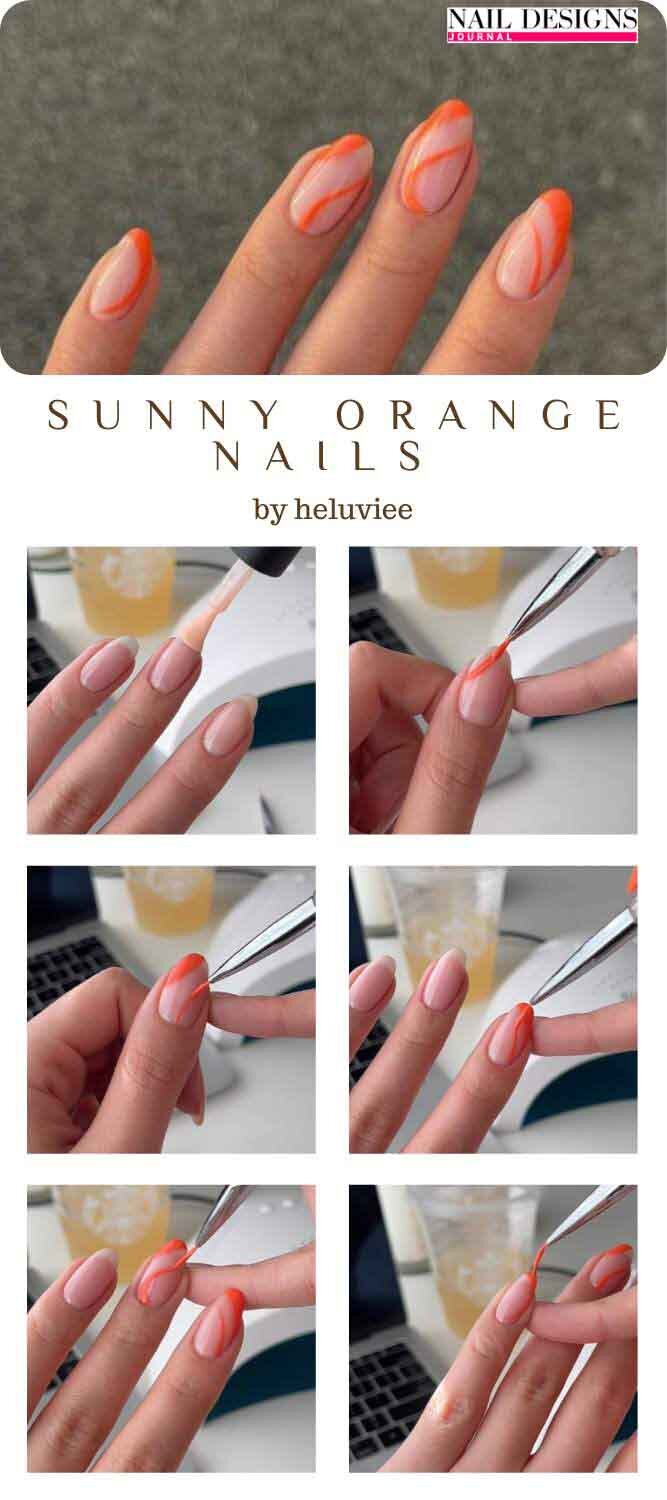
- Start applying a base coat to protect your nails and help the polish adhere better.
- Take a bright orange nail polish and a small brush, then apply an angled line to the tip of the middle and ring fingernails. This creates a playful and eye-catching design.
- Follow up with a solid coat of orange polish on the remaining nails for a cohesive look.
- Finish off with a glossy top coat to seal in the color and give your nails a beautiful shine. These sunny orange nails are perfect for adding a pop of color to any outfit and embracing the vibrant energy of summer.
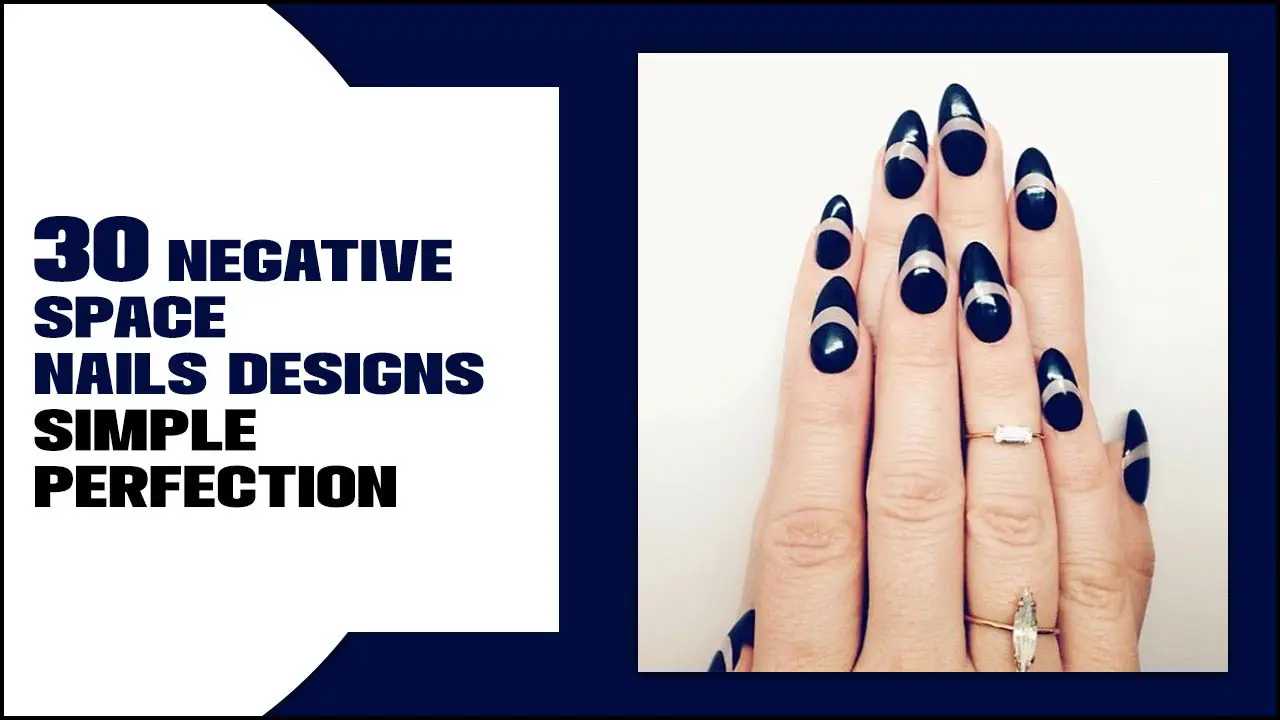
8.Negative Space Nail Art In Few Steps
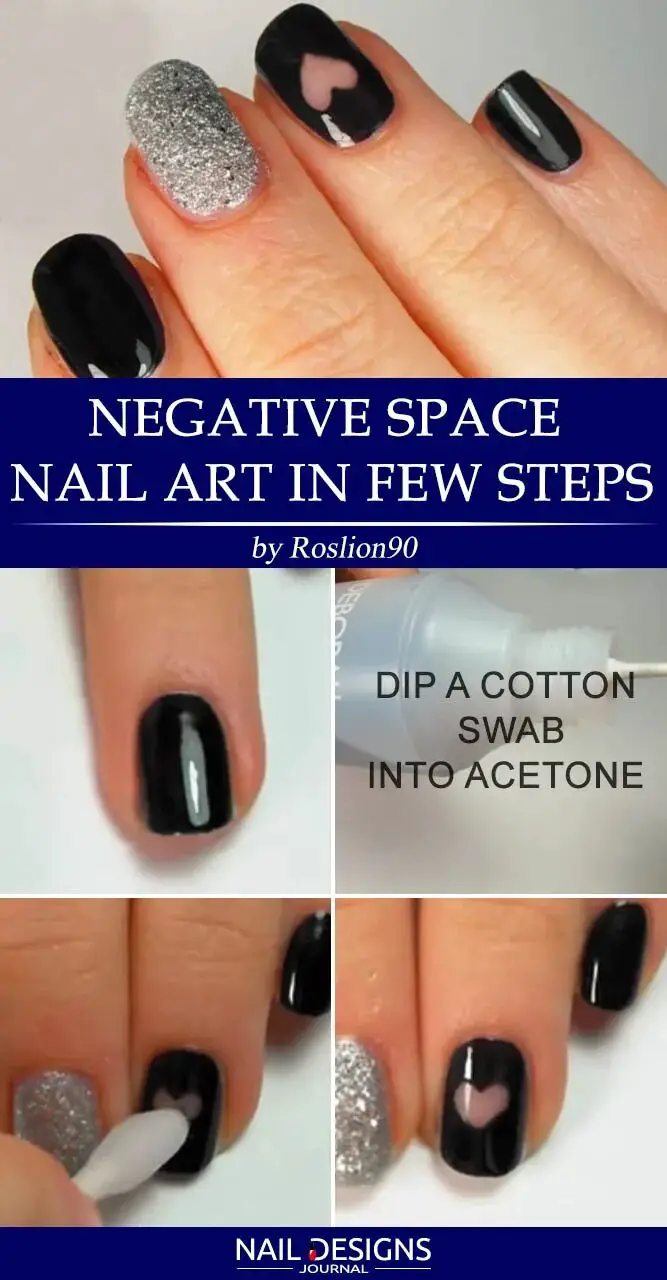
- Apply a base coat to protect your natural nails and help the polish adhere better.
- Apply black nail polish to all your nails except the middle one. This will create a negative space effect.
- On the middle fingernail, apply a silver sparkly base. This will serve as the focal point of your design.
- Use a Q-tip dipped in nail polish remover to carefully clean up any mistakes or smudges around your cuticles or on your skin.
- Finish off your design by applying a top coat to seal in the polish and add shine to your nails.
9.Light Ombre Manicure
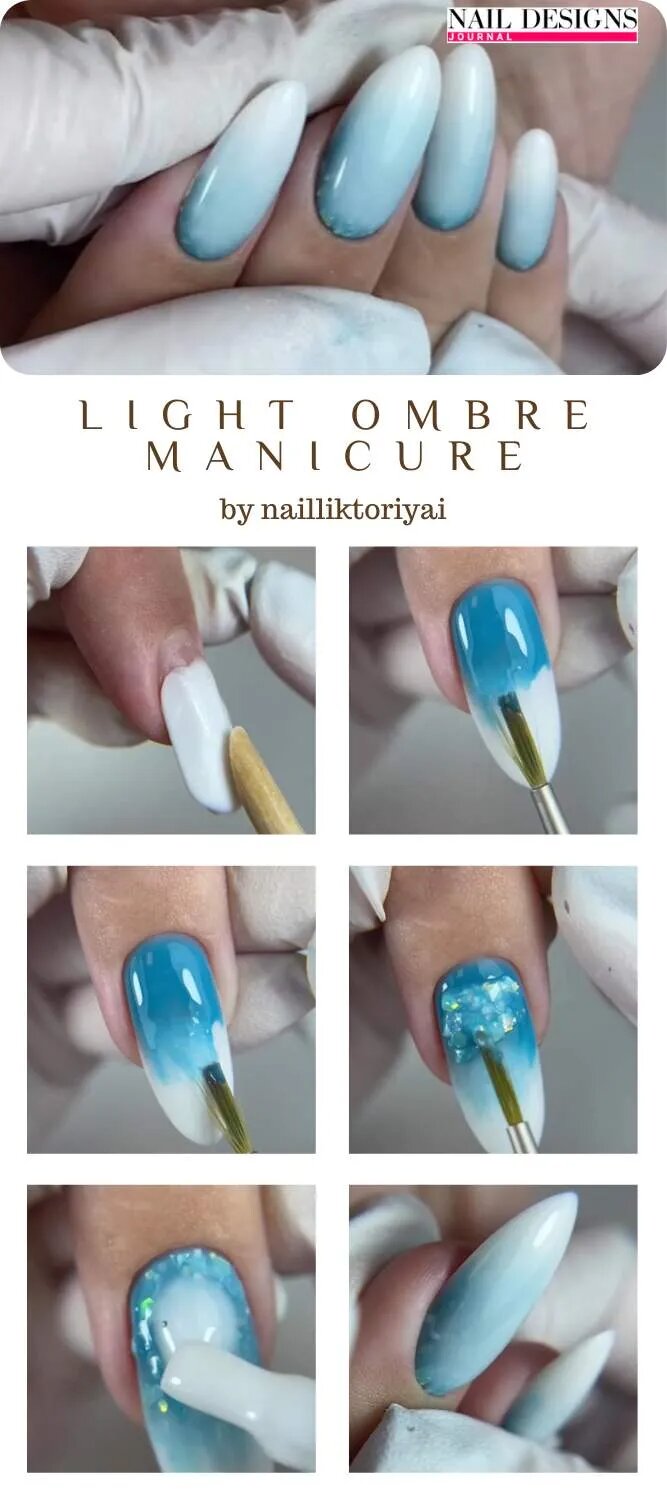
- Start by applying a white base from the middle toward the tips of the nails.
- Next, apply a blue nail color to the base of each nail toward its middle.
- Blend them using a clean brush or sponge to create a seamless transition between the two colors. Gently dab the brush or sponge along the area where the white and blue meet until you achieve a smooth ombre effect.
- Finish off your manicure with a clear top coat to seal in the colors and add shine to your nails. And there you have it – a stylish yet simple light ombre manicure sure to turn heads!
10.Simple Doticure Art You Can Do In 5 Min
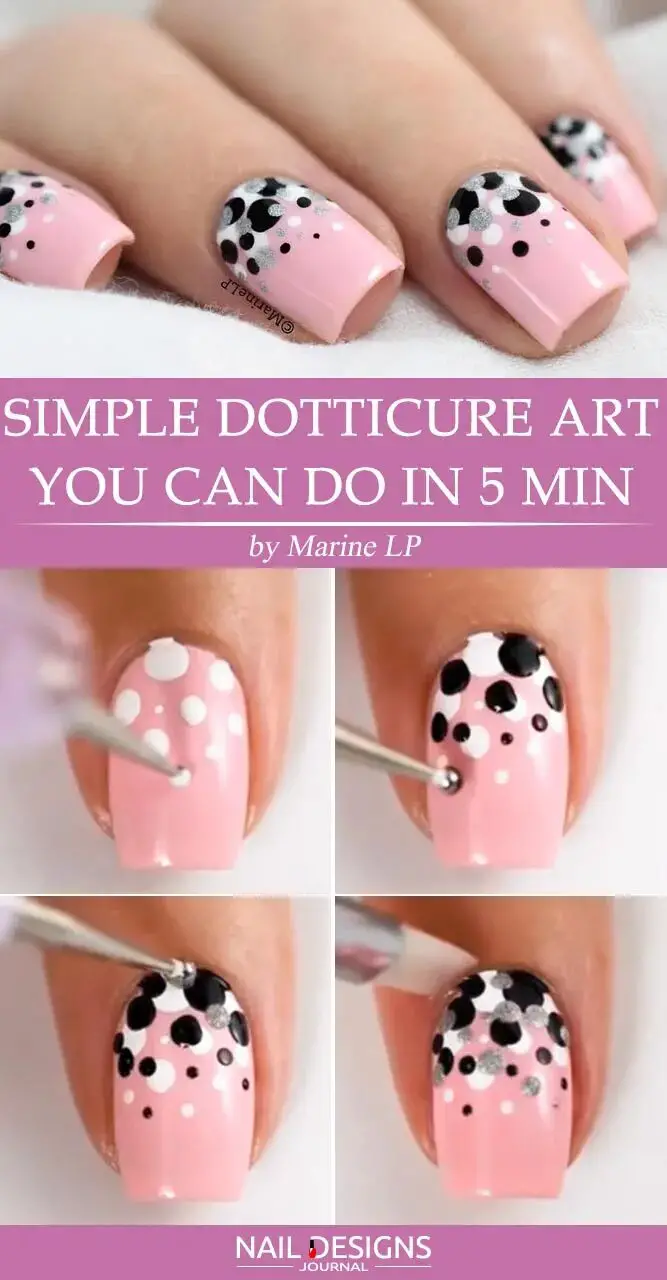
- Start by applying a base coat to protect your nails and help the polish adhere better.
- Apply a baby pink base coat for a soft and feminine look.
- Create various-sized dots on your nails Using white nail polish and different-sized dotting tools (such as the end of a bobby pin or a toothpick). You can experiment with shapes and patterns, like polka dots or a cute little heart.
- For some added dimension, use black nail polish to create smaller dots within the white ones, or vice versa.
- Finish off with a clear top coat to seal in your design and add shine.
11.Swirled Nail Art
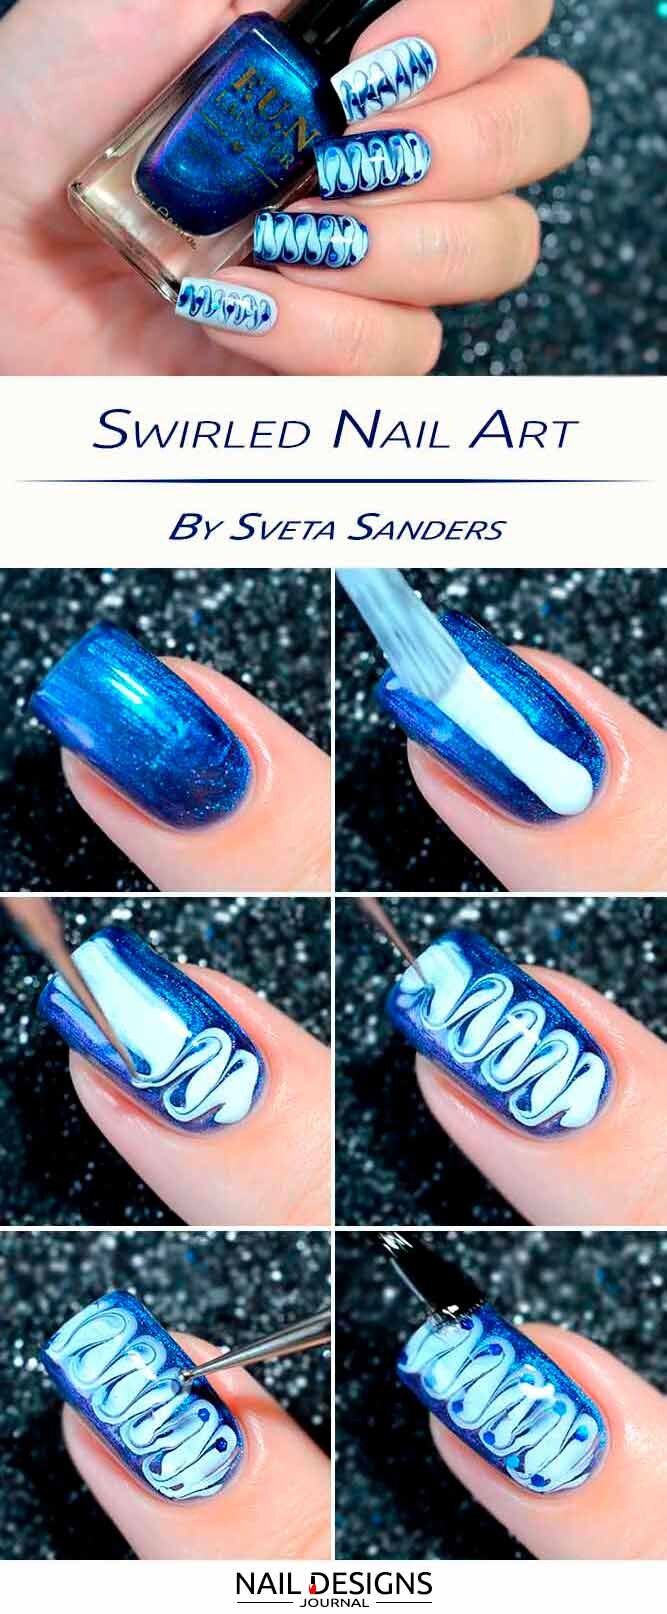
- Start with a clean and dry nail surface.
- Apply a base coat to protect your nails and help the design last longer.
- Choose two complementary nail polish colors. One will be the base color, and the other for the swirls.
- Apply the base color and let it dry completely.
- Dip a thin nail art brush or a toothpick into the second nail polish color.
- Start from one side of the nail. Make small swirls or waves on the nail’s surface using short, gentle strokes.
- Continue swirling until you achieve your desired design. You can create multiple swirls or just one accent swirl on each nail.
- Let the design dry completely before applying a top coat to seal in the design and add shine.
12.Quick And Easy Stamping Nail Art
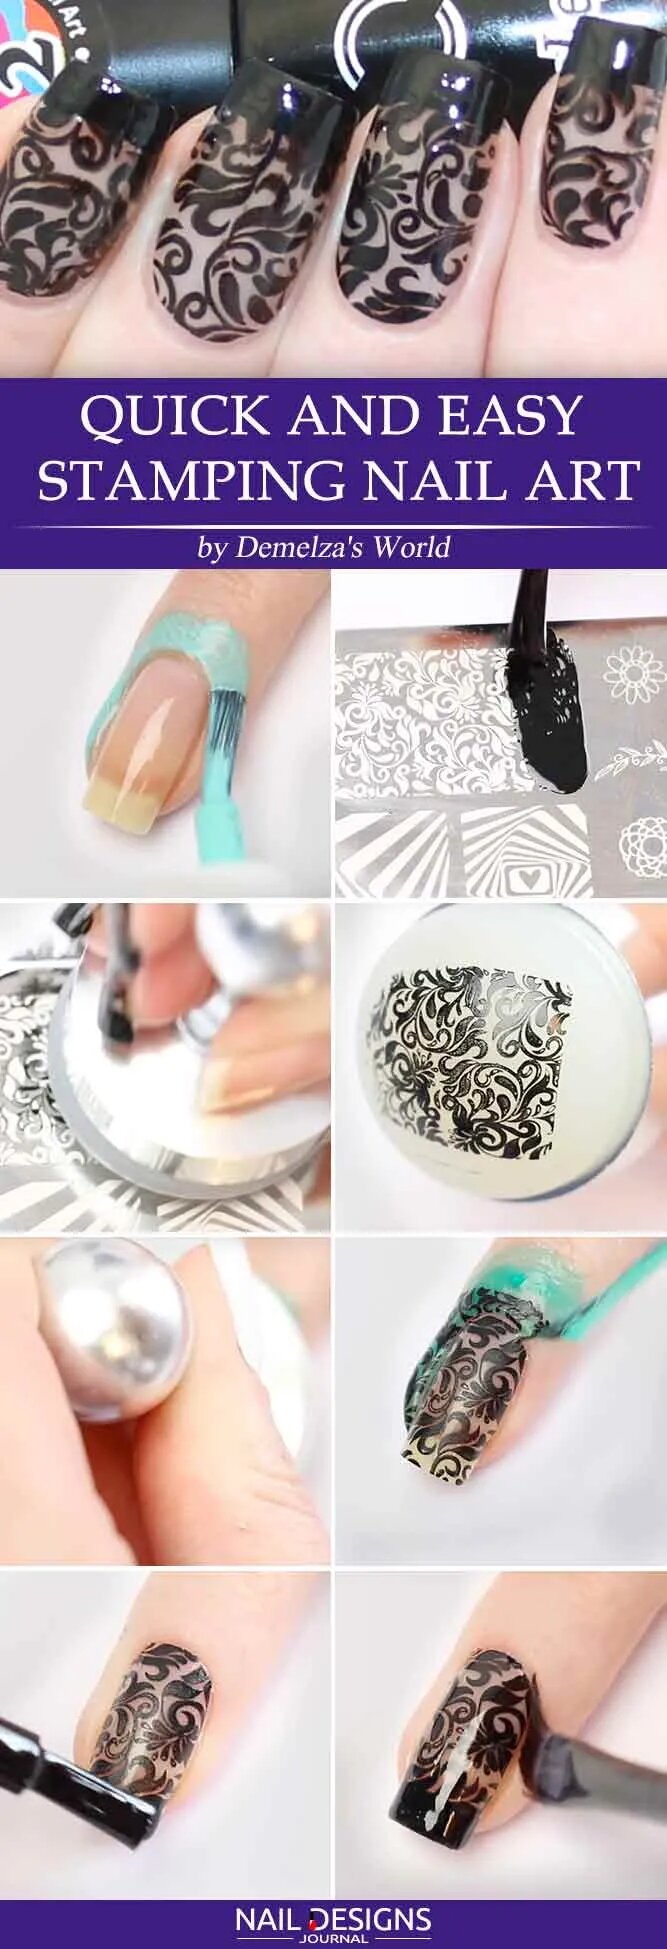
- Start with clean, dry nails.
- Choose a stamping plate with a design that you like.
- Apply a thin layer of stamping polish onto the desired design on the plate.
- Use a scraper to remove excess polish from the plate, leaving only the design filled with polish.
- Quickly transfer the design onto a stamper by gently pressing it onto the plate.
- Align the stamper with your nail and press down firmly to transfer the design onto your nail.
- Clean any excess polish around your cuticles using a brush or cotton swab dipped in acetone.
- Finish with a top coat to seal in your design and add shine.
13.Zig Zag Nail Art
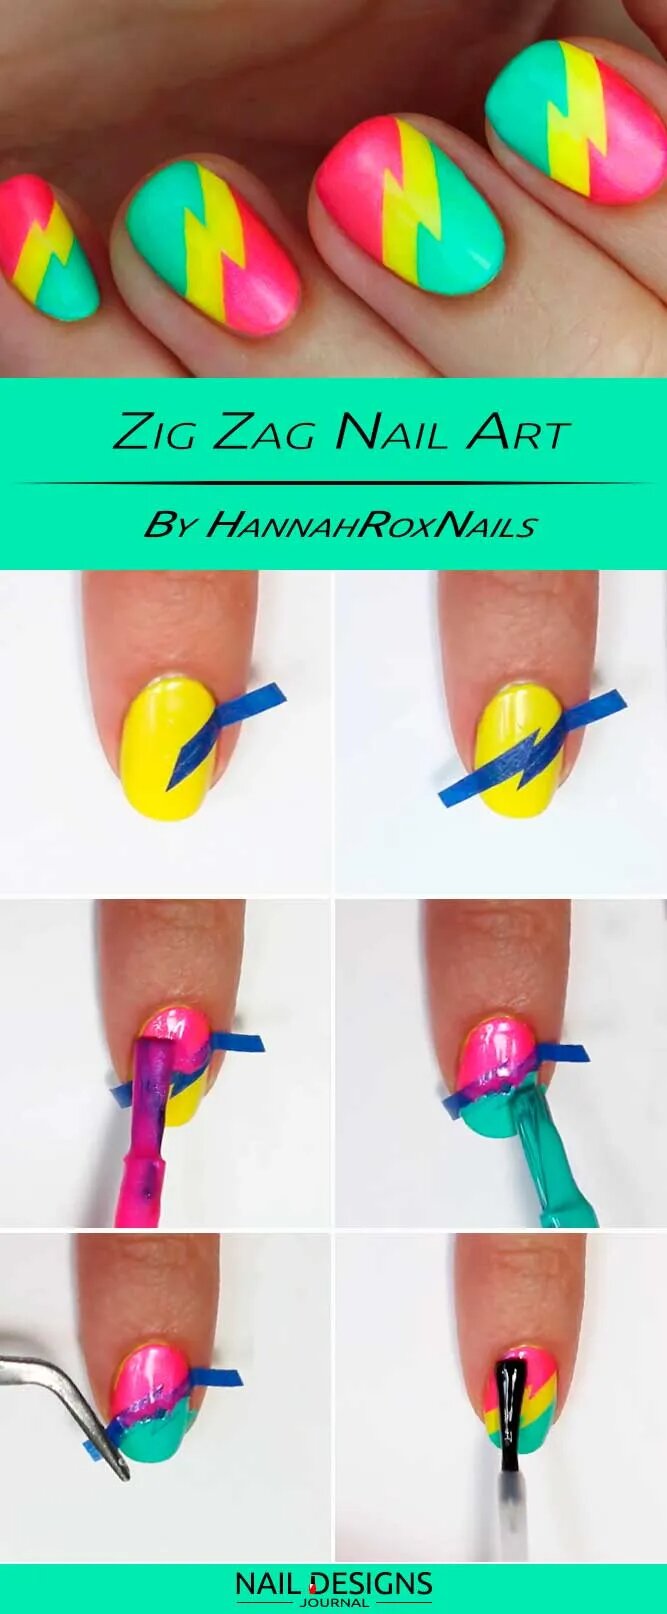
- Start by applying a base coat to protect your nails and help the polish adhere better.
- Choose two contrasting nail polish colors that you want to use for the zig-zag design.
- Apply the first color as your base coat and let it dry completely.
- Once the base color is dry, dip a thin nail art brush or a striping brush into the second color.
- Starting at one side of your nail, create a diagonal line using short strokes with the brush.
- Continue creating diagonal lines across your nail, alternating between the two colors until you reach the other side.
- Once you have completed the zig-zag pattern on all of your nails, let them dry completely.
- Finish off with a top coat to seal the design and add shine.
14.Gingham Nail Art
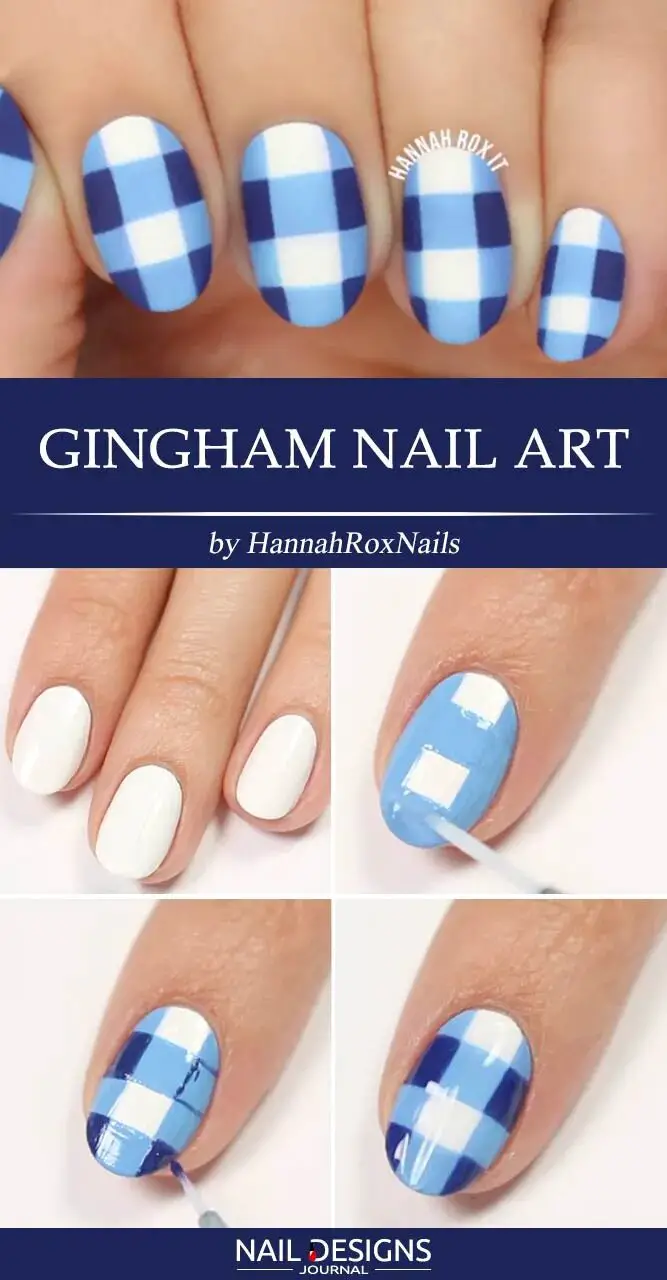
- Start by applying a base coat to protect your nails and create a smooth surface.
- Once the base coat is dry, choose two contrasting nail polish colors that will create the gingham pattern. For example, you could use a white polish as the base color and black polish for the lines.
- Apply two coats of the base color and allow it to dry completely.
- Create vertical and horizontal lines on each nail to form the gingham pattern using a thin nail art brush or a toothpick dipped in the second color. Make sure to leave equal spaces between each line.
- Allow the lines to dry before applying a top coat to seal in your design and add shine.
15.Stylish Chevron Nail Art In Simple Steps
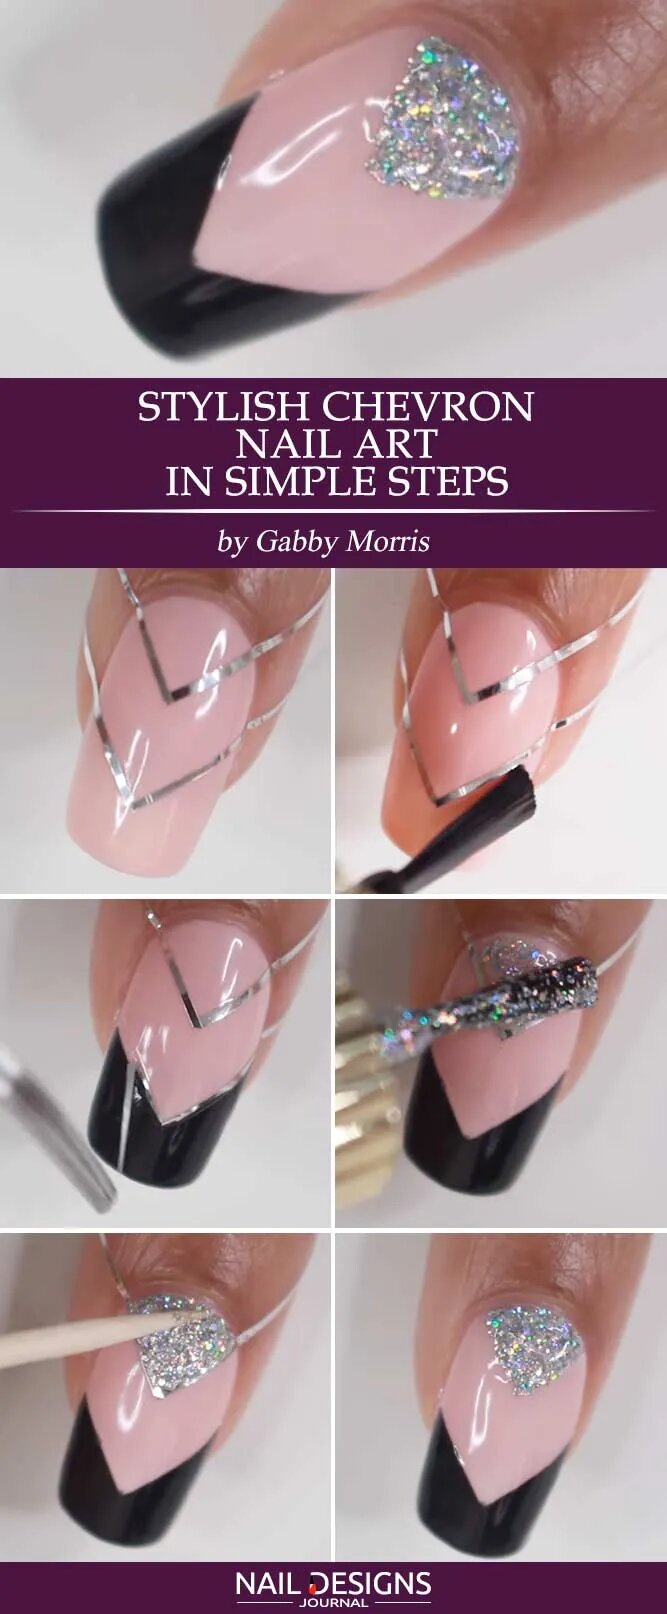
- Apply a base coat to protect your nails and help the polish adhere better.
- Choose two contrasting colors of nail polish that will create the chevron pattern. For example, you could use a light pink and a dark purple.
- Apply the lighter color as your base color and let it dry completely.
- Cut small pieces of striping tape and place them diagonally across your nails to create the chevron pattern.
- Carefully apply the second nail polish color over the exposed areas, covering the tape completely.
- Wait for the polish to dry slightly, then carefully remove the striping tape to reveal the chevron pattern underneath.
- Finish off your chevron nail art with a layer of top coat to seal in the design and add shine.
16.Metallic Nail Art
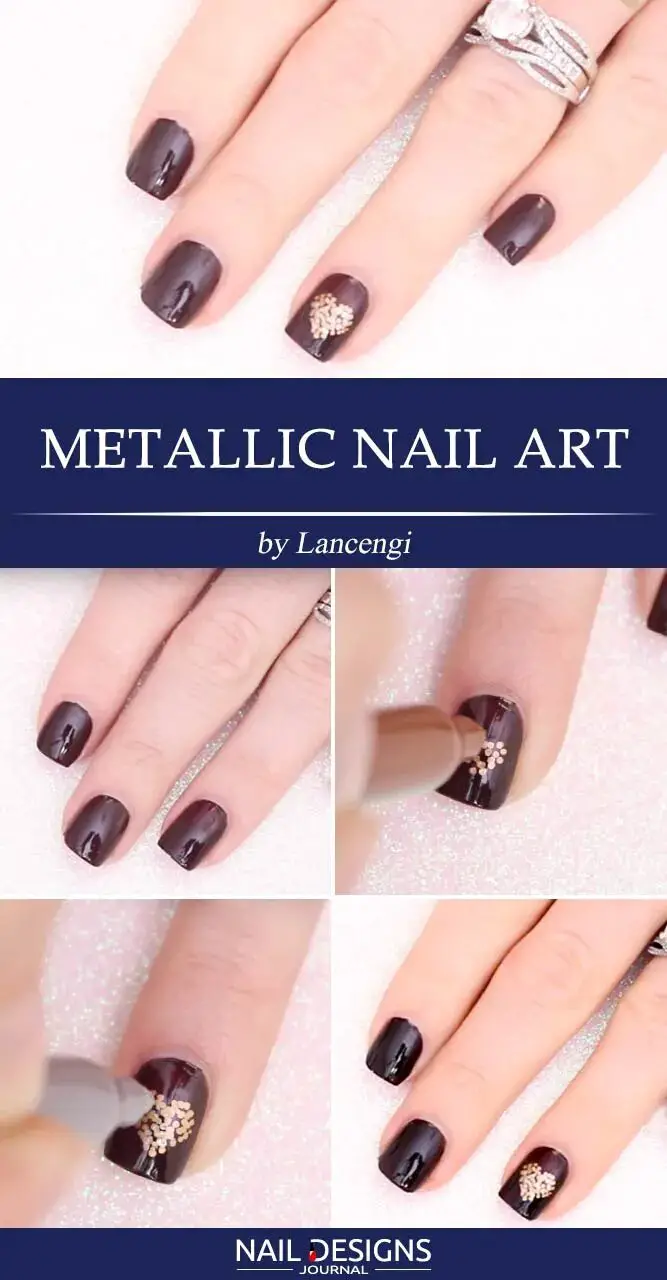
- Apply your favorite color as a base coat and allow it to dry completely.
- Once the base coat is dry, grab a metallic gold or silver Sharpie marker to make some fun designs on your nails. You can create geometric shapes, dots, lines, or any other pattern that catches your eye.
- After you’ve finished designing, let the metallic ink dry completely.
- Finish off with a clear top coat to seal in your metallic nail art and enhance its longevity.
17.Newsprint Nail Art
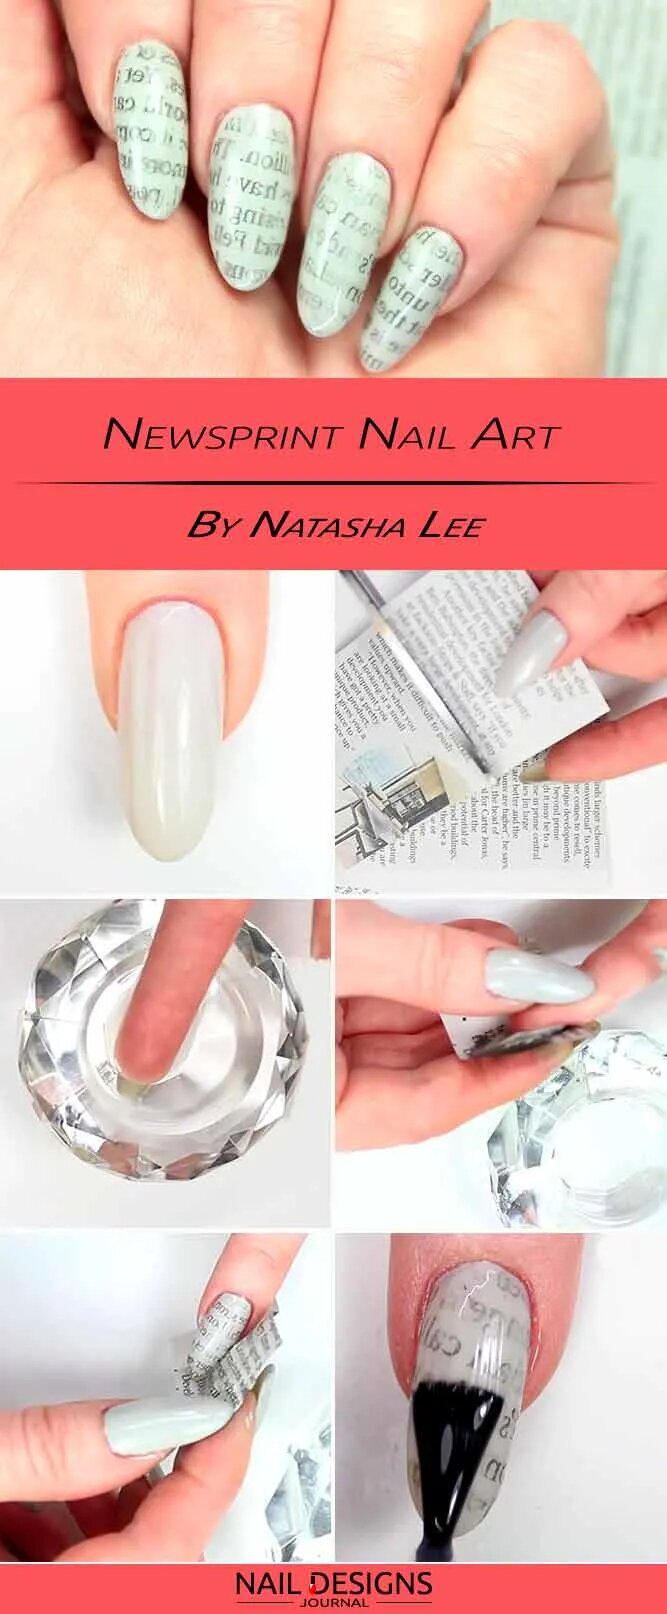
- Start by applying a base coat to protect your nails.
- Once the base coat is dry, apply two white or light-colored nail polish coats and allow it to dry completely.
- Pour a small amount of rubbing alcohol into a dish or container.
- Dip one strip of newspaper into the rubbing alcohol for about 5 seconds until it is saturated.
- Carefully press the newspaper strip onto your nail, ensuring it covers the entire surface.
- Gently press down on the newspaper strip for about 10-15 seconds to transfer the ink onto your nail.
- Carefully peel off the newspaper strip and repeat steps 4-6 for all your nails.
- Once all the designs are transferred, allow them to dry for a few minutes.
- Apply a top coat to seal in the design and add shine.
18.DIY Half Moon Nail Art With Vinyl Stencil
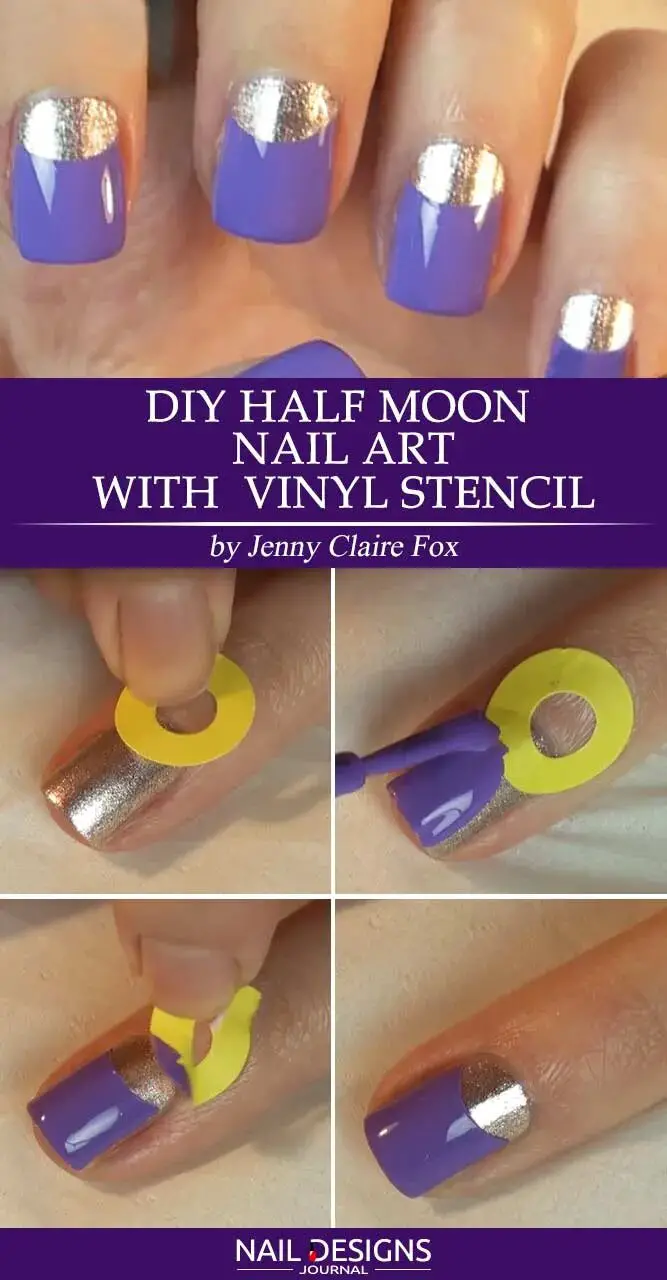
- Apply a base coat to protect your nails and ensure long-lasting wear.
- Once the base coat is dry, apply a light-colored polish to your entire nail and let it dry completely.
- Place the vinyl stencil near the base of your nail, creating a half-moon shape.
- Cover the stencil with a darker polish over the exposed part of your nail.
- Carefully peel off the vinyl stencil while the polish is still wet to reveal the half-moon design.
- Clean up any excess polish around your cuticles with a small brush dipped in nail polish remover.
- Finish with a glossy top coat to seal in your design and add shine.
19.Sweet Pink Summer Nail Art Design
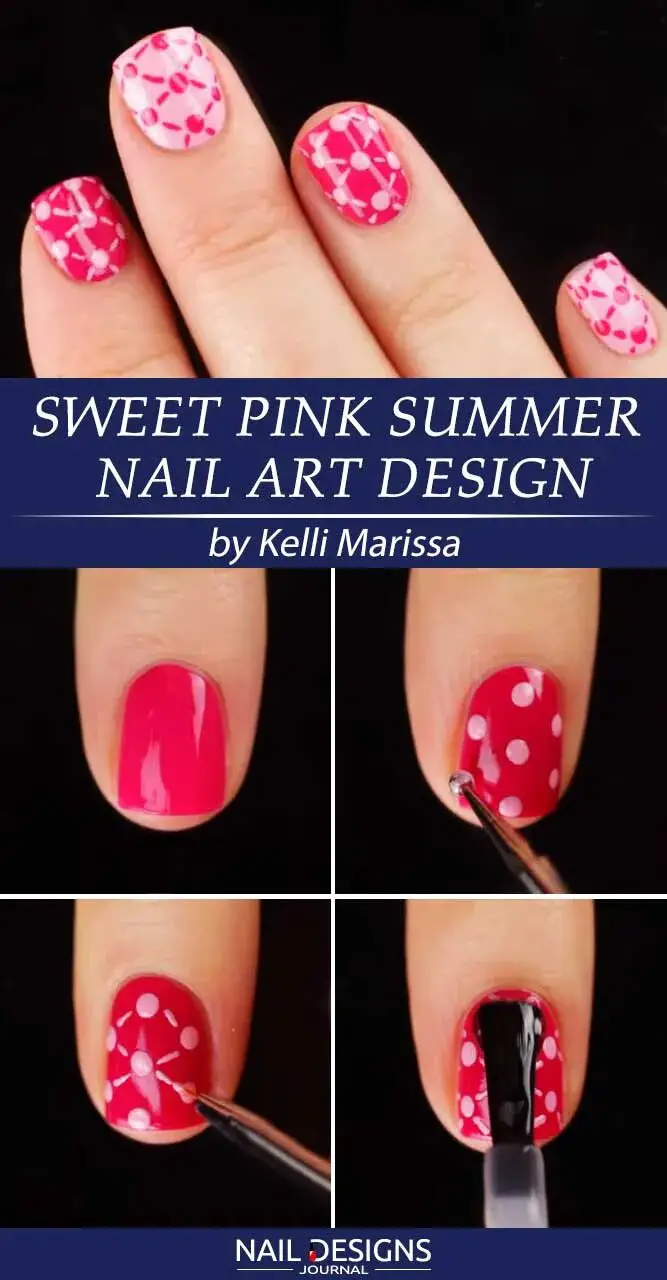
- Start by applying a base coat to protect your nails.
- Once dry, apply a light pink polish as the base color.
- Create small white dots on each nail to resemble polka dots using a thin brush or a dotting tool.
- Next, add a touch of sparkle by applying silver glitter polish to the tips of your nails.
- Finish off with a glossy top coat to seal in the design and add shine.
20.Perfect Dry Marble

- Start with a clean, dry base. Before starting the design, ensure your nails are free from any oils or residue.
- Apply a base coat to protect your nails and help the polish adhere better.
- Choose two contrasting nail polish colors. One will be your base color, and the other will be used for the marbling effect.
- Apply two coats of your base color and let it dry completely.
- Take a small piece of plastic wrap or a plastic baggie and crinkle it up. Dip it lightly into the second nail polish color and then dab it onto your nails in a random pattern.
- Repeat this step with different sections of plastic wrap until you achieve the desired marbling effect.
- Clean up any excess polish around your nails using a small brush dipped in nail polish remover.
- Finish off with a clear top coat to seal in the design and add shine.
21.Retro Swatches Nail Art
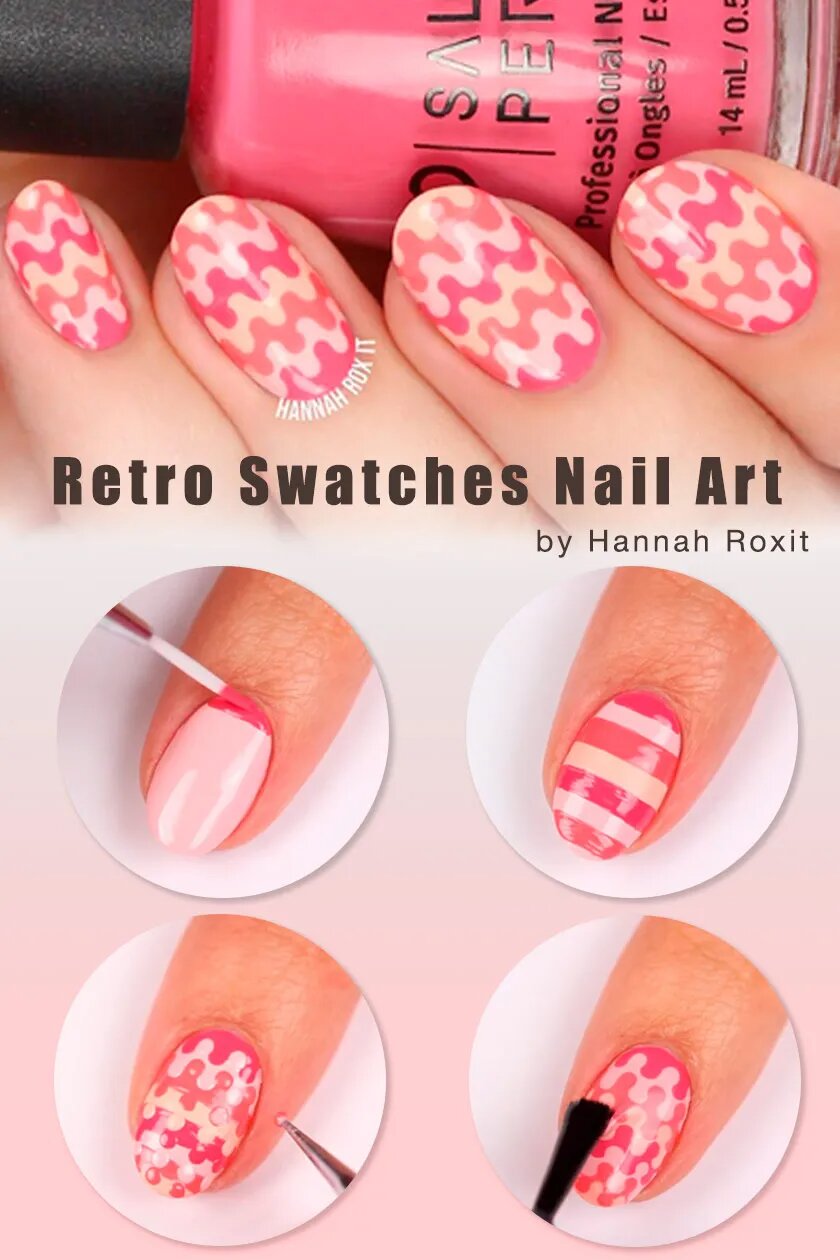
- Retro swatches nail art is a stylish and simple way to add vintage flair to your manicure.
- Start by applying a base coat to protect your nails and create a smooth surface.
- Choose a retro-inspired color palette, pastels or bold primary colors.
- Using a striping brush or toothpick, create thin lines or geometric shapes on each nail, resembling the look of paint swatches from the past.
- Allow the design to dry completely before applying a top coat to seal in the retro swatches’ nail art and add shine.
22.Abstract French Tips Nail Art
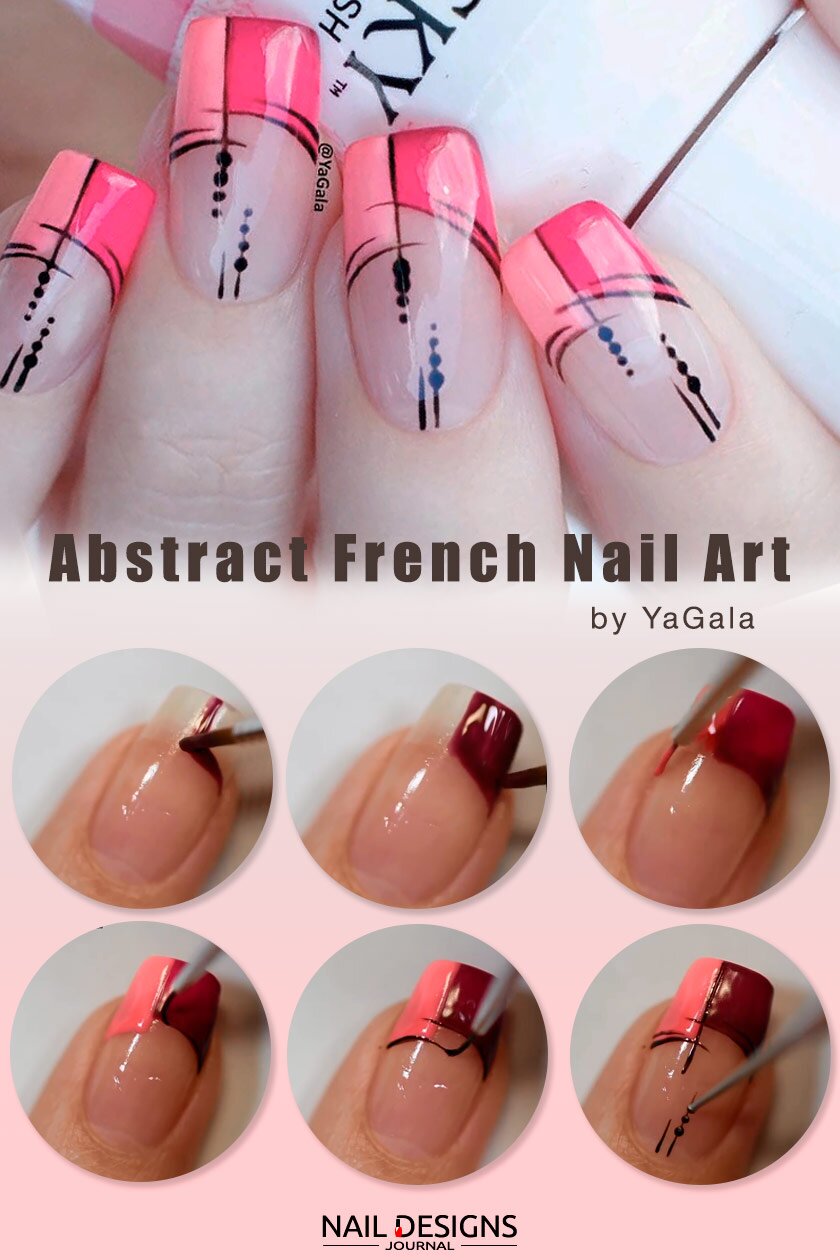
- Start applying a base coat to protect your nails and create a smooth surface.
- Choose your desired colors for the tips. You can opt for bold and vibrant shades or stick with more subtle pastels.
- Instead of painting straight lines across the tips, experiment with different shapes such as diagonal lines, triangles, or asymmetrical designs.
- To create abstract patterns, use a thin nail art brush or a dotting tool to add dots, lines, or swirls on the colored tips.
- Finish off with a glossy top coat to seal in your design and add shine.
23.Rhinestone And Floral Nail Art
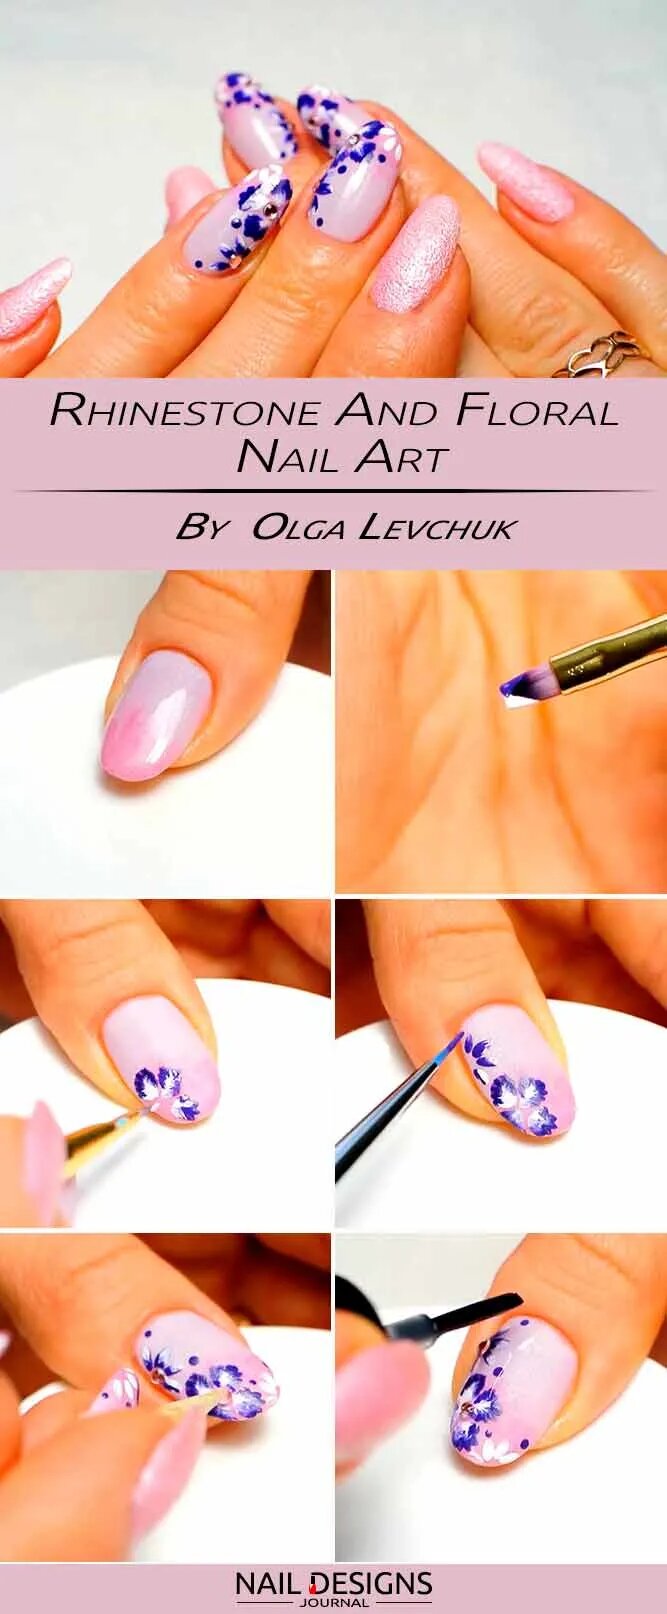
- Start with a clean and prepped nail surface. Ensure your nails are free from old polish or residue, and trim and shape them as desired.
- Apply a base coat to protect your natural nails and help the polish adhere better.
- Choose your desired nail polish colors. For a rhinestone and floral design, it’s best to go with light or neutral shades as a base color.
- Once the base color is dry, use a thin brush or dotting tool to create small flowers on your nails. You can use different shades of polish to create depth and dimension.
- To add rhinestones, apply a small amount of clear top coat to the desired area on your nail, then carefully place the rhinestones using tweezers.
- Finish off with a layer of top coat to seal your design and add shine.
24.Easy Water Marble Nail Art
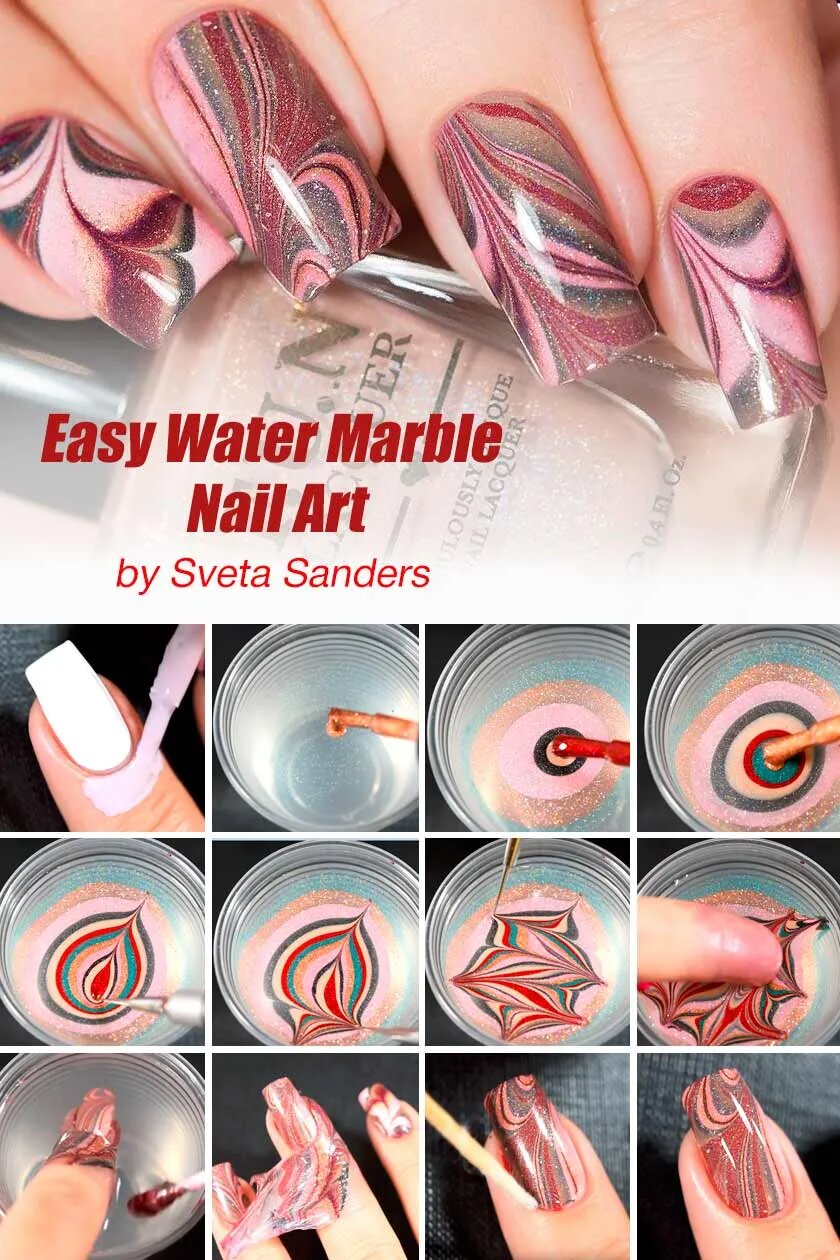
- Apply a base coat to protect your nails and help the polish adhere better.
- Fill a small cup with room temperature water. Make sure the cup is deep enough to submerge your finger fully.
- Choose two or more nail polish colors that you want to use for your design. Drop a few drops of each color into the water, creating concentric circles.
- Use a toothpick or a thin brush to create swirls and patterns in the polish on the water’s surface.
- Once you’re happy with the design, carefully dip your finger into the water, submerging it completely.
- Use a toothpick or a clean-up brush dipped in acetone to remove any excess polish around your nail.
- Slowly pull your finger out of the water and admire your beautiful marbled design!
- Allow the design to dry completely before applying a top coat to seal in the design and add shine.
25.Sparkly Waterfall Nail Art
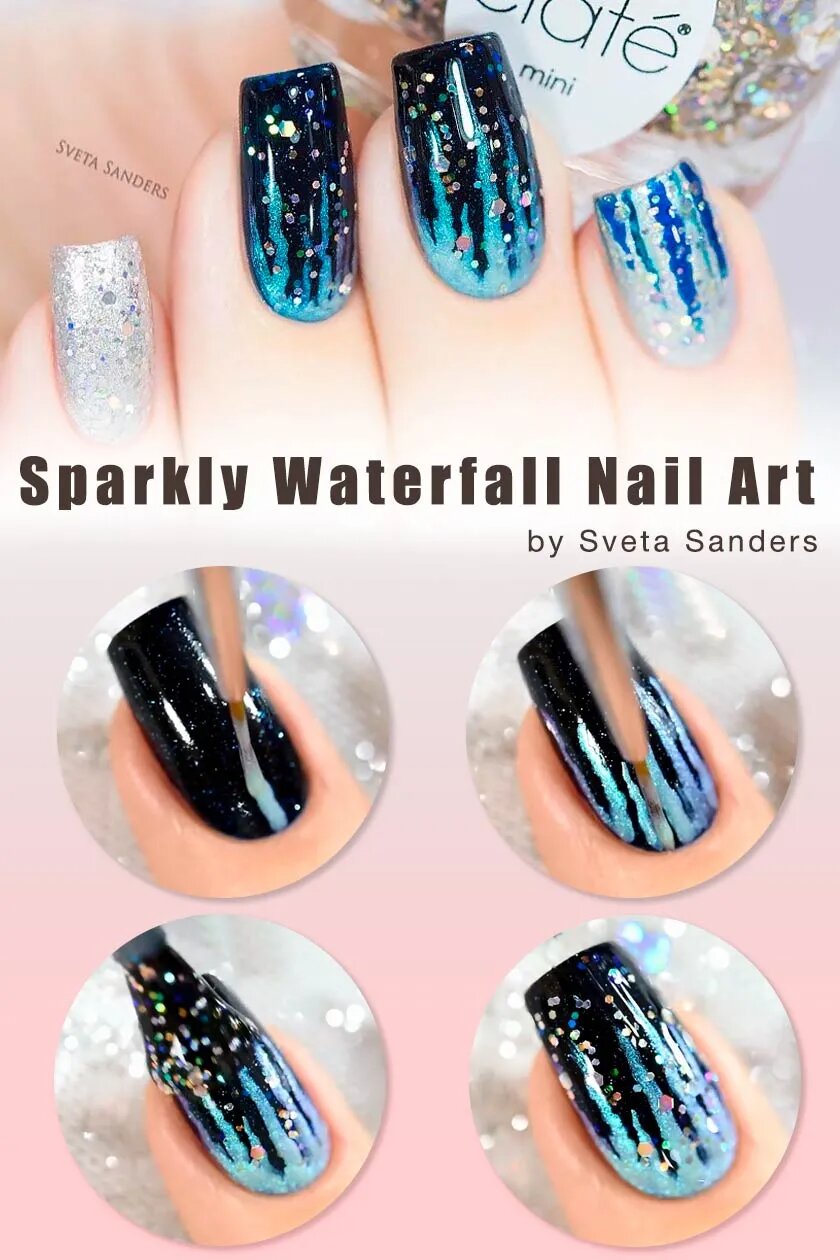
- Start applying a base coat to protect your nails and help the polish adhere better.
- Choose a light-colored nail polish as your base color. Apply two coats for full coverage and allow it to dry completely.
- Apply a fine glitter nail polish in your desired color to the tips of your nails, creating a gradient effect. You can use a sponge or a small brush to dab on the glitter for better control.
- Once the glitter is dry, use a thin brush or a toothpick to create vertical lines from the cuticle area towards the tip of the nail. These lines will resemble cascading waterfalls.
- Fill in the spaces between the lines with more glitter polish, alternating colors if desired. This will give your design depth and dimension.
- Allow the design to dry completely before applying a top coat to seal in the design and add shine.

