Watercolor nails are an achievable, artistic nail art trend that mimics the beautiful, blended look of watercolor paintings. With a few simple techniques and basic tools, you can create stunning, unique designs right at home, adding a splash of vibrant creativity to your manicure!
Ever scroll through nail art ideas and feel a little intimidated? Watercolor nails might look like a masterpiece painted by a pro, but guess what? You can totally do them! They’re a fantastic way to express yourself with soft, dreamy colors that blend like magic. Forget complicated tools or tricky techniques. We’re going to break down how to get that gorgeous, flowy watercolor effect, making your nails look stunning and totally unique. Get ready to unleash your inner artist!
Unleash Your Inner Artist: A Beginner’s Guide to Watercolor Nails
Welcome to the wonderful world of watercolor nails! If you’ve admired those ethereal, blended designs and thought, “There’s no way I can do that!” – think again! Watercolor nails are all about soft edges, beautiful color transitions, and a touch of artistic flair that anyone can master. They’re perfect for adding a delicate, artistic touch to any outfit or mood. We’ll guide you through everything you need to know, from the essential tools to the simple steps that will make your nails look like a dream.
Why Watercolor Nails Are Your Next Favorite Trend
What makes watercolor nails so special? It’s their versatility and effortless charm. Unlike sharp, graphic designs, watercolor looks are fluid and forgiving. No two designs are ever exactly alike, which means your nails will be truly one-of-a-kind! They can be as subtle or as bold as you like, fitting any occasion from a casual brunch to a special event. Plus, the techniques are surprisingly simple, making them a perfect DIY project for beginners looking to elevate their nail game.
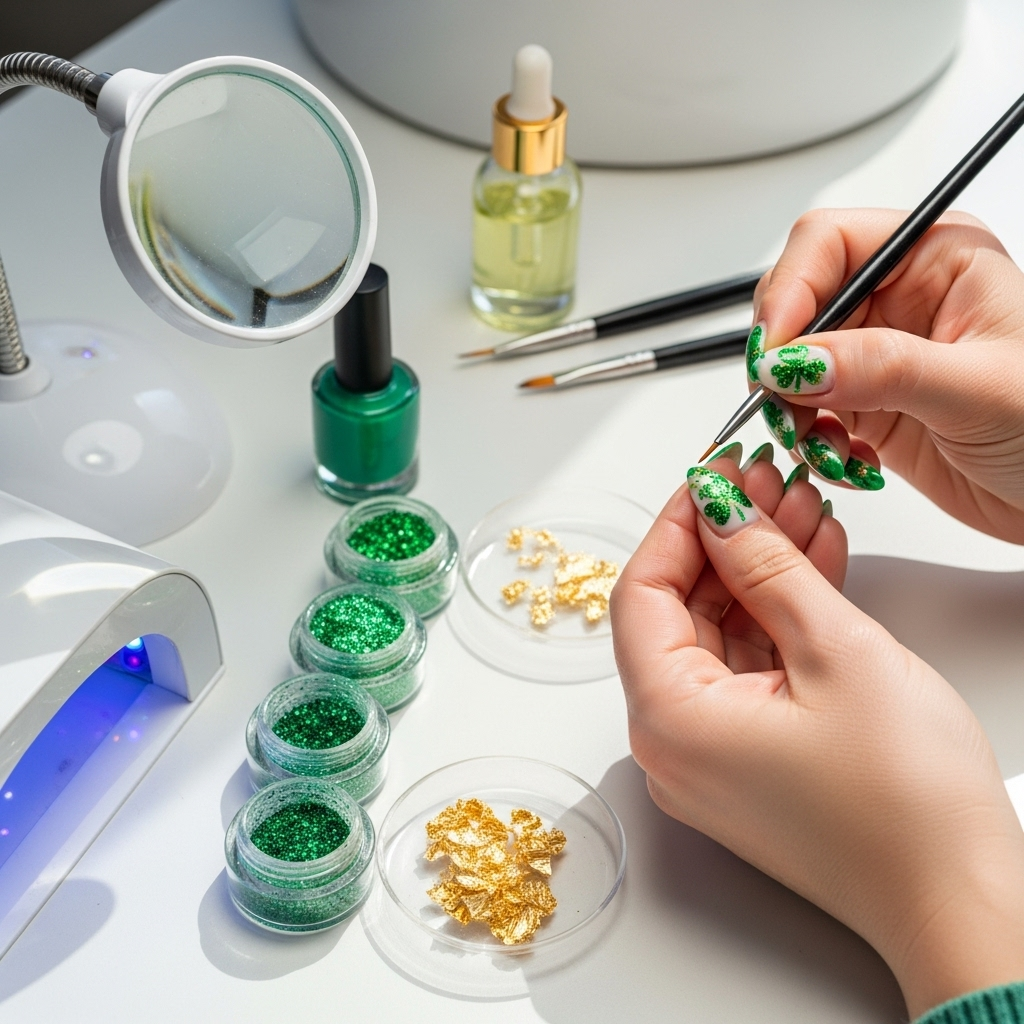
Essential Tools for Your Watercolor Nail Journey
You don’t need a fancy art studio to create watercolor nails. A few key items will set you up for success. Think of these as your artistic toolkit for your fingertips!
Must-Have Supplies:
- Base Coat: Just like any manicure, a good base coat protects your natural nails and helps polish adhere better.
- White Nail Polish: This serves as your “canvas.” A opaque white polish creates a bright base that makes the watercolor colors pop.
- Watercolor Paints: You have a few options here!
- Water-based Nail Paints: These are specifically designed for nail art and offer vibrant colors and easy blending.
- Acrylic Paints: Diluted with water, artist-grade acrylic paints can also work beautifully. Ensure they are non-toxic.
- Rubbing Alcohol (Isopropyl Alcohol): This is key for activating and blending certain types of watercolor nail paints. It helps create those signature watercolor effects. You can find this at most pharmacies.
- Small Detail Brushes: You’ll want a few different fine-tipped brushes for applying and blending the colors.
- Top Coat: A good top coat seals your design, adds shine, and protects your beautiful artwork from chipping.
- Clean-up Brush/Cotton Swabs: For tidying up any stray polish around your cuticles.
- Water (for acrylic paints): A small dish of water if you’re using diluted acrylics.
Getting Started: Prepping Your Nails for Art
Before we dive into the artistic fun, proper nail prep is crucial for a long-lasting and beautiful manicure. It’s like preparing a canvas before you start painting!
- Cleanse Your Nails: Start by removing any old nail polish. Wash your hands thoroughly with soap and water, and then use an alcohol wipe or nail polish remover to ensure your nails are free of oils and residue.
- Shape Your Nails: File your nails to your desired shape. Whether you prefer square, round, or almond, make sure they’re even.
- Push Back Cuticles: Gently push back your cuticles using a cuticle pusher. This gives you a cleaner surface to work on and prevents polish from lifting.
- Apply Base Coat: Apply a thin, even layer of your favorite base coat. Let it dry completely. This is the foundation for your stunning design!
Your Step-by-Step Guide to Creating Watercolor Nails
Ready to get creative? Follow these simple steps to achieve gorgeous watercolor nails that will turn heads!
Method 1: Using Water-Based Nail Paints (The Easiest Method!)
This is often the most beginner-friendly approach because the products are designed for this purpose. Many brands offer “watercolor” nail polishes that are formulated to blend effortlessly on the nail.
- Apply White Base: Paint 1-2 thin coats of white nail polish onto your nails. Let it dry until it’s just slightly tacky, not fully hardened. This tackiness helps the watercolor polish adhere and blend better.
- Apply Watercolor Shades: Take your desired watercolor nail polish shades. Dab or brush them onto the tacky white base coat. Don’t worry about perfect placement – the magic is in the blending! You can apply colors next to each other or create overlapping areas.
- Blend the Colors:
- Option A (With a Clear Polish/Top Coat): While the watercolor polish is still wet, dab a small amount of clear nail polish or your top coat over the colored areas. Use a clean, fine-tip brush to gently swirl and blend the colors together. Move the brush in light, sweeping motions.
- Option B (With Rubbing Alcohol): If your watercolor polish is specifically designed for alcohol activation (check product instructions!), you can lightly mist or dab a small amount of rubbing alcohol over the wet colors. This will cause them to bloom and blend. Use a brush to guide the blending if needed.
- Add More Color (Optional): If you want deeper hues or more intricate blending, you can carefully dab on additional dots or streaks of color and repeat the blending process.
- Let it Dry: Allow your watercolor design to dry completely. This is crucial! If it’s not dry, your top coat will smudge everything.
- Seal the Design: Apply a generous layer of clear top coat to seal your beautiful watercolor art. Make sure to cap the free edge of your nail by swiping the brush along the tip to prevent chipping.
- Clean Up: Use a small brush dipped in nail polish remover or a cotton swab to clean up any polish that got onto your skin.
Method 2: Using Acrylic Paints (For a More Artistic Feel)
Acrylic paints offer incredible color payoff and allow for a lot of control. Remember to use non-toxic, water-based acrylics.
- Apply White Base: Paint 2 thin coats of white nail polish and let them dry completely matte (not shiny).
- Prepare Your Palette: On a small palette or a piece of plastic, add a dot of your desired acrylic paint colors. Add a drop or two of water to each to dilute them slightly, making them more paint-like and less opaque.
- Start Painting: Dip a fine detail brush into one of your diluted acrylic colors. Apply it to your nail in a delicate stroke or dot.
- Blend and Layer:
- Use a clean, slightly damp brush to gently blend the edges of the acrylic paint. You can feather the edges, swirl colors together, or create soft gradients.
- Add more colors as desired, blending as you go. You can layer colors for more depth, but remember to let each layer dry slightly before adding another to avoid muddying the colors.
- For a truly watery effect, use very little paint and water, and focus on smooth, light strokes. You can also use a clean brush dipped in water to dilute and spread the pigment on the nail itself.
- Let it Dry: Allow the acrylic paint design to air dry completely. Acrylics dry pretty quickly.
- Apply Gel Top Coat (Recommended): For acrylic paints, a gel top coat cured under a UV/LED lamp provides the best durability and seal. If you don’t have a gel lamp, a good quality regular top coat can work, but be gentle during application to avoid smudging. Ensure the acrylic is fully dry before applying any top coat.
- Clean Up: Tidy up edges with a brush and remover.
Method 3: Using Rubbing Alcohol and Regular Nail Polish (Advanced DIY)
This method can be a bit trickier as it relies on the reaction between nail polish and alcohol, but it can create stunning, unique patterns.
- Apply White Base: Paint 2 thin coats of white nail polish and let them dry completely.
- Apply Color Dots: Using your regular nail polish in your chosen colors, place small dots or thin streaks directly onto the fully dried white base. Don’t use too much polish!
- Activate with Alcohol: Immediately, using an eyedropper or a brush dipped in rubbing alcohol (91% or 99% isopropyl alcohol works best), gently touch the alcohol to the wet polish dots. The alcohol will cause the pigment to diffuse and spread, creating a watercolor-like effect.
- Create Patterns: You can drip alcohol near or onto the polish to guide the spread, or use a fine brush to help maneuver the blooming colors. Work quickly, as the nail polish will start to dry.
- Let it Dry: Allow the nails to dry thoroughly. The alcohol evaporates quickly, but the nail polish needs time to set.
- Seal with Top Coat: Apply a generous, smooth layer of top coat. Be careful not to drag the brush too much, especially if any polish is still slightly soft.
- Clean Up: Clean up any messy edges.
Tips for Achieving Perfect Watercolor Blends
Even the simplest techniques benefit from a few handy tricks. Here are some pro tips to elevate your watercolor nails:
- Less is More: Start with a small amount of polish or paint. You can always add more! Overdoing it can lead to muddy colors.
- Work Quickly: Especially when blending, you want to work while the polish or paint is still wet to achieve seamless transitions.
- Use the Right Brush: A fine-tip detail brush is your best friend for controlled blending and adding delicate touches.
- Clean Your Brush: Rinse your brush frequently (in water for acrylics/water paints, or in nail polish remover for polish) to avoid color contamination.
- Practice on a Sheet of Plastic: Before applying to your nails, try the technique on a piece of plastic wrap or parchment paper. This helps you get a feel for how the colors blend and how much product to use.
- Embrace Imperfection: The beauty of watercolor is its organic, fluid nature. Don’t strive for perfect symmetry; embrace the unique, wabi-sabi charm!
- Consider Your Base: A truly opaque white base is key for vibrant colors. If your white isn’t opaque enough, your watercolor designs might look muted.
Contrasting & Complementary Colors: A Little Color Theory
Choosing your colors can make a big difference! Here’s a quick guide to making your watercolor nails pop.
| Effect | Recommended Color Combinations | Why They Work |
|---|---|---|
| Soft & Dreamy | Pastel Pinks + Baby Blues + Mint Greens | These colors are inherently soft and blend into beautiful, serene gradients. Great for a delicate look. |
| Vibrant & Energetic | Teal + Coral + Bright Yellow/Orange | These are complementary or analogous colors that create high contrast and a lively feel. They really “sing” together. |
| Earthy & Serene | Terracotta + Mustard Yellow + Olive Green | Warm, natural tones that blend for a sophisticated, grounded look. |
| Bold & Dramatic | Deep Purples + Emerald Greens + Hints of Gold | Rich, jewel tones create depth and luxury. Blend carefully for a sophisticated effect. |
| Monochromatic | Various shades of one color (e.g., light blue, medium blue, deep blue) | Subtle and chic, these blends create beautiful tonal variations for an elegant statement. |
| Metallic Accents | Any color palette + Silver or Gold | Add a stripe or fleck of metallic polish after blending for a touch of glamour. |
Don’t be afraid to experiment! Sometimes, unexpected color combinations create the most beautiful results. Think about the overall mood you want to achieve with your manicure.
Beyond the Basics: Elevating Your Watercolor Designs
Once you’ve got the hang of the basic watercolor technique, you can start playing with more advanced ideas!
- Adding Glitter: Apply a light dusting of fine glitter over the wet watercolor for a subtle shimmer, or use a glitter top coat.
- Marble Effect: Combine the watercolor technique with subtle marbling streaks using a darker shade and a fine brush.
- Floral Accents: Use a fine brush to paint delicate flower outlines or petals over your watercolor background.
- Geometric Overlays: After your watercolor has dried, use striping tape to create geometric shapes and paint over them with a solid color, then peel off the tape for a sharp contrast.
- Using Pigment Powders: For even more intense blending and iridescent effects, try gently dusting iridescent pigment powders over your wet watercolor layers.
Caring for Your Watercolor Nails
Your beautiful watercolor creations deserve a little TLC to last. Here’s how to keep them looking fresh:
- Seal Well: Always ensure you have a good layer of top coat. Reapply top coat every 2-3 days to maintain shine and prevent chips.
- Wear Gloves: Protect your nails when doing chores, washing dishes, or using cleaning products.
- Moisturize: Keep your cuticles and hands hydrated with cuticle oil and hand lotion. Healthy nails and skin make any manicure look better.
- Avoid Harsh Chemicals: Try to minimize contact with substances that can break down polish, like acetone (unless you’re removing polish).
FAQ: Your Watercolor Nail Questions Answered
What is the easiest way to do watercolor nails for beginners?
The easiest method for beginners is using water-based watercolor nail paints specifically designed for this effect. They are formulated to blend effortlessly on a slightly tacky white base, often with just a dab of clear polish or a special blending solution. Brands like Born Pretty and other indie polish makers often have great options.
Do I need special brushes for watercolor nails?
While you can achieve some blending with a regular detail brush, investing in a set of fine-tip detail brushes is highly recommended. A variety of brush sizes will give you more control for both applying color and blending edges. Look for brushes with synthetic bristles that can be cleaned easily.
Can I use regular nail polish to create watercolor effects?
Yes, but it’s a bit more advanced. You can dab dots of regular nail polish onto a wet white base and then quickly blend them using a clear polish or top coat. Another method involves using rubbing alcohol to “bloom” the polish, but this requires quick work and can be unpredictable. Water-based watercolor polishes are much more forgiving for beginners.
How do I prevent my watercolor nails from looking muddy?
The key is to avoid over-blending and to clean your brush frequently between colors. Start with a light hand and build color intensity gradually. Ensure each layer has a chance to set slightly before blending if you’re aiming for distinct layers. For the most seamless blend, aim to blend the colors while they are still wet on the nail.
How long do watercolor nails typically last?
With proper application, including a good base and top coat, and careful wear, watercolor nails can last as long as any other nail polish manicure, typically 5-7 days, sometimes longer. Reapplying top coat every few days can help extend their life and maintain their shine.
What’s the difference between watercolor nails and marble nails?
Watercolor nails focus on soft, blended, and often transparent-looking color transitions, mimicking the flow of watercolors. Marble nails aim to replicate the veining and patterns found in natural stone, often involving more distinct lines and blobs of color that are swirled together. While some techniques can overlap, watercolor is generally softer and more diffused.
Can I do watercolor nails with gel polish?
Absolutely! You can achieve watercolor effects with gel polish too. The process is similar: apply a white gel base coat and cure. Then, apply your colored gel polishes or gel paint on top, blend them while wet using a gel blending solution or a clean brush dipped in gel top coat, and then cure the final design. A gel top coat is essential to seal and protect the design.
Conclusion: Your Canvas Awaits!
And there you have it! Watercolor nails