Get ready for dazzling unicorn chrome nails! This guide breaks down how to achieve the magical, iridescent look at home with easy-to-follow steps, essential supplies, and pro tips for a flawless, dreamy finish that’s sure to turn heads.
Ever scrolled through social media and gasped at those mesmerizing, rainbow-hued nails that seem to shimmer with every move? Those, my friends, are unicorn chrome nails, and they’re way more achievable than you might think! If you’ve ever felt intimidated by achieving this ethereal, almost magical nail art, you’re in the right place. Forget complicated techniques; we’re here to demystify the process.
This guide is your friendly, no-fuss companion to creating stunning unicorn chrome nails right in your own home. We’ll cover everything you need, from the basics to the magical finishing touches. Get ready to transform your fingertips into tiny works of art that sparkle with an otherworldly glow. Let’s dive into the enchantment!
What Exactly Are Unicorn Chrome Nails?
Unicorn chrome nails are a type of nail art that features a pearlescent, iridescent, and often holographic finish. Instead of a solid color, they reflect a spectrum of colors, mimicking the mythical unicorn’s horn or a shimmering opal. This effect is typically achieved using a special chrome powder applied over a base polish, creating a dazzling, multi-dimensional sheen. It’s the perfect way to add a touch of fantasy and futuristic glam to your manicure, making your nails stand out in the most magical way.
Why You’ll Love Unicorn Chrome Nails
Unicorn chrome nails are more than just a trend; they’re a statement! Here’s why they’re a favorite among nail enthusiasts:
- Mesmerizing Effect: The shifting colors create a captivating, eye-catching look that’s unique to each angle and light source.
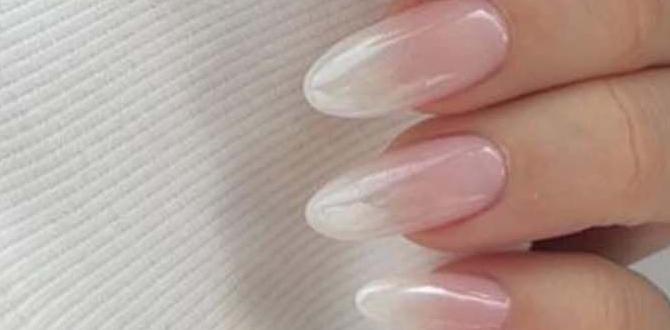
- Versatile Style: They can be adapted to any base color, from pure white for an ultimate ethereal glow to black for a dramatic, edgy vibe. Pastels and neons also create stunning variations.
- Achievable DIY: With the right tools and a little practice, you can achieve professional-looking results at home.
- Long-Lasting: When applied correctly over gel polish, the chrome effect can last for weeks, keeping your nails stunning.
- Confidence Booster: Let’s be honest, who doesn’t feel fabulous with magical, shimmering nails? They’re a surefire way to lift your mood and add a touch of sparkle to your everyday.
Essential Supplies for Your Unicorn Chrome Journey
Gathering the right materials is key to unlocking the magic of unicorn chrome nails. Don’t worry, most of these are readily available online or at your local beauty supply store. Here’s what you’ll need:
Base Coat and Top Coat
A good quality base coat is crucial for nail health and polish adhesion. For the chrome effect, a no-wipe gel top coat is non-negotiable. This specific type of top coat remains slightly tacky after curing, allowing the chrome powder to adhere flawlessly. Regular top coats or nail polish won’t work for this technique.
Color Base Polish
This is the color underneath your chrome. The final chrome color will be influenced by your base. A white gel polish is the most popular choice for that classic ethereal unicorn look, as it makes the iridescent shifts really pop. However, you can experiment with black for a darker, more mysterious vibe, or any other color you love!
Unicorn Chrome Powder
This is the star of the show! Unicorn chrome powders come in various formulations, but they all create that magical, iridescent sheen. Look for powders specifically labeled “unicorn chrome,” “iridescent powder,” or “holographic mermaid powder.” They often have pink, blue, and purple undertones that shift beautifully. You can find these in fine powder form or as small, pressed pans.
Application Tools
Precision and ease of application are important. Here are the tools that will help you:
- Silicone Applicator or Sponge: These are essential for smoothly buffing the powder onto the nail. Silicone tools are great because they’re easy to clean, while small eyeshadow sponge applicators (the cheap kind!) work wonders too.
- Small Brush (Optional but Recommended): A fine-tipped brush is helpful for dusting away any excess powder from around the cuticle and sidewalls.
UV or LED Nail Lamp
If you’re using gel polish and a no-wipe top coat, you absolutely need a UV or LED lamp to cure the gel layers. LED lamps are generally faster and more energy-efficient. Make sure the wattage is sufficient for proper curing – typically 36W or higher is recommended for home use.
Alcohol or Cleaner
A small amount of isopropyl alcohol (rubbing alcohol) or a dedicated gel cleanser is needed to wipe away any residue after buffing the chrome powder, ensuring a clean, smooth finish before the final top coat.
Nail File and Buffer
Standard manicure tools like a nail file for shaping and a buffer for smoothing the nail surface are essential for preparing your nails before you start the gel application.
Step-by-Step Guide to Achieving Unicorn Chrome Nails
Ready to create your own magical manicure? Follow these simple steps for stunning unicorn chrome nails. We’ll focus on the most popular method using gel polish and chrome powder.
Step 1: Prepare Your Nails
Start with clean, dry nails. Gently push back your cuticles using a cuticle pusher. Shape your nails to your desired length and style using a nail file. Lightly buff the surface of your nails with a buffer to remove any shine and create a smooth canvas. This helps the base coat adhere better.
Step 2: Apply Base Coat and Color
Apply a thin layer of your base coat and cure it under your UV/LED lamp according to the manufacturer’s instructions. Next, apply your chosen color polish. For the classic unicorn look, apply a thin, even layer of white gel polish. Cure this layer. Apply a second thin layer of the color polish for full opacity and cure it again. Using thin layers is crucial for a smooth, even finish.
Step 3: Apply No-Wipe Gel Top Coat
Apply a thin, even layer of your no-wipe gel top coat over the cured color polish. Ensure you cap the free edge of the nail to prevent lifting. This is the layer the chrome powder will adhere to. Do NOT cure this layer yet.
Step 4: Apply the Unicorn Chrome Powder
This is where the magic happens! Take your silicone applicator or sponge and dip it into the unicorn chrome powder. Gently begin to rub or buff the powder onto the uncured no-wipe gel top coat. Work in small sections, applying even pressure. You’ll see the color start to transfer and create that iridescent sheen. Continue buffing until the entire nail surface has a smooth, shimmery, chrome-like finish. Don’t forget the edges!
Pro Tip: It’s best to start with a small amount of powder and build it up. You can always add more, but it’s harder to take away.
Step 5: Clean Up Excess Powder
Once you’ve achieved the desired coverage, use a small, clean brush (or even a dry cotton pad) to gently sweep away any loose or excess powder from the nail and surrounding skin. This ensures a clean edge and prevents any powdery residue from being sealed into the final top coat.
Step 6: Seal the Chrome with a Top Coat
Now, it’s time to lock in that shimmer! Apply one or two thin, even layers of a regular gel top coat (it can be a wipe top coat, but a no-wipe also works here and is often smoother) over the buffed chrome powder. Make sure to cap the free edge of the nail with each layer to ensure durability and prevent chipping. Cure each layer of top coat thoroughly under your UV/LED lamp.
Step 7: Final Touches and Aftercare
Once the final top coat is cured, you’re done! If you used a wipe top coat, use a lint-free wipe with isopropyl alcohol to remove any sticky residue. Apply a nourishing cuticle oil to rehydrate your skin after the process. For lasting shine and to help your manicure endure, avoid prolonged exposure to hot water and harsh chemicals shortly after application.
Choosing Your Base Color: The Impact on Your Chrome
The color you choose as your base polish significantly impacts the final unicorn chrome effect. It acts as a foundation that the iridescent powder plays off of. Here’s a breakdown of popular choices:
| Base Color | Resulting Unicorn Chrome Effect | Best For |
|---|---|---|
| White | Pure, ethereal, rainbow shifts. The most classic and vibrant unicorn look. | Achieving the ultimate dreamy, fairy-tale aesthetic. Maximum color reflection. |
| Black | Deep, mysterious, jewel-toned shifts. The iridescence peeks through a dark, smoky base. | Creating a bold, edgy, or vampy look. Dramatic contrast. |
| Pastel (Pink, Blue, Lavender) | Softer, muted, candy-colored shifts. The base color gently influences the iridescence. | A sweet, delicate, and subtle unicorn vibe. Perfect for spring or a softer aesthetic. |
| Nud e or Light Pink | Subtle, pearlescent sheen with a hint of iridescent shimmer. Very sophisticated. | A “my nails but better” version with a touch of magic. Everyday wear. |
| Metallic (Silver, Gold) | An intensified metallic sheen with rainbow highlights. | Elevating a metallic manicure to the next level of shine and dimension. |
Tips for Applying Chrome Powder Smoothly
Achieving that perfectly smooth, mirror-like finish can sometimes be tricky. Here are some tips from experience:
- Thin Layers are Key: This applies to both the gel polish and the no-wipe top coat. Thick layers can lead to bubbling or an uneven cure, which will ruin the chrome effect.
- Don’t Over-Cure the No-Wipe Top Coat: If you cure the no-wipe top coat for too long, it can become fully cured and won’t have the tackiness needed for the powder to adhere. Follow your lamp’s recommended curing time for top coats.
- Buff, Don’t Smear: Apply the powder with a buffing motion rather than a smearing one. This helps the powder particles spread evenly and create a smooth surface.
- Work in Sections: If you find it hard to cover the whole nail at once, do one section at a time, buffing the powder in.
- Use Enough Powder (But Not Too Much): You need enough powder to get good coverage, but excessive amounts can create a gritty texture. Start with a little and add more as needed.
- Ensure Complete Coverage: After buffing, hold your nail up to the light at different angles to check for any bare spots or streaks. Gently buff those areas again.
- Cleanliness is Crucial: Make sure your tools are clean and free of dust or debris. A dirty applicator can lead to a patchy or dirty-looking finish.
Troubleshooting Common Unicorn Chrome Nail Issues
Even with the best intentions, you might run into a snag. Here are some common problems and how to fix them:
| Problem | Cause | Solution |
|---|---|---|
| Patchy or Streaky Finish | Uneven buffing, not enough powder, or uncured no-wipe top coat underneath. | Gently buff the affected area again with more powder. Ensure your no-wipe top coat was properly applied and uncured before powder application. If the issue persists, you may need to reapply the no-wipe top coat and try again. |
| Powder Not Sticking/Rubbing Off | No-wipe top coat was fully cured, or it wasn’t applied thinly enough. | The crucial step: The no-wipe top coat MUST be uncured when you apply the powder. Apply it thinly and cure for less time than you normally would for a full gel color, or ensure it’s still tacky. If it feels dry, it’s cured too much. |
| Dull or Matte Finish Instead of Chrome | Insufficient powder application, or the final top coat was applied too thickly or cured improperly. | Ensure you buff the powder until the surface is fully covered and shiny. For the final top coat, apply it thinly and cure thoroughly. A good quality gel top coat is also essential. |
| Powder Getting on Cuticles or Skin | Applying too much powder or not cleaning up properly. | Use a small brush to carefully dust away excess powder from the skin around the nail before curing the final top coat. You can also use a lint-free wipe with a small amount of alcohol to clean edges. |
| Chrome Lifting or Peeling | Improper sealing with the final top coat, especially not capping the free edge. | Always cap the free edge of the nail with every gel layer (base coat, color, no-wipe top coat, and final top coat). This creates a seal that prevents lifting. |
Can I Do Unicorn Chrome Nails Without Gel?
While the most durable and vibrant unicorn chrome effect is achieved with gel polish and a no-wipe gel top coat, you can achieve a similar look using traditional nail polish, though it’s more challenging and less long-lasting. Here’s how:
You’ll need a slightly different setup:
- Regular Nail Polish: In your desired base color (white is still recommended).
- Quick-Dry Top Coat: This is essential. It needs to be one that dries to a tacky finish that the powder can adhere to.
- Chrome Powder: The same unicorn powders work.
- Silicone Applicator/Sponge: For buffing.
The Process:
- Apply your base color nail polish and let it dry until it’s slightly tacky, but not fully dry. This is the trickiest part – you want it tacky enough for the powder to stick, but not so wet that it smudges everything.
- Gently buff the chrome powder onto the tacky polish using your applicator.
- Once the color is satisfactory, apply a quick-dry top coat. You may need a couple of layers to fully seal the powder.
Caveats: This method is more prone to smudging, chipping, and the chrome effect might not be as intense or long-lasting as the gel method. The tackiness window for traditional polish can be very small!
How to Care for Your Unicorn Chrome Nails
To keep your mesmerizing unicorn chrome nails looking their best, follow these simple aftercare tips:
- Moisturize Regularly: Dry skin can make any manicure look less polished. Apply cuticle oil daily and hand lotion frequently to keep your nails and surrounding skin healthy and hydrated.
- Be Gentle: Avoid using your nails as tools. Don’t pry, scrape, or pick at things with your nails, as this can lead to lifting or chipping of any manicure, including chrome.
- Protect from Harsh Chemicals: Wear gloves when doing household chores, especially those involving