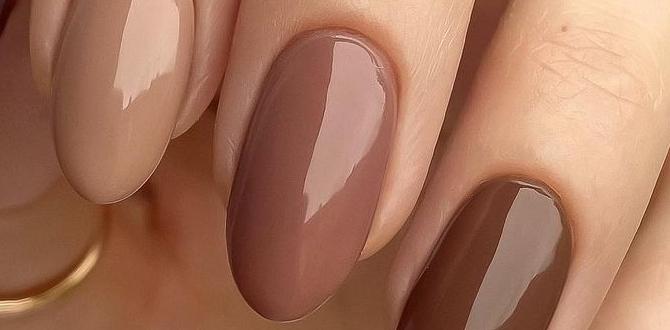
Tiramisu nail designs offer a chic, edible-inspired look with layers of creamy browns, whites, and cocoa accents. They’re surprisingly easy to achieve at home and perfect for adding a sophisticated touch to any outfit, making them a must-try for anyone looking to elevate their manicure game.
Tired of the same old nail colors? Dreaming of a manicure that’s as delightful as your favorite dessert? Tiramisu nail designs are here to whisk you away! These gorgeous looks mimic the iconic Italian treat with beautiful layers of creamy beige, rich brown, and dusting of cocoa. They’re incredibly versatile, suitable for everything from a casual day out to a special occasion. Don’t worry if you’re new to nail art; these designs are easier to create than they look and offer a unique way to express your style. Get ready to fall in love with your nails as we explore how to achieve these stunning, dessert-inspired looks!
Why Tiramisu Nails Are Essential
Tiramisu nail designs have become a beloved trend for so many reasons! They offer a unique blend of sophistication and playful elegance. Let’s dive into why they’re a must-have in your nail art repertoire.
The Allure of Edible Inspiration
Nails inspired by food are always a hit, and tiramisu is at the top of the list. The rich, layered aesthetic translates beautifully onto nails, creating a look that’s both comforting and chic. It’s a way to carry a little bit of deliciousness with you wherever you go!
Sophisticated Color Palette
The core colors of tiramisu nails – creamy off-whites, warm beiges, and deep chocolates – are incredibly sophisticated. These shades are neutral enough to complement almost any outfit and skin tone, making them a fantastic choice for everyday wear or even professional settings. They exude a certain understated luxury.
Versatility for Any Occasion
Whether you’re heading to a job interview, a coffee date, or a fancy dinner, tiramisu nails fit right in. You can opt for a subtle, minimalist version or go for a more detailed design with intricate cocoa powder effects. They’re the definition of adaptable style.
Beginner-Friendly Potential
While some nail art can be intimidating, many tiramisu-inspired designs are surprisingly easy to do at home. With just a few basic polishes and tools, you can create beautiful, layered looks that seem much more complex than they are. It’s a great way to experiment with DIY nail art.
Essential Tools for Your Tiramisu Nail Masterpiece
Before we start painting, let’s gather our tools! Having the right supplies makes all the difference in creating a smooth, professional-looking manicure. These are the basics you’ll want to have on hand for your tiramisu nail designs.
The Nail Polish Palette
This is where the magic happens! For tiramisu nails, you’ll need:
Base Coat: To protect your natural nails and help polish adhere better.
Creamy Off-White or Beige: The “mascarpone cream” layer. Think of a soft, not-quite-white or a light, milky beige.
Warm Medium Brown: The “ladyfinger” or “coffee-soaked” layer. A caramel or latte shade works beautifully.
Deep Chocolate Brown: For accents, lines, or darker layers.
Top Coat: To seal your design, add shine, and prolong wear.
Application Essentials
Nail Polish Remover: For tidying up mistakes and cleaning up the cuticle area.
Cotton Pads or Lint-Free Wipes: For applying remover and cleaning brushes.
Nail File & Buffer: To shape your nails and create a smooth surface.
Cuticle Pusher or Orange Stick: To gently push back your cuticles.
Thin Nail Art Brush or Toothpick: For drawing lines, creating texture, and adding details.
Dotting Tool (Optional): For creating small dots, perhaps mimicking cocoa powder specks.
Sponge (Optional): A makeup sponge can be great for creating gradient effects or a powdery texture.
Pro Tip for Cocoa Dusting
For that authentic “dusted with cocoa” look, you can use:
Brown Eyeshadow: A matte, deep brown eyeshadow can be applied with a brush or sponge over a slightly tacky top coat for a powdery effect. Ensure it’s a cosmetic grade product.
Fine Glitter (Brown/Gold Shift): A very subtle, fine-grain glitter can also mimic the shimmer of cocoa powder. Use sparingly!
Step-by-Step Tiramisu Nail Designs for Beginners
Ready to get your hands on these gorgeous designs? I’ve broken down a few popular tiramisu nail looks into easy-to-follow steps. You’ll be amazed at how simple they are!
Look 1: The Classic Layered Tiramisu
This design focuses on mimicking the distinct layers of the dessert. It’s elegant and surprisingly easy!
1. Prep Your Nails: Start with clean, dry nails. File them to your desired shape. Gently push back your cuticles. Apply a thin layer of base coat and let it dry completely.
2. The Creamy Base: Apply one or two thin coats of your creamy off-white or beige polish. Let each coat dry thoroughly. This is your foundation.
3. The “Ladyfinger” Line: Using your warm medium brown polish and a thin nail art brush (or a toothpick), carefully paint a horizontal line across your nail, about one-third of the way down from the cuticle. Aim for a slightly imperfect, natural line, as if it’s soaking into the cream.
4. The “Coffee Soak” Effect: Now, take your deep chocolate brown polish and a slightly damp sponge or a stippling nail art brush. Gently dab or stipple the edges of the brown line you just created. You want to create a feathered, slightly darker edge, representing where the coffee has soaked. Don’t overdo it! A little goes a long way.
5. Optional Cocoa Dusting: For the final touch, take your matte brown eyeshadow powder on a soft fluffy brush. Lightly dust it over the “coffee-soaked” area and along the brown line. Alternatively, use a very fine brown or gold glitter.
6. Seal the Deal: Once everything is completely dry, apply a generous layer of top coat to protect your design and add a beautiful glossy finish.
Look 2: The Subtle Swirl Tiramisu
This design is more abstract, using swirling techniques to capture the essence of tiramisu.
1. Prep and Base: As always, start with clean, prepped nails and a base coat. Apply one or two coats of your creamy off-white or beige polish until opaque and dry.
2. Coffee Drips/Swirls: On a spare surface (like a piece of foil or a palette), place a small amount of your warm medium brown and deep chocolate brown polish. Dip your thin nail art brush into both colors.
3. Create the Swirls: On your nail, gently swirl the two brown polishes together. You can create one large abstract swirl or several smaller ones. Think of how the coffee and cream might naturally mix. Don’t aim for perfection; organic shapes look best.
4. Feathering the Edges: Use a clean brush dipped in a tiny bit of the off-white/beige polish to softly blend the edges of the brown swirls into the base color, creating a subtle, integrated look.
5. Cocoa Accent (Optional): If desired, lightly dust a tiny bit of matte brown eyeshadow or fine glitter over the brown swirls.
6. Top Coat: Apply your favorite top coat to seal and shine.
Look 3: The Minimalist Tiramisu Tip
This is a chic, modern take, focusing on the color palette with a simple accent.
1. Prep and Base: Clean, file, and prep your nails. Apply base coat. Paint all nails with one or two coats of your creamy off-white or beige polish and let them dry.
2. The Brown French Tip: Using your warm medium brown polish and a very fine nail art brush, carefully paint a thin, curved line across the tip of each nail, akin to a French manicure. You can make the line a classic smile line or opt for a straight edge.
3. Deepen the Tip (Optional): For a bit more depth, you can use the deep chocolate brown polish to add a tiny, thin line just below or above the first brown line you created.
4. Cocoa Texture (Optional): With a dry brush, lightly swirl a touch of matte brown eyeshadow onto the brown tips.
5. Seal: Finish with a layer of top coat.
Tiramisu Nail Design Variations & Ideas
Once you’ve mastered the basics, you can play around with these ideas to create even more stunning tiramisu-inspired looks!
Ombre Effect
Create a beautiful gradient from the deep chocolate brown at the tip, fading up into the warm medium brown, and then blending into the creamy base color. This is perfect for a sophisticated, diffused look. You can achieve this using a makeup sponge.
Accent Nail Focus
Keep most of your nails in a solid creamy or beige shade, and dedicate one accent nail to a more intricate tiramisu design. This can be a full layer design, a detailed swirl, or even a tiny illustrated tiramisu slice!
“Café Au Lait” French Tips
Instead of a stark white French tip, opt for a deep brown or even a milky coffee color on the tips of your nails. This is a super wearable and elegant way to incorporate the theme.
Textured Accents
Experiment with different textures for your “cocoa dust.” Matte eyeshadow offers a powdery finish. Extremely fine glitter can give a subtle shimmer. Some people even use finely-milled pigment powders to achieve unique effects. Always ensure any powder used is cosmetic grade and sealed properly with a top coat for longevity and safety.
“Savoiardi” Stripe
Recreate the distinct striped pattern of ladyfingers on an accent nail using thin vertical lines of different brown shades against a creamy background.
Table: Comparing Tiramisu Nail Design Styles
Choosing the right tiramisu nail design depends on your style and the occasion. Here’s a quick comparison to help you decide:
| Design Style | Key Features | Best For | Difficulty Level |
| :——————— | :———————————————– | :——————————————– | :————— |
| Classic Layers | Distinct horizontal layers of cream and coffee. | Sophisticated, dessert-mimicking look. | Beginner-Intermediate |
| Subtle Swirl | Abstract, blended brown and cream swirls. | Modern, artistic, and subtle interpretation. | Beginner |
| Minimalist Tip | Plain creamy nails with brown French tips. | Chic, everyday wear, professional settings. | Beginner |
| Ombre Gradient | Smooth fade from dark brown to cream. | Elegant, seamless, and visually appealing. | Intermediate |
| Accent Nail | One detailed nail, others are simple. | Versatile, allows for focus on artistry. | Varies |
Tips for Achieving Flawless Tiramisu Nails
Even the simplest designs can look messy if not done right. Here are Lisa Drew’s top tips for achieving cuticle-perfect, salon-worthy tiramisu nails at home.
Work in Thin Coats: This is crucial for any nail polish application. Thin coats dry faster and prevent bubbling or streaking. Three thin coats are often better than one thick one.
Let Polish Dry Between Layers: Patience is key! Rushing between coats is the fastest way to smudge your design. Use a quick-dry top coat if you’re in a hurry, but still allow the undecoat to set.
Clean as You Go: Keep your nail polish remover and cotton swabs handy. Clean up any polish that gets on your skin or cuticle area immediately after you paint it. This makes a huge difference in the final look.
Practice on Nail Tips: If you’re new to nail art brushes or sponging techniques, practice on artificial nail tips first. This lets you get a feel for the tools and polishes without the pressure of doing it on your actual nails.
Seal with a Good Top Coat: A high-quality top coat not only locks your design in place but also adds that beautiful glossy finish that makes your nails look professionally done. Look for one with UV protection to prevent yellowing of lighter shades.
Don’t Forget the Detailing: Even a simple design can be elevated with a well-executed detail. A clean, crisp line or a perfectly blended edge makes all the difference.
The Science Behind Smooth Nails
For optimal polish application and longevity, creating a smooth nail surface is essential. This starts with proper nail preparation. Buffing your nails, not too aggressively, removes ridges and creates a canvas for the polish to adhere to. According to the American Academy of Dermatology Association, proper nail hygiene includes keeping nails clean and dry, and avoiding harsh chemicals that can damage the nail plate. A good quality base coat also helps to smooth out minor imperfections and create a barrier between your nail and the polish, preventing staining. For the most durable manicures, consider using a gel polish system, as it offers enhanced chip resistance and a longer-lasting shine, though it requires a UV/LED lamp for curing. (Note: Standard nail polish does not require a lamp.)
FAQ: Your Tiramisu Nail Design Questions Answered
I know new trends can bring up a lot of questions! Here are some common ones I get about tiramisu nail designs.
Q1: Are tiramisu nail designs hard to do at home?
Not at all! Many tiramisu nail designs, especially the layered and minimalist tip versions, are very beginner-friendly. With a few simple polishes and tools like a thin brush or toothpick, you can achieve beautiful results.
Q2: What are the main colors needed for tiramisu nails?
You’ll primarily need a creamy off-white or beige polish, a warm medium brown (like caramel or latte), and a deep chocolate brown for accents. Of course, a base coat and top coat are essential too!
Q3: Can I use regular makeup eyeshadow for the cocoa dusting effect?
Yes, you can! Use a matte, deep brown eyeshadow. Apply it with a soft brush over a slightly tacky top coat or directly onto the polish before the top coat. Ensure it’s cosmetic grade. Always seal it with a final top coat.
Q4: How can I make my tiramisu nail design last longer?
The key to longevity is preparation and a good top coat. Ensure your nails are clean and dry, use a base coat, apply polish in thin layers, let each layer dry, and finish with a high-quality, durable top coat. Reapplying top coat every couple of days can also extend wear.
Q5: What kind of brush is best for the brown lines in tiramisu nails?
A thin nail art brush, often called a “liner brush,” is ideal. A toothpick or even the edge of a fine orangewood stick can also work in a pinch for creating detailed lines.
Q6: Can tiramisu nail designs be adapted for short nails?
Absolutely! Short nails are fantastic for the minimalist tip design. For layered or swirled designs, simply adjust the scale of the colors and patterns to fit the shorter nail length. Even a simple color block of cream and brown can look très chic on short nails.
Conclusion: Indulge Your Nails with Tiramisu Chic
There you have it—a delightful journey into the world of tiramisu nail designs! From the simple elegance of a layered look to the chic statement of a minimalist tip, these dessert-inspired manicures are a perfect way to add a touch of warmth, sophistication, and fun to your style. I hope these step-by-step guides and tips have inspired you to grab your polishes and create your own edible-art masterpieces. Remember, nail art is all about creativity and self-expression, so don’t be afraid to experiment and make these designs your own. So go ahead, indulge your nails with a little bit of tiramisu magic. Happy painting!

