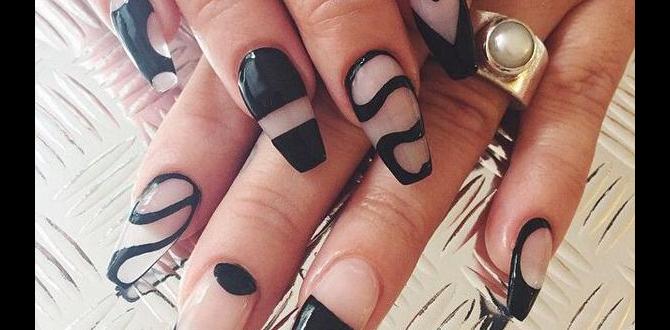
Swirl nail designs offer a chic and easy way to elevate your manicure. Perfect for beginners, these hypnotic patterns are achievable at home with simple tools and a little practice. Unleash your creativity and enjoy beautiful, sophisticated nails that make a statement!
Hey there, lovely nail enthusiasts! Are you looking for a way to add a little oomph to your nails without spending hours at the salon or wrestling with complicated techniques? You’re in the right place! Sometimes, we just want a gorgeous manicure that’s easy to achieve and looks effortlessly chic. Swirl nail designs are exactly that – a delightful blend of simplicity and style that can transform your fingertips into mini works of art. Whether you’re a complete beginner or just looking for a quick, creative update, these patterns are your new best friend. Let’s dive into how you can create stunning swirl nails right at home. Get ready to discover just how easy and fun nail art can be!
Why Swirl Nail Designs are Your New Go-To
Swirl nail designs are incredibly popular for a reason. They offer a fantastic balance of artistic flair and simple execution, making them perfect for everyone. Unlike intricate nail art that requires a steady hand and specialized tools, swirls can be adapted to various skill levels.
Here’s why you’ll love them:
- Effortless Elegance: Swirls instantly give your nails a sophisticated and polished look.
- Beginner-Friendly: You don’t need to be a pro to master this technique.
- Versatile Patterns: From subtle thin lines to bold, abstract shapes, swirls can be anything you want them to be.
- Customizable: Play with different color combinations to match your mood, outfit, or season.
- Time-Saving: Achieve a salon-quality look in a fraction of the time.
Getting Started: Your Swirl Design Toolkit
Before we get our hands (and nails!) dirty, let’s gather the essential tools. Don’t worry, you probably have most of these already, or they are easily accessible and budget-friendly. Having the right tools makes creating swirl designs so much simpler and more enjoyable.
Here’s what you’ll need:
- Base Coat: Essential for protecting your natural nails and helping your polish last longer.
- Color Polishes: Choose at least two contrasting colors for your swirl design.
- Top Coat: Seals your design and adds a beautiful shine for a professional finish.
- Dotting Tools (or Toothpick/Ballpoint Pen Tip): These are small tools with a rounded metal tip. They are perfect for picking up small amounts of polish to create dots and lines for swirls. If you don’t have dotting tools, a toothpick or the tip of a ballpoint pen works in a pinch!
- Thin Nail Art Brush (Optional): If you want more control over your lines, a fine-tipped brush is a great addition.
- Clean-Up Brush or Cotton Swab: For tidying up any polish that gets outside your nail edge.
- Nail Polish Remover: For those clean-up moments.
Nail Polish Care: Keeping Your Colors Vibrant
To ensure your swirl designs pop, keeping your nail polishes in good condition is key. Shaking your polish bottles vigorously can introduce air bubbles, leading to a streaky finish. Instead, try rolling the bottle gently between your palms. For polishes that have thickened over time, a few drops of nail polish thinner (not remover!) can help revive them, extending their lifespan and ensuring a smooth application. Learning about proper nail polish storage can also make a big difference in maintaining the quality of your polishes.
The Simple Steps to Stunning Swirl Nail Designs
Creating swirl nail designs is easier than you might think! We’ll walk through a popular and beginner-friendly method. This technique uses dots and lines to form a beautiful, fluid swirl.
Step 1: Prep Your Nails
- Start with clean, dry nails.
- Gently push back your cuticles.
- Shape your nails to your desired length and style.
- Apply a thin layer of your favorite base coat. Let it dry completely. This step is crucial for preventing staining and extending the life of your manicure.
Step 2: Apply Your Base Color
- Choose one of your polishes for the background color.
- Apply two thin, even coats.
- Allow each coat to dry almost completely between applications. This prevents smudging when you add your swirl design.
Step 3: Create Your Swirl Dots
- Now, grab your second polish color (this will be your swirl color) and your dotting tool, toothpick, or thin brush.
- Dip the tip of your tool lightly into the polish. A little goes a long way!
- On your nail, create a few small dots close to each other. Think of these as the anchor points for your swirl. You can place them in the center, off to one side, or even near the cuticle, depending on the look you want.
- For a classic look, place three or four dots in a curved line or a loose pattern.
Step 4: Connect the Dots (The Swirl Magic!)
- Using the same dotting tool or your thin brush, gently connect the dots you just made.
- Use a light touch and drag the polish from one dot to the next, creating a fluid line.
- You can make the line smooth and flowing, or a bit more jagged if you prefer a more abstract look.
- As you connect the dots, the polish will naturally blend and form a swirl effect.
- Don’t worry if it’s not perfectly symmetrical. The beauty of swirls is their organic flow!
Step 5: Refine and Accentuate (Optional)
- If you want a more complex swirl, you can add another dot or two and connect them to the existing line.
- Alternatively, you can use a very fine brush and your swirl color to outline your existing swirl for more definition.
- For a multi-colored swirl, use a different color polish and repeat steps 3 and 4, layering your swirls carefully. Make sure to let each layer dry slightly before adding the next to prevent them from blending too much unless that’s the intended effect.
Step 6: Clean Up Your Lines
- Take your clean-up brush or cotton swab, dip it lightly in nail polish remover.
- Carefully trace around the edges of your nail and your swirl design to remove any excess polish. This creates crisp lines and a professional finish.
Step 7: Seal the Deal with Top Coat
- Once your nail art is completely dry to the touch, apply a generous layer of top coat.
- This locks in your design, adds a beautiful glossy finish, and protects your swirls from chipping.
- Let your top coat dry thoroughly before touching anything.
Popular Swirl Nail Design Variations
Once you’ve mastered the basic swirl technique, there are tons of ways to get creative! Here are a few popular variations to inspire your next manicure:
The Classic Marble Swirl
This is often what people think of when they hear “swirl nails.” It involves creating marbled-like patterns by swirling two or more colors together. You can achieve this by dropping different polish colors onto a surface (like a piece of foil), swirling them with a toothpick or brush, and then transferring the pattern to your nail. Another method involves dropping dots of color onto a wet base coat and swirling them gently with a toothpick.
The French Tip Swirl Accent
Elevate your French manicure by adding a subtle swirl to the white tips. After applying your base color and French tips, use a fine brush or dotting tool to paint a delicate swirl design on top of the white tip. This adds a modern, artistic twist to a classic look.
The Abstract Swirl
Instead of perfectly formed swirls, go for a more free-form, abstract approach. Use varying thicknesses of lines and shapes, overlapping colors, and varied color palettes to create a unique, artistic statement. This is perfect for experimenting and doesn’t require perfect precision.
The Gradient Swirl
Combine the beauty of a gradient (or ombré) with swirls. Start with a gradient background on your nails, then add delicate swirls in a contrasting color over the top. The soft blend of the gradient underneath the defined swirls creates a dreamy, sophisticated effect.
The Minimalist Swirl Accent
For a subtle touch of flair, opt for a minimalist swirl on just one or two accent nails. A single, thin swirl in a contrasting color on a nude or sheer base can be incredibly chic and understated.
The Glitter Swirl
Add some sparkle! Use a glitter polish to create your swirl design over a solid base color, or incorporate fine glitter into your regular polish for a subtle shimmer within the swirl itself. For a bolder look, create a swirl pattern with a regular polish and then fill it in with a glitter polish.
Swirl Nail vs. Other Nail Designs: A Quick Comparison
It can be helpful to see how swirl designs stack up against other popular nail art techniques. This can help you choose the right design for your skill level and desired outcome.
| Design Type | Difficulty Level (Beginner) | Time Commitment | Tools Needed | Typical Look |
|---|---|---|---|---|
| Swirl Nail Designs | Easy to Moderate | 15-30 minutes (per hand) | Dotting tool/toothpick, nail polish, brushes, top coat | Fluid, organic, elegant, can be abstract |
| French Manicure | Easy to Moderate | 10-20 minutes (per hand) | Base color, white polish, striper brush/stencil, top coat | Classic, clean, polished, defined tips |
| Floral Nail Art | Moderate to Advanced | 30-60+ minutes (per hand) | Fine brushes, dotting tools, multiple colors, patience | Delicate, intricate, detailed, natural/artistic |
| Geometric Designs | Moderate | 20-40 minutes (per hand) | Tape, stencils, fine brushes, steady hand | Sharp, clean lines, precise shapes, modern |
| Glitter Ombre/Gradient | Easy | 10-20 minutes (per hand) | Glitter polish, sponge (optional), top coat | Soft, shimmering, gradual color change |
As you can see, swirl nail designs offer a fantastic entry point into nail art. They are forgiving, versatile, and can produce stunning results without demanding advanced skills.
Tips for Perfecting Your Swirls
Even though swirl designs are beginner-friendly, a few Pro-level tips can elevate your game and ensure beautiful results every time.
- Work Quickly: Nail polish dries fast! Have all your colors and tools ready before you start.
- Less is More: Don’t overload your dotting tool or brush with polish. It’s easier to add more than to remove excess.
- Practice Makes Perfect: If you’re nervous, try a few swirls on paper or an old nail tip first.
- Clean Up is Key: A good clean-up with a fine brush and remover makes all the difference between a DIY look and a salon-quality finish.
- Experiment with Colors: Don’t be afraid to mix and match. Bold contrasts can be striking, while pastels offer a softer look. Look for inspiration from color theory or even your favorite outfits!
- Consider Your Polish Consistency: Thicker polishes can create bolder swirls, while thinner ones lend themselves to more delicate lines. Adjust your technique accordingly.
The Importance of a Good Top Coat
A high-quality top coat is non-negotiable for any nail art, especially swirl designs. It’s not just about shine; it acts as a protective barrier. A good top coat will smooth out any texture from the polish, prevent chipping, and make your intricate designs last significantly longer. Look for quick-drying formulas to minimize the risk of smudges. For those who want their manicures to last, consider investing in a gel top coat if you have a UV/LED lamp, as these offer exceptional durability and shine. Reputable sources on nail care often highlight the critical role of the top coat in achieving a professional and long-lasting finish.
Maintaining Your Swirl Manicure
Once you’ve perfected your swirl nail designs, you’ll want them to last! Here are some tips to keep your manicure looking fresh:
- Be Gentle: Avoid using your nails as tools to scrape or open things.
- Moisturize: Keep your hands and cuticles hydrated with a good cuticle oil or hand cream. This prevents dryness and hangnails, which can damage your polish.
- Wear Gloves: When doing chores, especially those involving water or harsh chemicals (like washing dishes), wear gloves. This is one of the simplest yet most effective ways to protect your manicure.
- Touch-Ups: If you notice a small chip, you can sometimes carefully touch it up with a tiny bit of your base color and top coat.
- Avoid Harsh Chemicals: Prolonged exposure to solvents or cleaning agents can break down nail polish.
Frequently Asked Questions About Swirl Nail Designs
Q1: Can I create swirl nail designs with regular nail polish, or do I need special products?
You can absolutely create beautiful swirl nail designs with regular nail polish! While specialized nail art tools and polishes can offer more precision, you can achieve great results using standard polish, a dotting tool (or a toothpick/pen tip), and a steady hand. The key is in the technique and practice.
Q2: My swirls always look messy. What am I doing wrong?
Don’t worry, this is common when you’re starting! Try using less polish on your dotting tool or brush – it’s easier to add more than to remove excess. Also, ensure your base color is almost dry, but not completely hardened, before you start your swirl. This allows the new polish to blend smoothly rather than just sitting on top. Practicing on paper first can also help you get a feel for the pressure and movement needed.
Q3: How do I get clean lines for my swirls?
Clean lines come from careful application and good clean-up. Use a fine-tipped nail art brush or a very thin dotting tool. For your swirl color, aim for a polish with a medium consistency – not too thin, not too thick. The most crucial step for clean lines is the clean-up! Keep a small brush (like an old makeup brush or a dedicated nail art brush) dipped in nail polish remover handy. Use it to carefully trace around the edges of your nail and any stray polish, creating a crisp outline for your design.
Q4: Can I make swirls with glitter polish?
Yes, glitter polish can be used for swirls! You can use a glitter polish as your swirl color over a solid base color for a sparkling effect. For a more subtle shimmer, you can add a tiny amount of fine glitter to your regular polish before applying it. If you’re using a glitter polish to create the swirl, you might find it easier to use more of a “dabbing” or “placing” motion with your tool rather than a continuous drag, to keep the glitter particles from clumping too much.
Q5: How long do swirl nail designs usually take to do?
For a beginner, a simple swirl design on one or two accent nails might take around 15-20 minutes. If you’re doing swirls on all ten nails, or a more intricate multi-color swirl, it could take 30-45 minutes or even longer, especially if you’re being very meticulous with detail and clean-up. Remember to factor in drying time between coats and for the final top coat.
Q6: What colors work best for swirl nail designs?
The beauty of swirl designs is their versatility! Almost any color combination can work. For a sophisticated look, try contrasting colors like black and white, navy and gold, or deep red and cream. For a softer, more romantic feel, pastels like pink and lavender, or mint green and baby blue, are lovely. Metallics like gold, silver, or rose gold also make for stunning swirl accents against any base color. Consider the occasion and your personal style when choosing your palette!
Conclusion: Your Swirl Nail Journey Begins Now!
See? Creating beautiful swirl nail designs is totally within your reach! From understanding the basic tools to mastering the simple steps of connecting dots and perfecting clean lines


