Swirl French tips can elevate your manicure with a chic, playful twist on the classic French. This guide breaks down how to achieve this trendy look at home, even if you’re a beginner, using simple tools and techniques for stunning results.
Are you ready to give your nails a sophisticated yet fun upgrade? The classic French manicure is a timeless favorite, but sometimes we crave a little something more. Enter the swirl French tip! It’s a gorgeous way to add personality and flair to your fingertips, blending elegance with a touch of playful artistry. If you’ve ever admired this look and thought it was too complicated to do yourself, don’t worry! I’m Lisa Drew, and I’m here to show you just how easy it can be to master swirl French tips, no matter your skill level. Get ready to transform your nails into little works of art!
This guide will take you through everything you need to know, from gathering your supplies to perfecting your swirl technique. We’ll demystify the process, making it achievable and enjoyable. So, grab your favorite polishes, and let’s get those nails looking fabulous!
What Are Swirl French Tips?
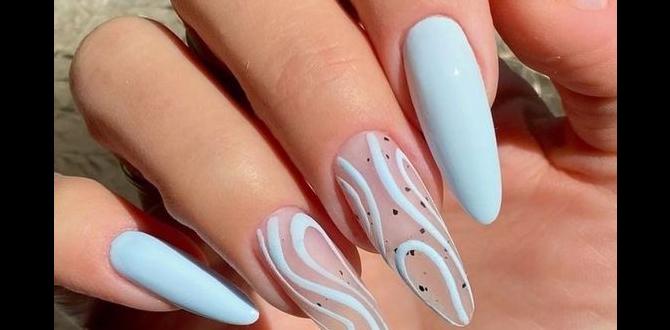
Swirl French tips are a creative variation of the traditional French manicure. Instead of a solid white or colored smile line at the tip of the nail, they feature a swirled or marbled pattern. This pattern can be as simple as two colors gently blended together or as intricate as a multi-colored, dynamic swirl. The beauty of swirl French tips lies in their versatility – they can be subtle and chic or bold and eye-catching. They offer a softer, more artistic take on the classic French, making them perfect for those who love a touch of design without being overly complicated.
Why Swirl French Tips Are a Must-Try
There’s a reason swirl French tips have become so popular. They offer a fantastic balance of sophistication and playfulness. For busy bees or those new to nail art, they provide a way to try a trendy design without needing advanced skills. They’re versatile enough for everyday wear but can also be a showstopper for special occasions. Plus, the endless color combinations mean you can personalize them to match any outfit or mood.
Gathering Your Swirl French Tip Arsenal: Essential Tools and Products
Before we dive into the swirling fun, let’s make sure you have everything you need. You don’t need a professional salon setup to achieve stunning swirl French tips. Here’s a straightforward list of what will help you create this look:
- Base Coat: Essential for protecting your natural nails and helping your polish adhere better.
- Your Chosen Polish Colors: This is where the magic happens! You’ll need at least two colors for the swirl effect, plus a color for your nail bed, and white or a complementary shade for the French tip accent.
- A Thin Nail Art Brush or Dotting Tool: This is your secret weapon for creating the swirl. A fine-tipped brush allows for precision.
- Top Coat: To seal your design, add shine, and ensure longevity.
- Nail Polish Remover and Cotton Pads/Q-tips: For cleaning up any mistakes (because they happen, and that’s okay!).
- Optional: A clean-up brush: A small, flat brush dipped in remover can help perfect the edges.
Choosing Your Colors: Making Your Swirl Pop
The color choice is crucial for swirl French tips. You can go classic with white and a soft pink, or experiment with bold contrasts like black and metallic gold, or even pastels for a softer vibe. Consider:
- Base Nails: A sheer pink, nude, or milky white often works beautifully as a base to let the swirl stand out.
- Swirl Colors: Aim for colors that complement each other. You could use two contrasting colors, or one lighter and one darker shade of the same color family.
- French Tip Accent: Often, one of your swirl colors will be the primary “tip” color, with the other creating the swirl effect.
Step-by-Step Guide to Perfect Swirl French Tips
Ready to get your swirl on? Follow these simple steps for a salon-worthy look at home!
Step 1: Prep Your Nails
Proper nail preparation is key to any great manicure. This ensures a smooth canvas and helps your polish last longer.
- Cleanliness is Key: Wash your hands thoroughly. Remove any old polish with nail polish remover.
- Shape Up: File your nails to your desired shape. A classic almond, squoval, or stiletto shape works well for French tips.
- Cuticle Care: Gently push back your cuticles using an orangewood stick or cuticle pusher. Avoid cutting them unless absolutely necessary, as they protect your nail bed. For a cleaner look, you can trim any hangnails carefully.
- Buff and Shine: Lightly buff the surface of your nails to create a smooth base. This also helps the polish adhere better.
- Clean Again: Wipe your nails with nail polish remover or rubbing alcohol on a cotton pad to remove any dust or oils.
Step 2: Apply a Base Coat
Apply one thin layer of your favorite base coat. This vital step protects your natural nails from staining and helps your polish grip. Let it dry completely.
Step 3: Apply Your Base Polish Color
Paint your nails with your chosen base color for the nail bed. This could be a sheer nude, a pale pink, or even a clean white. Apply two thin coats for full, even coverage, allowing each coat to dry thoroughly between applications. Patience here prevents streaks and ensures a clean finish.
Step 4: Create the Swirl French Tip
This is the fun part! Here are a couple of methods to achieve the swirl effect:
Method 1: The “Dot and Swirl” Technique
This method is great for beginners and offers a lot of control.
- Apply Your Tip Base: Paint a thin, solid line of your chosen French tip color (e.g., white) across the tip of your nail, just like you would for a classic French. Let this line dry slightly, but not completely.
- Add Your Swirl Color Dots: Using a fine nail art brush or a dotting tool, carefully place a few small dots of your second swirl color (e.g., a contrasting color like black or a metallic) onto the wet French tip line. Don’t overcrowd the tip; a few strategic dots are all you need.
- Gently Swirl: Using the brush or dotting tool, gently drag the second color through the first color to create a swirled effect. Think of it like gently pulling threads. You can create a single sweeping motion or a more intricate pattern with a few back-and-forth movements. Work quickly before the polish dries too much.
- Refine the Shape: If needed, use a clean, slightly damp brush (with a tiny bit of nail polish remover on it) to neaten the edges of your French tip and the swirl, ensuring a clean line at the cuticle and the free edge.
Method 2: The “Brush Stroke” Technique
This technique is slightly more advanced but can yield beautiful, fluid results.
- Apply Your Tip Base: Apply a thin, solid French tip line with your base color.
- Load Your Brush: Dip your fine nail art brush into your second swirl color. You want just enough polish to create a controlled line.
- Create the Swirl: Lightly touch the brush to the wet base French tip line and gently draw a swirled line. Imagine drawing a cursive ‘S’ or a gentle wave. You can overlap colors or create separate swirled lines within the tip area.
- Blend (Optional): If you want a more blended look, you can use a clean, slightly damp brush to gently swirl the colors together, being careful not to disturb the base too much.
- Clean Up: Use a clean-up brush dipped in polish remover to perfect the edges around the cuticle and the nail tip.
Pro Tip: Practice makes perfect! Don’t be discouraged if your first attempt isn’t flawless. Try practicing on a piece of paper or nail tips first to get a feel for the movement and polish consistency.
Step 5: Let it Dry (and Resist the Urge!)
Allow ample time for your swirl French tips to dry completely. This can take longer than usual because of the multiple layers and swirl effect. Resisting the urge to do things with your hands immediately is crucial to prevent smudges and dents.
Step 6: Apply a Top Coat
Once your design is thoroughly dry, apply a generous layer of top coat. This not only adds a beautiful glossy finish but also locks in your intricate design, preventing chipping and extending the life of your manicure. For extra longevity, you can reapply a top coat every few days.
Swirl French Tip Color Inspiration
The possibilities are endless when it comes to color combinations for swirl French tips. Here are a few ideas to spark your creativity:
| Look/Vibe | Base Color | French Tip Base Color | Swirl Colors | Occasion/Style |
|---|---|---|---|---|
| Classic Chic | Sheer Pink/Nude | White | White, Black | Timeless elegance, everyday sophistication |
| Glamorous Gold | Milky White | Champagne/Soft Gold | Champagne, Metallic Gold | Evening events, special occasions, a touch of luxury |
| Pastel Dream | Pale Pink | Light Blue/Lavender | Mint Green, Blush Pink | Spring/Summer, sweet and whimsical |
| Bold Contrast | Black | Deep Red/Burgundy | Black, Silver/Gunmetal | Edgy, modern, statement look |
| Sunset Hues | Peach/Coral | Soft Orange | Yellow, Pink, Orange | Fun, vibrant, vacation-ready |
| Monochrome Magic | Light Grey | Dark Grey | White, Light Grey, Dark Grey | Sophisticated, minimalist, chic |
Troubleshooting Common Swirl French Tip Issues
Even with the best intentions, sometimes things don’t go exactly as planned. Here are some common issues and how to fix them:
- Smudged Swirls: This usually happens if you touch the polish too soon. If it’s a fresh smudge, you might be able to gently smooth it with an orangewood stick or a fine brush. If it’s set, you may need to remove and start that nail again.
- Patchy Coverage: Apply polishes in thin, even coats. If a color looks patchy, let it dry and apply a second thin coat.
- Messy Edges: This is where your clean-up brush comes in handy! Dip a fine, angled brush in nail polish remover and carefully trace around the cuticle and nail edge to create a sharp, clean line.
- Colors Not Blending Well: Ensure your base line is still wet when you add your swirl color. Work quickly but deliberately. Sometimes, less is more when it comes to the amount of polish you use for the swirl.
- The Swirl Looks “Muddy”: This can happen if you over-swirl or use too many colors without proper separation. Try using fewer dots or simpler swirling motions.
Maintaining Your Swirl French Tips
Once you’ve perfected your swirl French tips, you’ll want them to last! Here are some tips for keeping them looking fabulous:
- Wear Gloves: Protect your nails by wearing rubber gloves when doing household chores, especially when washing dishes or using cleaning chemicals.
- Moisturize Often: Keep your hands and cuticles hydrated with a good hand cream or cuticle oil. Healthy cuticles contribute to overall nail health and appearance.
- Avoid Using Nails as Tools: Resist the urge to scrape or pry with your nails, as this can chip polish and damage your natural nail.
- Touch Up When Needed: If you notice any minor chips or wear, touch them up with a bit of top coat or the base color to extend the life of your manicure.
Frequently Asked Questions about Swirl French Tips
Are swirl French tips difficult for beginners?
Not at all! While they look intricate, the “dot and swirl” method is quite beginner-friendly. With a little practice, you’ll be creating beautiful swirls in no time. Our step-by-step guide makes it easy!
What are the best colors to use for swirl French tips?
You can use almost any color combination! Classic pairings like white and black, white and gold, or pastels like mint and pink are popular. Consider your base nail color and the overall look you want to achieve. Contrasting colors often make the swirl pop.
How long do swirl French tips typically last?
With proper application and care, swirl French tips can last anywhere from 7-14 days. Using a good base coat, top coat, and avoiding harsh chemicals will help extend their life. For gel polish, they can last even longer.
Can I use regular nail polish or do I need gel?
You can absolutely use regular nail polish! The techniques described in this guide work with both regular and gel polishes. Gel polish offers extra durability and shine but requires a UV/LED lamp to cure. Regular polish is more accessible and easier to remove.
What if my swirl looks messy?
Don’t worry! A clean-up brush dipped in nail polish remover is your best friend for tidying up edges. You can also use a fine brush to gently reshape lines before the polish fully dries. Remember, practice helps! You can also find helpful visual guides on how to prevent muddy swirls on reputable beauty sites.
How do I create a more intricate swirl?
For more intricate swirls, use a very fine nail art brush. Work on slightly tacky polish rather than completely wet. You can create finer lines by applying less pressure and using a smaller amount of polish on your brush. Experiment with different swirling patterns like spirals or waves. Watching short video tutorials can also offer excellent visual cues for advanced techniques.
The Art of the Swirl: Beyond the Basics
Once you’ve got the hang of the basic swirl French tip, don’t be afraid to experiment! You can incorporate glitter into your swirl for added sparkle, use ombré techniques to blend your colors before swirling, or even mix different finishes like matte and glossy. For those who love detailed art, consider adding tiny hand-painted details like dots or thin lines to complement your swirl. For inspiration on nail art techniques and color theory, sites like the Penn State University Libraries’ Art History guide on Color Theory can offer wonderful insights into harmonious color combinations.
Remember, nail art is a form of self-expression. The most important thing is to have fun and create something that makes you feel confident and beautiful. Whether you prefer a subtle marble effect or a bold, multi-colored swirl, the swirl French tip is a fantastic way to showcase your personal style.</p

