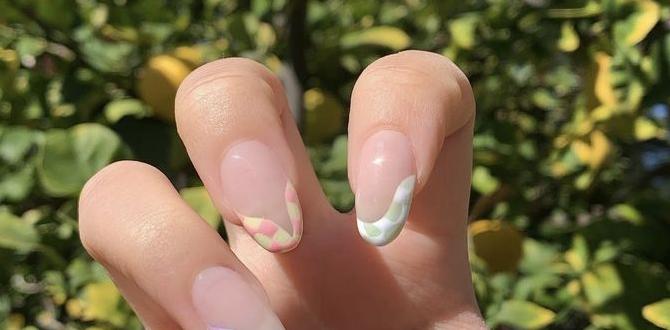
Swirl French tips are a playful, stylish twist on the classic French manicure, blending elegant simplicity with fun, artistic flair for a look that’s both sophisticated and unique.
Thinking about a classic French manicure but want to add a little something extra? Swirl French tips might be just what you’re looking for! They take the timeless elegance of French tips and inject a dose of fun and personality. Sometimes, getting a perfectly clean French tip line can feel a bit tricky, leading to smudges or uneven edges. But with swirl French tips, a little imperfection can actually add to the charm! This guide is all about making these gorgeous designs super easy to achieve, no matter your skill level. Get ready to discover how to create these eye-catching nails that are sure to turn heads!
What Exactly Are Swirl French Tips?
Imagine the classic French manicure: a clean, crisp white (or colored) tip gracefully arching over the natural nail. Now, picture that tip with a playful, swirling pattern integrated into its design. That’s the magic of swirl French tips! Instead of a solid line, you’ll see elegant curves, spirals, or marbling effects dancing across the tip of your nail. They’re a fantastic way to express your creativity and add a unique touch to your manicure. Think of it as adding a little artistic flourish that keeps the chic vibe of a French tip while making it entirely your own.
These aren’t just for special occasions, either. Swirl French tips can be as subtle or as bold as you like, making them perfect for everyday wear. Whether you’re rocking a minimalist look with a delicate swirl or going for a vibrant statement with bold colors, there’s a swirl French tip design for everyone. They offer a fantastic way to experiment with color and pattern without committing to a full nail art design. Plus, they’re surprisingly versatile and can complement a wide range of outfits and styles.
Why Are Swirl French Tips So Genius?
Swirl French tips are a brilliant innovation in nail art for several compelling reasons. They elevate a tried-and-true classic into something fresh and exciting, catering to those who love tradition but also crave a touch of individuality. Here’s why they’re a must-try:
- Versatile Style: They can be adapted to virtually any color palette, from soft pastels and nudes for a subtle look to vibrant neons and bold contrasts for a statement.
- Forgiving Technique: Unlike the sharp, precise lines of a traditional French tip, swirls can be more forgiving, making them easier for beginners to execute. A little wobble here and there can often enhance the artistic, organic feel of the swirl.
- Endless Design Possibilities: The swirl motif offers a canvas for infinite creativity. You can go with monochrome, ombre, glitter accents, or even incorporate different colors within the swirl itself.
- Chic yet Playful: They strike a perfect balance between sophisticated and fun. They’re elegant enough for professional settings but also have an inherent playfulness that suits more casual or festive occasions.
- Trendy Appeal: Swirl designs have been consistently popular in nail art, ensuring your manicure looks stylish and current.
Essential Tools for Perfect Swirl French Tips
Getting those gorgeous swirl French tips at home is totally achievable with the right tools! Don’t worry if you’re new to nail art; these are pretty straightforward. Having the right supplies makes all the difference between a DIY attempt and a salon-worthy finish.
Here’s what you’ll need:
- Base Coat: To protect your natural nails and help polish adhere better.
- Nail Polish Colors: Your main polish for the nail bed (nude, pink, sheer white), your tip color (classic white is a favorite, but any color works!), and colors for your swirl design.
- Fine-Tipped Detail Brushes or Dotting Tools: These are your best friends for creating those delicate swirl lines. A striping brush with a very fine tip is excellent for long, fluid swirls, while a dotting tool can be used to draw curves or create small dots that you connect. You can find great options online or at beauty supply stores. For example, the Amazon Basics nail art brushes offer a good starting point for beginners.
- Nail Polish Remover and Cotton Swabs: For cleaning up any mistakes and achieving crisp edges.
- Top Coat: To seal your design, add shine, and make your manicure last longer. A quick-dry top coat is a lifesaver!
- Optional: Nail Art Pen: For a super easy way to draw precise lines and swirls.
Step-by-Step: Creating Your Own Swirl French Tips
Ready to dive in? Follow these simple steps to create your own stunning swirl French tips. We’ll break it down so it’s easy to follow, even if you’ve never done nail art before!
Step 1: Prep Your Nails
Clean nails are key for a good manicure. Start by removing any old polish. Gently push back your cuticles with an orange stick – never cut them, as this can lead to infection! Lightly buff the surface of your nails to create a smooth canvas and remove any natural shine, which helps polish grip better. Finally, wash your hands to remove any dust or oils. Always apply a good quality base coat to protect your nails from staining and promote polish longevity. Let it dry completely.
Step 2: Apply the Base Color
Paint your nails with your chosen base color. This is usually a sheer pink, nude, or a milky white. Apply one or two thin coats, depending on the opacity. Ensure each coat is completely dry before moving on. Patience here is crucial to avoid smudges later!
Step 3: Create the French Tip Line
Now, let’s define the tip. You can do this freehand or use a French tip guide sticker if you want a very clean edge. For a freehand approach, use your chosen tip color (often white) and a fine-tipped brush. Start at one side of the nail and gently draw a curve across the tip, meeting the other side. Aim for a smooth, even arc.
Pro Tip for Beginners: If freehanding is intimidating, try using a makeup sponge! Dab a bit of polish onto a clean sponge and gently press it onto the tip of your nail. This gives a softer, more diffused line that can be easier to manage.
Step 4: Add the Swirl Design
This is where the fun begins! Using your fine-tipped detail brush, dotting tool, or nail art pen, pick up a contrasting color. Then, gently draw a swirl that starts from the French tip line and curves down onto the main part of the nail, or into the tip itself. You can create a single elegant swirl, a double swirl, or even a more abstract marbled effect.
Considerations for Swirls:
- Size: Decide if you want a large, statement swirl or small, delicate accents.
- Placement: Will your swirl overlap the tip line, originate from one side, or wind its way across the nail?
- Color Choice: Pick colors that complement your base and tip colors. Metallics, neons, or even subtle darker shades work beautifully.
For a marbled effect, apply small dots or lines of your swirl colors onto your base color while it’s still slightly wet, then gently blend them with your brush. For more defined swirls, create a line and then gently pull it into a curve or loop.
Step 5: Clean Up and Refine
Dip a fine-tipped brush or a clean cotton swab into nail polish remover. Carefully trace around the edges of your French tip and any stray swirl marks to clean them up. This step makes a huge difference in achieving a polished, professional look. Don’t be afraid to take your time!
Step 6: Apply the Top Coat
Once you are happy with your design and all the polish is dry, apply a generous layer of top coat. This not only adds a beautiful glossy finish but also protects your artwork from chipping and smudging. Make sure to cap off the free edge of your nail by brushing the top coat along the very tip. Let it dry completely.
Popular Swirl French Tip Design Ideas
The beauty of swirl French tips lies in their adaptability. You can play with colors, patterns, and styles to match your mood, outfit, or the season. Here are some ideas to spark your creativity:
Classic White Swirls on Nude Base
This is a timeless and elegant take on the trend. A sheer nude or milky pink base with a crisp white swirl over the French tip offers sophistication with a playful twist. It’s perfect for weddings, special events, or when you want a chic, understated look.
Bold Color Swirls
Don’t shy away from vibrant colors! Think electric blue swirls on a white tip, or hot pink and orange swirls on a black base. These make a statement and are fantastic for summer, parties, or showing off your bold personality.
Marble Effect Swirls
Create a chic, sophisticated marbled effect by blending two or three complementary colors within the swirl. White and gold, black and grey, or even pink and rose gold can create stunning, intricate patterns that look complex but are achievable with careful blending.
Glitter Swirls
Add some sparkle! Use a glitter polish to create your swirl on top of a classic French tip, or incorporate glitter into the swirl itself. This is a fun way to add a festive touch, perfect for holidays or a night out.
Ombre Swirls
Combine the ombre trend with swirls. Apply a soft ombre gradient to the entire nail, then add a contrasting swirl on top. Alternatively, make the swirl itself an ombre, transitioning from one color to another.
Minimalist Swirls
For a super subtle look, opt for a thin, delicate swirl in a complementary shade. A fine black swirl on a classic white tip, or a metallic gold swirl on a nude base, adds just enough detail to be eye-catching without being overwhelming.
Swirl French Tips vs. Traditional French Tips: A Comparison
While both are rooted in elegance, swirl French tips offer a modern, artistic edge. Here’s a quick look at how they stack up:
| Feature | Traditional French Tip | Swirl French Tip |
|---|---|---|
| Aesthetic | Classic, clean, minimalist, uniform. | Artistic, playful, unique, dynamic. |
| Technique Difficulty | Requires precision for a clean line; can be challenging for beginners. | More forgiving; artistic freedom allows for varied skill levels. |
| Design Versatility | Limited to color variations of the tip and base. | Infinite possibilities with colors, patterns, textures, and placement. |
| Trendy Appeal | Timeless, always in style. | Modern, embraces current nail art trends. |
| Personal Expression | Subtle; relies on color choice. | High; allows for significant personal style and creativity. |
Tips for Longevity: Making Your Swirl French Tips Last
Want your beautiful swirl French tips to stick around? A few simple habits can extend the life of your manicure:
- Always Cap the Edge: When applying your base, color, and top coat, swipe a little onto the free edge (the tip) of your nail. This seals the polish and prevents chipping.
- Wear Gloves: When doing chores like washing dishes or cleaning, wear rubber gloves. Water and harsh chemicals are the enemies of nail polish!
- Avoid Using Nails as Tools: Resist the urge to pick, scrape, or pry with your nails. They are for decoration, not for prying open cans!
- Reapply Top Coat: Every 2-3 days, apply a fresh layer of top coat. This revitalizes the shine and adds an extra layer of protection.
- Moisturize: Keep your nails and cuticles hydrated with cuticle oil. Healthy nails are less prone to breakage and will make your manicure look better for longer. A good cuticle oil can be found from many reputable brands, such as OPI’s Pro Spa Cuticle Oil.
Troubleshooting Common Swirl French Tip Issues
Even with the best intentions, sometimes things don’t go exactly as planned. Here are some common issues and how to fix them:
- Smudged Swirls: If your swirls smudge, it usually means the polish wasn’t dry enough. For minor smudges, try using a clean brush dipped in polish remover to gently reshape the area. For bigger smudges, you might need to carefully go over the swirl again once fully dry, or re-do that nail.
- Uneven Swirl Lines: If your lines are wobbly, don’t fret! Thicker polish can be harder to control. Try adding a drop of nail polish thinner to your polish if it’s too old. Alternatively, embrace the imperfection – a slightly wavy line can look artistic! You can also use a clean brush with polish remover to ‘erase’ and refine shaky lines.
- Polish Not Drying: Ensure you’re applying thin coats. Thick coats take much longer to dry and are prone to smudging. Using a quick-dry top coat can help speed up the process, but it’s best to let the color layers dry for a few minutes before adding the top coat.
- Swirls Looking Too Messy: If the swirl looks too chaotic, try simplifying your design. Instead of intricate loops, try a few graceful curves. Practice on a piece of paper or a nail tip first. Remember, less can be more!
Frequently Asked Questions About Swirl French Tips
Q1: Are swirl French tips difficult to do for beginners?
A1: Swirl French tips can be easier than you think! While achieving perfection takes practice, the flowing nature of swirls is often more forgiving than the sharp lines of traditional French tips. Using dotting tools or nail art pens can make it very manageable.
Q2: How long do swirl French tips typically last?
A2: With proper application and care, swirl French tips can last anywhere from 7 to 14 days. Using a good base and top coat, and avoiding harsh activities, will significantly extend their wear time.
Q3: What colors work best for swirl French tips?
A3: Almost any color combination can work! Classic choices include white swirls on nude or pink, black swirls on white, or metallic swirls on a contrasting base. Don’t be afraid to experiment with vibrant hues or create elegant marbled effects with complementary shades.
Q4: Can I do swirl French tips on short nails?
A4: Absolutely! Swirl French tips can look fantastic on short nails. You might opt for smaller, more delicate swirls or simple curved patterns to best suit the nail shape and size.
Q5: Do I need special nail polish for swirls?
A5: You don’t need special polish, but polishes with a good consistency and vibrant pigment work best. Fine-tipped detail brushes, dotting tools, or nail art pens are more important for creating the swirl pattern itself than the type of polish.
Q6: How do I clean up mistakes when doing swirls?
A6: A small, fine-tipped brush or a clean cotton swab dipped in nail polish remover is your best tool for cleanup. Gently trace around the edges of your design to correct any sloppiness and sharpen the lines.
Q7: Can swirl French tips be done with gel polish?
A7: Yes, swirl French tips can definitely be done with gel polish. The process is similar, but you’ll need a UV/LED lamp to cure each layer. Gel polish can offer a more durable and longer-lasting finish.
Q8: What is the difference between a swirl and a marble French tip?
A8: A swirl typically involves a single, continuous flowing line or pattern that resembles a spiral or curl. Marble French tips, on the other hand, are created by blending multiple colors together to mimic the veining and patterns seen in natural marble, often creating a more complex, mottled effect that can incorporate swirling elements.
Conclusion
Swirl French tips are more than just a design; they’re a celebration of creativity and personal style. They take a beloved classic and infuse it with fun, artistry, and endless possibilities. Whether you’re aiming for subtle elegance with a delicate white swirl or a bold statement with vibrant colors, this trend is incredibly versatile and surprisingly accessible


