Embrace cozy chic this winter with these easy-to-follow sweater nail designs! Perfect for beginners, these tutorials will help you create textured, stylish manicures that capture the essence of your favorite knitwear, making your nails a must-have winter accessory.
The chill in the air means it’s time to swap out our lighter polishes for something a little warmer and cozier. And what’s cozier than a soft, chunky sweater? This winter, we’re bringing that same comforting texture and style to our fingertips with sweater nail designs! If you’ve ever admired those artfully crafted manicures that mimic cable knits, intricate patterns, or ribbed textures, you might think they’re too complicated to do yourself. But trust me, with a few simple techniques and the right tools, you can totally rock these essential winter styles. We’ll break down everything you need to know, from the basic ups and downs of creating the illusion of knitwear to simple variations that’ll have everyone asking, “Who did your nails?” Get ready to transform your nails into your favorite winter accessory!
Why Sweater Nails Are Your Winter Must-Have
Sweater nails are more than just a trend; they’re a statement of cozy elegance. They perfectly capture the feeling of winter by bringing tactile textures and comforting imagery to something we see and use every day – our hands! Think about it: when you slip on your favorite cozy sweater, there’s an immediate sense of warmth and comfort. Sweater nail designs aim to replicate that same feeling. They add a unique dimension to your manicure, moving beyond flat colors and simple glitters to create something truly special. In winter, our style often leans towards heavier fabrics and warmer palettes, and sweater nails are the perfect complement to this aesthetic. They’re versatile, looking just as chic with a casual jeans-and-tee combo as they do with a festive holiday dress.
Getting Started: Your Sweater Nail Design Toolkit
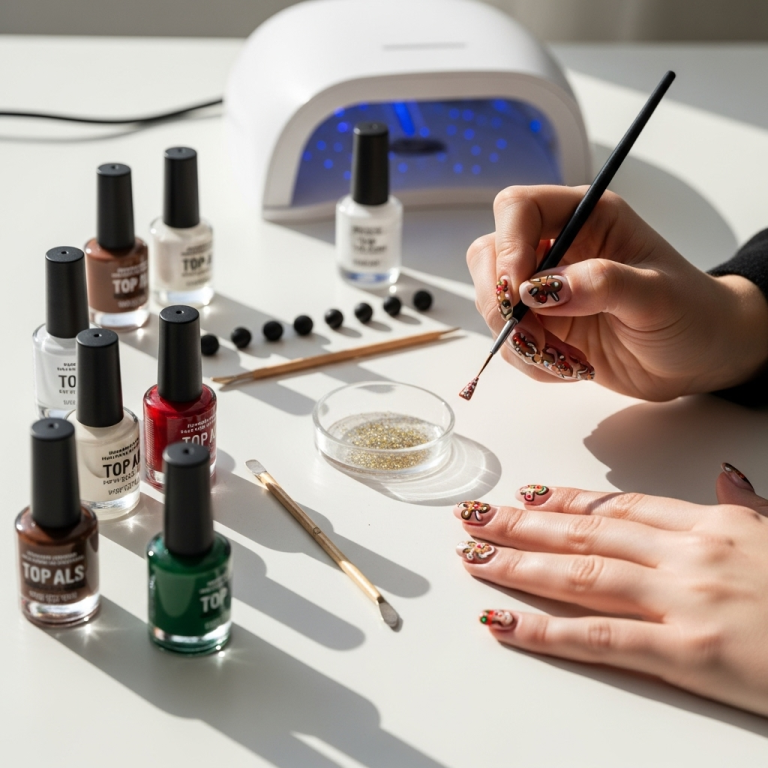
Before we dive into the fun of creating these cozy designs, let’s make sure you have everything you need. Don’t worry, you don’t need a professional nail salon’s worth of equipment! Most of these items are likely already in your nail polish stash, or they’re easy to find.
Essential Tools for Sweater Nail Designs:
- Base Coat: This is crucial for protecting your natural nails and helping your polish adhere better.
- Top Coat: Seals your design, adds shine, and helps your manicure last longer.
- Nail Polish Colors: Classic winter shades like creams, whites, grays, deep blues, burgundies, and forest greens work beautifully.
- Acrylic Powder (Clear or White): This is the key ingredient for creating the raised, textured “knit” effect. It reacts with your nail polish to create dimension.
- Gel Top Coat (No Wipe Recommended): If you’re using gel polish, a no-wipe gel top coat is ideal for this technique.
- Small Detail Brush or Dotting Tool: For creating fine lines and details.
- Orange Stick or Cuticle Pusher: For cleaning up edges.
- Rubbing Alcohol or Nail Polish Remover: For cleaning brushes and your nail surface.
- Optional: Rhinestones or Glitter: For adding a touch of sparkle.
You might be wondering about the acrylic powder. It’s a common product used in nail enhancements, and when applied over wet nail polish or gel, it hardens to create a raised texture. You can usually find clear or white acrylic powder at beauty supply stores or online.
The Classic Cable Knit: Your First Sweater Nail Design
This is the quintessential sweater nail design, and it’s surprisingly simple to achieve! The cable knit pattern mimics the look of interwoven stitches on a sweater.
Step-by-Step: Creating the Cable Knit
1. Prep Your Nails: Start with clean, dry nails. Apply your favorite base coat and let it dry completely. Then, apply your desired base color (a soft cream, white, or pale gray is perfect for this). Apply two coats for full opacity and let them dry thoroughly. If using gel, cure each coat according to the product instructions.
2. Paint Your “Yarn Loops”:
For Regular Nail Polish: Using a slightly darker shade of polish (or even the same base color for a subtle tone-on-tone effect), paint a thin, curved line across your nail. Then, paint another parallel line slightly above or below it, leaving a small gap. Imagine you’re painting the outer edges of your “knit” pattern.
For Gel Polish: Apply a thin layer of your chosen top coat (a no-wipe gel top coat is best here) on the nail where you want your design. You’ll then use your polish or gel color to paint the “yarn loops.”
3. Add the “Cross-Overs”: Now, using the same polish (or gel color) and your detail brush, connect these two lines with short, curving “stitch” marks. Think of them as little Vs or U-shapes that go between your two parallel lines, mimicking how stitches cross over in actual knitting. Don’t overthink perfection; a slightly imperfect look adds to the charm!
4. The Magic Dusting: Acrylic Powder Time! This is where the texture comes in.
For Regular Nail Polish: While the “yarn loop” polish is still wet, gently dip your nail into a small dish of clear or white acrylic powder. Alternatively, you can use a brush to lightly dust the powder over the wet polish. Make sure to cover all the painted lines.
For Gel Polish: While the gel top coat with your painted design is still wet (before curing!), sprinkle or dust the acrylic powder over the wet gel. Ensure the powder adheres to the lines you’ve painted.
5. Set the Texture:
For Regular Nail Polish: Gently tap off any excess acrylic powder. Let the polish dry completely. Once dry, you can gently brush off any loose powder with a soft brush.
For Gel Polish: Once the acrylic powder is on, place your nail under your UV/LED lamp and cure as usual. This will harden the gel and the acrylic powder together.
6. Clean Up and Seal:
For Regular Nail Polish: You might have some loose powder around the edges. Gently brush it away. Apply another layer of your base color polish over the textured lines if you want to reinforce the texture and then apply your trusted top coat to seal everything. Be careful not to flatten the texture too much with your top coat brush.
For Gel Polish: After curing your gel, gently wipe away any excess acrylic powder with a lint-free wipe or a soft brush. Then, apply your no-wipe gel top coat over the entire nail, being mindful not to flood the textured design. Cure again.
And voilà! You have a beautiful, textured cable knit sweater nail design.
Variations for Extra Flair
Once you’ve mastered the classic cable knit, you can play around with variations to keep your sweater nails fresh and exciting.
Textured Ribbed Nails
This design mimics the vertical lines of a ribbed sweater. It’s super easy and adds a subtle texture.
1. Prep: Apply base coat, then your chosen polish color. Let dry or cure gel.
2. Create Lines: Using a detail brush and a contrasting or matching polish (or gel color), paint thin, vertical lines down your nail. You can space them evenly for a classic ribbed look, or make them slightly varied.
3. Add Texture: While the polish/gel is wet, dust with acrylic powder as described in the cable knit tutorial.
4. Set & Seal: Let regular polish dry, or cure gel polish. Brush off excess powder and seal with a top coat.
Simple Herringbone Sweater Nails
Herringbone patterns give a sophisticated, woven look.
1. Prep: Base coat, color base. Dry/cure.
2. Paint First Line: With a detail brush and your design color, paint a slightly angled line across your nail.
3. Add Second Line: Next to it (or slightly overlapping), paint another angled line going in the opposite direction, creating a V-shape.
4. Continue Pattern: Keep alternating the direction of your angled lines, creating a series of V’s that connect to form a herringbone.
5. Apply Acrylic Powder: Dust wet lines with acrylic powder.
6. Set & Seal: Dry regular polish or cure gel. Brush off excess and apply top coat.
Abstract Knit Patterns
Don’t feel confined to traditional knit patterns! You can create abstract, swirling, or geometric lines and apply the acrylic powder technique for texture. This is great for adding a modern, artistic twist to your sweater nails. Think of abstract lines that remind you of the cozy texture of your favorite cardigan.
Color Palettes to Inspire Your Sweater Nails
The beauty of sweater nails is their versatility with color. Don’t limit yourself to solid shades.
Classic Winter Neutrals
Creamy White: Like a cozy cashmere sweater.
Soft Gray: A sophisticated and versatile choice.
Oatmeal Beige: Warm and inviting.
Muted Taupe: Elegant and understated.
Deep & Rich Tones
Winter Berry Red: Think deep cranberries or burgundy.
Forest Green: For a touch of nature.
Midnight Blue: A dark, moody hue.
Chocolate Brown: Rich and grounding.
Adding a Touch of Sparkle
For festive occasions or just a little extra glam, consider these additions:
Glitter Accent Nail: Pair your textured sweater nails with one glitter accent nail in a complementary shade.
Subtle Shimmer Top Coat: Apply a sheer glitter or shimmer top coat over your textured design for a hint of sparkle without overpowering the knit effect.
Tiny Rhinestones: Place a few small rhinestones at the base of a nail or along the edge of a design for a touch of sophistication.
A Comparison: Regular Polish vs. Gel for Sweater Nails
Both traditional nail polish and gel polish can be used for sweater nail designs, but they offer slightly different experiences and results. Understanding these differences can help you choose the best method for your skill level and desired outcome.
| Feature | Regular Nail Polish | Gel Polish |
|---|---|---|
| Application Process | Air dries. Requires patience between coats and careful dusting while wet. | Cures under UV/LED lamp. Allows for more working time with design, but requires lamp for setting. |
| Texture Creation | Works well with acrylic powder on wet polish for raised effect. Can sometimes feel less “set.” | Acrylic powder adheres to wet gel top coat or color, creating a very durable and smooth raised texture. |
| Longevity | Can chip more easily; typically lasts 3-7 days depending on care. | Much more durable; can last 2-3 weeks without chipping, especially with proper application. |
| Removal | Easier to remove with regular nail polish remover. | Requires acetone soak-off or specialized remover, can be more time-consuming. |
| Beginner Friendliness | Simpler setup, but requires fast work before polish dries. | Slightly more investment in lamp and products, but offers more control for detailed designs. |
| Finish | Can be slightly less uniform in texture; top coat application needs care not to flatten. | Often results in a smoother, more uniform raised texture; no-wipe top coats are ideal. |
Ultimately, the best choice depends on your preference. If you’re new to nail art and don’t have a UV lamp, regular polish is a great starting point. If you’re looking for a longer-lasting, more professional-looking finish, investing in gel supplies might be worth it.
Caring for Your Cozy Manicure
Once your stunning sweater nails are complete, a little care will help them stay looking their best throughout the season.
Be Gentle: Avoid using your nails as tools. Try not to scratch or pry with them, especially on the textured areas.
Moisturize: Keep your hands and cuticles hydrated with a good cuticle oil or hand cream. Healthy cuticles make your whole manicure look better and last longer.
Wear Gloves: When doing household chores, especially washing dishes or cleaning, wear gloves to protect your nails from harsh chemicals and prolonged water exposure.
Top Coat Touch-Ups: If you notice your top coat wearing thin on non-textured areas, you can carefully apply another thin layer. Be cautious over the textured parts to avoid flattening them.
Troubleshooting Common Sweater Nail Issues
It’s totally normal to encounter a few bumps on your nail art journey! Here are some common issues and how to fix them.
Issue: The texture isn’t raised enough.
Why it happens: Not enough acrylic powder used, or it was applied after the polish/gel started to dry.
Solution: Try using a bit more acrylic powder next time, and make sure to dust it onto the polish/gel while it’s still wet and tacky. For gel, ensure you apply the powder before curing.
Issue: The texture is too rough or uneven.
Why it happens: Too much acrylic powder, or it wasn’t evenly distributed.
Solution: Use a lighter dusting of powder. After it sets, gently buff the very peaks with a fine-grit buffer very carefully if they feel excessively bumpy, but be careful not to buff them flat. For gel, ensure you’re not flooding the nail with the powder.
Issue: My design bled or smudged.
Why it happens: With regular polish, the design colors blended before the acrylic powder set. With gel, the design lines weren’t clean enough or the powder was applied unevenly.
Solution: For polish, work a little faster. For polish and gel, practice drawing cleaner lines with a fine brush and make sure the acrylic powder adheres directly to the wet polish/gel lines.
Issue: My top coat flattens the texture.
Why it happens: Applying too much top coat or brushing too aggressively.
Solution: Use very thin layers of top coat. Use a gentle “floating” technique with your brush, allowing the top coat to spread over the design without disturbing the texture. For gel, a no-wipe top coat is excellent for this.
The Joy of Sweater Nails: Expressing Your Winter Style
Creating sweater nail designs is a fantastic way to express your personal style and embrace the cozy vibes of winter. It’s about more than just pretty nails; it’s about the tactile experience, the visual interest, and the confidence that comes from knowing you’ve created something beautiful yourself. Whether you opt for a classic cable knit, a chic ribbed effect, or a more abstract textured design, these manicures are sure to turn heads and keep your style game strong all season long.
Remember, the most important thing is to have fun with it! Don’t be afraid to experiment with colors, patterns, and textures. Your nails are a canvas for creativity, and sweater nail designs offer a wonderful new way to play. So grab your polishes, get your acrylic powder ready, and let’s get those nails looking as cozy and stylish as your favorite winter knit!
—
Frequently Asked Questions About Sweater Nail Designs
What exactly are sweater nails?
Sweater nails are nail designs that mimic the textured look and feel of knit fabrics, like those found on sweaters. They use techniques, often involving acrylic powder, to create raised, dimensional patterns that give the illusion of knit stitches.
Do I need special nail polish for sweater nails?
No, you don’t need special* polish, but you do need a few key items. Regular nail polish or gel polish works, but the essential ingredient for the texture is usually clear or white acrylic powder, which you dust onto wet polish or gel before it dries/cures.
Can beginners really do sweater nail designs?
Absolutely! While some designs can look intricate, the basic techniques, especially the cable knit, are quite beginner-friendly. The key is practice and ensuring you apply the textures while the polish or gel is still wet.
How do I get the raised texture effect?
The raised texture is achieved by applying acrylic powder (clear or white) over wet nail polish or uncured gel polish. The powder adheres to the polish, and once dried (for regular polish) or cured (for gel), it creates a hardened, raised surface that looks like knit fabric.
How long do sweater nail designs last?
The longevity depends on whether you use regular polish or gel. Regular polish sweater nails might last 3-7 days with care. Gel polish versions, when applied correctly, can last 2-3 weeks, offering more durability.
What colors are best for sweater nail designs?
Classic winter colors like creams, whites, grays, deep blues, burgundies, and forest greens are popular. However, you can use almost any color! Tone-on-tone designs (where the knit pattern is the same color as the base) offer a subtle elegance, while contrasting colors can make the pattern pop.
Can I add glitter or other decorations to my sweater nails?
Yes! You can definitely add glitter accent nails, use a glitter top coat over your sweaters nails (carefully, so as not to flatten the texture), or even add small

