Sugar nails are a simple and dazzling way to add texture and sparkle to your manicure. This guide breaks down how to achieve this stunning look at home, perfect for beginners wanting to elevate their nail art game. Get ready for your most eye-catching nails yet!
Ever seen nails that look like they’re dipped in glitter or sugar, sparkling from every angle? That’s the magic of sugar nails, and you can totally create this look yourself! It might sound fancy, but it’s actually super easy and a fantastic way for beginners to add some serious wow-factor to their manicures. Forget complicated designs; this trend is all about simple application and brilliant results.
We’ll walk through everything you need. From the best supplies to simple steps, you’ll be creating your own sparkling sugar nail masterpieces in no time. No more admiring from afar – get ready to rock a manicure that’s as fun to make as it is to show off!
What Exactly Are Sugar Nails?
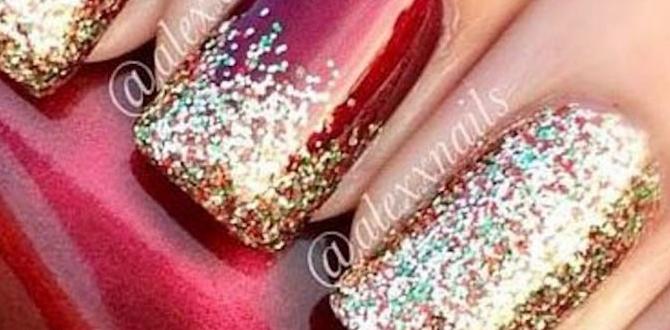
Sugar nails, also known as glitter nails or sugar effect nails, get their name from the textured, sparkling finish that resembles granulated sugar or fine glitter. Unlike traditional polish, this technique involves applying a special type of glitter or iridescent powder onto a sticky nail surface, creating a unique, dimensional look and feel.
The beauty of sugar nails lies in their versatility. You can opt for a full-coverage sparkle that’s dazzling and bold, or use the technique on accent nails for a more subtle yet still incredibly eye-catching effect. The texture is a key part of the charm, making them a fun alternative to smooth, glossy finishes.
Why You’ll Love Sugar Nails
If you’re looking for a manicure that’s both beautiful and relatively simple to achieve, sugar nails are a fantastic choice. Here’s why this trend is a favorite:
- Stunning Sparkle: They catch the light beautifully, making your nails look like they’re adorned with genuine gems.
- Easy Application: The process is straightforward, even for beginners. You don’t need advanced artistic skills.
- Customizable: You can choose from countless colors and glitter sizes to match any outfit or mood.
- Long-Lasting: When applied correctly, sugar nails can be quite durable.
- Trend-Forward: This look is always in style, offering a touch of glamour and fun.
Essential Supplies for Your Sugar Manicure
Gathering the right tools is the first step to a flawless sugar nail look. Don’t worry, most of these are common nail care items you might already have or can easily find at beauty supply stores or online.
The Must-Haves:
- Nail Polish: Choose your base color. Any color works, but lighter shades often make the glitter pop more.
- Top Coat or Base Coat: This will be your “sticky layer” to adhere the glitter.
- Fine Glitter or Specialty Glitter Powder: This is the star! Look for fine-grained glitter or iridescent pigment powders specifically designed for nails. You can find holographic, iridescent, metallic, and even chunky glitters.
- Small Brush or Applicator: A fluffy makeup brush, a dedicated makeup sponge applicator, or even a stiff fan brush works well for dusting on the glitter.
- Optional: Clear Nail Polish or Top Coat (for sealing): If you want a smoother finish or extra protection for your sugar effect.
- Cuticle Pusher and Nail File: For preparing your nails.
- Rubbing Alcohol or Nail Polish Remover: To clean the nail surface.
Step-by-Step Guide: Creating Stunning Sugar Nails
Ready to get your sparkle on? Follow these simple steps for a sugar nail manicure that will turn heads. We’ll cover the most popular method using glitter and a sticky coat.
Step 1: Prep Your Nails
Like any manicure, starting with clean, properly prepped nails is key. This ensures the polish adheres well and your design lasts longer.
- Clean: Remove any old nail polish. Wash your hands thoroughly.
- Shape: File your nails to your desired shape and length.
- Cuticle Care: Gently push back your cuticles using a cuticle pusher. Avoid cutting them unless absolutely necessary, as this can lead to damage. The Mayo Clinic provides great advice on safe manicure practices.
- Buff: Lightly buff the surface of your nails to create a smooth canvas.
- Clean Again: Wipe your nails with rubbing alcohol or nail polish remover to remove any oils or residue.
Step 2: Apply Your Base Color (Optional but Recommended)
For a more defined sugar effect, applying a base color is a great idea. This color will show through the glitter and add depth.
- Apply one or two thin coats of your chosen nail polish color.
- Let each coat dry completely. A fully dried base color prevents smudging when you apply the sticky layer.
Step 3: Create the “Sticky Layer”
This is where the magic happens! You need a sticky surface for the glitter to adhere to. The easiest way is by using a top coat or a specific sticky base coat.
- Apply one thin, even coat of clear nail polish, top coat, or a dedicated sticky base coat over the entire nail.
- Crucial Tip: Do NOT let this layer dry completely! You want it to be tacky. If it dries too much, the glitter won’t stick properly.
Step 4: Apply the Glitter
Now for the fun part – adding the sparkle!
- Method 1 (Dipping): While the sticky layer is still wet, carefully dip your nail directly into a pot of fine glitter or pour glitter onto a clean surface and dip your wet nail into it. Gently press the glitter onto the nail to ensure good adhesion.
- Method 2 (Dusting): Use your brush or applicator to gently “dust” or sprinkle the glitter onto the sticky nail surface. Work in sections if needed to ensure full coverage. You can tap gently to help the glitter settle.
- Ensure the entire nail is covered in glitter. You can add more glitter if needed, but a light hand usually works best for a smooth “sugar” effect.
Step 5: Remove Excess Glitter
Once your nail is coated, it’s time to clean up.
- Gently tap the side of your finger to shake off any loose glitter.
- Use your fluffy brush to lightly sweep away any excess glitter from around your cuticle and fingertips. Do this gently so you don’t disturb the glitter on the nail itself.
Step 6: Seal the Deal (Optional but Recommended)
To protect your beautiful sugar effect and create a smoother finish (if desired), you’ll want to seal it.
- For a Textured Finish: Apply a thin layer of glitter-specific top coat or a thin layer of clear nail polish. Be careful not to drag the glitter! Sometimes applying it in one careful stroke helps. This preserves the textured feel.
- For a Smoother Finish: Apply a generous, but not excessive, layer of a good quality top coat. You might need two coats for a truly smooth, encapsulated finish. Allow each coat to dry thoroughly.
Step 7: Let It Dry
Be patient! Allow your nails to dry completely. Sugar nails often take a little longer to fully harden, especially if you’ve applied multiple layers or a thicker top coat to smooth them out. Avoid touching anything for at least 15-20 minutes, and ideally, give them an hour to set properly.
Tips for Different Sugar Nail Effects
The basic sugar nail technique is incredibly versatile. You can achieve a wide range of looks by playing with different materials and application methods. Here are some ideas to get you inspired:
Ombre Sugar Nails
Create a beautiful gradient effect by using multiple shades of glitter. Start with one color at the tip and gradually introduce a second color towards the cuticle, blending lightly where they meet.
Accent Nail Sparkle
If a full glitter nail isn’t your style, apply the sugar effect to just one or two accent nails. This provides a chic pop of sparkle that complements a solid polish color.
Holographic/Iridescent Finishes
For an ethereal shine, use holographic or iridescent pigment powders instead of traditional glitter. These catch the light in rainbow hues and look absolutely magical.
Chunky Glitter vs. Fine Glitter
- Fine Glitter: This gives the classic “sugar” effect, providing full coverage with a textured feel. It’s the easiest for beginners to work with.
- Chunky Glitter: This creates a more pronounced, textured surface. You might need to use more top coat to encapsulate it for a smoother finish and to prevent snags.
Common Issues and How to Fix Them
Even with the best intentions, sometimes things don’t go perfectly. Here are a few common problems and their easy fixes:
Problem: Glitter Isn’t Sticking
Cause: Your sticky layer dried too much before you applied the glitter, or your base polish/top coat wasn’t tacky enough.
Fix: Ensure your sticky layer is truly tacky. If it seems dry, add another thin layer of top coat and work quickly. Make sure you’re using a polish that remains tacky for a while – some quick-dry formulas can be problematic.
Problem: Uneven Glitter Coverage
Cause: Not enough glitter applied, or applied unevenly.
Fix: Apply more glitter while the sticky layer is still wet. For dusting, try applying glitter in thin layers with your brush, building up coverage slowly. For dipping, ensure the entire nail surface is covered in the sticky layer before dipping.
Problem: Glitter is Catching or Snagging
Cause: Chunky glitter pieces are sticking out, or the top coat didn’t fully encapsulate the glitter.
Fix: Apply an extra coat or two of top coat, making sure to cap the free edge of your nail well. For very textured glitter, you might need to carefully file down any sharp edges (gently!) before applying the final top coat. A good, thick top coat is essential for smoothing.
Problem: Top Coat Smudging the Glitter
Cause: Applying the top coat too aggressively, or the glitter layer underneath wasn’t fully dry.
Fix: Apply the top coat in one or two careful strokes, without going back and forth. Let the glitter adhere for at least a few minutes before applying the top coat if you’re worried about smudging. A thinner top coat might work better for the first sealing layer.
Maintaining Your Sugar Nails
To keep your sparkling sugar nails looking fabulous for as long as possible, a little bit of care goes a long way. Treat them gently!
- Be Gentle: Avoid using your nails as tools to open cans, scrape things, or pry.
- Moisturize: Keep your cuticles and hands moisturized. Dry, brittle cuticles can affect the surrounding nail polish.
- Wear Gloves: When doing household chores, especially those involving water or harsh chemicals, wear rubber gloves to protect your manicure.
- Touch-Ups: If you notice any chips or loose glitter, you can often do a quick touch-up by applying a bit more top coat and a sprinkle of matching glitter.
Sugar Nails vs. Other Glitter Techniques
While “sugar nails” generally refers to the textured glitter effect, it’s helpful to understand how it compares to other popular nail glitter techniques:
| Technique | Description | Texture | Finish | Best For |
|---|---|---|---|---|
| Sugar Nails | Applying fine glitter or pigment powder onto a sticky base (polish/top coat) | Textured (like sugar) | Sparkly, matte or glossy (depending on top coat) | Overall sparkle, textured effect, easy DIY |
| Glitter Polish | Nail polish with glitter suspended within it | Smooth (glitter is encapsulated) | Glossy, sparkly | Quick, simple glitter application; less texture |
| Loose Glitter Application (Encapsulated) | Applying loose glitter and then fully encapsulating it with gel or acrylic for a smooth, 3D effect | Smooth (after encapsulation) | Highly glossy, dimensional sparkle | Professional-looking, durable, smooth finish; requires gel/acrylic skills |
| Glitter Ombre/Gradient (using loose glitter) | Applying loose glitter strategically to create a gradient | Textured (can be smoothed with top coat) | Sparkly gradient | Artistic glitter placement; can be done with polish or gel |
As you can see, the “sugar nail” method is distinct because of its raw, textured application that gives it that signature grainy feel, very similar to granulated sugar crystals. While other methods can achieve glitter effects, the sugar nail technique is prized for its unique tactile element and ease of application for a DIY look.
Frequently Asked Questions (FAQ)
Q1: Can I use regular craft glitter for sugar nails?
A1: While you can, it’s not ideal. Craft glitter is often larger and can have sharper edges, making it feel rough and prone to snagging. Nail-specific glitter is finely milled and designed to adhere better and feel smoother. If you do use craft glitter, opt for the finest grain you can find.
Q2: How do I make my sugar nails look smoother if I don’t like the texture?
A2: You can achieve a smoother finish by applying extra layers of a good quality top coat. Make sure each layer dries thoroughly, and focus on “capping” the free edge of your nail with the top coat to seal everything in. For a very smooth finish, consider using builder gel or acrylic to encapsulate the glitter, though this is more advanced.
Q3: Can I do sugar nails with gel polish?
A3: Yes! The process is similar, but you’ll use a gel top coat as your sticky layer. Apply your gel color, cure it, then apply a thin layer of gel top coat (don’t cure this layer). Apply your glitter, cure the glitter-coated nail, and then apply a final gel top coat (and cure again) to seal. Curing under a UV/LED lamp helps set the gel, making the application slightly more durable.
Q4: How long do sugar nails typically last?
A4: With proper application and care, sugar nails can last anywhere from 5 days to two weeks. The durability depends on the quality of your products, how well you prepped your nails, and how gently you treat them. Using a good top coat is crucial for longevity.
Q5: Can I combine sugar nails with regular nail polish?
A5: Absolutely! This is a popular way to wear the trend. You can apply regular polish to some nails and create the sugar effect on accent nails, or even create a sugar ombre effect transitioning from polished to glittered. Just ensure the regular polish is fully dry before proceeding with the sticky layer and glitter application.
Q6: What are iridescent pigment powders?
A6: Iridescent pigment powders are finely milled powders that shift colors depending on the light and angle. Unlike glitter, they don’t have distinct particles but rather create a shimmering, pearlescent effect. They are applied similarly to fine glitter and can give a beautiful, ethereal sugar-like sheen.
Conclusion
There you have it – your complete guide to rocking stunning sugar nails! We’ve covered what they are, why they’re so fantastic, and exactly how to create them at home with simple steps and readily available supplies. You’ve learned how to prep your nails, apply that essential sticky layer, get the perfect glitter coverage, and seal the deal for a long-lasting sparkle.
Remember, the beauty of the sugar nail technique is its forgiving nature and incredible versatility. Don’t be afraid to experiment with different colors, glitter sizes, and even create ombre effects. Whether you go for a full dazzling effect or a subtle accent nail, your sugar-kissed manicure is sure to bring a smile to your face and a sparkle to your day. So grab your glitter, embrace the fun, and get ready to enjoy your most dazzling nails yet!


