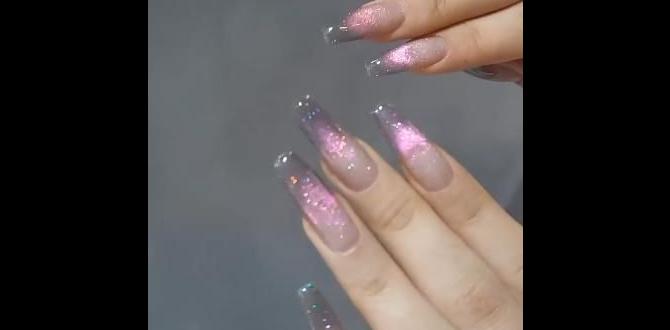
Get sparkling, textured sugar effect nails at home! This easy DIY guide shows beginners how to create stunning, eye-catching manicures using simple tools and techniques. Achieve that gorgeous, granulated sparkle for a truly unique look that’s both professional and fun.
Ever seen nails that look like they’re sparkling with fine sugar crystals? Maybe you’ve scrolled through Instagram or seen them on a friend and thought, “Wow, how did they do that?” It’s the incredible “sugar effect nail design,” and it’s easier to achieve than you might think! For anyone new to nail art, this trendy look can seem intimidating, but don’t worry. We’re here to break it down into simple, fun steps. Get ready to transform your nails into dazzling works of art without needing to be a pro. Let’s dive into creating that essential, stunning sugar effect!
What You’ll Need: Your Sugar Effect Nail Design Toolkit
Before we start sprinkling, let’s gather our supplies! Having the right tools makes all the difference for a smooth and beautiful sugar effect nail design. Think of it like baking – you need your ingredients and utensils ready. Don’t worry if you don’t have everything right away; many of these are staples for any nail lover.
Essential Nail Polish & Base Coats
- Base Coat: This protects your natural nails and helps polish adhere better.
- Colored Nail Polish: Your choice of color for the base of your design.
- Top Coat: Crucial for sealing and adding shine (and sometimes for adhering the ‘sugar’ if you’re not using glitter). We’ll discuss a few techniques!
The “Sugar” Elements: Your Sparkle Source
- Fine Glitter: This is your primary ingredient! Look for cosmetic-grade, fine-grain glitter. It mimics the look of sugar best. You can find these at most beauty supply stores or online.
- Sugar-Like Powders: Some brands offer specialized powders that give a true sugar-like texture. These can be holographic, iridescent, or simply have a matte granular finish.
- Iridescent Flakes/Powder: While not strictly “sugar,” these can create a similar shimmering, textured effect that’s stunning.
Application Tools
- Small Bowl or Palette: To hold your glitter or powder.
- Fan Brush or Small Brush: For gently dusting on glitter or powder. A fluffy makeup brush can also work in a pinch!
- Tweezers: Handy for picking up larger flakes if you’re going for a more complex texture.
- Cuticle Pusher & Nail File: For preparing your nails for a flawless finish.
- Rubbing Alcohol or Nail Polish Remover: For cleaning up mistakes and prepping the nail.
Step-by-Step: Creating Your Stunning Sugar Effect Nails
Creating a sugar effect nail design is all about layering and precision. We’ll walk through the most popular and beginner-friendly methods. Each technique leads to that coveted textured sparkle!
Method 1: The Classic Glitter Sprinkle (Easiest!)
This method is fantastic for beginners and gives a beautiful, textured glitter look that closely resembles sugar. It’s quick, easy, and looks super professional.
- Prep Your Nails: Start by cleaning your nails. Push back your cuticles and gently file them into your desired shape. Make sure they are free of oils and old polish.
- Apply Base Coat: Paint one thin layer of your chosen base coat and let it dry completely.
- Apply Your Color: Apply one or two thin coats of your colored nail polish. Let the second coat dry until it’s just slightly tacky – not fully dry! This is key for the glitter to adhere.
- Sprinkle the Glitter: Pour a generous amount of your fine glitter or sugar-like powder onto a small dish or piece of paper. Holding your nail over the dish, gently sprinkle the glitter over the tacky polish. You can use a fan brush to lightly press it down or just tap your finger to release the glitter. For maximum sparkle, ensure you cover the entire nail surface.
- Repeat if Necessary: If you want a denser effect, you can apply another layer of clear polish (or the same color if it’s still slightly soft) and then sprinkle more glitter.
- Seal the Sparkle: Once the glitter is applied and you’re happy with the coverage, wait a few minutes for the colored polish to firm up slightly. Then, carefully and gently apply a top coat. The trick here is to be very gentle so you don’t disturb the glitter too much. A thicker, glossy top coat works best to encapsulate the glitter and create a smooth finish over the texture. Apply two coats of top coat if needed to build up a smooth surface over the texture.
- Clean Up: Use a small brush dipped in rubbing alcohol or nail polish remover to carefully clean up any stray glitter around your cuticle and fingertips.
Method 2: The Glitter Dip (For More Control)
This technique offers a bit more control over glitter placement and can achieve a very uniform, dense sparkle.
- Prep and Base: Follow steps 1-3 from Method 1: prep nails, apply base coat, and apply colored polish, letting the second coat dry to a tacky state.
- Pour Glitter into a Dish: Pour a larger amount of fine glitter into a shallow bowl or dish.
- Dip and Press: Carefully dip your tacky nail directly into the glitter dish. Make sure the entire nail surface is covered. Gently press the glitter into the polish with your fingertip or a clean brush to ensure good adhesion.
- Tap Off Excess: Lightly tap your finger or brush off any excess glitter.
- Apply Clear Polish/Top Coat: Apply a layer of clear nail polish or a good quality top coat over the glitter. This will adhere the glitter to the nail.
- Second Glitter Application (Optional): For an even more intense sugar effect, wait for the clear polish to become slightly tacky, then dip again or sprinkle more glitter.
- Seal It In: Apply a final top coat. Again, be gentle! You might need 2-3 layers of top coat to create a smooth surface that covers the textured glitter. Let each layer dry adequately between applications.
- Clean Up: As before, use a brush with alcohol to tidy up the edges.
Method 3: Sugar Effect with Gel Polish (For Longevity)
This method uses gel polish and a UV/LED lamp for a longer-lasting manicure. The process is similar, but curing under a lamp is vital.
- Prep and Base Gel: Prep your nails as usual. Apply a gel base coat and cure it under your UV/LED lamp according to the manufacturer’s instructions.
- Apply Color Gel: Apply your colored gel polish. Cure it under the lamp. Apply a second coat if desired and cure again.
- Apply Top Coat (Non-Wipe): Apply a non-wipe gel top coat. Cure it under the lamp. This creates a sticky surface for the glitter to adhere to. If you only have a regular wipe top coat, cure it, then gently wipe away the inhibition layer with isopropyl alcohol.
- Sprinkle or Dip: While the non-wipe top coat is still tacky (or after wiping), sprinkle your fine glitter or sugar powder onto the nail, or dip the nail into the glitter. Gently press to adhere.
- Apply Gel Top Coat: Apply another layer of gel top coat over the glitter. Make sure to completely cap the edges of your nail. Cure this final layer under the lamp. You might need two layers of gel top coat to achieve a smooth finish, curing each layer separately.
- Clean Up: Wipe away any excess glitter around the cuticle with a lint-free wipe and alcohol.
Tips for a Flawless Sugar Effect Nail Design
Achieving that perfect sugar effect is all about the details. Here are some pro tips to make your DIY manicure shine:
- Glitter Size Matters: For a true sugar effect, fine-grain glitter is your best friend. Chunky glitter will look… well, chunky, not sugary!
- Tacky Surface is Key: Whether you’re using regular polish or gel, a slightly tacky surface is what helps the glitter grip. Don’t let regular polish dry completely before applying glitter.
- Gentle Top Coating: This is where many beginners struggle. Apply top coat in thin, even layers, and use a gentle brush stroke. Avoid the urge to scrub the polish on. A good quality, slightly thicker top coat can help smooth over texture effectively.
- Layer Your Top Coat: Don’t be afraid to apply 2-3 thin layers of top coat, allowing each to dry. This builds up a smooth surface and truly seals in the glitter, preventing snagging.
- Clean Edges for a Professional Look: Always clean up glitter or polish smudges around your cuticles. A fine brush dipped in nail polish remover or alcohol is perfect for this.
- Experiment with Colors: Don’t limit yourself to clear glitter! Try colored glitters, holographic glitters, or even metallic powders over different base colors for endless possibilities.
- Consider the Finish: Do you want a super glossy finish, or a more matte, sugar-like texture? You can achieve a matte finish by using a matte top coat as your final layer.
Comparing Base Colors and Glitter Combinations
The magic of the sugar effect nail design lies in how the base color interacts with the glitter or powder. Here’s a quick look at some popular and stunning combinations:
| Base Color | Glitter/Powder Suggestion | Effect |
|---|---|---|
| Classic White/Cream | Fine silver, iridescent, or holographic glitter | Sparkling confection, like sugared almonds or delicate icing. Very elegant and versatile. |
| Soft Pastels (Pink, Blue, Lilac) | Matching pastel glitter, iridescent flakes, or fine holographic glitter | Sweet and whimsical, perfect for spring or a romantic look. Imagine pastel candies. |
| Deep Jewel Tones (Emerald, Sapphire, Ruby) | Gold, silver, or iridescent glitter; sometimes matching tone glitter | Luxurious and sophisticated. The glitter catches the light beautifully, adding depth. Think of precious gemstones dusted with frost. |
| Black or Deep Navy | Silver, holographic, or any color shimmer; crushed foil for metallic sugar | Edgy and glamorous. Creates a dramatic contrast, like a starry night or dark chocolate with sprinkles. |
| Nude or Beige | Champagne, rose gold, or subtle iridescent glitter | Understated elegance. Perfect for a ‘no-makeup’ makeup look for nails, adding just a hint of shimmer and texture for everyday wear. |
| Metallic Foils (Gold, Silver, Rose Gold) | Clear glitter, iridescent powder | Ultra-modern and bold. Creates a high-impact, futuristic sugar effect. |
The Science Behind Nail Adhesion and Durability
Ever wonder why certain nail techniques last longer than others? It’s a bit of chemistry and material science at play! Understanding these principles can help you achieve longer-lasting and more beautiful sugar effect nail designs.
Polymerization: Nail polish, especially gel polish, hardens through a process called polymerization. In traditional nail polish, this is an oxidative process where solvents evaporate, causing the polymer chains to link. For gel polish, this requires UV or LED light to initiate and accelerate the linking of monomers and oligomers into a solid, durable network. The effectiveness of your top coat in sealing the glitter directly depends on its ability to form a strong polymer matrix.
Surface Adhesion: For any polish or design to last, it needs to adhere well to the nail surface. Proper nail prep—cleaning, filing (creating a slightly rough surface for polish to grip), and using a good base coat—is crucial. A base coat creates a barrier, prevents staining, and provides a foundation for subsequent layers to bond to. The slightly tacky surface we aim for with regular polish is a direct indicator that the base layer is ready to form a strong bond with the glitter and subsequent top layers.
Intended Use of Glitters: When choosing your glitter, ensure it’s cosmetic-grade. These glitters are formulated to be safe for skin and nails and have particle shapes that adhere well. Some craft glitters can be sharp or contain materials that might degrade or react with nail polish chemicals, potentially affecting both the look and the health of your nails. You can learn more about nail product safety and ingredients from organizations like the U.S. Food and Drug Administration (FDA), which regulates cosmetics.
Frequently Asked Questions About Sugar Effect Nail Designs
Here are some common questions beginners have about creating this beautiful nail design:
Q1: Can I use regular craft glitter for sugar effect nails?
A1: It’s best to use cosmetic-grade or nail-art specific glitter. Craft glitter can sometimes have rough edges that snag, or it might contain materials that aren’t safe for prolonged contact with skin and nails. Cosmetic glitters are designed to be smooth and safe.
Q2: How do I prevent my sugar effect nails from feeling too rough?
A2: The key is to apply enough top coat! You might need two or even three thin layers of a good quality, glossy top coat. Ensure each layer dries properly and gently smooths over the texture. A matte top coat can also give a lovely textured finish without the shine.
Q3: My glitter keeps falling off. What am I doing wrong?
A3: Make sure your base color is still slightly tacky when you apply the glitter. If it’s too dry, the glitter won’t adhere properly. Also, ensure you seal it well with a good top coat and consider applying multiple layers to encapsulate the glitter fully.
Q4: Can I do glitter ombre sugar effect?
A4: Absolutely! Apply your base color, and then lightly tap or sprinkle glitter onto the tips or a specific area of the nail while the polish is still tacky. You can build up the density of the glitter towards the tip for a beautiful gradient effect. You might need to use a brush to blend the edges softly.
Q5: What is “non-wipe” gel top coat?
A5: A non-wipe gel top coat cures under a UV/LED lamp without leaving a sticky residue (called an inhibition layer). This tacky surface is perfect for adhering glitter, powders, or chrome pigments directly, making the application process simpler for certain designs.
Q6: How long does a sugar effect nail design typically last?
A6: With regular nail polish, you can expect it to last 3-7 days, depending on your daily activities and how well it was sealed. If you use gel polish and a proper curing process, your sugar effect nails can last 2-3 weeks.
Conclusion: Your Sparkle Journey Awaits!
And there you have it! Creating a stunning sugar effect nail design is totally achievable, even for nail art beginners. We’ve covered the essential tools, the step-by-step methods for both regular and gel polish, and even shared some pro tips to ensure your manicure is flawless. Remember, the most important ingredients are your creativity and patience. Don’t be afraid to experiment with different colors, glitters, and techniques. Each attempt is a chance to refine your skills and express your unique style. So grab your favorite polish and glitter, and get ready to dazzle with nails that truly sparkle!


