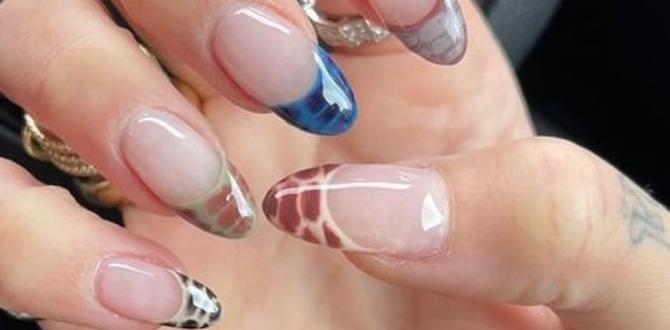
Transform your nails into miniature works of art with stone nail designs! These stunning looks mimic natural stone textures, offering an effortless yet elegant beauty that’s surprisingly easy to achieve at home. Learn simple techniques to create sophisticated marble, agate, and geode effects that will elevate your manicure game.
Nails can be your canvas for self-expression, and “stone nail designs” are a fantastic way to add a touch of natural elegance. Ever admired those chic, marbled nails or the captivating depth of agate patterns and wished you could recreate them? You’re not alone! Many of us feel intimidated by intricate nail art, thinking it requires professional skills. But the truth is, creating beautiful stone-inspired designs is more accessible than you might think, even for beginners. Forget complicated tools and advanced techniques; we’re diving into simple methods that deliver sophisticated results. Let’s unlock the secret to effortlessly beautiful stone nails that will have everyone asking, “Where did you get those done?” Get ready to discover your inner nail artist!
Unleash Your Inner Artist: The Allure of Stone Nail Designs
Stone nail designs are incredibly popular for a reason. They offer a sophisticated, natural, and luxurious feel that’s hard to beat. Think about the beauty of marble countertops, the rich veins of agate, or the sparkling facets of geodes – translating these natural wonders onto your nails is a truly captivating experience. These designs aren’t just trendy; they’re timeless, adding an element of refined artistry to any look. Whether you prefer the subtle elegance of a single accent nail or a full set of stone-inspired masterpieces, there’s a design to suit every style and occasion.
Why Stone Designs?
Natural Beauty: They mimic the organic patterns and textures found in nature, offering a unique and sophisticated aesthetic.
Versatility: Stone designs can be adapted to suit any color palette, from classic black and white marble to vibrant, colorful agate.
Sophistication: They lend an air of elegance and luxury to your manicure, making your hands look polished and chic.
Beginner-Friendly: Many popular stone effects are surprisingly easy to achieve with simple techniques.
Endless Creativity: The possibilities are virtually limitless, allowing for endless personalization and artistic expression.
Getting Started: Your Stone Nail Design Toolkit
Before we dive into the techniques, let’s gather the essential tools. Don’t worry; you probably have most of these already, or they are easy to find at your local beauty supply store or online.
Essential Tools for Stone Nail Designs
Having the right tools makes all the difference when creating your stone nail designs. Here’s what you’ll need:
- Nail Polish: Your base colors and white/black for marbling.
- Top Coat: Essential for sealing your design and adding shine.
- Base Coat: Protects your natural nails and helps polish adhere better.
- Thin Nail Art Brush or Toothpick: For drawing fine lines and creating veins.
- Sponge (Makeup Sponge or Nail Art Sponge): For creating textured, diffused effects.
- Small Cup or Palette: To mix colors or create marbling effects.
- Rubbing Alcohol or Nail Polish Remover: To clean up mistakes and thin polish.
- Clean-up Brush: An angled brush dedicated to cleaning up polish around the cuticles.
- Optional: Glitter Polish or Foils: For adding extra sparkle and dimension.
Understanding Nail Polish Formulas
The type of nail polish you use can impact the final look. While regular nail polish works well, gel polish offers a durable, long-lasting finish, perfect for intricate designs that need to stay flawless. If you’re using regular polish, work quickly as it dries faster. For gel, you’ll need a UV/LED lamp to cure each layer.
When creating stone effects, a slightly thicker polish can sometimes yield better marbling results, as it doesn’t spread too thinly too quickly. However, you don’t want it so thick that it’s unworkable. A good rule of thumb is to find a balance.
Technique 1: The Classic Marble Nail Design (Easy!)
Marble is perhaps the most iconic stone nail design. It’s elegant, chic, and surprisingly simple to achieve with just a couple of colors and a brush or toothpick.
Step-by-Step Marble Magic:
- Prep Your Nails: Start with clean, dry nails. Apply a base coat and let it dry completely. This protects your nails and ensures a smooth canvas.
- Apply Base Color: Paint your nails with your desired base color. This could be white, black, nude, or even a soft pastel. Apply one or two coats for full opacity. Let it dry completely.
- Create the Veins: Dip your thin nail art brush or a toothpick into a contrasting color (like black or dark gray for a white base, or white for a dark base). With a light hand, draw thin, irregular lines across your nail. Don’t make them perfectly straight; natural veins have variations. You can make them wispy, bolder, or even create little branching patterns.
- Soften the Lines (Optional but Recommended): While the contrasting lines are still wet, you can gently drag a toothpick through them in a single, wavy motion to slightly blur and blend them, giving a more natural, organic look. Be careful not to over-blend, or you’ll lose the definition.
- Add More Detail (Optional): For a more complex look, you can add a few thinner lines in a slightly different shade or use a metallic polish (like gold or silver) for added luxury.
- Seal the Deal: Once the design is completely dry (this is crucial!), apply a generous layer of top coat. Make sure to cap the free edge of your nail by running the brush along the tip.
- Clean Up: Use your clean-up brush dipped in nail polish remover to tidy up any polish that got onto your skin or cuticles.
Pro Tip: For a more diffused marble effect, you can skip the brush/toothpick entirely and instead dab a small amount of contrasting polish onto a piece of foil or a palette, pick up a tiny bit with a damp (with alcohol or remover) nail art brush, and gently tap it onto the nail. This creates a softer, blended look.
Technique 2: The Sponged Stone Effect (Textured & Trendy)
This technique uses a sponge to create a more textured and diffused stone appearance, similar to natural rock formations. It’s fantastic for achieving a granite or subtle marble look.
Step-by-Step Sponged Stone:
- Prep: Apply base coat and your chosen base color. Let it dry completely matte or slightly tacky.
- Prepare Your Palette: Put small dots of 2-3 complementary colors onto a piece of foil or a clean palette. A base color, black or dark gray, and maybe a lighter shade or metallic all look great.
- Sponge Application: Lightly dampen a small piece of a makeup sponge or a dedicated nail art sponge with water and squeeze out excess. This helps the polish transfer without absorbing too much.
- Apply Colors to Sponge: Gently tap the damp sponge onto the dots of polish on your palette. You want to pick up a mix of the colors, not saturate the sponge.
- Dab onto Nails: Lightly and randomly dab the sponge onto your nails. You can press and lift, twist, or roll the sponge gently to create different textures. Don’t cover the entire nail in solid color; think of it as dappling.
- Build Layers: You can repeat steps 4 and 5, picking up different color combinations or applying more pressure in certain areas to build depth and create the illusion of natural striations.
- Add Details (Optional): Once you’re happy with the sponged texture, you can use a thin brush or toothpick to add a few fine veins in black or white, just as in the marble technique, to enhance the stone effect.
- Seal: Apply a top coat once the sponged layers are dry.
- Clean Up: Tidy up any stray polish with your clean-up brush.
Tip: Using a slightly alcohol-dampened sponge can help create more of a blended “water color” effect, while a dry sponge will give a more defined dappled look.
Technique 3: Agate & Geode Nails (Sparkling Sophistication)
Agate and geode nails are all about capturing the mesmerizing patterns and inner sparkle of these natural crystals. They often involve layering colors, adding glitter, and creating depth.
Step-by-Step Agate/Geode Glam:
- Base and Layers: Apply your base coat and a desired base color. For agate, think blues, greens, purples, or earthy tones. For geodes, white or black can be a good base to make glitter pop.
- Create the “Crystal” Edges: Using a thin brush and a lighter or metallic polish (gold, silver, rose gold), paint a rough outline around a portion of your nail or create branching lines. This will mimic the crystal formation.
- Build the Agate Bands: Dip your brush into a slightly darker, complementary color. Apply it next to the metallic or lighter lines, letting it bleed slightly. Use a dabbing or swirling motion. Then, add another slightly darker shade next to that, blending the edges where they meet. You want to create ribbon-like bands of color.
- Add Depth with Glitter/Foil: While the colors are still wet (or if using gel, cure and then use art gel), carefully press fine glitter or a small piece of foil into specific areas, especially where different color bands meet or along the “crystal” edges. This mimics the sparkle of natural agate or geodes.
- Refine and Blend: Use a very fine brush with a little bit of darker polish to deepen some of the lines or add subtle shadow effects. You can also use a damp (with alcohol) brush to gently blend colors where needed.
- Seal the Sparkle: Apply several thin layers of top coat to smooth out the textured glitter and foil and seal everything in. A thicker, glossy top coat works exceptionally well here.
- Clean Up: Perfect your edges with your clean-up brush.
Resources for Inspiration: For stunning examples and further inspiration, explore resources like My Mini Mall’s Agate Nail Designs, which showcases a beautiful array of styles.
Mastering the Tools: A Deeper Dive
Let’s talk a bit more about how to make your tools work best for you.
Brushes: Your Vein-Drawing Powerhouse
Nail art brushes come in various sizes, but for stone designs, a thin liner brush (often labeled “liner” or “detailer”) with a length of about 5-7mm is ideal. The longer the bristles, the more fluid the line you can draw. For beginners, a stiff, short-bristled brush can also work by dabbing or flicking polish to create texture rather than drawing smooth lines. You can also find specialized marble brushes with splayed bristles, designed to create instant marbled patterns with a single swipe.
Sponges: Texture Masters
Makeup sponges are readily available and work perfectly. Cut them into small pieces (about half an inch) so you have more control and don’t waste product. Nail art sponges are also available and often come in various textures and shapes. Experimenting with a slightly damp versus dry sponge is key to understanding how it affects the polish application.
Toothpicks: The Budget-Friendly Wand
Don’t underestimate the humble toothpick! It’s a fantastic tool for beginners. You can use it to draw fine lines, swirl colors for marbling, or even pick up tiny pieces of glitter. Just be sure to use a fresh one for each nail or design element to avoid muddying your colors.
Frequently Asked Questions About Stone Nail Designs
Got questions? We’ve got answers!
Q1: Can I really do stone nail designs without special skills?
A: Absolutely! The techniques we’ve discussed, like simple marbling and sponging, are designed for beginners. With a little practice and patience, you’ll be creating beautiful stone looks in no time. The key is to embrace the imperfection; natural stones aren’t perfect!
Q2: What are the best polish colors for marble nails?
A: Classic white and black is a timeless choice, offering a dramatic contrast. Other popular combinations include:
- White base with gray or silver veins.
- Black base with white or gold veins.
- Nude or pastel pink base with white or rose gold veins.
- Dark blue or teal with white or gold veins.
Experimenting with different color pairings is part of the fun!
Q3: How do I get clean lines for my stone designs?
A: For clean lines, use a very thin nail art brush. Load just a tiny amount of polish onto the tip of the brush. Start with a light touch and practice drawing on a piece of paper first. For cleanup, a small, angled brush dipped in nail polish remover is your best friend for tidying up the edges.
Q4: My marble lines look too sharp and not natural. What did I do wrong?
A: This usually happens when the polish is too thin, or you’ve dragged the brush too firmly. Try using slightly thicker polish, and when you draw the lines, use a feather-light touch. If the lines dry too sharp, you can soften them by gently swirling a toothpick through them immediately* after drawing, or by dabbing over them lightly with a makeup sponge slightly dampened with alcohol.
Q5: Can I use regular nail polish for these techniques, or do I need gel?
A: You can absolutely use regular nail polish! For regular polish, you’ll need to work a bit faster as it dries quickly. The key is to let each layer dry completely before moving on. Gel polish offers added durability and a high-gloss finish, and it also gives you more “work time” before curing, which can be helpful for blending. If using gel, you’ll need a UV/LED lamp.
Q6: How can I make my stone nail designs last longer?
A: A good quality top coat is your best friend! Apply a thick, even layer of top coat and make sure to seal the free edge of your nails (the tip). Consider using a gel top coat if you’re using regular polish for a bit more durability, or a quick-dry top coat. Reapplying top coat every few days can also extend the life of your manicure.
Q7: What are some resources for learning more about nail art tools and techniques?
A: There are many fantastic resources online! Reputable sites like Nailpro offer in-depth guides on nail art tools. YouTube channels dedicated to nail art are also invaluable for visual learners, offering step-by-step tutorials and product reviews. You can also find design inspiration and advice on beauty blogs and Pinterest.
Beyond the Basics: Elevating Your Stone Designs
Once you’ve mastered the fundamental techniques, don’t be afraid to experiment!
Incorporating Glitter and Foils
Glitter isn’t just for holidays! Fine holographic glitter can add a stunning dimension to marble without making it look costume-y. For a geode effect, strategically placing larger glitter pieces or metallic foils can mimic the natural crystalline structure. Remember to use a glitter or foil adhesive if needed, and always seal with a generous top coat to ensure a smooth finish.
Color Play
Don’t limit yourself to monochrome. Try creating marble effects with vibrant colors like fuchsia and orange, or deep jewel tones like emerald and sapphire. Agate designs are perfect for showcasing a spectrum of colors. Think about the natural colors of precious stones like amethyst, turquoise, or rose quartz for inspiration.
Consider the undertones when choosing complementary colors. For instance, blues and purples often pair well together, as do greens and blues, or warm tones like pinks and oranges.
Finishing Touches: Matte vs. Glossy
The finish of your top coat can dramatically change the look of your stone design. A high-gloss top coat often enhances the depth and shine, making the colors pop and giving a luxurious feel. On the other hand, a matte top coat can give your nails a sophisticated, velvety texture that resembles natural stone even more closely. Try both and see which you prefer!
A Quick Look at Durability & Care
When your stone nail designs are done, a little care goes a long way.
Protecting Your Masterpiece
- Avoid Harsh Chemicals: Wear gloves when cleaning or doing chores that involve strong detergents or solvents, as these can break down the top coat and polish.
- Moisturize: Keep your hands and cuticles moisturized. Dry cuticles can lead to lifting at the base of the nail.
- Gentle Filing: If you need to file your nails, do so gently to avoid snagging or damaging the design.


