Stiletto French Nails 2025: Essential Glam for a Fierce and Chic Look
Ready to elevate your nail game in 2025? Stiletto French nails blend the timeless elegance of the French manicure with the daring edge of a stiletto shape. This guide breaks down how to achieve this stunning look, perfect for adding a touch of glamour. Get ready for nails that are sure to turn heads!
—
Nail trends are always evolving, and in 2025, the stiletto French manicure is set to be a total showstopper. Perhaps you’ve seen these sharp, elegant nails on social media or celebrity red carpets and wondered, “Can I really achieve that myself?” It’s easy to feel a little intimidated by this chic look. But what if I told you that achieving that glamorous stiletto French nail isn’t as difficult as it seems? With a little patience and the right approach, you can totally rock this trend right at home. Forget those salon appointments that drain your wallet! We’re going to walk through everything you need to know, from getting the perfect shape to mastering the clean white tip. Get ready to feel fabulous and express your unique style with nails that are both sophisticated and strikingly modern.
This guide will cover everything you need to transform your nails into the must-have stiletto French style of 2025. We’ll explore the tools you’ll need, offer step-by-step instructions for both natural and artificial nails, and share some dazzling design ideas to make your manicure truly your own. Let’s dive in!
What Are Stiletto French Nails?
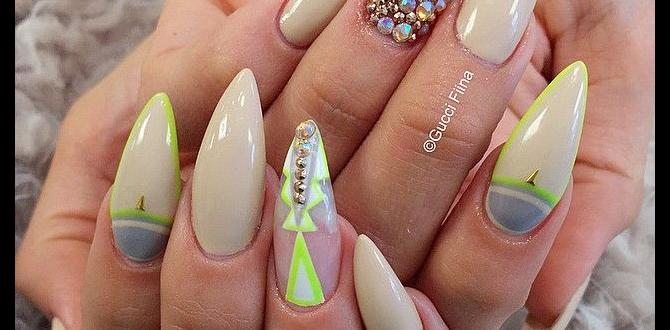
Imagine the classic French manicure – that clean, sophisticated look with a white tip. Now, picture that tip perched on a nail shaped like a stiletto heel – long, tapered, and coming to a sharp point. That’s the essence of stiletto French nails! It’s a bold fusion that takes the understated elegance of a French tip and injects it with a dose of modern drama and undeniable glamour. This style is all about making a statement, offering a sophisticated yet fierce silhouette that elongates the fingers and adds a powerful finishing touch to any outfit.
Why Stiletto French Nails for 2025?
In 2025, personal style is all about confident self-expression. Stiletto French nails perfectly capture this vibe by blending timeless class with a modern, edgy twist. They’re not just a trend; they’re a statement piece that says you’re chic, daring, and in control. This manicure offers:
- Sophistication: The French tip provides an air of classic refinement.
- Edge: The stiletto shape adds a contemporary, bold flair.
- Versatility: They can be dressed up for special occasions or worn to add a pop of glam to everyday wear.
- Elongation: The sharp, pointed shape naturally makes fingers appear longer and more slender.
This combination makes them an ideal choice for anyone looking to make a stylish impact. It’s the perfect way to embrace a look that’s both elegant and undeniably fierce.
Essential Tools and Supplies
To achieve those fabulous stiletto French nails, you’ll need a few key items. Don’t worry; most of these are standard nail care essentials! Having the right tools makes the process smoother and the results so much better.
For Shaping:
- Nail File (Medium Grit): For shaping the nails.
- Nail Clippers: To trim excess length if starting with longer natural nails.
- Glass Nail File (Optional but Recommended): For smoothing the edges and preventing snags, especially on natural nails.
- Cuticle Pusher/Orange Stick: To gently push back your cuticles for a clean canvas.
For the French Tip:
- Base Coat: To protect your natural nail and help polish adhere.
- Sheer Pink, Nude, or Milky White Polish: For the nail bed.
- White Nail Polish (Opaque): For the tip.
- Thin Nail Art Brush or French Manicure Tool: For precise tip application.
- Top Coat: To seal the design and add shine.
For Stiletto Shape (If Using Extensions/Tips):
- Nail Glue: To adhere artificial tips.
- Artificial Stiletto Nail Tips: Available in various sizes and lengths.
- Tip Cutter or Sharp Scissors: To trim artificial tips to the desired length before filing.
For a Flawless Finish:
- Rubbing Alcohol or Nail Polish Remover: For cleaning the nail surface.
- Lint-free Wipes: To avoid fuzzy residue.
- Cuticle Oil: To nourish and moisturize after your manicure.
How to Achieve Stiletto French Nails (Step-by-Step)
Ready to get started? We’ll cover how to do this on both natural nails and with the help of artificial tips, as the stiletto shape can be challenging to achieve on very long natural nails without breakage.
Method 1: On Natural Nails
This method works best if your natural nails are already quite strong and long. The key is gradual shaping to avoid weakening the nail.
- Prep Your Nails: Start by removing any old polish. Gently push back your cuticles with a cuticle pusher. If your nails are too long for the desired stiletto shape, trim them down slightly using clippers, leaving a little extra length to file.
- Shape the Stiletto: Using your medium-grit nail file, begin to carefully file the sides of your nails inward towards the center, creating a soft point. Work slowly and file in one direction to prevent splitting. Aim for a subtle taper rather than an immediate sharp point. Ensure both hands are symmetrical. Proper filing techniques are crucial here.
- Smooth and Clean: Gently buff the surface of your nails to create a smooth base. Wipe your nails with rubbing alcohol or nail polish remover on a lint-free wipe to remove any dust or oils.
- Apply Base Coat: Paint a thin layer of your base coat and let it dry completely.
- Color the Nail Bed: Apply one or two thin coats of your chosen sheer pink, nude, or milky white polish. Let each coat dry thoroughly. This creates a subtle, natural-looking base.
- Create the French Tip: This is where the magic happens!
- Option A (Freehand with a thin brush): Dip your thin nail art brush into the opaque white polish. Carefully paint a crisp smile line across the tip of your nail, tapering towards the sides to match your stiletto shape. Start from one side, curve it across the edge, and meet it on the other side.
- Option B (Using a French Manicure guide/tool): If you have a French tip applicator tool, follow its instructions. These tools often help create a cleaner line, though they might require a bit more practice to get the stiletto curve just right.
- Refine the Tip: If your line isn’t perfect, use a small brush dipped in nail polish remover to clean up any stray marks before the polish fully dries.
- Apply Top Coat: Once the white tips are completely dry, apply a generous layer of your favorite top coat. Make sure to cap the free edge (paint a little along the very tip of your nail) to help prevent chipping and add extra shine.
- Final Touches: Let your nails dry completely. Apply a drop of cuticle oil to each nail and massage it in.
Method 2: Using Artificial Stiletto Nail Tips
This method is excellent for achieving a dramatic stiletto shape and length, especially if your natural nails aren’t amenable to extreme shaping.
- Prepare Your Natural Nails: Gently push back your cuticles. Lightly buff the surface of your natural nails with a fine-grit file or buffer. This helps the glue and tips adhere better. Clean your nails with rubbing alcohol or nail polish remover and a lint-free wipe.
- Select and Trim Tips: Choose stiletto tips that fit your nail beds comfortably. You might need to try a few sizes. Once you have the right fit, use a tip cutter or sharp scissors to trim the tips to your desired length before applying them. This is much easier than filing down a long tip later.
- Apply Artificial Tips: Apply a small amount of nail glue to the back of the artificial tip (the part that will adhere to your natural nail). Press the tip firmly onto your natural nail, holding it in place for about 15-30 seconds until the glue sets. Ensure there are no air bubbles. Repeat for all nails.
- Shape the Stiletto: Once the glue is completely dry, use your medium-grit nail file to shape the artificial tips into perfect stiletto points. Work your way inward from the sides, creating a smooth taper. Ensure symmetry. Again, filing one direction is key.
- Apply Base Coat: Apply a thin layer of your base coat over the entire nail, including the artificial tip. Let it dry completely.
- Color the Nail Bed: Apply one to two coats of a sheer pink, nude, or milky white polish to the nail bed, extending almost to where the white tip will begin. Let each coat dry.
- Paint the White Tip: Using opaque white polish and a thin nail art brush or French tip tool, carefully paint the crisp white smile line at the tip of each stiletto nail. Aim for a clean, sharp curve that complements the stiletto shape.
- Clean Up Edges: Use a small brush dipped in nail polish remover to neaten any wobbly white tip lines before they dry.
- Seal with Top Coat: Apply a generous layer of top coat to add shine and protect your entire manicure. Cap the edges to enhance durability.
- Final Moisturizing: Allow nails to dry thoroughly. Apply cuticle oil and gently massage it into the skin around your nails.
Stiletto French Nail Design Ideas for 2025
While the classic white tip is timeless, 2025 is all about putting your personal spin on trends! Here are some dazzling design ideas to make your stiletto French nails truly unique:
The Classic with a Twist
- Pearlescent Tips: Instead of opaque white, opt for a pearlescent or shimmery white polish for the tips. This adds a subtle glow and extra dimension.
- Glitter Fade Tips: Apply a white tip, then gently blend a fine silver or iridescent glitter from the tip upwards for a touch of sparkle.
Color Play
- Black Stiletto French: Swap the white tip for a chic black polish against a nude or sheer base. This is incredibly sophisticated and edgy.
- Pastel Power: Use soft pastel shades (think lavender, mint green, baby blue) for the tips. This offers a fresh, modern take on the French.
- Bold Hues: Don’t shy away from vibrant colors! Emerald green, sapphire blue, or even a fiery red tip can make a stunning statement.
Embellishments and Accents
- Chrome Tips: Apply a white tip, then use a chrome powder for a metallic, futuristic finish.
- Accent Nail Glitter: Keep most nails classic stiletto French, but add a full glitter nail or a nail with intricate glitter details on one or two accent nails.
- Tiny Gems or Pearls: Place a small rhinestone or pearl at the cuticle line or at the apex of the smile line for a touch of luxury.
- Debossed Lines: Consider subtle debossed lines or textures near the tip for a high-fashion look.
Nail Bed Variations
- Subtle Shimmer Base: Use a sheer polish with a hint of fine glitter for the entire nail bed before applying the white tip.
- Milky White Base: A slightly opaque, milky white base can offer a soft, modern canvas.
When experimenting, remember that the stiletto shape itself is a statement. Sometimes, a simple, perfectly executed classic stiletto French is all you need!
Maintaining Your Stiletto French Nails
Keeping your gorgeous stiletto French nails looking pristine requires a little care. These tips will help prolong the life and beauty of your manicure:
- Wear Gloves: Protect your nails when doing household chores, especially washing dishes or cleaning.
- Avoid Using Nails as Tools: Don’t use your nails to scrape, pry, or open things. This is a sure way to cause chips or breaks.
- Moisturize: Keep your hands and cuticles hydrated with cuticle oil and hand cream. Dryness can weaken nails and make polish prone to chipping.
- Gentle Filing: If you experience any snagging or lifting, gently file in one direction to smooth the edge. Avoid harsh scrubbing.
- Refresh the Top Coat: Apply a fresh layer of top coat every 2-3 days to maintain shine and protection.
- Be Mindful of the Shape: The stiletto point is delicate. Be conscious of not snagging the tip on clothing or rough surfaces.
Regular maintenance ensures your stiletto French nails stay sharp and glamorous for as long as possible.
Troubleshooting Common Issues
Even with the best intentions, a few snags can happen. Here’s how to fix them:
Issue: Wobbly or Uneven White Tip
Solution: Don’t panic! Before the polish dries completely, use a small, clean brush (like a fine art brush or an old, clean makeup brush) dipped in nail polish remover to carefully clean up the edges of the white tip. For a fresh start, you can also wait for it to dry and gently buff it smooth with a fine buffer before reapplying more carefully.
Issue: White Tip Smudging
Solution: This usually happens if the white tip polish isn’t fully dry when you apply the top coat, or if you’re too rough with the top coat application. For the white tip, ensure it’s bone dry. When applying top coat, use a smooth, even stroke. If a smudge occurs, you might need to gently buff the area and reapply the white tip and top coat.
Issue: Natural Nail Breaking While Filing
Solution: This indicates your natural nails might not be strong enough for extreme stiletto shaping, or you’re being too aggressive. Slow down the filing process. Using a glass nail file can help prevent micro-tears. If a break occurs, it’s best to trim the nail down to a manageable length and consider using artificial tips for a while until your natural nails strengthen.
Issue: Artificial Tips Lifting or Air Bubbles
Solution: This usually stems from improper prep or application. Ensure your natural nail surface is clean and slightly buffed for adhesion. Apply the glue evenly to the tip and press firmly without moving it. If a tip lifts, it’s best to gently remove it, prep again, and reapply with fresh glue.
Issue: Uneven Length Between Nails
Solution: This is a common hurdle! It’s easiest to correct with a file. After applying tips or shaping natural nails, hold your hand under good light and compare lengths. Carefully file to even them out. Take breaks to look at your hands from different angles to ensure symmetry.
Remember, practice makes perfect! Each manicure session will help you refine your technique.
Stiletto French Nails: A Comparison
To help you decide which approach is best for you, here’s a quick comparison:
| Feature | Natural Nails | Artificial Tips/Extensions |
|---|---|---|
| Achieving Shape | Challenging; requires strong, long nails. Risk of breakage. | Easier; provides a strong base for desired shape and length. |
| Length Options | Limited by natural nail growth. | Highly customizable. |
| Durability | Can be prone to bending or breaking if nails are thin. | Generally more durable and less prone to breakage. |
| Application Time | Potentially longer if shaping is difficult. | Requires precise gluing and trimming, but shaping is faster. |
| Potential for Damage | Risk of thinning or weakening natural nails from filing. | Risk of damage to natural nail underneath if removed improperly. |
| Aesthetic | Can look very natural and delicate. | Can achieve more dramatic, salon-like results. |

