Sticker press on overlay nails offer a quick, easy, and beautiful way to achieve salon-worthy manicures at home, allowing for stunning nail art without the time commitment or cost. They are a genius, essential tool for busy individuals wanting gorgeous, customizable nails instantly.
Are you dreaming of gorgeous, statement nails but don’t have hours to spend at the salon or the patience for intricate DIY art? We totally get it! Sometimes life is just too busy for a traditional manicure. But what if you could get that flawless, stylish look in minutes, right at your own vanity? Enter sticker press on overlay nails – your new best friend for instant nail perfection. They’re a total game-changer, making beautiful, customizable nails accessible to everyone. Forget complicated techniques and expensive supplies; we’re about to unlock the secret to effortless, show-stopping nails.
What Exactly Are Sticker Press On Overlay Nails?
Let’s break down this amazing nail innovation. Sticker press on overlay nails are essentially pre-designed, thin adhesive nail wraps or decals that you apply to your natural nails. They are overlays, meaning they’re designed to be applied over your existing nail shape and length, giving them a professional and polished look. Think of them as a temporary tattoo for your nails, but far more durable and stylish! They come in an incredible variety of designs, from chic minimalist patterns to dazzling holographic finishes and intricate floral art. Unlike traditional press-on nails that can sometimes feel bulky, overlays are slim and flexible, allowing them to conform beautifully to your nail bed for a natural appearance.
Why Are They a Genius Essential?
So, why do we call them a “genius essential”? It’s simple! They tick all the boxes for busy beauty lovers:
Speed: Apply a full set in under 15 minutes. Yes, really!
Ease: No drying time, no smudging, and minimal skill required.
Variety: Access to countless designs you might not be able to create yourself.
Affordability: Significantly cheaper than salon manicures or even buying individual nail art supplies.
Damage-Free: When applied and removed correctly, they won’t harm your natural nails.
Customization: Mix and match designs, or even layer them for unique looks.
They empower you to switch up your nail game as often as you change your outfit, all while keeping your nails healthy and your wallet happy.
Getting Started: What You’ll Need
The beauty of sticker press on overlay nails is their simplicity. You really don’t need much to achieve salon-quality results. Here’s a quick rundown of the essentials:
Your Chosen Sticker Press On Overlay Nails: Naturally! Pick a design that speaks to you.
Nail File or Buffer: For shaping your natural nails and gently buffing the nail surface.
Cuticle Pusher: To gently push back your cuticles, creating a clean canvas.
Scissors or Nail Clippers: To trim the overlays to the perfect size.
Rubbing Alcohol or Nail Prep Dehydrator: To ensure your natural nails are clean and oil-free for optimal adhesion.
Tweezers (Optional but Recommended): For precise placement of the overlays.
Top Coat (Optional but Recommended): For added shine and longevity. Choose a good quality, chip-resistant top coat.
That’s it! You’re all set to transform your nails.
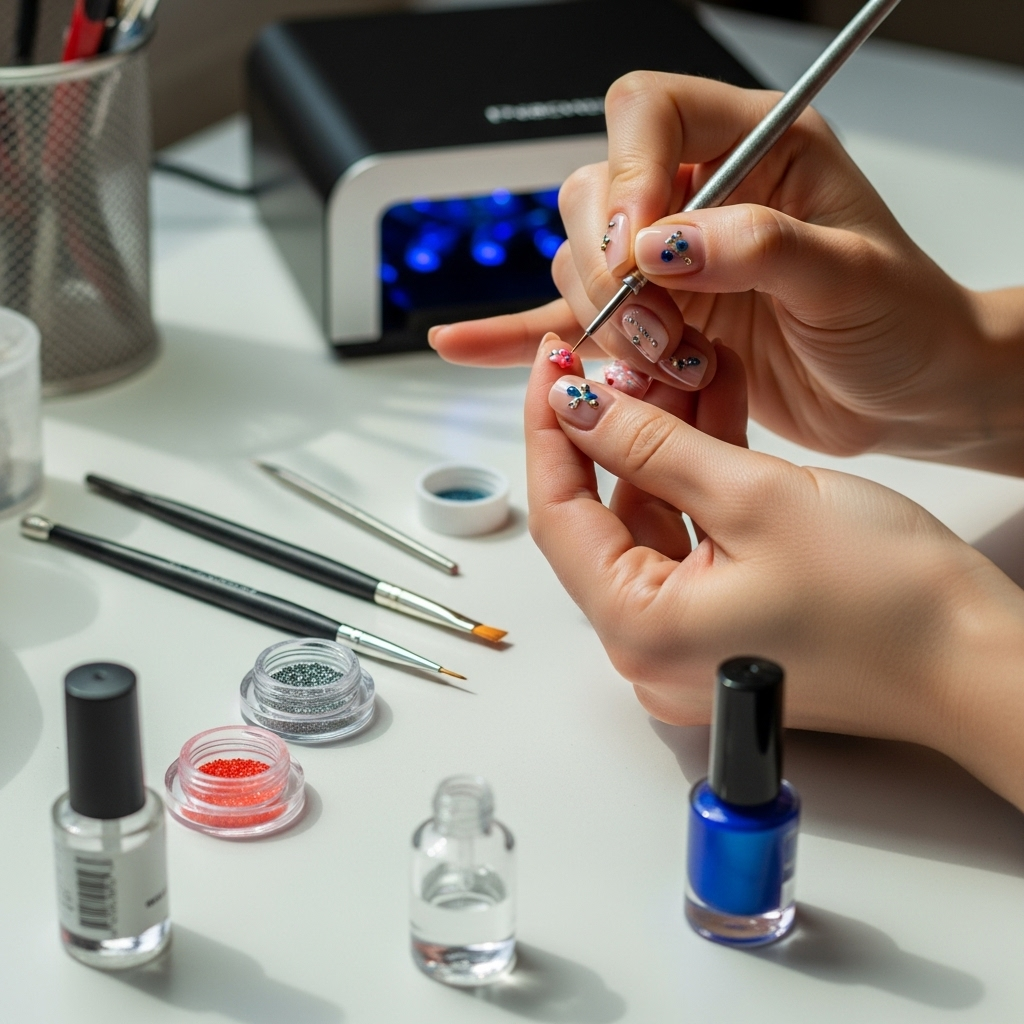
Step-by-Step Guide: Applying Your Sticker Press On Overlay Nails
Ready to dive in? Follow these simple steps for a flawless application that will last.
Step 1: Prep Your Canvas
This is the most crucial step for ensuring your overlays last and look their best.
Clean Your Nails: Remove any old nail polish or product.
Shape Your Nails: File your natural nails to your desired shape and length. You want them to be smooth and even.
Push Back Cuticles: Gently push back your cuticles using a cuticle pusher. This creates a larger surface area for the overlay to adhere to and gives a more professional finish. Avoid cutting your cuticles unless you are very experienced, as this can lead to infection. The NailCarePro guide to cuticle care offers excellent, safe techniques.
Buff the Surface: Lightly buff the surface of your natural nails with a fine-grit buffer. This removes any natural oils and creates a slightly rough surface that helps the adhesive stick.
Cleanse and Dehydrate: Wipe each nail with rubbing alcohol or a nail prep dehydrator. Let it dry completely. This removes any remaining dust or oils.
Step 2: Select and Size Your Overlays
Most overlay kits come with multiple sizes.
Find Your Match: Lay out the overlays and find the size that best fits each of your natural nails. You want the overlay to cover your nail from sidewall to sidewall without going onto your skin or cuticle area.
Trim if Necessary: If you find an overlay that’s almost perfect but slightly too long, you can gently trim it with scissors to fit your nail length.
Step 3: Peel and Apply
This is where the magic happens!
Peel Carefully: Gently peel the desired overlay from its backing. Use tweezers if it helps with precision. Try not to touch the adhesive side.
Position: Starting at the cuticle end, carefully place the overlay onto your nail.
Smooth and Press: Gently smooth the overlay down, working from the cuticle towards the free edge. Press firmly to ensure there are no air bubbles or creases. You want a smooth, seamless application.
Step 4: Fold and File
Now, we’ll refine the edges.
Fold Over: Carefully fold the excess overlay material over the free edge of your natural nail.
File Away Excess: Use a nail file to gently file away the excess material from the underside of your nail’s free edge. File in one direction (downwards) to create a clean, smooth line.
Step 5: Seal with Top Coat (Optional but Recommended)
This step adds shine and protects your beautiful new design.
Apply Thinly: Apply a thin, even layer of your favorite clear top coat over the entire overlay and your natural nail.
Cure if Needed: If you’re using a gel top coat, cure it under a UV/LED lamp according to the product instructions. Regular top coats will air dry.
Apply Second Coat (Optional): For extra durability and a high-gloss finish, you can apply a second thin layer of top coat after the first has dried or cured.
Congratulations! You’ve just applied your sticker press on overlay nails. Enjoy your stunning new manicure!
Pros and Cons: Sticker Press On Overlay Nails
Like any beauty product, sticker press on overlay nails have their advantages and disadvantages. Understanding these can help you make an informed decision about whether they’re right for you.
| Pros | Cons |
|---|---|
| Speed & Convenience: Apply in minutes, perfect for busy schedules. | Durability Varies: Longevity can depend on application quality and daily wear. |
| Cost-Effective: Much cheaper than salon manicures. | Design Limitations: While variety is vast, highly intricate or custom 3D art might be unavailable. |
| Damage-Free Removal: Can be removed gently without harming natural nails. | Potential for Bubbles/Creases: Requires careful application to avoid imperfections. |
| Huge Design Variety: Access to trends, art, and finishes easily. | May Not Fit All Nail Beds Perfectly: Some users may struggle to find the ideal size for every nail. |
| No Drying Time: Ready to go immediately after application (or curing if using gel top coat). | Can Lift if Not Cared For: Exposure to harsh chemicals or prolonged soaking can cause edges to lift. |
| Great for Special Occasions: Instant glamour for events. | Learning Curve for Application: While easy, mastering the perfect application might take a few tries. |
| Empowerment for Beginners: Allows anyone to create beautiful nail art. | Can Be Thinner Than Traditional Press-Ons: Some might prefer the feel of thicker, full-coverage press-on nails. |
Tips for Maximum Longevity and Shine
Want your sticker press on overlay nails to last as long as possible and look stunning the whole time? Here are some pro tips:
Perfect Prep is Key: We can’t stress this enough! Thoroughly cleaning and dehydrating your nails makes a huge difference in adhesion.
Smooth Application: Take your time to smooth out any air bubbles. Tiny bubbles can become weak spots. A helpful video tutorial on avoiding bubbles can be a lifesaver here (imagine a link to a reputable YouTube channel focused on nail tutorials).
Seal it Right: A good quality top coat, especially a gel top coat cured under a lamp, will add a protective layer that seals the overlay and adds incredible shine.
Avoid Water Immersion: Try to avoid long soaks in water, like prolonged baths or washing dishes without gloves. This can soften the adhesive and cause lifting.
Wear Gloves: When doing chores, gardening, or anything that involves harsh chemicals or prolonged hand contact with water, wear protective gloves.
Gentle on Your Nails: Avoid using your nails (or the overlay edges) as tools to open things or scrape. Treat them with care.
Filing Technique: When filing the excess overlay, always file downwards and in one direction. This creates a clean edge and prevents tearing.
Touch Ups: If you notice a tiny bit of lifting on an edge, sometimes dabbing a tiny bit of nail glue or a clear polish underneath can secure it.
Sticker Press On Overlays vs. Other Nail Options
How do sticker press on overlay nails stack up against other popular nail enhancements? Let’s take a quick look:
Sticker Press On Overlay Nails
Application Time: 5-15 minutes
Skill Level: Beginner
Cost: Low ($5-$20 per set)
Durability: 7-14 days (with proper care)
Nail Damage: Minimal to none (when removed correctly)
Design Options: Vast, trendy, and artistic
Best for: Quick style changes, temporary looks, budget-conscious users
Traditional Press-On Nails
Application Time: 10-20 minutes
Skill Level: Beginner
Cost: Varies ($10-$40+ per set)
Durability: 1-3 weeks (depending on adhesive and nail quality)
Nail Damage: Can vary; some glues can be harsh.
Design Options: Wide range, often more 3D or sculpted options
Best for: Longer-lasting wear, achieving specific nail lengths/shapes
Gel Polish (DIY or Salon)
Application Time: 30-60 minutes (DIY), 45-75 minutes (Salon)
Skill Level: Intermediate (DIY)
Cost: Moderate ($15-$30 DIY kit, $40-$80 Salon)
Durability: 2-3 weeks
Nail Damage: Minimal with proper application/removal; UV exposure is a consideration (see AAD on UV dryer safety).
Design Options: Hundreds of colors, some nail art possible
Best for: Long-lasting color, scratch-resistant finish
Acrylics/Gels (Extensions)
Application Time: 60-120+ minutes
Skill Level: Professional required
Cost: High ($60-$150+ initial, $40-$90 fills)
Durability: 2-4 weeks (fills needed)
Nail Damage: Can be significant if not applied/removed properly; risk of lifting and fungal infections.
Design Options: Unlimited, including complex 3D art and sculpting
Best for: Significant length/shape changes, very strong nails
As you can see, sticker press on overlay nails offer a unique sweet spot: they provide the visual impact and design variety of more complex options with the ease, speed, and affordability that many desire.
Creative Ways to Wear Sticker Press On Overlay Nails
Don’t just stick to the standard application! Get creative and make your overlays uniquely yours.
Accent Nails: Use a bold or intricate overlay design on just one or two accent nails and a solid complementary color on the rest for a subtle yet chic look.
Mix and Match: Combine different designs from the same collection or with complementary color palettes. Try a floral overlay on one hand and a coordinating solid color on the other.
Layering (Advanced!): For the truly adventurous, try layering a sheer glitter overlay over a solid-colored overlay or even polish. This can create depth and a truly unique finish. Make sure the base is completely dry/cured before layering.
French Tips: Some overlay designs are perfect for creating a quick and easy French tip look. Apply the overlay to cover the nail bed, then trim and file to create a clean white or colored tip.
* Jewelry Accents: After applying your overlays and top coat, consider adding a tiny bit of nail glue to a specific spot and applying a small rhinestone or charm for extra bling.
The possibilities are truly endless. Experiment and let your personality shine through your fingertips!
Frequently Asked Questions About Sticker Press On Overlay Nails
Q1: How long do sticker press on overlay nails typically last?
A: With proper application and care, they can last anywhere from 7 to 14 days. Factors like your daily activities and how well you prepped your nails can influence this.
Q2: Can I reuse sticker press on overlay nails?
A: Generally, no. They are designed for single use, as the adhesive is typically strong and single-use. Once removed, the adhesive can lose its tackiness and may be difficult to reapply cleanly or securely.
Q3: Are sticker press on overlay nails bad for my natural nails?
A: Not at all! When applied and removed correctly, they are very gentle. The key is to avoid pulling them off forcefully. Soaking your nails in warm, soapy water or using a natural oil (like cuticle oil or coconut oil) to loosen the adhesive before gently lifting is recommended.
Q4: How do I remove sticker press on overlay nails?
A: The easiest way is to soak your nails in warm, soapy water for about 10-15 minutes, or until the edges start to lift. Then, gently use a cuticle pusher or orangewood stick to lift the overlay away from your natural nail. You can also use a bit of cuticle oil or acetone-based nail polish remover along the edges to help loosen the adhesive.
Q5: Can I apply sticker press on overlay nails over gel polish or acrylics?
A: While some people do, it’s generally best to apply them directly to your clean, prepped natural nails. Applying over other enhancements might affect adhesion and longevity, and removing them could be more complicated. For the best results, stick to natural nails.
Q6: What if I have a small air bubble? Can I pop it?
A: It’s best to avoid popping small bubbles if possible during application, as this can create a hole. Smooth them out as much as you can. If a small bubble forms after application, it usually doesn’t affect longevity too much, but it can be a weak spot. A careful application of top coat over the bubble might reinforce it slightly.
Q7: Can I swim or shower with them on?
A: Yes, you can shower and swim with them on. However, prolonged exposure to water, especially hot water, can soften the adhesive over time. Try to minimize long soaks and pat your hands dry thoroughly afterward. Wearing gloves for extensive dishwashing or cleaning is always a good idea.
Conclusion
Sticker press on overlay nails are more than just a trendy beauty hack; they’re a brilliant solution for anyone seeking gorgeous, stylish nails without the time, cost, or commitment of traditional manicures. They offer an accessible entry into the world of nail art, empowering you to express yourself with confidence and creativity. Whether you’re a seasoned nail enthusiast or a complete beginner, these overlays provide an easy, effective way to achieve stunning results.
From their lightning-fast application to their incredible variety and damage-free wear, they’ve earned their spot as a genius essential in our beauty arsenals. So go ahead, experiment with dazzling designs, switch up your look as often as you like, and wear your nails with pride. Because with sticker press on overlay nails, beautiful hands are just minutes away, proving that looking fabulous can indeed be simple, fun, and totally achievable. Happy nailing!