Spirulina nail designs offer a vibrant, healthy-looking manicure with a unique, natural appeal. These stunning looks use the greenish-blue algae to create eye-catching patterns and tones for a fresh, modern twist on nail art. Perfect for beginners and enthusiasts alike, exploring spirulina-inspired nails is fun and achievable!
Ever looked at your nails and wished for a splash of something different, something natural yet incredibly chic? Spirulina, that amazing superfood, has inspired a whole new trend in nail art, and it’s surprisingly easy to achieve! Forget those complicated designs that take hours. Spirulina nail designs are all about embracing beautiful, organic colors and simple artistry. Whether you’re a total beginner or just looking for a fresh idea, you’re going to love how these cool, calming tones can transform your manicure. Get ready to dive into a world of stunning, healthy-looking nails.
—
What Exactly Are Spirulina Nail Designs?
Spirulina nail designs are manicures that draw inspiration from the striking, natural color of spirulina, a type of blue-green algae. This isn’t about applying actual algae to your nails (phew!). Instead, it’s about using nail polish colors that mimic the vibrant teal, deep green, and subtle blue hues found in spirulina. Think of it as capturing the essence of this powerful superfood in a beautiful, wearable art form.
These designs can range from subtle, watery washes of color to bold, geometric patterns. The beauty lies in their versatility and the naturally appealing color palette. They offer a refreshing departure from traditional reds and pinks, bringing a touch of nature’s artistry right to your fingertips. Plus, the connection to a healthy superfood can make it feel like you’re wearing a little bit of wellness!
Why Choose Spirulina Nail Designs? The Undeniable Appeal
There are so many reasons to fall in love with spirulina-inspired nail art. It’s not just a fleeting trend; it’s a style that offers a unique blend of modern aesthetics and a nod to nature’s beauty.
- Unique Color Palette: The distinctive teal-green and deep blue shades are eye-catching and sophisticated. They stand out without being overly loud, making them perfect for any occasion.
- Natural & Earthy Vibe: If you love the feeling of being connected to nature, these colors bring that organic, grounded energy to your look.
- Versatility: Spirulina colors pair beautifully with a wide range of other shades, from earthy neutrals to bright pops of complementary colors.
- Instant Health & Vitality: The vibrant, fresh tones can give the impression of healthy, strong nails, aligning with the superfood’s reputation.
- Achievable for Beginners: Many spirulina-inspired looks are simple washes, ombre effects, or minimalist designs that even someone new to nail art can master.
- Modern & Trendy: This is a fresh take on nail art that’s currently trending, offering a stylish and contemporary look.
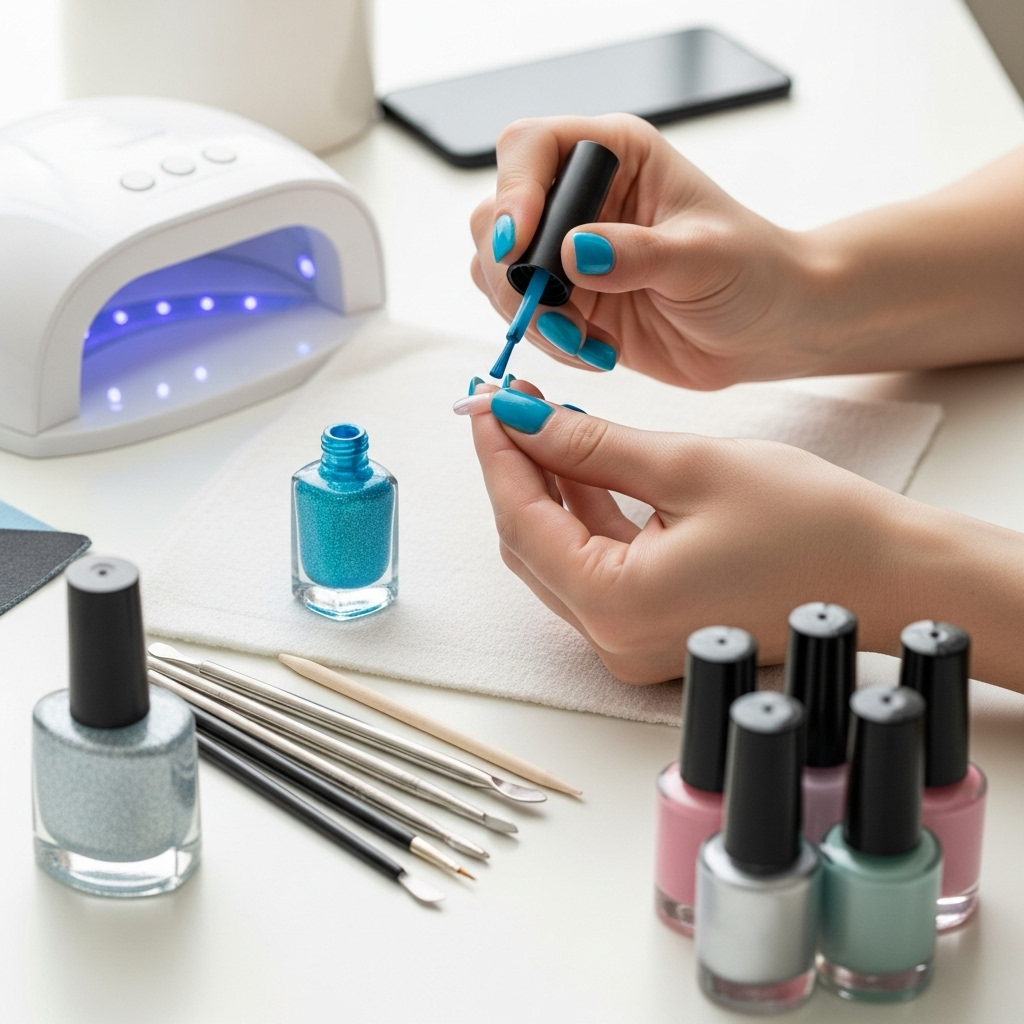
Essential Tools for Your Spirulina Nail Design Journey
Before you start creating your own spirulina-inspired masterpieces, having the right tools will make the process smoother and the results even better. Don’t worry, you don’t need a professional salon’s worth of equipment!
Here’s a breakdown of the essentials:
- Base Coat: This is crucial for protecting your natural nails and helping your polish last longer. A good quality base coat prevents staining and creates a smooth canvas.
- Top Coat: Just as important as the base coat, a top coat seals in your design, adds shine, and prevents chips.
- Nail Polish in Spirulina Shades: This is your main ingredient! You’ll want polishes in shades of teal, deep green, and oceanic blue. You might also want a lighter or darker shade to create contrast.
- Dotting Tools or Toothpicks: Perfect for creating small dots, swirls, or intricate details.
- Thin Nail Art Brush: Essential for drawing fine lines, creating patterns, or cleaning up edges.
- Sponge (Makeup or Nail Art Specific): Great for creating ombre effects or a textured, watercolor look.
- Nail Polish Remover & Cotton Swabs/Pads: For cleaning up mistakes and tidying the cuticles.
- Orange Stick or Cuticle Pusher: For gently pushing back your cuticles to create a cleaner nail surface to work on.
Color Palette Suggestions:
When selecting your nail polishes, think about capturing the essence of spirulina. Here are some ideas:
- Core Spirulina Colors: Teal, Emerald Green, Deep Sea Blue, Navy, Olive Green.
- Accent Colors: White (for contrast or marbling), Black (for bold lines or outlines), Gold or Silver (for metallic accents), Light Blue or Mint Green (for softer gradients).
Creating Stunning Spirulina Nail Designs: A Step-by-Step Guide
Ready to get creative? Here are a few beginner-friendly spirulina nail design ideas you can easily do at home. We’ll start with a simple gradient and then move to a fun marbled look.
Design 1: The Ocean Gradient
This is a beautiful and simple way to capture the watery essence of spirulina. It looks intricate but is surprisingly easy!
- Prep Your Nails: Start with clean, dry nails. Apply a thin layer of base coat and let it dry completely.
- Apply Base Color (Optional but Recommended): If you want a slightly different undertone, apply a sheer white or light gray polish. This can make your spirulina colors pop more. Let it dry.
- Prepare for the Gradient: On a piece of foil or a clean surface, apply stripes of your chosen spirulina colors (e.g., a deep blue next to a teal, and then an emerald green).
- Create the Gradient: Lightly dab a clean sponge into the polish stripes, blending the colors slightly on the sponge. Gently dab the sponge onto your nail, starting from the cuticle area and moving upwards. Re-apply polish to the sponge as needed and dab again to build color intensity.
- Clean Up: Use a small brush dipped in nail polish remover to clean up any polish that got on your skin around the nail.
- Add Shine: Once the gradient is completely dry, apply a generous layer of top coat to seal the design and give it a beautiful glossy finish.
Design 2: Spirulina Swirl Marble
This technique creates a unique, organic pattern that looks like swirling water or natural stone.
- Prep and Base Coat: Ensure your nails are prepped and have a dry base coat. You can apply a sheer white or light gray base color here too.
- Apply Primary Color: Paint one or two nails with a solid base color that complements your spirulina shades, such as white or a very light grey. Let it dry.
- Create the Swirls: On a clean surface, dab a few drops of your main spirulina polish (e.g., teal) and then a drop of a contrasting color (e.g., deep blue or even white).
- Dip and Swirl: Using a toothpick or a nail art stylus, gently swirl the colors together without over-mixing. You want distinct swirls, not a muddy mess.
- Transfer the Design: Quickly but carefully, press your nail onto the swirled polish on your surface. You can gently roll your nail to pick up more of the pattern. Some people prefer to use a makeup sponge to dab the swirled polish onto the nail.
- Repeat and Clean Up: Repeat on other nails if desired. Use your cleanup brush and remover to perfect the edges.
- Seal It In: Apply a thick layer of top coat once everything is dry. This will smooth out the texture from the marbling and seal the pattern.
Design 3: Minimalist Spirulina Dots
Perfect for when you want a touch of flair without a full design. This is super quick and looks effortlessly chic!
- Prep and Polish: Apply your base coat and then one or two coats of your favorite solid spirulina color (like a rich emerald green or a deep teal). Let it dry completely.
- Dotting Time: Dip your dotting tool or the tip of a toothpick into a contrasting color (e.g., white, gold, or a lighter teal).
- Create the Pattern: Place dots strategically on your nail. You could do a single line of dots along the cuticle, a few scattered dots on one side of the nail, or a simple cluster near the tip.
- Add Outline (Optional): For a more defined look, use a very fine nail art brush and a darker color to outline some of the dots or create tiny connecting lines.
- Seal: Finish with a reliable top coat.
Advanced Spirulina Nail Design Techniques
Once you’re comfortable with the basics, you might want to explore more intricate spirulina nail designs. These techniques add an extra layer of sophistication and creativity.
Water Marbling with Blue-Green Hues
This technique requires a bit more practice but results in stunning, unpredictable patterns. You’ll need a bowl of room-temperature water and a few different spirulina-esque polishes.
The Process:
- Prep your nails with a base coat. Apply a thin layer of latex or tape around your fingernails to protect your skin from polish.
- In a small cup of water, carefully drizzle drops of your chosen spirulina colors and perhaps a white or black polish.
- Use a toothpick to gently swirl the colors, creating a marbled pattern.
- Carefully dip your nail into the water, allowing the polish design to transfer onto your nail.
- Gently lift your nail from the water.
- Peel off the latex or tape and clean up any excess polish.
- Seal with a top coat.
This method is wonderful for achieving abstract, flowing designs that truly capture the dynamic beauty of natural elements.
Stamping with Spirulina Colors
Nail stamping is fantastic for consistent, detailed designs. You’ll need a stamping plate with your desired patterns, a stamper, and a scraper.
The Process:
- Apply your base color to the nail.
- Apply a bold spirulina polish to the stamping plate.
- Quickly scrape off the excess polish with your scraper.
- Immediately press the stamper onto the design to pick it up.
- Align and press the stamper onto your nail.
- Clean up and seal with a top coat.
Many stamping plates offer floral, geometric, or abstract designs that look incredible when filled with teal, green, and blue polishes.
Adding Metallic Accents
Gold, silver, or rose gold can elevate any spirulina nail design. These metallic touches add a luxurious contrast to the earthy tones.
- French Tips: Use a metallic polish for the tips of your nails over a spirulina base.
- Geometric Lines: Use a fine brush or striping tape to add thin metallic lines across your nails.
- Decals or Foils: Apply metallic nail foils or pre-made metallic decals for a quick, high-impact accent.
- Dotting: Use a metallic polish with a dotting tool to add small, glittering accents.
Maintaining Your Spirulina Nail Designs
To keep your beautiful spirulina nail designs looking fresh and vibrant for as long as possible, follow these simple maintenance tips:
- Always Use a Top Coat: This is your best friend for longevity. Reapply a thin layer of top coat every 2-3 days to refresh the shine and protect the design.
- Wear Gloves for Chores: Protect your nails from harsh chemicals and excessive moisture by wearing rubber gloves when washing dishes, cleaning, or gardening.
- Moisturize Regularly: Keep your cuticles and the skin around your nails hydrated with cuticle oil or a good hand cream. Healthy skin makes your manicure look better.
- Avoid Using Nails as Tools: Resist the urge to peel, scrape, or pry with your fingernails. This can chip or lift the polish, ruining your design.
- Be Gentle: Treat your nails with care. Avoid banging them or exposing them to extreme temperature changes, which can weaken the polish.
Understanding Nail Health and Spirulina Colors
While spirulina nail designs are all about aesthetics, it’s also worth noting the connection to the actual superfood and its purported benefits. Spirulina itself is known for its rich nutrient profile, including vitamins, minerals, and antioxidants. While applying polish doesn’t provide these benefits directly to your nails, choosing vibrant, natural-looking colors can contribute to a feeling of wellness and a more positive self-image. It’s a fun way to incorporate a healthy vibe into your beauty routine.
However, it’s important to ensure your nails are healthy underneath. If you notice any discoloration, brittleness, or other issues, it’s best to consult with a healthcare professional or a dermatologist. For more general information on nail health and appearance, resources like the American Academy of Dermatology offer valuable insights and guidance.
Table: Spirulina Nail Design Pros and Cons
To help you decide if spirulina nail designs are for you, here’s a quick look at the advantages and disadvantages.
| Pros | Cons |
|---|---|
| Unique and trendy color palette. | Requires specific polish colors to achieve the look. |
| Natural, earthy, and calming aesthetic. | Some advanced techniques might require practice. |
| Versatile, pairs well with many outfits and styles. | Can be prone to chipping if not properly sealed with top coat. |
| Achievable for beginners with simple designs. | Darker shades might potentially cause staining if nails aren’t prepped with a good base coat. |
| Gives a vibrant, healthy, and sophisticated look. | Finding the perfect shade of teal or green might involve some experimentation. |
Frequently Asked Questions About Spirulina Nail Designs
Q1: Can I use actual spirulina powder in my nail polish?
A: It’s generally not recommended to mix raw spirulina powder directly into your nail polish. This can alter the polish’s consistency, damage the brush, and may not adhere well to your nails. The beauty of spirulina nail designs comes from using polishes in colors inspired by spirulina.
Q2: How do I prevent my nail polish from staining my nails with these colors?
A: Always apply a good quality base coat before any colored polish, especially darker or more intense shades like deep blues and greens. A good base coat acts as a barrier. If you do notice staining, a nail whitening solution or a bit of lemon juice can sometimes help, but prevention is key!
Q3: What colors go well with spirulina nail designs?
A: Spirulina colors are quite versatile! They pair wonderfully with neutrals like white, cream, beige, and gray. They also look stunning with metallic accents like gold or silver. For a bolder look, consider complementary colors like coral or even pops of bright yellow or orange.
Q4: Can I do spirulina nail designs if I have short nails?
A: Absolutely! Shorter nails are perfect for many spirulina nail designs. Minimalist dots, simple stripes, or gradient tips can look incredibly chic on short nails. In fact, a clean, well-executed design often looks more polished on shorter nail lengths.
Q5: How long do spirulina nail designs usually last?
A: With proper application and maintenance (especially a good top coat and avoidance of harsh activities), most spirulina nail designs can last anywhere from 5-10 days. Reapplying top coat every few days helps to extend their life and keep them looking shiny.
Q6: Are there different finishes for spirulina nail polishes?
A: Yes! You can find spirulina-inspired colors in various finishes, including creamy, glossy, metallic, shimmer, and even matte. Experimenting with different finishes can add another dimension to your nail art. A glossy finish often enhances the “liquid” or “watery” feel of these colors.
Conclusion: Embrace Your Inner Artist with Spirulina Nails
Spirulina nail designs are a fantastic way to express your creativity while embracing a fresh, natural, and sophisticated color palette. From the simplest dot accent to intricate water marbling, there’s a spirulina-inspired look to suit every skill level and personal style. By gathering your essential tools and following these easy steps, you can confidently achieve stunning, healthy-looking manicures right at home.
<