Nail art has become a popular form of self-expression, allowing individuals to showcase their creativity and personality through their fingertips.
From intricate designs to bold colors, there seems to be no limit to nail art possibilities. However, one trend that has been on the rise is skyline nails. This unique style features iconic cityscapes on the nails, adding a touch of urban flair to any manicure. Whether you’re a fan of skyscrapers or simply looking for a new and exciting way to jazz up your nails, skyline nails are a must-try.
We will explore the world of skyline nails and provide some cool ideas and simple tutorials that will transform your nails into mini cityscapes. Get ready to elevate your nail game with these innovative and imaginative designs you couldn’t imagine.
1.Skyline Nails In Night City
Creating skyline nails in a night city theme is a cool and unique way to express your love for urban landscapes. To achieve this look, apply a dark blue or black base coat to mimic the night sky. Then, using a thin nail art brush or a toothpick, carefully paint the silhouettes of buildings along the tips of your nails using white or silver polish.
You can add details like windows or stars with a dotting tool or toothpick. Finish off with a glossy topcoat to seal your design and give it a polished look. This nail art idea is perfect for city dwellers and anyone wanting to add urban flair to their manicures.
2.Light Sky Nails Designs
Light sky nail designs are a trendy and fun way to add a touch of whimsy to your manicure. These designs typically feature soft, pastel colors reminiscent of a clear blue sky. Whether you opt for a simple, single-color design or get creative with clouds, sunsets, or even tiny birds, light skynails are sure to make a statement.
To achieve this look, apply a base coat to protect your nails. Then, choose your desired colors and use a thin brush or dotting tool to create your design. Finish with a glossy top coat for added shine and durability.
3.Nude Nails With Skyline Art
Tutorial videos feature innovative methods for integrating skyline art into nude nail designs, offering valuable insights for creating stunning and elegant nail art. Step-by-step guidance is provided, inspiring viewers to explore new ways of incorporating skyline motifs while honing their nail art skills.
These videos showcase the creative process and provide practical tips for crafting intricate skyline designs on nude nails. By leveraging social media platforms and YouTube channels, these tutorials demonstrate the best ways to captivate a wider audience with captivating skyline nail art, taking nail art to the next level.
4.Batman Nails Art
If you’re a fan of Batman and want to express your love for the Dark Knight through your nail art, then Batman’s nails are a perfect choice. This cool and simple tutorial will guide you through creating a fun and eye-catching manicure that showcases your superhero fandom. To start, gather all the necessary materials, such as black, yellow, and white nail polish, a thin brush or toothpick, and a top coat.
Begin by painting your nails with a black base coat, allowing them to dry completely. Then, using the thin brush or toothpick, carefully draw the iconic Batman logo in yellow on one or more nails. Finally, use white polish to add details such as the bat ears and eyes. Finish off with a layer of top coat to seal your design and give it a shiny finish.
5.Blue Sky Nails Designs
Various tutorial videos showcase diverse blue sky nail art designs and tutorials, offering step-by-step guidance for crafting captivating nails reminiscent of the beautiful blue sky.
These videos provide valuable information on creating stunning blue sky nail designs, offering inspiration and techniques for depicting different elements of the sky on your nails. From cloud patterns to gradients, tutorial videos are a great way to explore and learn new techniques to elevate your nail art to the next level.
6.Nature Sky Nails Designs
Nature sky nail designs are a popular trend in nail art. These designs often feature serene scenes of clouds, sunsets, or starry night skies, bringing a touch of the outdoors to your fingertips.
Creating nature sky-nail designs can be a fun and creative way to express your love for nature and showcase your artistic skills. Many simple tutorials are available online that can guide you through the process step by step, making it easy for even beginners to achieve stunning results.
7.Skyline Nails With Animals
Discover tutorial videos showcasing skyline nail art with animal themes, offering step-by-step guidance and valuable insights into creating captivating skyline nails with animal art. Learn diverse techniques for integrating animal motifs into skyline nail designs and draw inspiration from unique tutorials.
Explore new ways to craft skyline nails with animals, expand your creativity, and engage a wider audience through social media and YouTube. Elevate your skyline nail art to the next level by infusing animal elements, reaching potential customers, and building brand awareness with instructional videos that resonate with your target audience.
8.Purple Ombre Nails Skyline
Create a stunning manicure with a purple ombre nails skyline design. This simple tutorial will guide you through the steps to achieve a chic look for your nails. Start by applying a base coat to protect your nails and ensure long-lasting wear. Next, choose three shades of purple nail polish, ranging from light to dark.
Apply the lightest shade to the base of your nails and gradually work toward the tips, using a sponge or a makeup brush to blend the colors. Once the ombre effect is achieved, let it dry completely before adding a glossy top coat for a polished finish.
9.Dark Night Sky Nails Designs
Night sky nail designs are a trendy and unique way to showcase your style. With a few simple steps, you can create a stunning manicure that resembles the beauty of a starry night. To achieve this look, apply a dark base color to your nails—black or navy blue works well for creating the night sky backdrop.
Once the base color is dry, use a thin brush or dotting tool to create stars on your nails using white or silver nail polish. You can also add some sparkle by incorporating glitter polish or rhinestones for an extra touch of glamour. Finish off with a top coat to seal your design and ensure long-lasting wear.
10.Diy Sky Nails In Few Steps
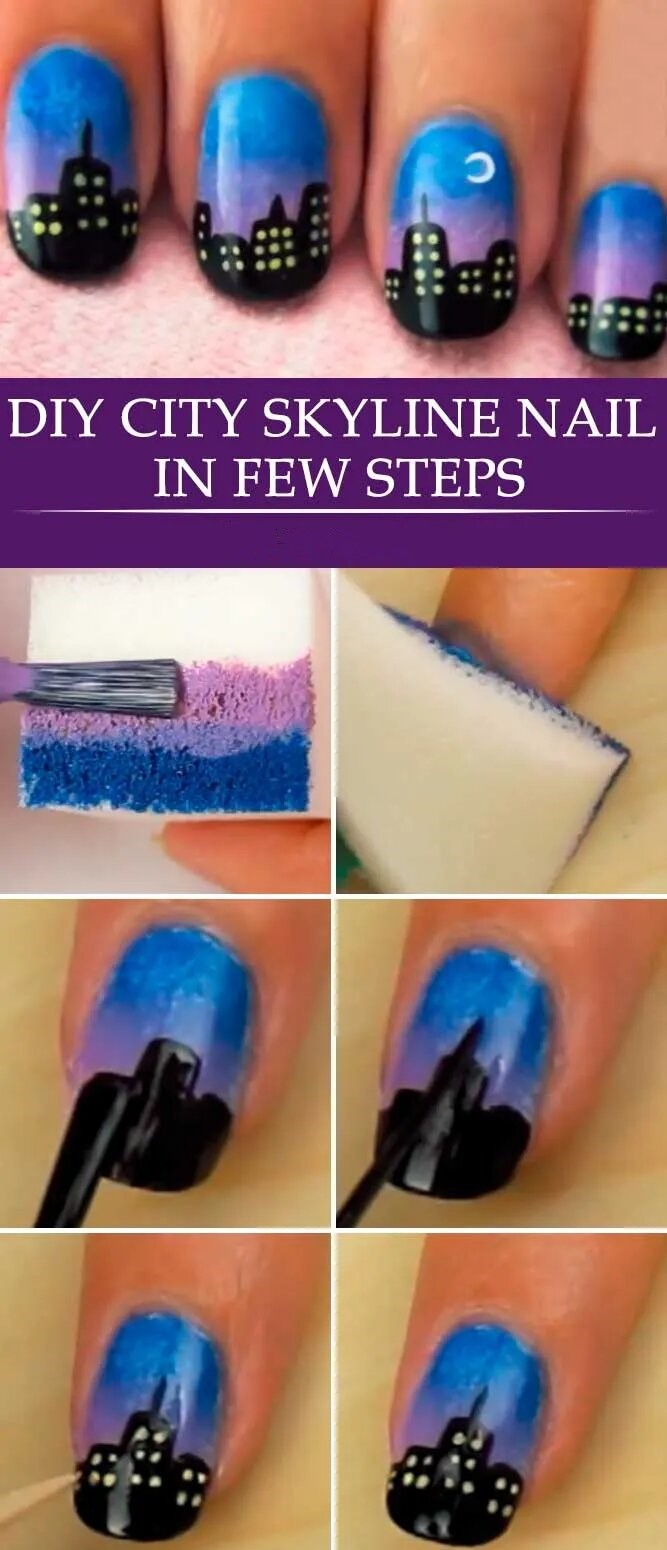
Want to add a touch of celestial beauty to your nails? Look no further than DIY snails. This trendy nail art design is surprisingly simple to achieve and will have your nails looking out of this world. Here’s a step-by-step guide to creating your sky nails:
- Start with a clean, dry base: Ensure your nails are free from any polish or oils before you begin.
- Apply a base coat: This will help protect your nails and create a smooth surface for the nail polish.
- Choose your colors: For a classic sky look, opt for shades of blue, white, and silver. You can also get creative and experiment with different colors to create a unique sky-inspired design.
- Create a gradient effect: Using a makeup sponge, dab different shades of blue onto each nail to create a beautiful ombre effect that mimics the sky.
- Add clouds: Dip a small brush or dotting tool into white polish and gently dab cloud-like shapes onto your nails. Don’t worry about making them perfect – the more natural and fluffy they look, the better.
- Let it dry completely: Give your nails ample time to dry before applying a top coat to seal in your design and add shine.
11.New York Skyline Nails Quick Tutorial
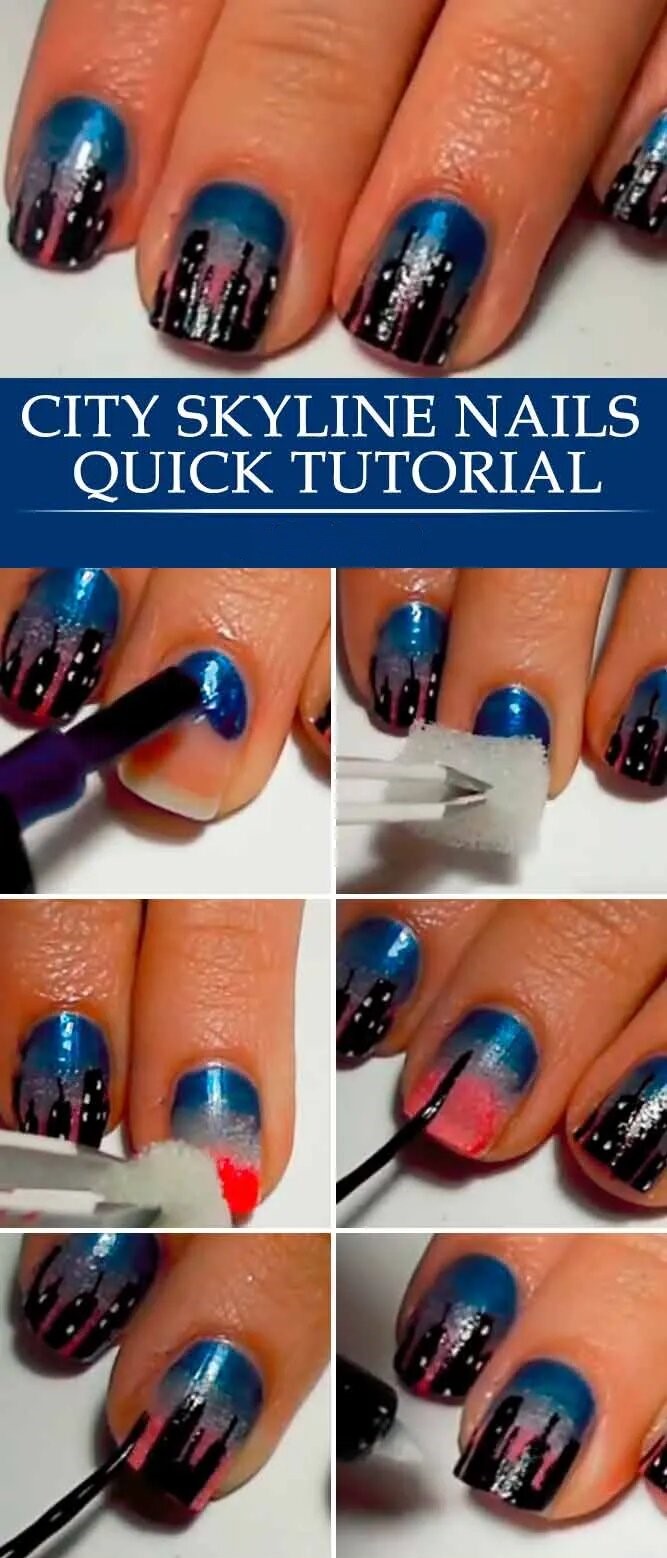
Capture the iconic New York skyline on your nails effortlessly with this quick tutorial. Learn how to recreate the stunning New York skyline in no time. This tutorial allows you to easily achieve the New York skyline nail art, providing a great way to express your creativity.
The detailed walkthrough videos will guide you through the process, ensuring that even first-time nail artists can create the New York skyline nails. Share your results on social media platforms and show your artistic skills to a wider audience.
12.Quick Simple Skyline Ombre Nails
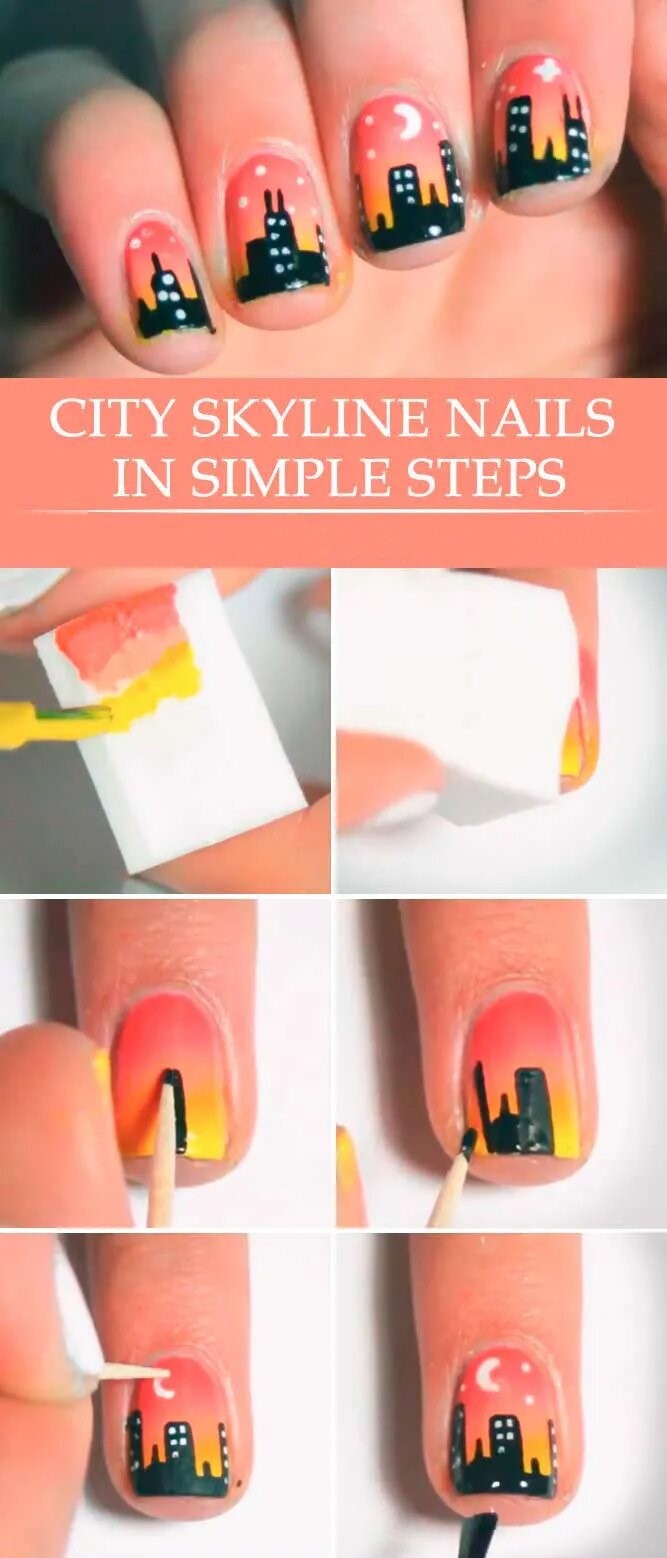
Creating a stunning ombre effect on your nails doesn’t have to be complicated. With this quick and simple tutorial, you can quickly achieve a beautiful skyline ombre nail design. Here’s how to do it:
- Apply a base coat to protect your nails and ensure the polish adheres well.
- Choose two complementary nail polish colors – one lighter and one darker – that you want to use for your ombre effect.
- Apply the lighter color as the base coat and let it dry completely.
- Cut a small makeup sponge into a triangular shape, with one flat side and two slanted sides.
- On a piece of paper or a plastic palette, apply a line of each nail polish color next to each other, slightly overlapping.
- Dab the sponge onto the polish to pick up both colors.
- Press the sponge onto your nails, rolling, starting from the tips and moving towards the cuticles.
- Repeat steps 6 and 7 until you achieve the desired ombre effect, making sure to blend the colors seamlessly.
- Clean up any excess polish around your nails using a small brush dipped in nail polish remover.
- Finish off with a glossy top coat to seal in your design and add shine.
13.City Sky Nails In Simple Steps
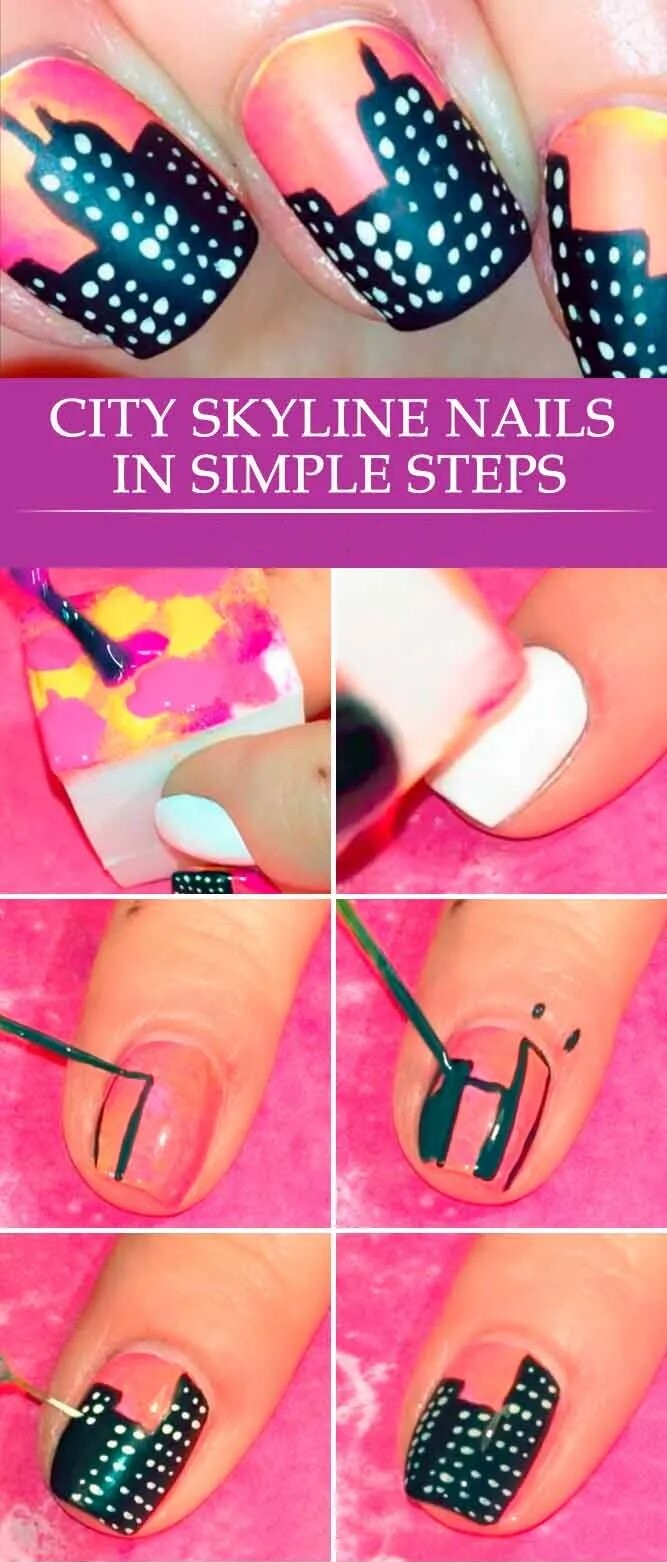
This trendy design features a skyline silhouette against a gradient background, creating a cool urban vibe at your fingertips. Here’s a simple step-by-step tutorial to help you achieve this look:
- Apply a base coat to protect your nails and help the polish adhere better.
- Choose two or three colors that represent the colors of the sky at different times of day, such as blues, purples, pinks, and oranges. Apply the lightest color as the base coat and let it dry completely.
- Using makeup or a small piece of sponge, dab the other colors in random spots on your nails to create a gradient effect. Blend the colors gently until you achieve the desired look.
- Once the gradient is dry, use black nail polish or a nail art pen to draw the silhouette of buildings along the tips of your nails. You can make them as simple or as detailed as you like!
- Finish off with a glossy top coat to seal in your design and add some shine.
14.Sky Blue Nails You Can Do In 5 Min
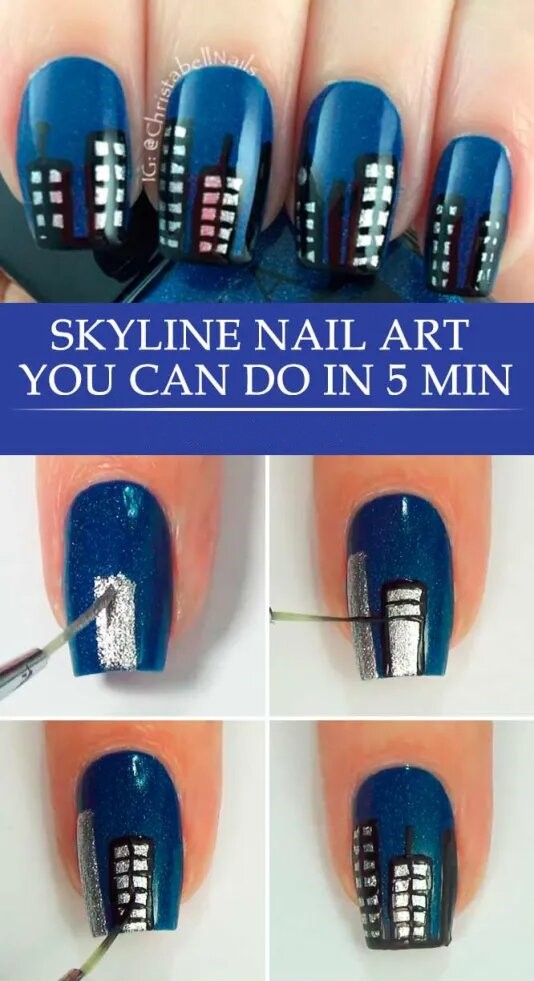
You can achieve gorgeous sky-blue nails in just 5 minutes with just a few simple steps. Start by applying a clear base coat to protect your nails and help the polish adhere better. Next, apply two coats of sky blue nail polish, allowing each coat to dry completely before moving on.
You can add a layer of glitter or a top coat with shimmer for an extra sparkle. Finish off with a quick-drying top coat to seal in the color and add shine. In just a few minutes, you’ll have beautiful sky-blue nails that will turn heads.
15.Simple Nails Using Mood Polish For Blue Sky Nails
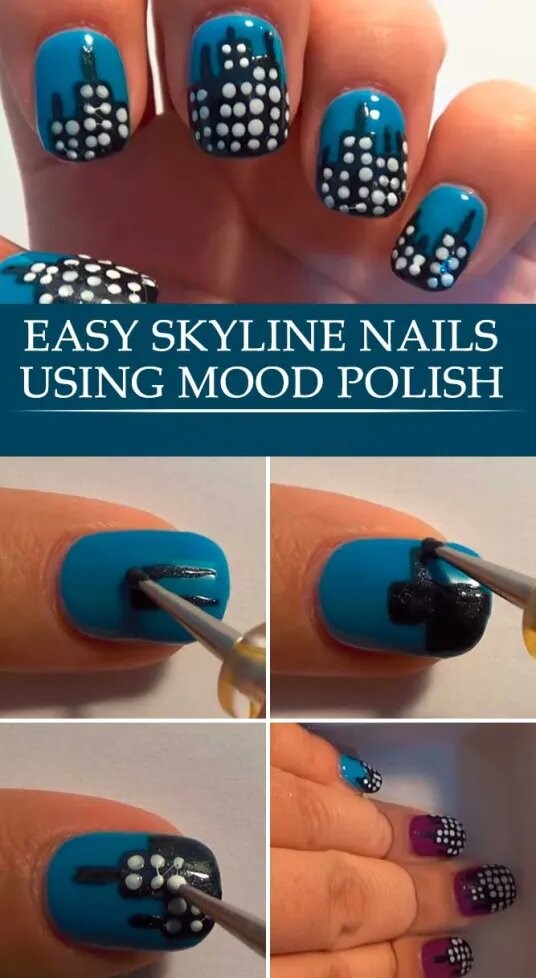
Achieving a stunning nail look doesn’t have to be complicated. If you’re looking for a simple yet eye-catching design, consider using mood polish to create blue sky nails. Mood polish is a type of nail polish that changes color based on the temperature of your nails.
Apply a base coat to protect your natural nails to achieve blue sky nails. Once dry, apply a layer of mood polish and watch it transform from a cool shade to a vibrant blue when your nails are warm. Finish off with a top coat to seal in the color and add shine. This fun and easy nail design is perfect for adding a touch of whimsy to your look and will impress everyone around you.

