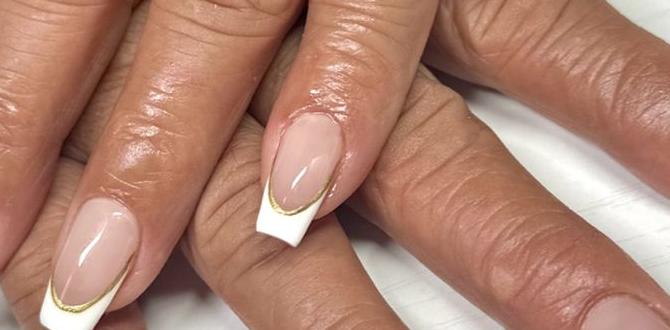
Short nail design ideas are simple, stylish, and totally achievable! Discover easy techniques, essential tools, and trendy looks that make your nails pop, no matter the length. Get ready for a beautiful manicure that’s perfect for anyone.
Are your nails a bit on the shorter side? Don’t worry! Many people think you need long nails to rock amazing nail art, but that’s just not true. Short nails can be incredibly chic and offer a fantastic canvas for creativity. The good news? You don’t need a nail technician degree to create gorgeous looks. We’re here to show you how to make your short nails shine with simple, proven design essentials. Get ready to fall in love with your manicure!
Why Short Nails Are Amazing
Short nails are incredibly practical. They’re less prone to breaking, easier to maintain, and perfect for daily activities like typing, cooking, or even just daily life. Plus, a well-manicured short nail looks neat, polished, and sophisticated.
Essential Tools for Short Nail Designs
You don’t need a million fancy gadgets to create beautiful short nail designs. Here are a few must-haves that will make creating your art a breeze:
- Nail File: For shaping and smoothing. A fine-grit file is best to avoid damaging the nail.
- Nail Buffer: To create a smooth surface and add a natural shine.
- Cuticle Pusher/Orange Stick: To gently push back cuticles for a clean nail bed.
- Base Coat: Protects your natural nail and helps polish adhere better.
- Top Coat: Seals your design, adds shine, and increases longevity.
- Your Favorite Nail Polish Colors: The foundation of every great design!
- Dotting Tools: These come in various sizes and are perfect for creating dots, flowers, and other patterns.
- Thin Nail Art Brushes: For lines, swirls, and intricate details.
- Stencils or Tape: Great for creating clean lines and geometric shapes.
Having these basics will open up a world of possibilities for your short nails. You can find many of these tools at your local drugstore or beauty supply store. For more in-depth information on nail care tools and their uses, explore resources from organizations like the U.S. Food & Drug Administration (FDA) on Nail Care Products, which offers safety and usage guidelines.
The Easiest Short Nail Design Ideas
Ready to get creative? Here are some beginner-friendly designs that look stunning on short nails:
1. The Classic French Manicure (with a Twist!)
The French manicure is timeless for a reason. It looks incredibly chic on short nails. For a modern twist, try different colored tips or a “baby French” where the white line is super thin.
How to do it:
- Apply a base coat.
- Paint your nails with a sheer nude, pink, or milky white polish.
- Once dry, carefully paint a thin line of white or colored polish along the free edge of your nail. You can freehand this or use a stencil.
- Apply a top coat.
2. Simple Dots
Dots are your best friend for easy nail art! They add a playful touch without being too complicated.
How to do it:
- Apply your base color.
- Using a dotting tool (or the tip of a bobby pin!), dip it into a contrasting polish color.
- Gently press the dotting tool onto your nail to create dots. You can make them evenly spaced, scattered, or even form shapes like hearts or flowers.
- Seal with a top coat.
3. Chic Color Blocking
This is perfect for a modern, graphic look. It’s all about clean lines and bold color combinations.
How to do it:
- Paint your nails with your base color.
- Once dry, use striping tape or a thin brush to create a geometric line across your nail.
- Apply a second color in one of the sections.
- Carefully remove the tape while the polish is still slightly wet.
- Repeat for other sections or nails.
- Finish with a top coat.
4. Glitter Accents
A touch of glitter can elevate any manicure. You can go for a full glitter nail or just add a sparkle to one or two nails.
How to do it:
- Apply your base color.
- For an accent nail, apply a clear polish or a glitter top coat directly onto one nail.
- For a glitter gradient, apply a glitter polish from the tip of the nail downwards, fading the glitter as you go.
- Seal all nails with a top coat.
5. Minimalist Lines
Thin lines add a touch of sophistication and length to short nails. They are surprisingly easy to create with a fine brush or striping tape.
How to do it:
- Paint your nails with your chosen base color.
- Using a very thin nail art brush dipped in a contrasting color, draw a single straight line down the center of the nail, or create a few parallel lines.
- Alternatively, use striping tape for very precise lines.
- Let dry and seal with a top coat.
Trend-Forward Short Nail Design Ideas
Want to try something a little more trendy? These ideas are still super approachable and look amazing on shorter nails:
The “Minimalist Chic” Look
This involves subtle details that make a big impact. Think fine lines, tiny dots near the cuticle, or a single accent nail with a simple graphic.
- Base: Neutral or pastel colors (nude, beige, light pink, sky blue).
- Accent: A thin metallic line, a single dot at the base, or a small geometric shape.
Why it works for short nails: It elongates the nail visually and keeps the focus on clean, elegant design.
“Negative Space” Designs
These designs leave parts of the nail bare, which can cleverly create the illusion of length. It’s also very modern and chic.
- Technique: Apply polish only in certain sections, leaving clear parts of the nail. Use tape to create sharp geometric shapes or patterns.
- Colors: Often uses bold colors against the natural nail or a clear polish base.
Why it works for short nails: The bare nail sections break up the polish, making the nail appear longer and more delicate.
Subtle Ombre
Ombre doesn’t have to be dramatic! A soft gradient from one shade to a slightly lighter or darker shade of the same color family can be stunning.
- Application: Use a makeup sponge to gently blend two complementary colors.
- Best Colors: Pastels, nudes, or soft blues/pinks.
Why it works for short nails: A subtle blend can create a seamless, elongated look without being overpowering.
The “Half-Moon” Manicure
This retro-inspired design highlights the lunula (the white, crescent-shaped part of your nail at the base). It creates a chic, sophisticated look.
- How to: Leave the half-moon area unpolished or color it in a contrasting shade.
- Tips: Use a guide sticker or carefully freehand the curve.
Why it works for short nails: It draws attention to the natural shape of the nail and can make fingers appear more slender.
Achieving a Perfect Finish
No matter the design, the finish makes all the difference. Here’s how to get that salon-quality look:
Nail Prep is Key
Before you even think about polish, proper nail preparation is crucial for any design to look its best. This includes having clean, dry nails, pushing back cuticles gently, and filing them to your desired shape. A well-prepped nail means a smooth canvas for your art.
Base Coat Benefits
Never skip the base coat! It prevents your natural nails from staining (especially with darker polishes) and creates a smoother surface for your polish and design to adhere to. This helps your manicure last longer and look more professional.
Top Coat Tactics
A good top coat is your best friend for sealing in your design, adding shine, and preventing chips. Apply a generous, even layer. For extra durability, consider a quick-dry top coat. Many people shy away from them, but they can be a lifesaver for busy schedules. For tips on extending the life of your manicure, you might find resources on nail care from reputable beauty organizations helpful.
Let It Dry (Properly!)
This is perhaps the hardest part, but essential! Give your polish and design ample time to dry completely. Rushing this step is the quickest way to smudge your hard work. If you’re short on time, consider using a quick-dry spray or drop product, or even a nail dryer fan.
Common Short Nail Design Challenges & Solutions
Even with the best intentions, sometimes things don’t go as planned. Here are a few common issues and how to fix them:
| Challenge | Solution |
|---|---|
| Smudged polish | Don’t panic! If it’s a small smudge and the polish is still wet, you can often gently smooth it over with your brush or a clean finger. If it’s dried, gently file down the area and reapply a thin layer of color, then touch up the design and seal with a top coat. For larger smudges, sometimes it’s best to remove and start that nail again. |
| Uneven lines or dots | Mistakes happen! Dip a small, precise brush (or a Q-tip) in nail polish remover and carefully clean up the edges of your lines or dots. For dots, a clean dotting tool or toothpick can help you refine their shape. Patience is key here! |
| Polish looks streaky | This usually means the polish is too thick or the brush strokes were uneven. Try applying thinner coats. If a color is particularly streaky, you might need three thin coats instead of two thicker ones. Ensure your polish isn’t too old, as it can thicken over time. |
| Design looks “too busy” | Sometimes less is more. If a design feels overwhelming on short nails, simplify it. Try focusing the detail on one or two accent nails instead of all ten. A simple color polish with a single accent nail can be just as impactful. |
Nail Care Tips for Beautiful Short Nails
Keeping your nails healthy is just as important as making them pretty. Here are some simple tips:
- Moisturize Regularly: Use cuticle oil or hand cream daily to keep your cuticles soft and prevent hangnails.
- Be Gentle: Avoid using your nails as tools to open things or scrape surfaces.
- Strengthen Your Nails: Consider using a nail strengthener, especially if your nails are prone to breaking.
- Regular Trimming and Filing: Keep nails at a comfortable length and shape to prevent snags and breaks.
FAQ: Short Nail Design Ideas
Q1: What’s the easiest way to do nail art on short nails?
A: Dotting tools are fantastic for beginners! You can create simple dots, flowers, or even patterns by repeating dots. Simple stripes using tape or a thin brush are also very easy.
Q2: Can I make my short nails look longer with design ideas?
A: Yes! Vertical lines, thin stripes running down the center of the nail, or ombre effects that fade upwards can create the illusion of length. Negative space designs also help.
Q3: What colors are best for short nails?
A: Almost any color looks good! Lighter shades like pastels, nudes, and milky whites can make nails appear more delicate. Bold, vibrant colors create a statement. Darker shades like deep blues, greens, or wines are also sophisticated. It’s really about personal preference!
Q4: How often should I change my nail polish on short nails?
A: This depends on how well your polish lasts and your personal preference. Aim to refresh your manicure every 5-7 days, especially if you notice chipping. Regular touch-ups can keep them looking neat between full changes.
Q5: Are glitter designs messy on short nails?
A: Glitter can sometimes be tricky, but a good top coat helps! For a clean glitter look, try glitter nail polish that has the glitter suspended in a clear or colored base. Applying it near the tips or as an accent nail is also a great way to manage it.
Q6: What’s a good beginner-friendly nail polish formula for short nails?
A: Look for polishes with a good brush that’s not too wide, as this makes it easier to control application on smaller nails. Cream finishes and satin finishes are generally easier to apply evenly than shimmers or glitters for beginners.
Q7: How do I prevent my short nail designs from chipping quickly?
A: The key is proper prep and protection. Always use a base coat, apply your color in thin layers, and seal everything with a high-quality top coat. Capping the free edge (painting the very tip of your nail with your top coat) also helps prevent chipping.
Conclusion
Who knew short nails could be so much fun to decorate? With these proven essentials and simple design ideas, you’re well on your way to creating beautiful, eye-catching manicures right at home. Remember, the most important thing is to have fun with it and let your personality shine through. Don’t be afraid to experiment, find what you love, and embrace the beauty of your perfectly polished short nails. Happy polishing!


