Short micro French nails are the chic, understated way to rock the French manicure trend. They offer a delicate, sophisticated look that’s perfect for everyday wear and special occasions, adapting beautifully to shorter nail lengths. Think of them as the minimalist cousin of the classic French tip – elegant, modern, and incredibly versatile.
Hey nail lovers! Ever feel like the classic French manicure is a bit much for your everyday style, or maybe just doesn’t quite work with shorter nails? You’re not alone! Sometimes, those bold white tips can feel a little dated or even overpowering. But what if there was a way to get that refined, polished look without all the fuss? Get ready, because short micro French nails are about to become your new obsession. They deliver that subtle touch of elegance that feels fresh and totally achievable. We’ll walk you through everything you need to know to create this stunning look, making your nails the perfect accessory for any outfit or mood!
What Exactly Are Short Micro French Nails?
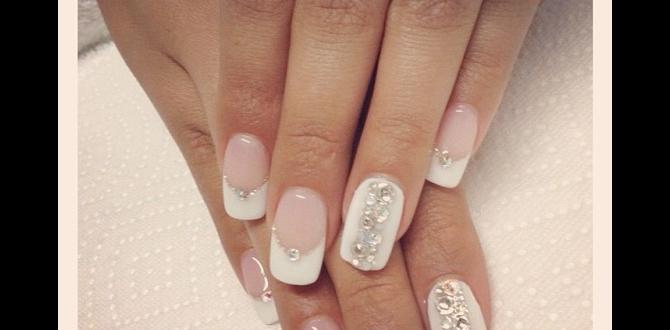
So, what makes a micro French nail “micro”? It’s all about the width of that iconic white (or colored!) tip. Unlike the traditional French tip, which features a bolder, wider band of color at the edge of the nail, the micro French tip is incredibly delicate and thin. We’re talking lines so fine, they look like a whisper of color hugging the natural curve of your nail. This subtle detail is what makes them so universally flattering and incredibly modern.
Think of it as a minimalist take on a classic. Instead of a sweeping smile line and a chunky tip, you get a precise, slender line. This delicacy is key to their appeal. They enhance the natural shape of your nail without demanding all the attention, making them perfect for those who love a polished look that whispers rather than shouts.
Why Short Micro French Nails Are a Must-Have Trend
Why the buzz around short micro French nails? Let us count the ways! They’ve taken the nail world by storm for so many good reasons. They combine timeless elegance with a fresh, contemporary twist, making them a go-to for fashion-forward individuals and those who prefer a clean, sophisticated aesthetic.
The Appeal of Understated Elegance
The primary draw of short micro French nails is their understated elegance. They’re not in-your-face; they’re subtly beautiful. This makes them incredibly versatile. They can elevate a casual outfit, complement a professional work look, or add a touch of polish to evening wear. The thinness of the line means they don’t compete with patterns or textures in your clothing; instead, they harmonize with them.
Perfect for Shorter Nail Lengths
This is where short micro French nails truly shine. The classic French manicure can sometimes look unbalanced or disproportionate on shorter nails, making the nail bed appear even shorter. Micro French tips, however, perfectly complement shorter nail lengths. The delicate line draws attention to the natural shape of the nail without creating a visual break that shortens the nail. They make short nails look intentionally styled and chic. You don’t need long nails to rock a French tip anymore!
Subtle Yet Striking
While they are subtle, micro French nails are undeniably striking. The stark contrast of a thin, crisp line against a neutral base can be incredibly eye-catching in its simplicity. It’s a design that requires precision and skill, which often translates to a more expensive and refined look, even when you do it yourself.
Endless Customization Options
Don’t think micro French nails are limited to just white tips! This trend is incredibly adaptable. You can play with:
- Colors: Swap classic white for pastels, neons, metallics, or even deep jewel tones. A thin black micro French tip on a nude base is incredibly chic.
- Base Colors: While nude and sheer pink are popular, you can experiment with milky whites, soft grays, or even a sheer colored base.
- Sheen: Opt for a matte finish for a super modern vibe, or a high-gloss finish for classic shine.
Low Maintenance & Easy to Achieve (with practice!)
Compared to intricate nail art, micro French nails are relatively low maintenance. Once applied, the fine line doesn’t chip as easily as a thicker tip might. And while achieving a perfectly straight line takes practice, the overall application is far simpler than complex designs. We’ll get to the how-to soon!
Essential Tools for Your Micro French Manicure
To achieve that perfectly precise micro French tip, you’ll need a few key tools. Don’t worry, they’re all pretty standard nail supplies, and investing in good quality ones will make the process so much smoother!
The Nail Polish Essentials:
- Base Coat: Always start with a good base coat to protect your natural nails and help your polish adhere better.
- Base Color Polish: This is the main color of your nail. Think nudes, sheer pinks, milky whites, or even light grays.
- Detail Polish: This will be the color for your thin French tip. Classic white is popular, but explore other colors!
- Top Coat: Crucial for sealing your design, adding shine, and protecting against chips. A quick-dry top coat is a lifesaver.
The Application Tools:
- Fine-Tipped Nail Art Brush: This is your most important tool for precision. Look for brushes specifically designed for nail art, with a very fine, pointed bristle. Synthetic bristles are generally easiest to clean.
- Dotting Tool (Optional but helpful): A dotting tool with a small bead can be used to control the amount of polish on your brush or to create small dots if you wish.
- Nail Polish Remover: For cleaning up any mistakes.
- Cotton Swabs or Orangewood Stick: For precise cleanup around the cuticle and sidewalls.
- Paper Towel or Palette: To offload excess polish from your brush.
Optional but Recommended:
- Nail Clips or French Tip Guides: These can help create a straighter line, especially when you’re starting out. However, with practice, you might find you prefer freehanding.
- Cuticle Oil: For nourishing your nails and cuticles after your manicure.
Step-by-Step: Creating Short Micro French Nails
Ready to get those perfect, delicate French tips? While practice makes perfect, following these steps will set you up for success. We’ll focus on a freehand method first, as it offers the most control once mastered. We’ll also touch on using guides.
Step 1: Prep Your Nails
This is non-negotiable for a long-lasting, clean manicure.
- Clean: Remove any old polish. Wash your hands thoroughly.
- Shape: File your nails into your desired shape. For micro French tips, squoval, round, or a soft almond shape generally works best. Keep them relatively short and neat.
- Cuticle Care: Gently push back your cuticles using an orangewood stick or a cuticle pusher. You can also apply a cuticle remover if needed. Avoid cutting cuticles at home unless you are experienced, as this can lead to infection. For a professional cuticle trim, consult a salon.
- Buff: Lightly buff the surface of your nails to create a smooth canvas and remove any natural oils.
- Clean Again: Wipe your nails with a lint-free cloth soaked in nail polish remover or rubbing alcohol to remove any dust or oils.
This stage ensures your polish adheres well and your nails look immaculate. A smooth nail surface is key to a smooth polish application.
Step 2: Apply Your Base Coat
Apply one thin, even layer of your chosen base coat. This protects your nails from staining and helps your color adhere better. Let it dry completely – usually about 60 seconds.
Step 3: Apply Your Base Color
Now, apply your main nail color. This is typically a nude, sheer pink, or milky white for a classic look. Apply two thin coats for full, even coverage, allowing each coat to dry partially before applying the next. You want an opaque or semi-opaque base that provides a smooth backdrop for your micro tip. Ensure there are no streaks or patches.
Step 4: Prepare Your Micro Tip Polish
This is where the magic happens!
- Shake it up: Ensure your detail polish (the white or colored polish for the tip) is well-shaken.
- The Palette Trick: Apply a small dot of your detail polish onto a clean piece of paper, a tile, or a dedicated nail art palette.
- Load Your Brush: Dip your fine-tipped nail art brush into the polish. Gently wipe the brush on the edge of the polish bottle or your palette to remove excess polish. You want just enough to create a fine line, not a blob. Too much polish will make it difficult to get a clean, thin line.
Step 5: Create the Micro French Tip (Freehand Method)
This takes a steady hand and patience!
- Stabilize: Rest your hands on a stable surface. You can even rest your pinky finger on the table for extra stability.
- The First Side: Starting from one sidewall of your nail, gently glide the brush towards the free edge, creating a thin, curved line that follows the natural shape of your nail tip.
- The Other Side: Repeat on the other sidewall, connecting the two lines to form a delicate smile line. Aim for a very thin band of color.
- The Tip: If needed, you can lightly fill in the very tip of the nail if there’s a tiny gap, but the focus is on that thin line.
- Refine: Immediately after applying the line, use a cotton swab or an orangewood stick dipped in nail polish remover for minor corrections to sharpen the line. Work very carefully and quickly before the polish dries.
- Repeat: Do this for each nail, working one nail at a time. It’s often easier to do all the left-hand nails first, then the right, or vice-versa, depending on which hand is dominant.
Don’t be discouraged if your first few attempts aren’t perfect! Focus on getting a consistent, thin line. The more you practice, the steadier your hand will become.
Step 5B: Creating the Micro French Tip (Using Guides – Optional)
If freehanding feels daunting, try these:
- Apply Base Color: Complete steps 1-3.
- Apply Guides: Carefully place fine striper tape or French tip guide stickers onto your nails, just below where you want your micro tip to be. Ensure they are firmly adhered to prevent polish seepage. They are designed to create a barrier.
- Apply Tip Color: Using your detail polish and a fine brush (or carefully from the bottle if the tip is small enough), paint over the edge of the guide. Aim to paint just a very thin line of color that extends slightly over the edge of the nail. Avoid thick coats.
- Remove Guides: Before the polish dries completely, carefully peel off the guides at an angle. This is crucial for a clean line.
- Touch-ups: Use a fine brush and remover for any minor imperfections.
While guides can help, they can also sometimes lift polish or cause bleeding if not applied or removed correctly. They are a helpful tool for beginners experimenting with lines.
Step 6: Apply Your Top Coat
Once all your micro French tips are dry to the touch (wait at least 5-10 minutes to be safe!), apply a generous, even layer of your top coat. Make sure to cap the free edge of your nail by running the brush along the edge. This helps prevent chipping and seals your beautiful design. If using a quick-dry top coat, you’ll be ready to go in just a few minutes!
Step 7: Final Touches
Once the top coat is mostly dry, apply a drop of cuticle oil to each nail and massage it in. This rehydrates your cuticles and adds a final touch of polish. Clean up any stray polish on your skin with a small brush dipped in remover.
Pro Tips for Flawless Micro French Nails
Want to level up your micro French game? These tips will help you achieve salon-worthy results at home.
- Thin is In: Resist the urge to make your line too thick. The beauty of micro French is its delicacy.
- Steady Hands: If you have trouble with shaky hands, try holding your breath for a second as you draw the line, or keep your elbows propped on a table.
- Less is More with Polish: Overloading your brush with polish is the quickest way to a messy line. Always offload excess.
- Clean as You Go: Don’t wait for polish to dry completely to fix mistakes. Use a fine brush and remover for immediate cleanup.
- Practice on a Nail Wheel: Before attacking your actual nails, practice drawing lines on a nail wheel or even a piece of paper to get the feel of the pressure and polish amount.
- Consider Gel Polish: If you’re comfortable with gel polish and a UV/LED lamp, gel offers incredible control and a long-lasting, super-shiny finish that makes thin lines easier to manage and less prone to smudging. The curing process between steps allows for easier corrections.
- Color Play: Don’t be afraid to experiment with different color combinations for the tip and base. Metallic tips, neon accents, or deep jewel tones can offer a modern twist.
Here’s a quick comparison of some popular approaches:
| Method | Pros | Cons | Best For |
|---|---|---|---|
| Freehand with Fine Brush | Ultimate control, natural look, portable. | Requires practice, can be shaky at first. | Experienced users, on-the-go touch-ups. |
| Using Guides/Stencils | Helps achieve a straight line, good for beginners. | Can cause polish lift/seepage, less natural edge. | Beginners, creating crisp geometrics. |
| Using a Stamp/Silicon Stamper | Can be very precise and quick once mastered. | Requires specialized tools, less common for micro tips. | Users with specific stamping kits. |
| Gel Polish (with Lamp) | Long-lasting, high shine, easy corrections before curing. | Requires lamp and gel products, removal can be longer. | Durability seekers, those comfortable with gel. |
The Versatility of Micro French Nails: Beyond the Basics
The micro French trend is far more than just white tips on nude nails. Its inherent subtlety and precision make it a fantastic base for further creativity. This is where personalization truly shines.
Color Combinations to Explore
The world is your oyster when it comes to color!
- Classic Neutrals: Creamy base with a soft white or off-white micro tip.
- Monochromatic: Using two shades of the same color family – e.g., a pale pink base with a slightly deeper rose micro tip.
- Bold & Bright: A nude or sheer base with a neon pink, electric blue, or lime green micro tip for a playful pop.
- Metallic Magic: A simple nude base with a thin strip of silver, gold, or rose gold.
- Dark & Moody: A sheer black or deep navy base with a thin, crisp white or silver micro tip.
- Jewel Tones: A deep emerald or sapphire base with a contrasting micro tip in gold or a lighter shade of the same tone.
Incorporating Other Elements
Micro French tips can be a jumping-off point for more intricate designs:
- Glitter: Add a fine glitter accent on one or two nails, or along the micro tip itself for a touch of sparkle.
- Minimalist Art: Pair your micro French with a single dot, a fine line accent, or a tiny star on another area of the nail.
- Ombré Blending: The micro French tip can act as the subtle start to a soft ombré fade on the nail.
- Negative Space: Combine the micro French tip with areas of unpolished nail (negative space) for a modern, airy look.
For instance, the Nailpro magazine highlights how micro French manicures are a nod to early 2000s aesthetics re-imagined for today’s minimalist fashion.
Maintaining Your Micro French Nails
Even the most beautiful

