Nail art has become popular in recent years, with various techniques and designs constantly emerging. Among these techniques, Sharpie nail art has been gaining attention.
It is an easy and inexpensive way to add an artistic touch to your nails and allows for endless creativity and customization. Sharpie nail art offers options for every taste, whether you want to sport a bold and vibrant design or opt for a more subtle and delicate look.
We will explore nine ways to do Sharpie nail art at home, with design ideas that cater to different preferences. From simple and elegant patterns to intricate and intricate designs, we will provide tips and tricks to help you achieve salon-worthy Sharpie nail art in the comfort of your home.
1.Black Sharpie Nail Art: Elegant Marble Nails
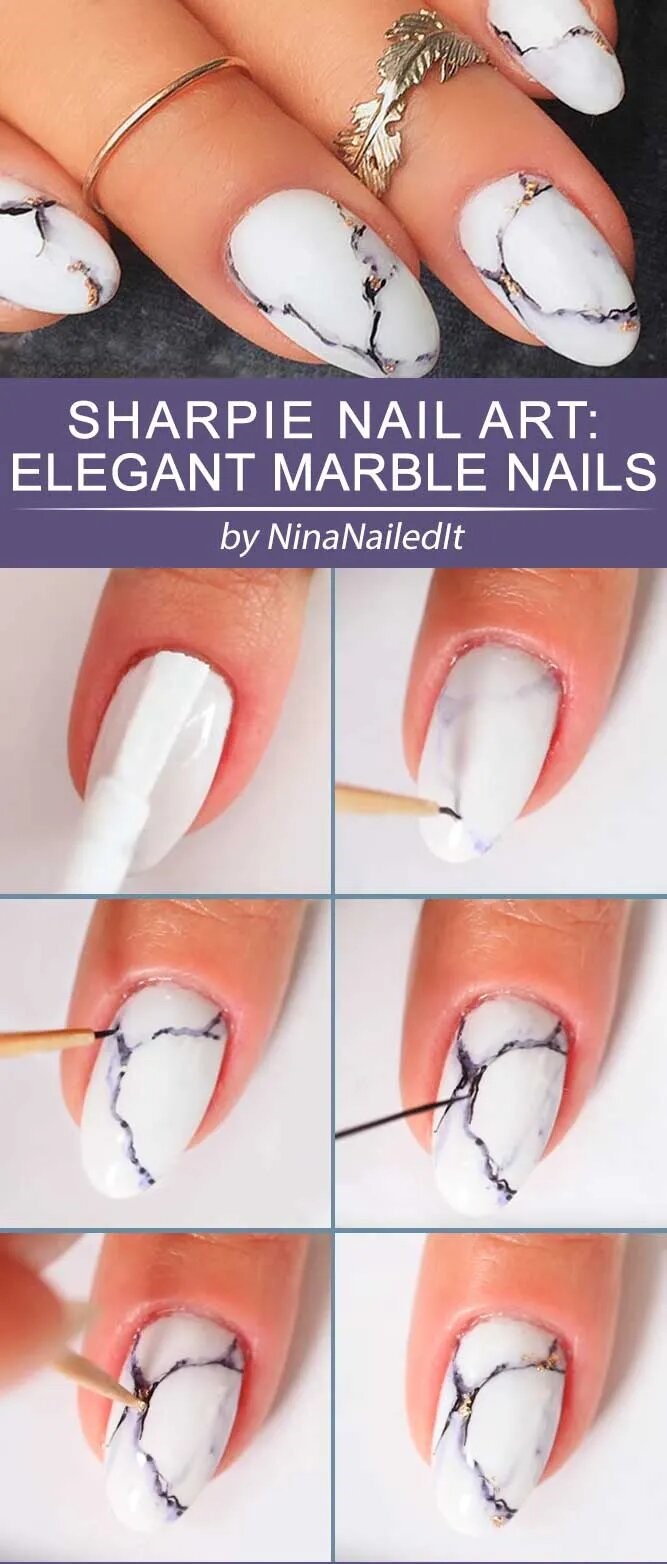
Black Sharpie nail art can add a touch of elegance to your manicure. One popular design is the marble nails, which can be achieved using a black Sharpie marker. With these simple steps, you can achieve elegant marble nails using a black Sharpie marker at home. Here are some steps to create this elegant look:
- Start by applying a base coat to protect your nails.
- Once dry, apply a white or light nail polish as the base color once dry.
- Take a black Sharpie marker and draw random lines or squiggles on your nails to create the marble effect.
- Use a small brush dipped in rubbing alcohol to blend and soften the lines, creating a more natural marble appearance.
- Let the design dry completely before applying a top coat to seal and protect the design. This will also give your nails a glossy finish.
2.Easy Diy: Sharpie Holo Glitter Gradient Nails
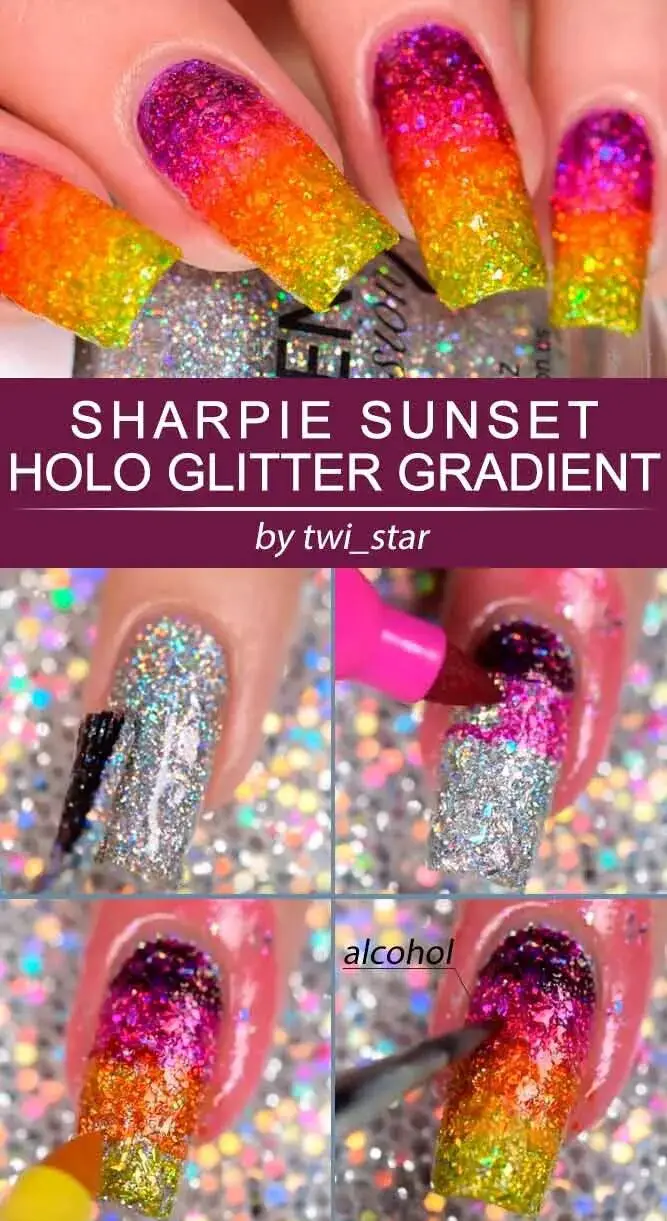
Creating a holo glitter gradient design on your nails using Sharpie markers is an easy and fun DIY project. With just a few simple steps and creativity, you can achieve stunning holo glitter gradient nails using Sharpie markers. Here’s how you can achieve this look:
- Start by applying a base coat to protect your nails.
- Choose two or three colors of Sharpie markers that you want to use for the gradient effect.
- Begin by coloring the bottom half of your nail with the lightest color, using short strokes.
- Take the next color and color over the edge where the first color ends, blending them together.
- Repeat this process with the remaining colors, creating a seamless gradient effect.
- To add some sparkle, take a silver or holographic glitter Sharpie marker and apply it to the tips of your nails, creating a gradient effect from the glitter to the colored portion of your nail.
- Finish off with a top coat to seal the design and add shine.
3.Sharpie Watercolor Nail Art With Decals
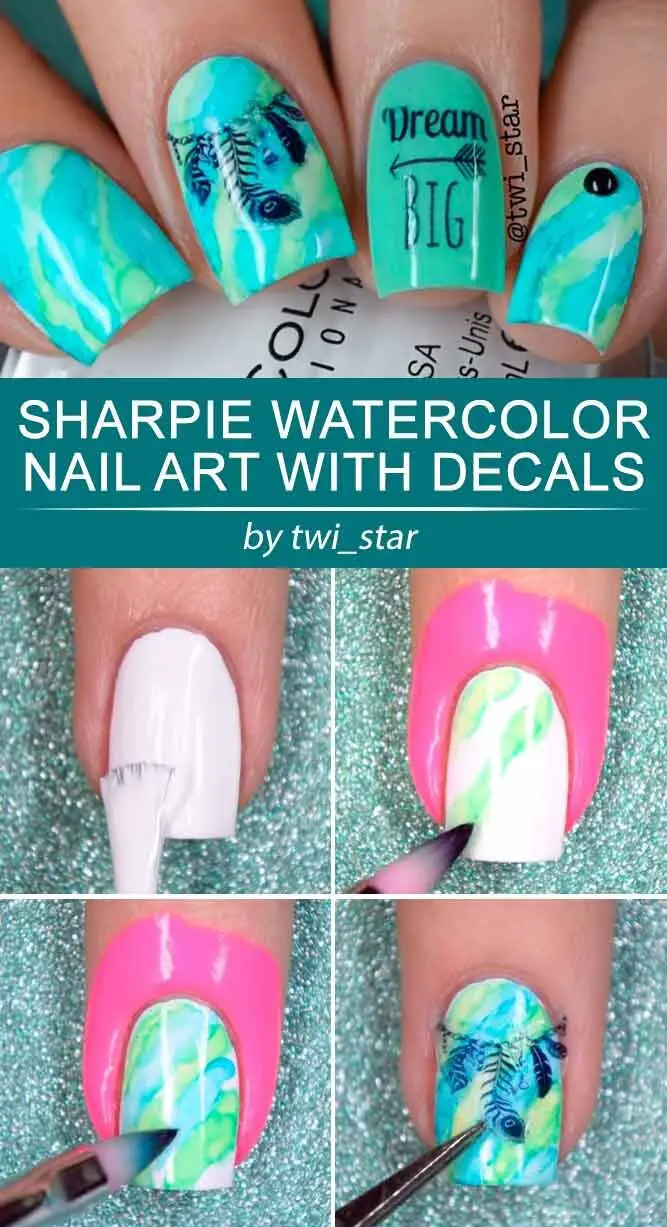
Creating sharpie watercolor nail art with decals is a fun and creative way to express your personal style. Here are some design ideas to get you started:
- Start by painting your nails with a base color of your choice. This will serve as the background for your sharpie watercolor design.
- Once the base color is dry, use a sharpie marker in different colors to create abstract shapes and patterns on your nails. You can draw flowers, swirls, or any other inspiring designs.
- To achieve the watercolor effect, dip a small brush in rubbing alcohol and lightly dab it over the sharpie design. This will blend the colors and create a soft, watercolor-like appearance.
- For added flair, apply nail decals over the dried sharpie watercolor design. This can be floral decals, geometric shapes, or any other decal that complements your design.
- Finish off with a clear top coat to protect your nail art and add shine.
4.Sharpie Nail Art Ideas: Tender Watercolor Flowers
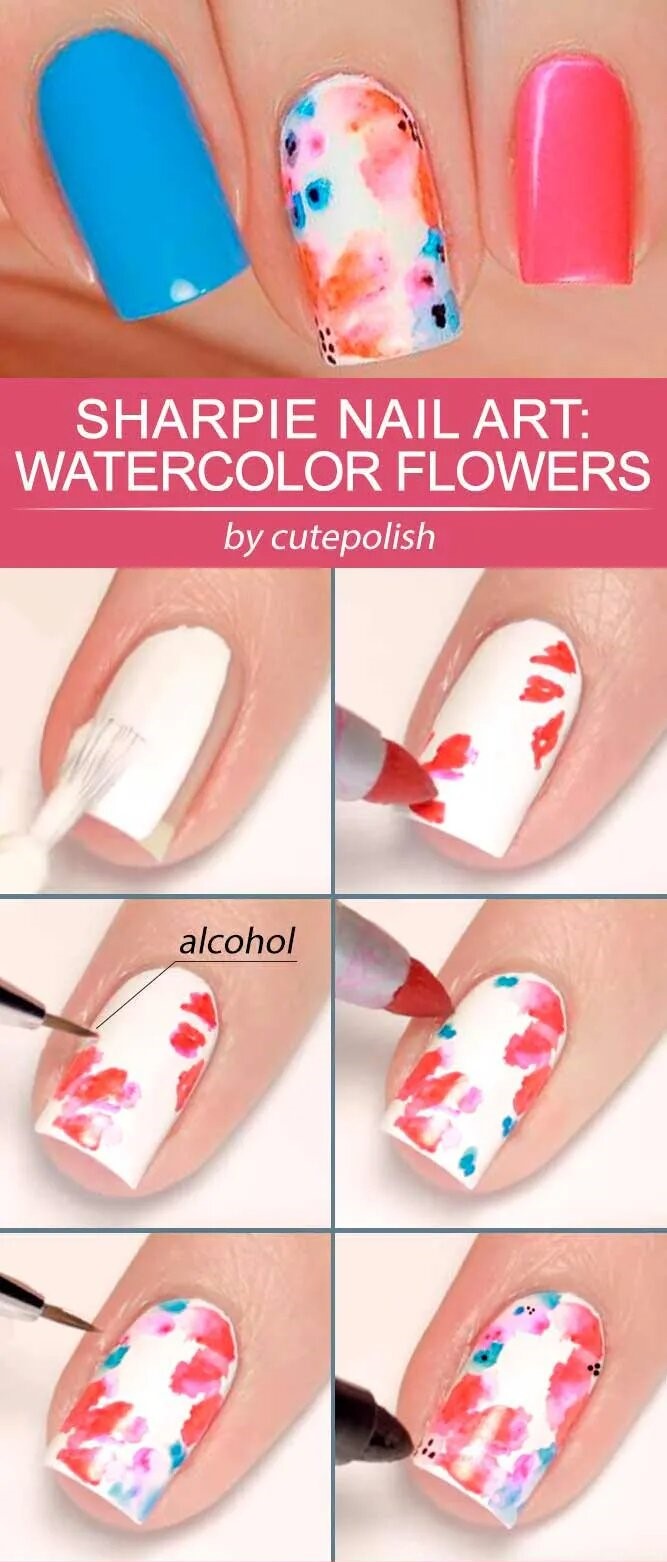
Creating tender watercolor flowers with Sharpie nail art is a fun and creative way to design your nails at home. Here are some ideas to help you achieve this beautiful look:
- Start applying a base coat to protect your nails and create a smooth surface.
- Use a light-colored nail polish as the background for your watercolor flowers. This will make the colors of the Sharpie markers pop.
- Choose a variety of Sharpie colors that you want to use for your flowers. Pastel shades work well for a soft and delicate look.
- To create the watercolor effect, lightly dab the tip of the Sharpie marker onto your nail, creating small dots or strokes. Then, using a small brush dipped in acetone or rubbing alcohol, gently blend the colors together to create a watercolor effect.
- Once you are happy with your flower design, seal it with a top coat to protect the artwork and make it last longer.
With these tips, you can easily create stunning watercolor flower designs using Sharpie markers on your nails. Let your creativity bloom and enjoy wearing your unique nail art!
5.Sharpie Manicure With Mirror Powder
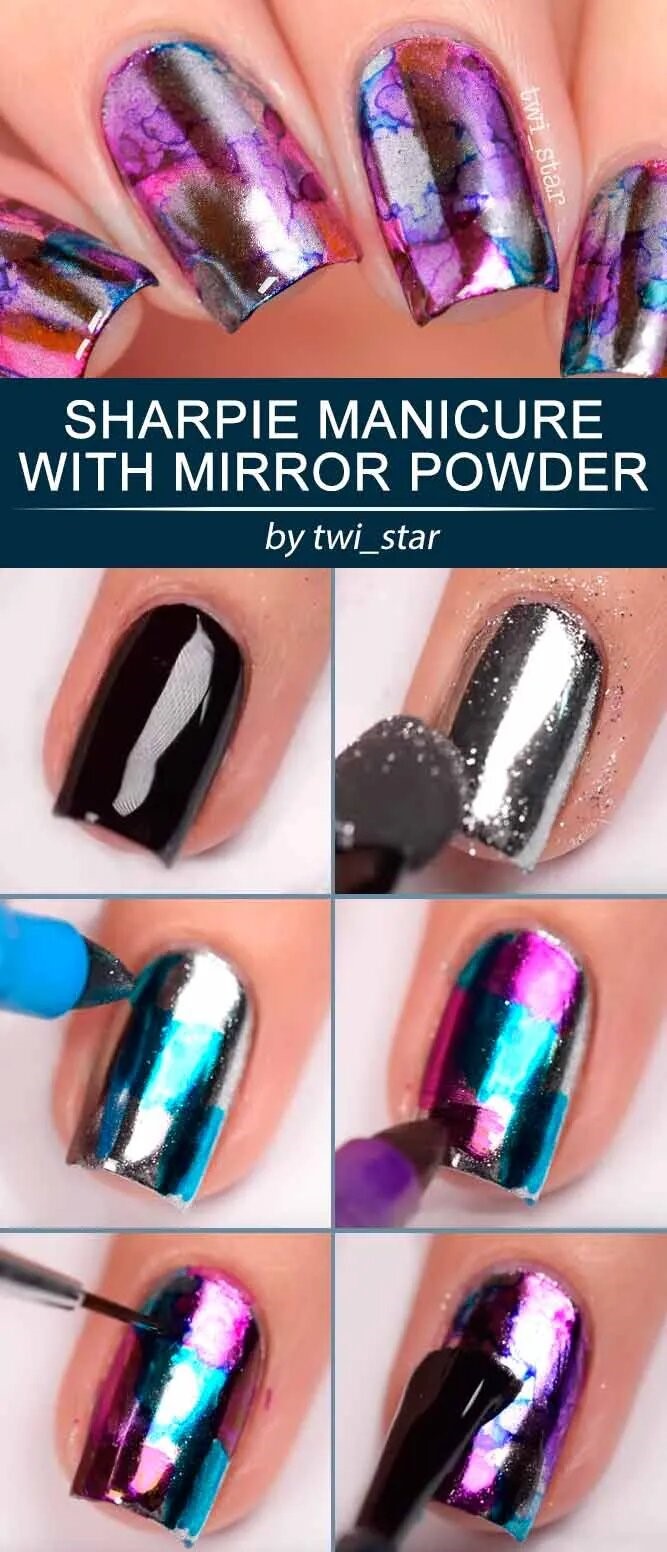
- Start applying a base coat to protect your nails and help the design adhere better.
- Choose a sharpie color that complements your desired manicure look.
- Begin drawing your desired designs directly onto your nails using the sharpie. You can get creative with patterns, shapes, or even write words or quotes.
- Once you’re satisfied with the design, let it dry for a few minutes.
- Apply a top coat layer to seal the sharpie design and add shine to your manicure.
- For an extra touch of glam, apply mirror powder over the dried sharpie design. Use a sponge applicator to lightly rub the powder onto your nails until they achieve a mirrored effect.
- Finish off with another layer of top coat to protect and prolong your sharpie manicure. Enjoy your unique and eye-catching nail art at home!
6.Watercolor Nail Art With Sharpies
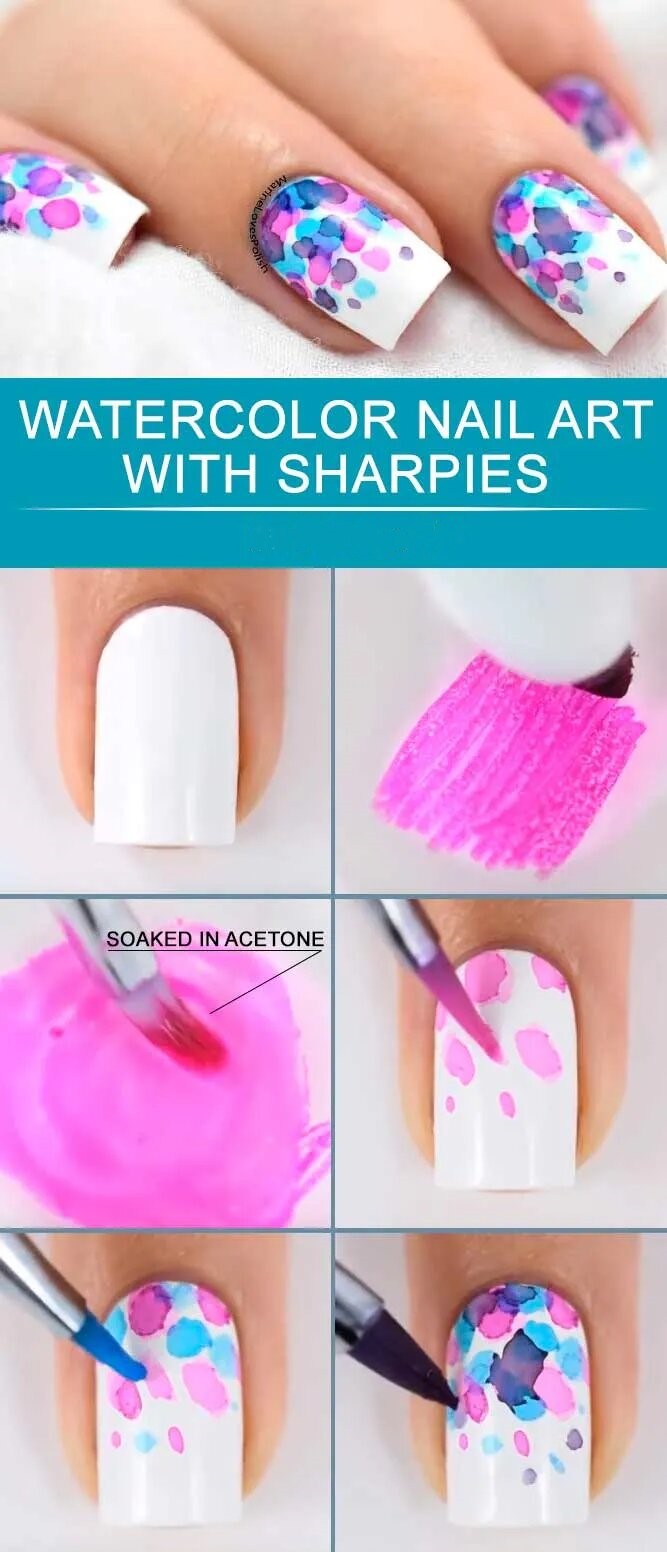 Watercolor nail art with Sharpies is a fun and creative way to add color to your nails. Here are some easy steps to achieve this look:
- Start by applying a base coat to protect your nails.
- Choose your desired Sharpie colors. Remember, watercolor effects work best with lighter shades.
- Use a white or light-colored nail polish as the base for your design. This will make the Sharpie colors stand out more.
- Take a plastic bag or piece of parchment paper and color it with your Sharpie colors.
- Dip a small brush or sponge into rubbing alcohol and dab it onto the colored plastic surface.
- Press the brush or sponge onto your nails, creating a watercolor effect.
- Repeat steps 4-6 with different colors until you achieve your desired design.
- Once dry, apply a top coat to seal in the design and add shine.
With this simple technique, you can create unique and vibrant watercolor nail art at home using Sharpies. Let your creativity flow and experiment with different colors and designs to find the perfect look for you!
7.Geometric Nail Art Using Sharpie
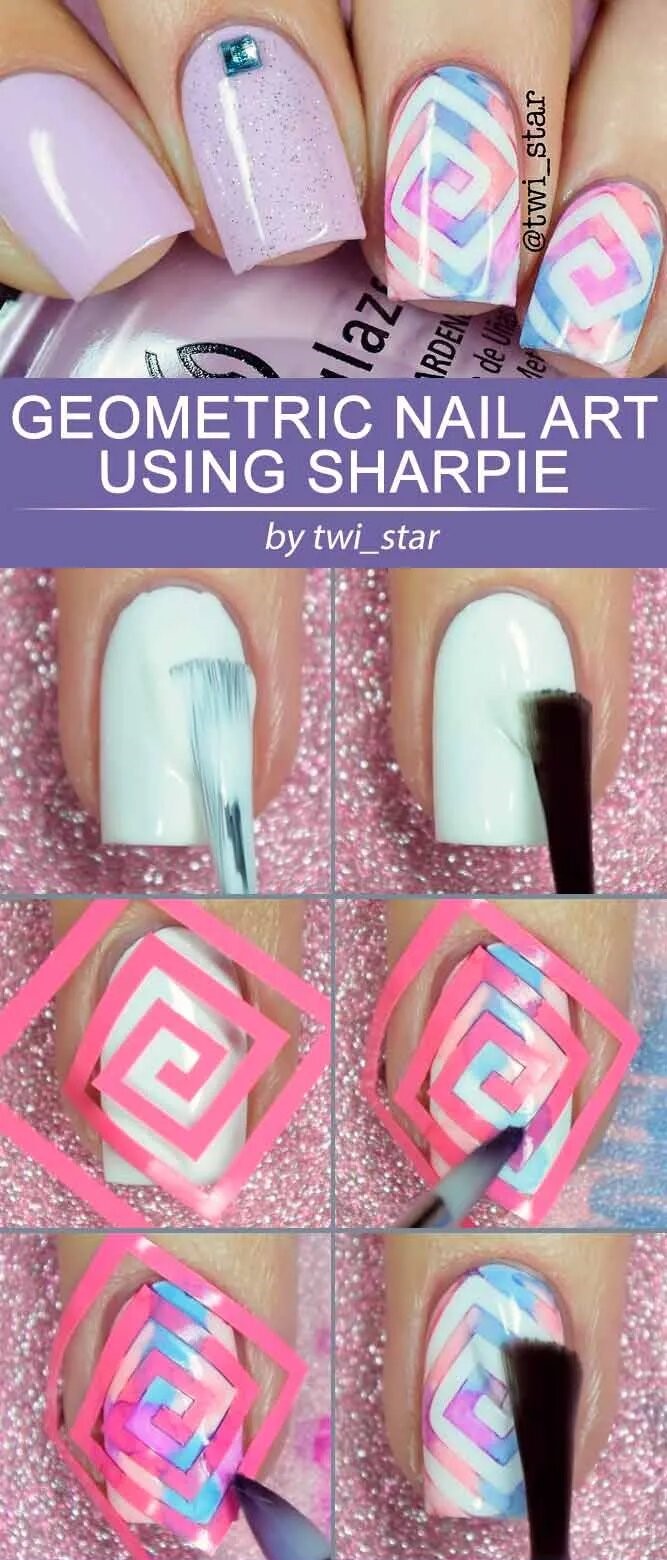
Geometric nail art using Sharpie markers is a fun and creative way to add a unique design to your nails. With just a few simple steps, you can create stunning geometric patterns that will impress. Here’s how:
- Start by applying a base coat to protect your nails.
- Once the base coat is dry, choose your desired Sharpie colors. It’s best to use bright and bold colors for a striking effect.
- Begin by drawing your chosen geometric shapes on your nails using the Sharpie markers. You can create triangles, squares, or intricate patterns like chevron or stripes.
- Allow the Sharpie designs to dry completely before applying a top coat to seal in the design and prevent smudging.
- Finish off with cuticle oil or hand cream for a polished look.
Remember, practice makes perfect! Don’t be afraid to experiment with different shapes and color combinations to find a design that suits your taste. With Sharpie nail art, the possibilities are endless!
8.Cute Sharpie Flower Nails
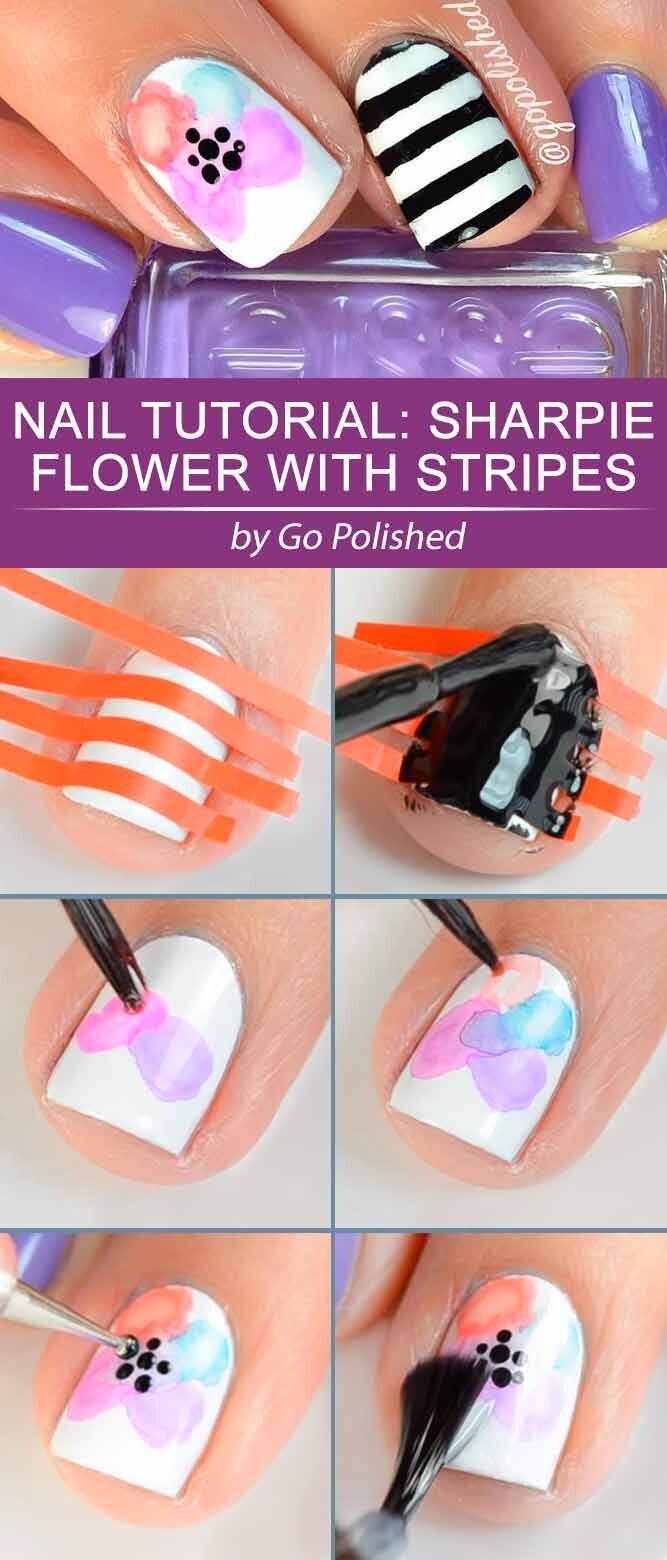
Creating cute Sharpie flower nails is a fun and easy way to add floral flair to your manicure. With these simple steps, you can achieve cute Sharpie flower nails that will turn heads and showcase creativity. Here’s how you can achieve this adorable nail art design:
- Start by prepping your nails. Make sure they are clean and free of any polish or oils.
- Choose your desired base color for the nails. Light pastel colors work well for this design.
- Once the base color has dried, use a black Sharpie marker to draw flower petals on each nail. You can create different sizes and shapes of petals to add variety.
- Next, use a different colored Sharpie marker to add dots in the center of each flower to represent the flower’s stamen.
- To make your flowers pop, add small leaves or vines using a green Sharpie marker.
- Once you are satisfied with your design, seal it with a clear top coat to protect the artwork and make it last longer.
9.The Triangle Look
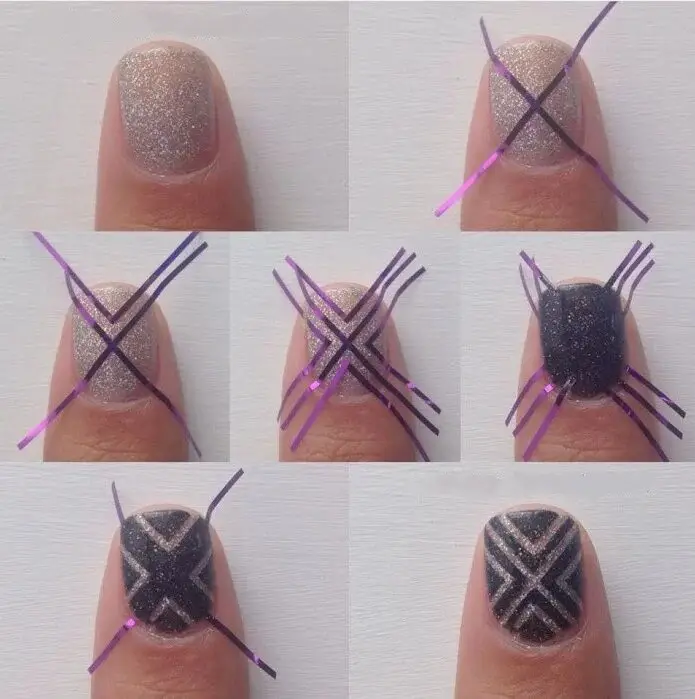
The Triangle Look is a popular nail art design that adds a modern and geometric touch to your nails. To achieve this look, apply a base coat to protect your nails. Next, choose three complementary colors and paint each nail with one color.
Once the base colors are dry, use a sharpie or thin brush to create triangle shapes on each nail. You can create different sizes and orientations of triangles to add variety to your design. Finish off with a top coat to seal the design and add shine.

