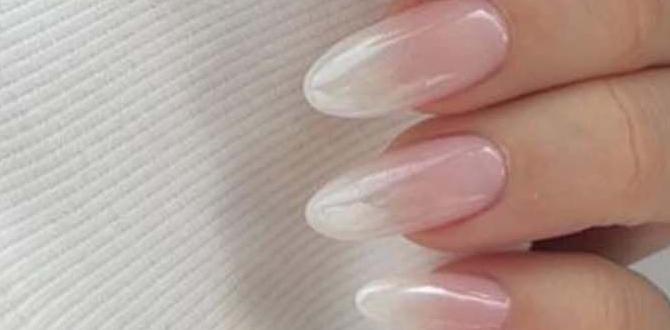
Raspberry milk nails are a soft, milky pink shade with a hint of berry warmth, offering a chic, versatile look perfect for any occasion. This trending nail color is surprisingly easy to achieve at home with just a few key steps and the right polish.
Hello, nail lovers! Are you ready to dive into one of the most delightful nail trends to grace our fingertips lately? We’re talking about raspberry milk nails! This gorgeous shade is like a creamy, dreamy hug for your nails, offering a subtle pop of color that’s both sophisticated and playful. If you’ve seen this trend and thought it looked too complicated to do yourself, think again! We’re here to break down exactly how to get those stunning raspberry milk nails, no fancy salon required. Get ready to transform your nails into a sweet, stylish statement piece!
—
Raspberry Milk Nails: Your Ultimate Beginner’s Guide
Welcome to the sweet world of raspberry milk nails! This trend has taken the beauty world by storm, and it’s easy to see why. It’s the perfect blend of sweet, creamy, and chic, offering a sophisticated yet approachable color that complements almost any outfit and skin tone. Think of it as your favorite berry smoothie, but for your nails – soft, inviting, and utterly delicious looking.
Whether you’re a complete beginner looking to try a new nail color or a seasoned pro wanting to master this specific shade, this guide is for you. We’ll cover everything from understanding the color to achieving that perfect milky finish, along with some extra tips to make your manicure last. So grab your favorite nail polish, and let’s get those nails looking absolutely stunning!
What Exactly Are Raspberry Milk Nails?
Raspberry milk nails are named for their beautiful hue, which closely resembles the color of milk mixed with a touch of raspberry syrup. It’s not a bright, bold pink, nor is it a sheer nude. Instead, it’s a creamy, opaque pink with a subtle warmth that comes from those raspberry undertones. The “milk” aspect refers to the creamy, almost opaque finish, which gives it depth and a luxurious feel. This isn’t a neon or a pastel; it’s a sophisticated, muted, yet distinct color that’s both trendy and timeless.
The beauty of raspberry milk nails lies in their versatility. They work wonderfully for:
- Everyday wear, adding a touch of polish to your daily look.
- Special occasions, offering a chic and subtle statement.
- All seasons, feeling appropriate whether it’s spring, summer, fall, or winter.
- Various skin tones, as the warm undertones tend to be universally flattering.
Why Are Raspberry Milk Nails So Popular?
In a world of bold colors and intricate nail art, raspberry milk nails offer a refreshing change of pace. Their popularity can be attributed to several factors:
Subtle Sophistication: They provide a polished look without being overly flashy. This makes them ideal for professional settings or for those who prefer a more understated elegance.
Universally Flattering Hue: The blend of creamy pink and warm berry undertones makes this shade surprisingly versatile and flattering on a wide range of skin tones.
The “Clean Girl” Aesthetic: This trend aligns perfectly with the minimalist, polished, and effortlessly chic “clean girl” aesthetic that’s been popular in beauty and fashion.
Easy to Achieve: Unlike complex nail art, achieving a solid raspberry milk nail color is relatively straightforward, making it accessible for DIY manicures.
Nostalgic Charm: There’s something comforting and a little nostalgic about milky pastel shades, evoking a sense of sweet simplicity.
Tools and Supplies You’ll Need
To achieve that perfect raspberry milk manicure at home, you’ll need a few essential items. Don’t worry, it’s simpler than you think!
Essential Nail Care Tools:
- Nail File: For shaping your nails. A medium-grit file (around 180-240 grit) is good for natural nails.
- Nail Buffer: To smooth the nail surface.
- Cuticle Pusher or Orange Stick: To gently push back cuticles.
- Nail Clippers: If you need to trim your nails.
- Cuticle Oil: To hydrate and nourish your cuticles afterwards.
For the Polish Application:
- Base Coat: Crucial for protecting your natural nails and making polish last longer. A good ridge-filling base coat can also create a smoother canvas.
- Raspberry Milk Nail Polish: This is your star! We’ll talk more about finding the right shade below.
- Top Coat: To seal your color, add shine, and prevent chipping. A quick-dry top coat is a lifesaver!
- Cotton Balls/Pads & Nail Polish Remover: For cleaning up mistakes and removing old polish.
- Optional: Gel Polish System: If you prefer gel manicures, you’ll need a gel base coat, raspberry milk gel polish, gel top coat, and a UV/LED nail lamp.
Finding Your Perfect Raspberry Milk Polish
This is where the magic happens! When searching for your “raspberry milk” shade, look for polishes that fall into these categories:
Opaque Pink Creams: The base should be a solid, creamy pink.
Warm Undertones: Seek out shades that have a hint of warm, berry-like undertones, not cool or blue-toned pinks.
Milky Finish: The formula should be opaque enough to cover the nail evenly without streaks, giving that signature milky look.
You might find polishes labeled as:
- Creamy Pink
- Milky Rose
- Dusty Raspberry
- Soft Berry Cream
- Opaque Blush
Don’t be afraid to experiment! Sometimes a slightly sheerer pink layered with a white polish can create a similar effect. Online swatches and reviews are your best friend here!
Step-by-Step Guide to Achieving Raspberry Milk Nails
Ready to get painting? Follow these simple steps for a flawless raspberry milk manicure.
Step 1: Prep Your Nails
Good prep is the foundation of a great manicure.
- Remove Old Polish: If you have any old polish on, use nail polish remover and a cotton pad to clean your nails thoroughly.
- Shape Your Nails: Use your nail file to shape your nails into your desired shape. File in one direction to avoid weakening the nail.
- Smooth the Surface: Gently buff away any ridges or imperfections with a nail buffer. Don’t over-buff, especially if you have thin nails.
- Push Back Cuticles: Apply a tiny bit of cuticle oil or remover, wait a minute, and then gently push back your cuticles with a cuticle pusher or orange stick. Avoid cutting them if you’re a beginner; pushing them back is safer.
- Cleanse: Wipe each nail with nail polish remover or rubbing alcohol on a cotton pad to remove any oily residue. This ensures your polish adheres well.
Step 2: Apply the Base Coat
A base coat is non-negotiable!
- Apply one thin, even coat of your base coat.
- This protects your natural nails from staining and helps your color last longer.
- Let it dry completely (usually 30-60 seconds).
Step 3: Apply the Raspberry Milk Polish
This is the fun part!
- First Coat: Apply a thin, even layer of your raspberry milk polish. Start with a bead of polish in the center of the nail, then brush down to the tip, followed by strokes on each side. Avoid flooding your cuticles.
- Let it Dry: Allow the first coat to dry for a minute or two. This is crucial for preventing streaks and air bubbles.
- Second Coat: Apply a second thin coat. This coat should provide full opacity and deepen the color. If you’re still seeing VNL (Visible Nail Line) or streaks, wait a bit longer and consider a third thin coat. Two thin coats are usually better than one thick one.
Step 4: Apply the Top Coat
Seal the deal!
- Once the color coats are completely dry, apply a generous layer of your top coat.
- Make sure to cap the free edge of your nail by running the brush along the tip. This is a key step for preventing chips.
- Let your top coat dry thoroughly. A quick-dry formula can significantly speed this up!
Step 5: Final Touches
Once everything is dry:
- Apply a drop of cuticle oil to each nail.
- Gently massage it into your cuticles to rehydrate them.
- Wipe away any excess oil.
And there you have it – beautiful raspberry milk nails!
Variations and Creative Twists
While the classic raspberry milk shade is divine on its own, don’t hesitate to play around and add your personal touch!
Milky Finish Techniques:
If your chosen polish isn’t quite “milky” enough, here are a few tricks:
- Layering sheer polishes: Apply a sheer pink or berry polish, let it dry, then apply one or two coats of a sheer, opaque white or milky nude polish over the top.
- Translucent white polish: Some brands offer “sheer white” or “milky white” polishes that are designed to be layered over other colors to add that opaque, milky effect.
- Building opacity: Patience is key! Applying multiple thin coats of your raspberry shade can build up the creamy, opaque finish without making the polish thick and prone to chipping.
Subtle Accents for a Pop:
Want to add a little something extra? Try these subtle accents:
- Single Accent Nail: Paint one nail on each hand in a slightly different shade, like a deeper berry, a soft white, or even a subtle glitter.
- Tiny Dot or Rhinestone: Place a small, delicate silver or gold rhinestone at the base of one or two nails, or a tiny dot near the cuticle.
- Half-Moon Manicure: Leave the cuticle area (the half-moon) bare or paint it in a contrasting nude or white for a chic, modern look.
- Subtle Ombre: Blend your raspberry milk shade with a sheer nude or a soft white at the tips for a gradient effect.
Caring for Your Raspberry Milk Nails
To keep your stunning raspberry milk nails looking fresh and fabulous for as long as possible, follow these simple care tips:
- Reapply Top Coat: Every 2-3 days, apply another layer of top coat to refresh the shine and add protection against wear and tear.
- Moisturize! Keep your hands and cuticles hydrated. Dryness can lead to hangnails and make your manicure look dull. Use cuticle oil and hand cream regularly.
- Wear Gloves: When doing chores like washing dishes, cleaning, or gardening, wear gloves to protect your nails from harsh chemicals and excessive water exposure, which can lead to chipping and lifting.
- Avoid Using Nails as Tools: Resist the urge to ‘help’ open packages or scrape things with your nails. This is a surefire way to cause chips and breaks.
- Gentle Removal: When it’s time to change your color, use a good quality nail polish remover and soak your nails rather than vigorously scrubbing. This is especially important for gel polishes.
Finding the Perfect Polish Shade: A Comparison
Choosing the right nail polish can be tricky. Different brands and formulas can result in slightly different looks. Here’s a comparison table to help you navigate your options for achieving that ideal raspberry milk finish:
| Polish Type | Pros | Cons | Ideal For |
|---|---|---|---|
| Classic Cream Polish | Widely available, affordable, easy to apply and remove. Offers a smooth, opaque finish. | May chip faster than gel, requires drying time. Can sometimes show brush strokes if applied too thickly. | Beginners, everyday wear, quick touch-ups. |
| Jelly/Sheer Polish + White/Milky Polish | Allows for custom color mixing, creates a unique depth and milky effect. | Requires more steps and precision to get the right color balance and opacity. Can be streaky if not applied carefully. | Those who want a truly custom, luminous raspberry milk shade. |
| Gel Polish | Incredibly durable, high-shine finish, lasts 2-3 weeks without chipping. Faster application with quick-dry lamp. | Requires a UV/LED lamp and specific removal process. Can be more expensive initially. Not ideal for frequent color changes. | Long-lasting manicures, durability, salon-quality finish at home. |
| “One-Step” Gel/Hybrid Polish | Combines base, color, and top coat. Easy to use, no lamp needed for some formulas, durable finish. | Durability varies by brand. May not be as long-lasting as traditional gel. | Convenience with good durability, for those who want a step up from regular polish without a full gel kit. |
When searching for the raspberry milk shade, looking at swatches on different skin tones can be incredibly helpful. What looks like a perfect raspberry milk on one person’s hand might appear slightly different on yours, due to undertones. A quick peek at reputable beauty blogs or YouTube swatch videos can give you a great idea of how shades look in real life.
Expert Tips for a Flawless Finish
As someone who loves a good manicure, I’ve picked up a few tricks over the years that can elevate your raspberry milk nail game from good to absolutely stunning!
- Thin Coats are Key: This is the golden rule of nail polish. Thick coats take longer to dry, are more prone to smudging, and can look clumpy. Aim for thin, even layers for a smooth, professional finish.
- The “Three-Stroke” Method: For each coat of polish, start with a bead of polish in the center of your nail, swipe down to the tip, then one stroke on each side of the nail. This helps ensure even coverage.
- Clean Up Mistakes Immediately: Keep a small brush (like a clean makeup brush or a fine-tipped art brush) dipped in nail polish remover handy. Dip the tip in remover and use it to clean up any polish that got onto your skin or cuticles right after you apply it. This makes a huge difference!
- Don’t Forget the Capping: Running your top coat brush along the very edge (free edge) of your nail is called “capping.” This seals the polish and is one of the best ways to prevent chips and lifting.
- Let Polish Fully Cure: Even with quick-dry top coats, try to avoid strenuous activity with your hands for at least an hour after your manicure. The polish continues to harden and “cure” for a while after it feels dry to the touch. You can learn more about how nail polish dries and cures from resources like Scientific American.
- Consider a Ridge Filler Base Coat: If your natural nails have a lot of texture or ridges, a ridge-filling base coat will create a smoother canvas for your raspberry milk polish, leading to a much more even and professional look.
- Experiment with Finishes: While creamy and opaque is the classic raspberry milk look, try a matte top coat for a trendy, velvety finish, or a subtle iridescent shimmer top coat for a little extra sparkle.
Frequently Asked Questions (FAQ)
Got questions about raspberry milk nails? We’ve got answers!
Q1: What skin tones look best with raspberry milk nails?
A: Raspberry milk nails are wonderfully versatile! The warm, berry undertones make them particularly flattering on medium to deep skin tones. However, lighter skin tones can also rock this shade; it just might appear a bit brighter and more statement-making. The creamy, milky aspect softens the pink, making it more adaptable than a vibrant fuchsia.
Q2: Is raspberry milk a warm or cool tone?
A: Raspberry milk nails are generally considered a warm-toned pink. The “raspberry” aspect brings in those warmer, reddish-berry undertones, while the “milk” aspect gives it a creamy, softened opacity. This warmth is what makes it so universally flattering.
Q3: How many coats of polish do I need for raspberry milk nails?
A: Typically, two thin coats of a good quality raspberry milk polish are enough to achieve a creamy, opaque finish without streaks. If your polish is more sheer, or you want a deeper color, a third thin coat might be necessary. Always ensure each coat is dry before applying the next.
Q4: Can I achieve raspberry milk nails with regular nail polish, or do I need gel?
A: Absolutely! You can achieve stunning raspberry milk nails with regular nail polish. The key


