Quick Summary: Rainbow French tips are a fun and stylish twist on a classic manicure. This guide shows beginners how to achieve stunning rainbow French tips at home with easy-to-follow steps and essential tools, making a vibrant statement that’s surprisingly achievable!
French manicures have been a go-to for chic nails for ages. But sometimes, classic can feel a little… well, classic. If you’re looking to add a splash of color and personality to your fingertips without going overboard, rainbow French tips are your new best friend! They’re playful, eye-catching, and a fantastic way to express your vibrant side. You might think they look complicated, but with a few simple tricks, you can rock this trend right at home. Get ready to brighten up your look with a dazzling display of color!
Why Rainbow French Tips Are a Must-Try Trend
Who says French tips have to be white? Rainbow French tips take a beloved nail art staple and inject it with pure joy. It’s like a party on your fingertips! This trend is super versatile and can be adapted to any occasion, from a casual day out to a fun celebration. They offer a burst of color that instantly lifts your mood and your entire look. Plus, they’re a brilliant way to experiment with color combinations you might not normally try.
The beauty of this design lies in its ability to be both sophisticated and incredibly fun. The clean lines of the French tip keep it elegant, while the rainbow colors add a playful, modern edge. It’s the perfect balance that appeals to everyone from nail art novices to seasoned pros. Ready to learn how to create this stunning look?
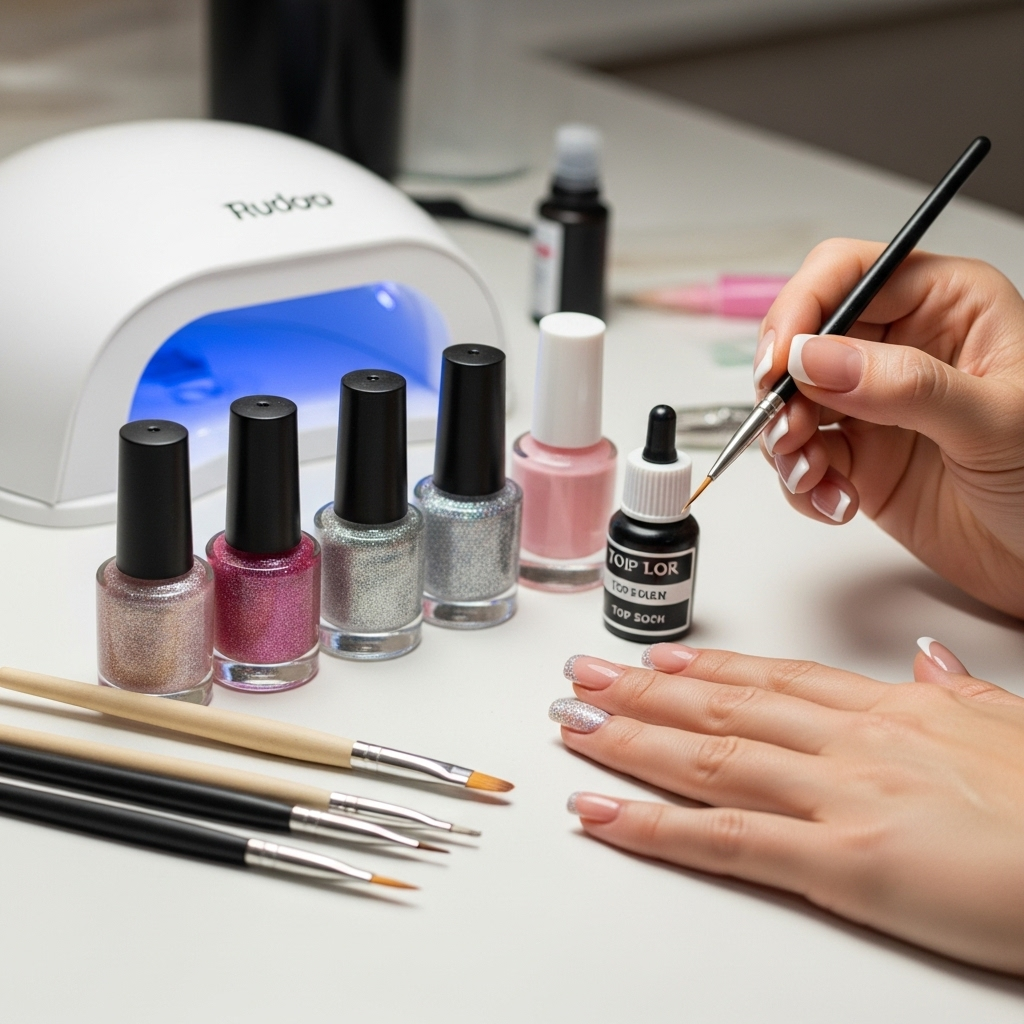
Essential Tools You’ll Need for Rainbow French Tips
Don’t let the idea of multiple colors intimidate you! Gathering the right tools makes the process smooth and enjoyable. Think of these as your trusty sidekicks in creating your masterpiece. Having these on hand means you’re all set for a seamless application.
- Base Coat: This is your nail’s best friend! It protects your natural nail from staining and helps your polish adhere better, making your manicure last longer. A good base coat is non-negotiable for healthy, beautiful nails.
- Assorted Bright Nail Polishes: You’ll need your chosen rainbow colors! Pick vibrant shades that pop. Think red, orange, yellow, green, blue, and purple. Even a few colors can create a beautiful gradient.
- Clear Top Coat: This seals in your design, adds a beautiful shine, and protects your rainbow tips from chipping. A high-quality top coat is key to making your manicure last.
- Thin Nail Art Brush or Striping Tape: This is crucial for creating those clean, precise lines. A fine-tipped brush gives you control, while striping tape can help beginners achieve a perfectly straight line.
- Nail Polish Remover: For inevitable little smudges or mistakes. A little acetone can be a lifesaver!
- Cotton Pads or Q-Tips: To apply the nail polish remover cleanly.
- Optional: Dotting Tools: If you want to add tiny dots to transition colors or create a unique effect, dotting tools are excellent.
Step-by-Step Guide: Creating Your Own Rainbow French Tips
Let’s get down to business! This guide is designed to be super easy to follow, even if you’ve never done nail art before. We’ll break it down into simple steps so you can achieve salon-worthy results in no time.
Step 1: Prep Your Nails
Start with clean, dry nails. Gently push back your cuticles using an orange stick or cuticle pusher. If your nails are uneven, file them to your desired shape. For a smooth canvas, a light buffing with a nail buffer can work wonders. Make sure to wipe away any dust.
Step 2: Apply Your Base Coat
Apply one thin layer of your clear base coat. This step is super important! It helps prevent your colorful polishes from staining your natural nails and gives your manicure something to grip onto, helping it last longer. Let it dry completely.
Step 3: Choose Your Rainbow Color Application Method
This is where the fun begins! You have a couple of great options for applying your rainbow colors to the tips. Let’s look at two popular methods:
Method A: Using a Nail Art Brush for a Gradient Effect
This method is fantastic for a seamless, blended rainbow look. It takes a little patience, but the result is stunning!
- Start with Your First Color: Apply your first rainbow color (e.g., red) to the very tip of your nail. You want a nice, opaque line.
- Clean Your Brush: Wipe your nail art brush clean.
- Apply the Second Color: Gently overlap and blend the edge of your second color (e.g., orange) onto the first color. Think of it like feathering the edges together slightly.
- Continue the Rainbow: Repeat this process with each subsequent color (yellow, green, blue, purple), blending each one into the previous color towards the cuticle. Don’t worry if it’s not perfectly smooth; the colors will meld as they dry.
- Clean Up: Use a small brush dipped in nail polish remover to clean up any stray polish around your cuticles or fingertips.
Method B: Using Striping Tape for Defined Lines
This method is perfect for those who want crisp, clean lines for each color of the rainbow. It’s a bit more structured.
- Apply a Base Color: Paint your entire nail with a light, neutral color or even a clear polish. Let it dry completely.
- Place Your First Striping Tape: Carefully apply a strip of nail art striping tape across the tip of your nail, where you want your first colored stripe to end. Press it down firmly.
- Paint Your First Color: Apply your first rainbow color (e.g., red) over the tape and the tip of the nail. Make sure the coat is even.
- Remove Tape While Wet: Immediately after painting, carefully peel off the striping tape. If you wait for the polish to dry, it will likely peel off with the tape, creating a mess.
- Let It Dry and Repeat: Let the first color dry completely. Then, apply your next strip of tape above the first color, leaving space for your next rainbow shade. Repeat steps 3-4 with your next color (e.g., orange), and continue this process for each color in your rainbow.
- Clean Lines: Once all colors are dry, you should have distinct, colorful stripes. Clean up any edges with a small brush and remover.
Step 4: Let Them Dry
Allow your rainbow layers to dry completely. This is critical! If your polish is still wet, your top coat will smudge everything. Patience is key here.
Step 5: Apply Your Top Coat
Once everything is dry, apply a generous layer of your clear top coat. Make sure to cap off the free edge of your nails by running the brush along the tip of your nail. This helps prevent chipping and seals in your beautiful rainbow design.
Step 6: Admire Your Work!
Give your nails a moment to fully cure. Then, step back and admire your stunning, homemade rainbow French tips! You did it!
Choosing Your Rainbow Palette: Tips for Success
The beauty of rainbow French tips is that you can customize them to your heart’s content. Here are some ideas to help you pick your perfect palette:
- Classic ROYGBIV: Red, Orange, Yellow, Green, Blue, Indigo, Violet. This is the traditional rainbow spectrum and always looks vibrant.
- Pastel Rainbow: Soft pink, baby blue, mint green, lavender, pale yellow. Perfect for a sweet and dreamy look.
- Jewel-Toned Rainbow: Emerald green, sapphire blue, amethyst purple, ruby red, citrine yellow. Creates a rich and luxurious feel.
- Neon Rainbow: Bright, electric shades that really pop! Great for a bold, statement-making manicure.
- Ombre Rainbow: Instead of distinct lines, blend the colors seamlessly from one tip to the next across all your nails, or even blend them within each tip’s stripe.
Don’t be afraid to mix and match! You can also use glitter polishes for an extra sparkle in your rainbow.
Troubleshooting Common Issues
Even the most experienced nail art enthusiasts encounter a few hiccups. Here are some common problems and how to fix them:
- Smudged Polish: If you smudge while applying a new layer or top coat, gently use a brush dipped in nail polish remover to clean up the area. If it’s a major smudge, you might need to remove that nail’s color and start that specific tip section again.
- Uneven Lines: For brush-applied lines, try to keep a steady hand and use the side of the brush. For tape application, ensure the tape is pressed down firmly and removed cleanly. Practice makes perfect!
- Polish Not Drying: Some polishes, especially thicker ones, take longer to dry. Ensure you’re applying thin coats. A fast-drying top coat can also help speed things up. You can also try quick-dry drops.
- Staining: This is why a good base coat is so important! If you notice staining, ensure you use a barrier polish next time and consider a nail polish remover with strengthening ingredients.
Maintenance and Longevity
To keep your rainbow French tips looking fabulous for as long as possible, follow these simple tips:
- Wear Gloves for Chores: Protect your hands and nails when doing dishes, cleaning, or gardening.
- Avoid Using Nails as Tools: Don’t use your nails to pry things open or scrape labels.
- Reapply Top Coat: Every couple of days, apply a fresh layer of top coat to refresh the shine and add an extra layer of protection.
- Moisturize: Keep your cuticles and hands hydrated with cuticle oil and hand cream. Healthy cuticles make a manicure look tidier.
Comparing Rainbow French Tip Techniques
Choosing the right method depends on your skill level and the look you’re going for. Here’s a little comparison:
| Method | Best For | Pros | Cons | Skill Level |
|---|---|---|---|---|
| Nail Art Brush (Gradient) | Seamless color blending, fluid rainbow effect | Can achieve beautiful ombre effects, allows for artistic freedom | Requires a steady hand, blending can be tricky initially | Intermediate |
| Striping Tape (Defined Lines) | Crisp, clean edges between colors | Achieves sharp lines with precision, beginner-friendly for straight edges | Tape can sometimes lift polish if not removed correctly, limited blending | Beginner to Intermediate |
| Freehand with Regular Polish Brush | Thicker stripe of color before adding detail | Uses tools you likely already have, good for bold stripes | Difficult to get thin, precise lines, prone to pooling | Beginner |
Beyond the Tips: Adding Extra Flair
Once you’ve mastered the basic rainbow French tip, why not experiment with variations?
- Reverse French Tips: Apply the rainbow colors to the cuticle line instead of the tips.
- Accent Nail Rainbow: Do rainbow French tips on just one or two nails to make them pop against a more neutral manicure.
- Glitter Rainbow: Incorporate glitter polishes into your rainbow for extra sparkle.
- Stamping and Decals: Use rainbow-colored nail stamps or decals over a French tip base for an instant design. A quick search for “nail stamping techniques” can offer further inspiration.
Remember, nail art is all about self-expression! There are no strict rules, so have fun with it!
Frequently Asked Questions About Rainbow French Tips
Q1: How long do rainbow French tips usually last?
With proper application and care, including a good base and top coat and avoiding harsh chemicals, rainbow French tips can last anywhere from 7 to 14 days. Reapplying top coat every few days can extend their life.
Q2: Can I do rainbow French tips if I have short nails?
Absolutely! Rainbow French tips look fantastic on short nails. The key is to keep the colored stripe proportionate to the length of your nail bed. A thinner stripe often works best on shorter nails.
Q3: What’s the easiest way for a beginner to do rainbow French tips?
For beginners, using striping tape is often the easiest way to achieve clean lines. Alternatively, you can use a thin nail art brush and focus on making each colored stripe relatively thick to start, then gradually refine them as you practice.
Q4: Can I use gel polish for rainbow French tips?
Yes, gel polish is excellent for rainbow French tips! Gel polish offers incredible durability and shine. The application process is similar, but you’ll need a UV or LED lamp to cure each layer of gel polish. Always follow the manufacturer’s instructions when working with gel polish products.
Q5: What if my colors blend together too much?
If you’re using a brush and the colors are blending too much, allow each color to dry a little longer before applying the next, or use less polish on your brush. When using tape, ensure you’re removing the tape cleanly before applying the next layer. A clean-up brush with remover can fix minor overlaps.
Q6: How many colors do I need for a rainbow?
You don’t need all seven traditional rainbow colors! Even three or four well-chosen vibrant colors can create a beautiful and impactful rainbow French tip. Think about color combinations that you love.
Conclusion: Unleash Your Inner Artist with Rainbow French Tips
Rainbow French tips are more than just a trend; they’re a joyful expression of creativity and personal style. They prove that you don’t need to be a professional nail artist to achieve stunning, eye-catching results. Whether you opt for the smooth blend of a gradient brush or the crisp precision of striping tape, this manicure is achievable and incredibly rewarding.
Remember to have fun with the process! Experiment with different color palettes, play with techniques, and embrace any little imperfections as part of your unique design. With the right tools and this simple guide, you’re well-equipped to create beautiful, vibrant rainbow French tips that will brighten your day and turn heads. So grab your polishes, get creative, and let your fingertips shine with all the colors of the rainbow!