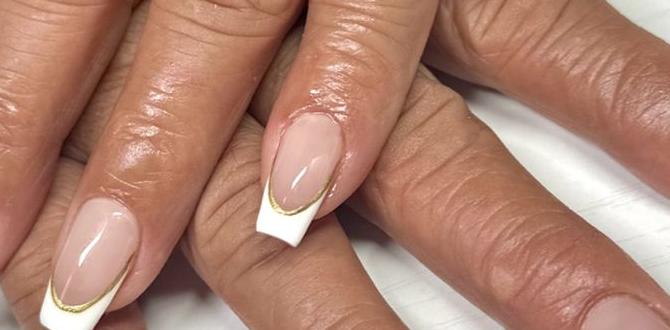
Party nail art is your secret weapon to a dazzling finish for any celebration! From glitz and glam to subtle chic, these essential designs are surprisingly easy to create and instantly elevate your look. Get ready to shine with stunning, confidence-boosting nail art perfect for beginners.
Getting ready for a party can feel like a whirlwind! You’ve picked out your outfit, planned your makeup, but what about your nails? You want them to be special, to be a little sparkle of the party spirit. But maybe the thought of intricate designs feels overwhelming, or you worry you don’t have the right tools or skills. Don’t fret! We’re here to show you that stunning party nail art is absolutely within your reach. We’ll break it down into simple steps, focusing on designs that look amazing without needing pro-level expertise. Let’s get those nails holiday-ready and ready to impress!
Why Party Nail Art is Essential for Your Look
Think of your nails as the finishing touch to your entire party ensemble. They’re like the perfect accessory that ties everything together. When your nails look polished and festive, it subtly boosts your confidence. They become a conversation starter, a little hint of your personality shining through. For any event, whether it’s a casual get-together with friends, a formal holiday dinner, or a New Year’s Eve bash, well-done party nail art can truly make you feel more put-together and celebratory.
It’s not just about looking good; it’s about feeling good. A touch of sparkle, a bold color, or a cute design can instantly lift your mood and make you feel more in the spirit of the occasion. And the best part? You don’t need to spend a fortune at the salon. With a few basic tools and some easy techniques, you can create salon-worthy looks right at home. We’ll guide you through everything you need to know to make your nails the star of the show!
Getting Started: Essential Tools and Supplies
Before we dive into the fun designs, let’s gather our party nail art toolkit! Don’t worry if you don’t have everything on this list right away. You can start with the basics and build your collection as you try more designs. Having the right supplies makes the process smoother and the results so much better. Think of these as your creative companions for all things nails!
Here’s a breakdown of what you’ll need:
The Must-Haves:
- Nail Polish: A variety of colors is key! Think classic reds, sophisticated blacks, shimmery golds and silvers, and fun glitters.
- Base Coat: This protects your natural nail from staining and helps your polish adhere better for longer wear.
- Top Coat: This seals in your design, adds shine, and prevents chips. A quick-dry top coat is a lifesaver!
- Nail Polish Remover: For correcting mistakes or when it’s time for a new design. Acetone-free is gentler on your nails.
- Cotton Balls or Pads: For removing polish.
For the Designs:
- Thin Nail Art Brushes: These are crucial for drawing fine lines, dots, and small details. Look for a set with various tip sizes.
- Dotting Tools: These have small metal balls at the end, perfect for creating perfect polka dots and swirls. They come in various sizes, too!
- Toothpicks or a Pin: A surprisingly effective and readily available tool for small details and creating marbling effects.
- Tweezers: Great for picking up tiny rhinestones or glitter pieces and placing them precisely.
- Small Dish or Palette: To place a small amount of polish you’re using for detailing.
Optional (But Fun!):
- Nail Striping Tape: Creates super crisp, clean lines, perfect for geometric designs.
- Stencils: For easy, repeatable patterns.
- Rhinestones, Glitter, Sequins: For that extra touch of sparkle and dimension.
- UV/LED Lamp: If you plan to use gel polish for extra durability.
Remember, practicing with your tools is part of the fun! Don’t be afraid to experiment. You can find many of these supplies at your local drugstore, beauty supply store, or online retailers like Amazon. For more in-depth information on nail care basics, the American Academy of Dermatology Association offers great advice on keeping your nails healthy.
5 Stunning & Easy Party Nail Art Designs for Beginners
Now for the exciting part! We’ve picked out some fantastic party nail art ideas that are simple to achieve but deliver maximum impact. These designs are perfect for anyone new to nail art. We’ll walk you through each one step-by-step.
Design 1: Glitter Fade (Ombre) Nails
This is a classic for a reason! A glitter fade looks super sophisticated and festive, but it’s incredibly easy to do. It’s like a little bit of magic on your fingertips.
What You’ll Need:
- Base coat and top coat
- Your favorite polish color (e.g., deep blue, black, burgundy)
- Glitter polish (silver, gold, or iridescent works well)
- A makeup sponge (a clean, dry kitchen sponge cut into a small piece works too!)
Step-by-Step Guide:
- Prep: Apply your base coat and let it dry. Then, apply two thin coats of your chosen polish color, letting each coat dry completely.
- Start the Fade: Take your makeup sponge and apply a layer of glitter polish onto the tip of the sponge. Don’t overload it.
- Dab It On: Gently dab the sponge onto the tips of your nails. You want to concentrate the glitter at the very tips and gradually fade it down. Reapply glitter to the sponge as needed, dabbing a little lower on the nail each time to create the gradient effect.
- Layer Up: Repeat the dabbing process until you achieve your desired glitter coverage. You can build up the intensity gradually.
- Clean Up: Use a small brush dipped in nail polish remover to clean up any glitter that got on your skin or cuticles.
- Seal It: Once everything is dry, apply a generous coat of your top coat to seal in the glitter and smooth out any texture.
Pro Tip: For a smoother finish, you can dab a little of your base color polish over the glitter fade before the final top coat. This helps to blend the transition!
Design 2: Elegant Polka Dots
The humble polka dot is a timeless pattern that can be made instantly festive with the right colors. It’s chic, playful, and incredibly simple to execute with a dotting tool.
What You’ll Need:
- Base coat and top coat
- Your base polish color (e.g., black, navy, soft pink)
- A contrasting polish color for the dots (e.g., white, gold, silver, red)
- A dotting tool (or a toothpick/ballpoint pen tip)
Step-by-Step Guide:
- Prep: Apply your base coat and let it dry. Paint your nails with your chosen base color. Apply a second coat if needed and let it dry completely.
- Load Your Tool: Dip the tip of your dotting tool into your contrasting polish color. You don’t need a huge blob, just enough to make a clear dot.
- Start Dotting: Gently press the dotting tool onto your nail to create a perfectly round dot. Place dots evenly spaced across the nail.
- Create Your Pattern: You can cover the whole nail with dots, create a line of dots along the free edge (like a reverse French tip), or make a cluster of dots on one side of the nail.
- Clean Between Dots: Wipe your dotting tool clean with nail polish remover on a cotton pad between each dot or group of dots to keep them crisp and well-defined.
- Seal It: Once your dots are completely dry, apply a good layer of top coat. Be gentle when you apply the top coat so you don’t smudge the dots!
Pro Tip: Mix and match sizes! Use a larger dotting tool for bigger dots and a smaller one for accent dots to add visual interest.
Design 3: Dazzling Glitter Accents
Sometimes, you don’t need a full-blown intricate design to make a statement. A touch of glitter strategically placed can be just as eye-catching and is super beginner-friendly.
What You’ll Need:
- Base coat and top coat
- Your polish color of choice
- A fine glitter polish or loose glitter with clear polish/top coat
- A thin nail art brush or toothpick
Step-by-Step Guide:
- Prep: Apply your base coat, let it dry. Paint your nails with your main polish color. Apply a second coat and let them dry almost completely, but not bone dry – slightly tacky is good.
- For Glitter Polish: Take a glitter polish and carefully apply it in a shape. Some ideas: a thin stripe down the center of the nail, a V-shape at the cuticle, or just on the very tip like a glitter French tip.
- For Loose Glitter: Apply a thin line of clear polish or top coat where you want the glitter to go. Then, use a dry brush or toothpick to gently pick up loose glitter and place it onto the wet polish. Tap off any excess.
- Clean Up Edges: Use a clean brush dipped in nail polish remover to neaten up the edges of your glitter design.
- Seal It: Once the glitter is dry and the polish is set, apply a generous coat of top coat. This is important to smooth out the texture of the glitter and make it last. You might need two coats of top coat for really chunky glitter.
Pro Tip: If using loose glitter, it’s easiest to do this design on one or two accent nails rather than all ten for a more sophisticated look.
Design 4: Chic Glitter French Manicure
The French manicure is a timeless classic, and adding a touch of glitter instantly makes it party-ready. It’s elegant and surprisingly easy to achieve!
What You’ll Need:
- Base coat and top coat
- Sheer nude or pale pink polish
- A glitter polish (gold, silver, or iridescent look great!)
- French tip guides or striping tape (optional, but helpful!)
- A thin nail art brush or toothpick
Step-by-Step Guide:
- Prep: Apply base coat. Then apply one or two thin coats of your sheer nude or pale pink polish. Let it dry completely.
- Option A (Using Guides): Apply French tip guides or striping tape across your nail, about a quarter-inch from the tip. Press down firmly to ensure a clean seal.
- Option B (Freehand): You’ll use a brush or toothpick to paint the glitter tip. It takes a little practice but is totally doable!
- Apply Glitter: If using guides, carefully paint your glitter polish over the tip of your nail, on top of the guide. If freehanding, use your thin brush or toothpick to draw a curved line of glitter polish across the tips of your nails.
- Remove Guides: While the glitter polish is still wet, carefully peel off the French tip guides or striping tape. This creates a crisp line. If you missed a spot or have a wobbly line, don’t worry! You can often fix it with a tiny bit more polish on a clean brush.
- Clean Up: Use a small brush dipped in nail polish remover to clean up any stray glitter or polish on your skin or cuticles.
- Seal It: Once everything is completely dry, apply a thick, even coat of top coat.
Pro Tip: Instead of white tips, try a colored glitter for a modern twist on the classic French!
Design 5: Metallic Foil Accents
Metallic foil accents add a high-fashion, almost futuristic vibe to your nails. They catch the light beautifully and look way more complicated than they are to apply!
What You’ll Need:
- Base coat and top coat
- Your polish color of choice
- Nail foil adhesive (or clear nail glue)
- Metallic foil transfer sheets (comes in various colors and patterns)
- Tweezers or an orange stick
Step-by-Step Guide:
- Prep: Apply base coat. Paint your nails with your main color and let it dry completely.
- Apply Foil Adhesive: Apply a thin, even layer of nail foil adhesive to the areas where you want the foil to stick. This could be the entire nail, just the tips, or a specific pattern. Let the adhesive dry until it becomes clear and tacky – this is crucial! It will feel slightly sticky to the touch.
- Transfer the Foil: Place the metallic foil sheet (colored-side up) onto the tacky adhesive. Gently press down all over the foil with your fingertip or an orange stick.
- Peel It Off: Carefully peel off the foil backing. The metallic design should now be transferred onto your nail. If some areas didn’t transfer well, you can try applying more adhesive to those spots, let it dry, and reapply the foil.
- Clean Up: Use a soft brush or a cotton swab to gently brush away any excess foil that didn’t transfer cleanly.
- Seal It: Apply a layer of top coat to protect the foil design and add shine. Be gentle so you don’t smudge the foil.
Pro Tip: Some foiling systems work best with specific top coats to prevent them from dulling the shine. Check the foil packaging for recommendations.
Nail Preparation: The Foundation for Great Nail Art
Even the most beautiful nail art won’t last or look its best if your nails aren’t prepped properly. Think of it as preparing a canvas before painting! Taking a few extra minutes for nail prep makes a huge difference in how your manicure turns out and how long it stays looking good.
Key Steps for Perfect Nail Prep:
- Cleanliness is Key: Start with clean, dry nails. Remove any old polish thoroughly. Wash your hands and gently push back your cuticles with an orange stick or cuticle pusher. Avoid cutting your cuticles, as this can lead to infection and damage. For healthy cuticles, check out Healthline’s guide.
- Shape Them Up: Gently file your nails into your desired shape. Always file in one direction to prevent splitting or weakening.
- Buff to Smoothness: Lightly buff the surface of your nails with a fine-grit buffer. This smooths out ridges and creates a slightly textured surface for the polish to adhere to, helping it last longer. Don’t over-buff, or you can make your nails too thin.
- Wipe Down: Before applying any polish, wipe each nail with nail polish remover or an alcohol wipe. This removes any dust, oil, or residue that could prevent your polish from sticking.
- Base Coat Application: Apply a thin, even layer of base coat. This protects your natural nail from staining (especially from dark polishes!) and provides a smooth surface for your color. Let it dry completely.
Investing a little time in this preparation stage will ensure your gorgeous party nail art looks flawless and lasts through all your celebrations.
Maintaining Your Party Nail Art
You’ve created a masterpiece! Now, you want it to last. Here are some tips to keep your party nail art looking fresh and fabulous:
- Be Gentle: Avoid using your nails as tools. Don’t try to scrape, pry, or open things with them.
- Wear Gloves: When doing household chores, especially washing dishes or cleaning with harsh chemicals, wear rubber gloves. Water and chemicals are the enemies of nail polish!
- Reapply Top Coat: For extra longevity, apply another thin layer of top coat every 2-3 days. This can help seal in the design and add extra shine, especially if you notice any chipping starting.
- Moisturize: Keep your hands and cuticles hydrated with hand cream and cuticle oil. Healthy cuticles mean a healthier-looking manicure.
- Avoid Hot Water Soaks: Prolonged soaking in hot water can weaken the polish bond.
Following these simple care tips will help your stunning party nail art stay vibrant and chip-free for as long as possible, letting you focus

