Learn how to achieve stunning oval nail designs with this beginner-friendly guide, covering shaping, flawless application, and creative ideas to elevate your manicure masterpiece.
Dreaming of elegant, elongated nails? The oval shape is a timeless favorite for a reason! It’s super flattering, looks sophisticated, and works with almost any polish color or design. But sometimes, getting that perfect oval shape and applying designs on them can feel a bit tricky. Don’t worry, I’m here to help! This guide will walk you through everything you need to know to create beautiful oval nail masterpieces right at home. Get ready to transform your nails into something truly special!
Why Oval Nails Are a Fan Favorite
Oval nails have been a go-to for nail lovers for ages, and it’s easy to see why. Their gentle, rounded shape is incredibly versatile and complements every hand shape and finger length. They create an illusion of longer, slimmer fingers, making your hands look more graceful. Plus, they’re less prone to snagging or breaking compared to sharper nail shapes. This makes them not only stylish but also practical for everyday life. Whether you love a bold color, a subtle French tip, or intricate nail art, oval nails provide the perfect canvas.
The Essential Toolkit for Oval Nail Design
Before we dive into creating stunning designs, let’s gather your nail toolkit. Having the right tools makes all the difference, turning a potentially frustrating DIY session into a fun and successful creative endeavor. You don’t need a professional salon setup; a few key items will have you well on your way.
Must-Have Nail Tools:
- Nail Clippers: For the initial shaping and tidying up.
- Nail File: A good quality grit file (around 180-240 grit is ideal for natural nails) is essential for shaping and smoothing. Look for glass files too; they are great for sealing the edges.
- Emery Boards: For finer filing and smoothing edges.
- Cuticle Pusher & Nippers: To gently push back and trim excess cuticles for a clean nail bed.
- Buffing Block: A gentle buffer will smooth out any ridges and create a perfect base for polish.
- Base Coat: Protects your natural nail and helps polish adhere better.
- Top Coat: Seals your design, adds shine, and prevents chipping.
- Nail Polish in Your Chosen Colors: The stars of the show!
- Dotting Tools or Toothpicks: For creating small dots and simple patterns.
- Thin Nail Art Brushes: For intricate lines, swirls, and details.
- Nail Polish Remover & Cotton Pads: For quick clean-ups and correcting mistakes.
- Orange Stick or Cuticle Stick: For cleaning under the nail edge and detailed work.
Mastering the Oval Nail Shape: A Step-by-Step Guide
Achieving the perfect oval shape is the foundation of any beautiful oval nail design. It’s all about patience and precision. Follow these simple steps, and you’ll be shaping like a pro in no time!
Step 1: Prep Your Nails
Start by removing any old polish. Then, wash your hands with soap and water and dry them thoroughly. Gently push back your cuticles using a cuticle pusher. If needed, carefully trim any excess cuticle skin with nippers. Smoothing out ridges with a gentle buffing block can also prepare your nail surface beautifully.
Step 2: Trim to the Desired Length
If your nails are too long, use nail clippers to trim them down to your desired length. It’s easier to shape from a slightly longer nail than to try and file down a very long nail. Aim to leave a little extra length to work with for shaping.
Step 3: Begin Shaping
Take your nail file and hold it at a 90-degree angle to your nail. Start filing from one side of the nail towards the center. Make sure to always file in one direction, not back and forth, as this can weaken the nail. Repeat on the other side, filing towards the center to create a straight edge. You should now have a square-ish shape with slightly rounded corners.
Step 4: Create the Curve
Now, gently start filing the corners into a rounded shape. Imagine you’re drawing a gentle arc from one side of the straight edge to the other. File in smooth, sweeping motions, gradually rounding the corners. Check your progress frequently. The goal is to create a smooth, continuous curve that tapers slightly towards the tip, resembling an egg shape.
Step 5: Refine and Smooth
Once you’ve achieved the basic oval shape, use the finer side of your nail file or an emery board to smooth out any rough edges. Go over the entire nail surface with a buffing block to ensure it’s smooth and ready for polish. A final wipe with a damp cloth or nail polish remover can remove any dust.
Step 6: Repeat and Admire!
Repeat these steps for all your nails, ensuring they are as symmetrical as possible. Take your time; shaping is a skill that improves with practice!
Show-Stopping Oval Nail Design Ideas for Beginners
Now for the fun part – designing! Oval nails provide a lovely elongated canvas, perfect for showcasing a variety of styles. Here are some inspiring and beginner-friendly design ideas that look absolutely stunning on oval shapes.
1. The Classic French Manicure (with a Twist!)
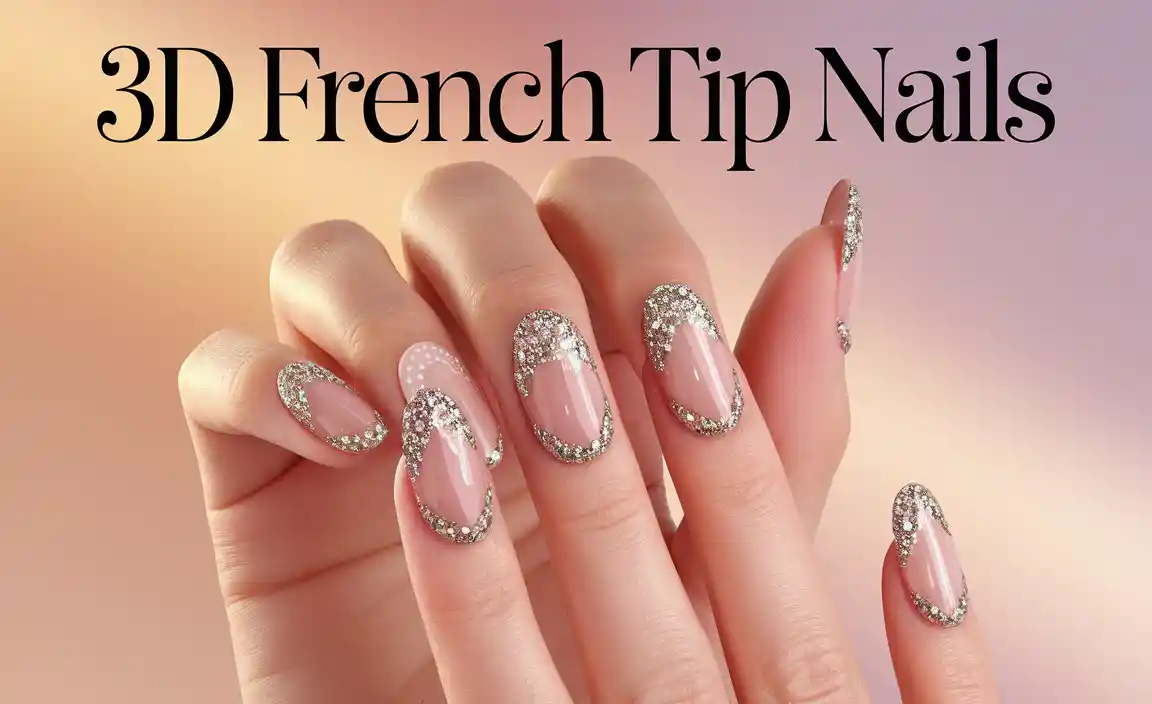
You can’t go wrong with a French manicure. On an oval nail, the smile line is elongated beautifully. For a twist, try a colored French tip! Instead of white, use a pastel pink, a soft blue, or even a metallic shade for the tip. This is super easy with a thin brush or a dotting tool.
2. Minimalist Dots
This is one of the easiest yet most chic designs. Apply your base color (nude, pastels, or even bold tones look great). Once dry, use a dotting tool or the tip of a toothpick dipped in a contrasting color (white, black, gold, or silver) to place a few dots near the cuticle or along the free edge. You can create a single line of dots or a scattered pattern. This look is incredibly sophisticated and surprisingly simple to achieve.
3. Gradient or Ombre Nails
Ombre nails are stunning on oval shapes, creating a smooth transition of color. For beginners, a sponge technique is your best friend. Apply two colors side-by-side on a makeup sponge, then dab it onto your nail. Repeat for opacity. Lighter colors fading into darker ones or soft pastels are particularly elegant on oval nails.
4. Single Accent Nail
If intricate designs feel too daunting, focus on one nail! Paint all your nails one solid color that you love. Then, on one finger (usually the ring finger), add a simple design. This could be a glitter polish, a metallic stripe, a few strategically placed rhinestones, or even a hand-painted minimalist floral detail. It adds a pop of style without overwhelming the look.
5. Chic Stripes
Vertical or horizontal stripes can be easily achieved with striping tape or by using a fine nail art brush. Vertical stripes can further elongate the nail, which is a great effect for oval shapes. Try a white and gold combination for a touch of luxury, or black and white for timeless appeal.
6. Glitter Accent
Glitter is always a good idea! Apply a glitter polish over your base color, or dedicate an accent nail to full glitter coverage. You can also create a glitter gradient by applying more glitter towards the tip or cuticle. It adds instant sparkle and glamour.
7. Simple Floral Motifs
Don’t be intimidated by flowers! Start simple. Use a dotting tool to create small petals around a central dot, or try a few delicate leaf shapes with a fine brush. Even a single, small flower on an accent nail can make a big impact.
Applying Polish Flawlessly on Oval Nails
The shape of oval nails can sometimes make polish application around the cuticle area a bit trickier due to the curve. But with a little technique, you can achieve a clean, professional finish every time. Think of it as painting on a curved surface!
Step 1: The Base Coat is Key
Always start with a good base coat. This protects your natural nails from staining, especially with darker polishes, and creates a smooth surface for polish application. Apply one thin, even coat and let it dry completely.
Step 3: The First Polish Coat
Dip your brush lightly into the polish. Wipe off excess polish on the bottle neck, but not completely dry. You want enough polish for one smooth stroke. Start in the middle of the nail, just above the cuticle. Push the brush gently towards the cuticle, then pull it forward to the tip. Then, paint one side parallel to the nail wall, and then the other side. This “three-stroke” method helps ensure even coverage.
Step 4: Building Coverage
Apply a second thin coat of polish, following the same three-stroke method. This coat should deepen the color and provide full opacity. If you notice any pooling of polish around the edges, don’t worry!
Step 5: The Clean-Up Act
This is where the magic happens! Take an angled brush (or an old, clean small makeup brush) and dip the tip lightly into nail polish remover. Gently go around the edges of your nail and cuticle, cleaning up any polish that has strayed. This is the secret to a salon-perfect finish. An orange stick with a tiny bit of cotton wrapped around the tip can also be used for precision.
Step 6: Top Coat for Shine and Longevity
Once your polish is completely dry (give it a few minutes!), apply a good quality top coat. This seals your design, adds a beautiful shine, and protects your manicure from chipping. Extend the top coat slightly over the free edge of your nail to “cap” it, which helps prevent tip wear.
Oval Nail Design Inspiration: Trends and Classics
Oval nails are incredibly adaptable to trends, while also shining with classic simplicity. Here’s a look at some popular styles that look amazing on this shape.
The Power of Pastels
Soft, muted pastel shades like baby blue, mint green, lavender, and pale pink are incredibly chic on oval nails. They convey a sense of calm and sophistication, perfect for everyday wear or a special occasion.
Bold & Beautiful
Don’t shy away from vibrant colors! A deep sapphire blue, a fiery red, an emerald green, or a rich marigold can make a striking statement on oval nails. These colors pop and showcase the elegant shape.
Metallic Magic
Gold, silver, rose gold, and bronze polishes add an instant touch of glamour. They can be used all over for a bold look or as accent details like stripes, French tips, or glitter tips. They catch the light beautifully on the curved surface of oval nails.
Nude & Natural Tones
For an effortlessly elegant look, nude and neutral tones are unparalleled. They create a clean, polished appearance and make hands look naturally refined. This is a fantastic base for subtle nail art or simply worn on its own.
Seasonal Styles
Oval nails are perfect for embracing seasonal aesthetics. Think deep reds and oranges for autumn, icy blues and silvers for winter, bright florals and neons for spring, and vibrant corals and sea-blues for summer. The shape lends itself well to adapting these themes.
Maintaining Your Oval Nails
Keeping your skillfully shaped oval nails looking their best is all about consistent care. A few simple habits will ensure your manicures last longer and your nails stay healthy.
Daily Care:
- Moisturize: Apply cuticle oil and hand lotion daily, especially after washing your hands. This keeps your cuticles soft and prevents hangnails.
- Protect: Wear gloves when doing household chores like washing dishes or cleaning, as harsh chemicals can damage your nails and polish.
- Avoid Using Nails as Tools: Resist the urge to use your nails to open cans or scrape off labels. This can lead to chips and breaks.
Weekly Care:
- Reapply Top Coat: Every 2-3 days, apply an extra layer of top coat to refresh your manicure, add shine, and reinforce protection against chips, especially on your prominent fingers.
- Gentle Buffing: If you notice dullness, a gentle buff with a mild buffing block can restore shine without removing polish.
- Maintain Shape: If you notice any snags or chips, gently file them back into their oval shape as soon as possible to prevent further damage. It’s better to do a quick touch-up than wait for it to worsen.
Long-Term Health:
- Polish-Free Breaks: Give your nails a break from polish every so often. Let them breathe and recover for a few days.
- Healthy Diet: A balanced diet rich in vitamins and minerals (like biotin, Vitamin E, and iron) supports nail strength and growth.
- Professional Help: If you experience persistent nail issues like brittleness, peeling, or discoloration, consult a dermatologist. They can help identify underlying causes and recommend treatments. For example, the American Academy of Dermatology offers comprehensive advice on nail health.
Understanding Nail File Grits
The grit of a nail file refers to the coarseness of the abrasive material on its surface. Different grits are suited for different purposes and nail types. Using the right grit can prevent nail damage and help you achieve a smoother finish.
Here’s a quick breakdown:
| Grit Range | Type | Best For |
|---|---|---|
| 60-100 | Coarse | Artificial nails (acrylics, gels) – for shaping and shortening. Use with extreme caution on natural nails. |
| 100-150 | Medium | Artificial nails – for smoothing and refining. Can be used for shortening natural nails with care. |
| 150-240 | Fine | Natural nails – for shaping, smoothing edges, and preparing the surface for polish. This is the ideal range for most DIY oval nail shaping. |
| 240+ | Extra Fine / Polishing | Buffing natural nails to a shine, smoothing imperfections. Used in buffing blocks. |
For shaping natural nails into an oval shape, you’ll want to focus on files within the 150-240 grit range for shaping and then a higher grit buffer for smoothing. Always remember to file in one direction to avoid damaging the nail layers.
FAQs about Oval Nail Designs
Q1: How do I make my oval nails look longer?
The oval shape naturally elongates fingers. To enhance this, opt for lighter or nude polish shades, keep your French tips thinner, and consider vertical accent details like stripes. Avoid very dark, solid colors if your primary goal is to maximize the illusion of length.
Q2: What if I accidentally file my nails too short for a design?
Don’t worry! Even shorter nails can look great. For shorter oval nails, focus on simple, clean designs like a single accent dot, a minimalist French tip, or a solid, vibrant color. Even without designs, a well-shaped shorter oval nail looks polished.
Q3: How do I prevent nail polish from chipping on oval nails?
Start with a good base coat, apply thin, even coats of color (two coats are usually best), and always finish with a quality top coat. Remember to “cap” the free edge of your nail with your top coat to seal it. Reapplying top coat every 2-3 days also helps extend the life of your manicure.
Q4: Can I do oval nail designs if I have weak nails?
Absolutely! Oval nails are generally less prone to breaking than sharper shapes. For weak nails, focus on gentle shaping with finer grit files, always use a strengthening base coat, and avoid harsh scrubbing or chemicals. Simple designs with minimal layers of polish or just a good quality polish and top coat would be ideal.
Q5: What’s the best way to clean up mistakes when painting oval nails?
The best tool is a small, angled brush dipped in nail polish remover. You can also use an orange stick with a tiny bit of cotton wound around the tip. Gently trace around your cuticle and sidewalls to wipe away any stray polish for a crisp, clean edge.
Q6: Are oval nails good for gel polish application?
Yes, oval nails are excellent for gel polish application and designs. The smooth, curved surface provides a great base for gel, and the shape is flattering with various gel art techniques, from simple colors to more intricate designs.
Conclusion
There you have it! Your ultimate guide to mastering the oval nail design. From achieving that flawless oval shape to applying polish like a pro and exploring a world of creative designs, you’re now

