Outline nail designs are a super fun and chic way to add a modern twist to your manicure! They use clean lines to emphasize the shape of your nail or create cool graphic effects, making them perfect for beginners and pros alike. Get ready to explore easy and stylish trends!
Ever stare at your polish bottle, wishing your nails could look salon-perfect without the hassle? Achieving those clean, defined looks you see online can feel totally intimidating. But what if I told you that a simple outline can transform your nails from ordinary to extraordinary? It’s true! Outline nail designs are a playful and surprisingly easy way to express yourself. Grab your favorite polish, and let’s dive into this trend that’s all about bold edges and creative flair. We’ll break it all down, from the simplest lines to more intricate patterns, making sure you feel confident and inspired every step of the way. Get ready to discover how easy it is to nail this look!
What Are Outline Nail Designs?
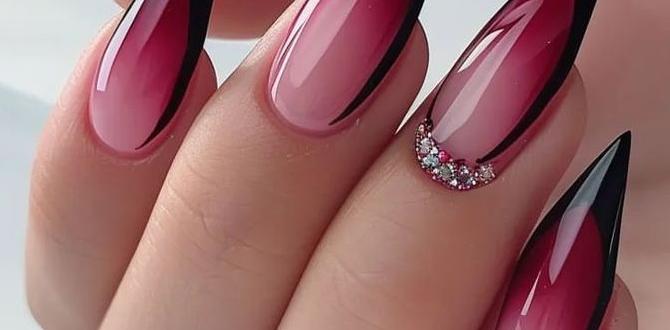
Outline nail designs are exactly what they sound like: manicures that use contrasting colors or finishes to draw a distinct line around the edge of your nail, a specific shape, or a design element. Instead of filling in a whole nail or creating a complex pattern, you’re focusing on the boundaries. Think of it like a coloring book, but you’re only coloring the lines! This technique adds a modern, graphic feel and can make your nails pop in a subtle yet impactful way.
The beauty of outline nail designs lies in their versatility. They can be as minimalist or as elaborate as you want. A single thin line around your natural nail shape can elevate a simple polish, while a bolder outline around a French tip or a graphic shape can make a real statement. It’s a fantastic trend for anyone looking to add a touch of artistry to their fingertips without needing advanced nail art skills.
Why Are Outline Nails So Popular?
Outline nail designs have surged in popularity for several great reasons:
- Chic & Modern Aesthetic: They offer a clean, graphic, and contemporary look that pairs well with almost any outfit or occasion.
- Beginner-Friendly: Many outline designs require minimal precision, making them perfect for DIYers just starting with nail art.
- Versatile Styling: From subtle whispers of color to bold, contrasting statements, they can be adapted to your personal style.
- Emphasis on Nail Shape: Outlines can beautifully highlight the natural curve and shape of your nails, making them look even more elegant.
- Cost-Effective: You can achieve stunning results with just a couple of polish colors and basic tools, saving you money on salon visits.
Essential Tools for Outline Nail Art
Before we get into the fun designs, let’s gather your toolkit. You don’t need a professional kit to create amazing outline nails. Here are the essentials:
- Base Coat: Protects your natural nails and helps polish adhere better. A good quality base coat like OPI’s Natural Nail Base Coat is a great start.
- Top Coat: Seals your design, adds shine, and prevents chipping. Seche Vite Dry Fast Top Coat is a favorite for its quick drying time.
- Polish Colors: Choose at least two contrasting colors – one for the base and one for the outline.
- Detail/Liner Brush: This is key for drawing those clean lines. Look for brushes with fine tips. A good set might include brushes of varying lengths and thinness. Many art supply stores carry them, or you can find them online at places like Amazon. For a professional feel, consider brushes designed for nail art.
- Dotting Tool: Useful for adding small accent dots or creating rounded ends for outlines.
- Nail Polish Remover: For cleaning up any mistakes (we all make them!).
- Cotton Swabs/Pads: For precise cleanup.
- Optional: Stencils or Tape: For creating straighter lines or specific shapes if freehand is tricky.
Genius Outline Nail Design Trends You’ll Love:
Let’s get inspired! These trends are easy to achieve and look incredibly chic.
1. The Classic Outline
This is the simplest and most elegant way to try out outline nail designs. It’s perfect for everyday wear and incredibly easy!
How to Create:
- Start with a clean, prepped nail. Apply a thin layer of your chosen base coat and let it dry.
- Apply two coats of your base polish color. Let it dry completely. This is the color that will peek through the outline.
- Using your detail brush and a contrasting polish color, carefully trace around the edge of your nail. You can outline the entire perimeter or just the free edge (like a reverse French tip!).
- For a super clean look, try to keep the line as consistent in thickness as possible.
- Let the outline dry completely, then apply a generous layer of top coat to seal everything in and add shine.
Tips for Success:
- If you’re new to freehanding, practice on a piece of paper first.
- Don’t press too hard with the brush; let the polish do the work.
- If you make a mistake, dip a cotton swab in nail polish remover and carefully clean it up before it dries.
2. The Reverse French Outline
A fun twist on the classic French manicure, this design outlines the cuticle area instead of the tip. It’s sophisticated and modern.
How to Create:
- Apply base coat and your desired base polish color (let it dry fully).
- With your detail brush and contrasting polish, paint a semi-circle curve along your cuticle line.
- You can make this curve thin and delicate or slightly thicker for a bolder look.
- Ensure the outline is smooth and follows the natural shape of your nail bed.
- Once dry, finish with a top coat.
Pro Tip:
For an even cleaner cuticle outline, you can use a small, fine brush dipped in nail polish remover to clean up any wobbly bits after painting.
3. Geometric Shape Outlines
This trend is all about playing with shapes. You can outline squares, triangles, or even abstract forms on your nail.
How to Create:
- Paint your nails with your base color and let them dry.
- On an accent nail (or all of them!), use your detail brush and contrasting polish to draw a shape. A simple square or rectangle in the center of the nail is a great starting point.
- You can outline just the perimeter of the shape, or fill it in with a solid color and then outline that.
- Experiment with placing shapes off-center or layering them.
- Seal with a top coat.
Variations:
- Outline a negative space: Paint a shape and leave the area inside unpainted or with just a clear coat. Then outline the shape itself.
- Outline multiple shapes: Draw several small geometric forms on one nail with their outlines.
4. Outline Accents
This is about using outlines to highlight specific parts of a design. Think of it as adding definition to a focal point.
How to Create:
- Start with a simple nail design. This could be a solid color, a gradient, or even a minimalist dot.
- Once your base design is dry, use your detail brush and a contrasting color to outline a specific element. For example, if you have a single dot, outline that dot. If you have half a moon design, outline that moon.
- This technique adds depth and makes even the simplest designs look more professional and artistic.
- Always finish with a top coat.
Examples:
- Outline the tip of a French manicure for a super defined look.
- Outline a single stripe or a floral element.
- Outline the entire nail shape, but only over a specific part of the nail, like just the tip or just the base.
5. Dual-Tone Outlines
Why use one color when you can use two? This trend involves using two different outline colors. It adds complexity and visual interest.
How to Create:
- Apply your base polish color and let it dry completely.
- Decide on your outline strategy. You could do one color outlining one side of the nail and another color outlining the other.
- Alternatively, you can use one color for the outer edge outline and then a second, thinner line of a different color just inside or outside the first line.
- This can create a subtle gradient effect or a bold, graphic statement.
- Finish with a top coat once the polish is dry.
Trend Alert:
Try outlining your nail with white or black, and then adding a thin, bright neon line just inside or outside it. It’s unexpectedly stylish!
6. Outline French Tips
A modern update to the timeless French manicure. Instead of filling the tip, you outline it!
How to Create:
- Paint your nails with your base polish color and let it dry.
- Using your detail brush and a contrasting color, carefully draw a line along the free edge of your nail, mimicking the shape of a traditional French tip. Like the classic outline, you can outline the entire perimeter or just the tip.
- You can also opt to fill the tip with a solid color and then outline that filled tip for an even more defined look.
- Seal with a top coat.
7. Outline with Different Finishes
Play with textures! Use a matte polish to outline a glossy base, or a glitter polish to outline a cream finish.
How to Create:
- Apply your base polish and let it dry.
- Use your detail brush and a contrasting polish in a different finish (e.g., matte, glitter, metallic) to create your outline.
- For example, a matte black outline over a glossy nude base is incredibly chic. A fine glitter outline can add sparkle without being overwhelming.
- Top coat is essential here to protect the finishes and ensure longevity.
Achieving Flawless Lines: Tips & Tricks
Getting those perfect outlines can be a little tricky at first, but with these tips, you’ll be creating clean lines like a pro in no time!
- Thin Coats are Key: Don’t try to load up your brush with too much polish. Thin, controlled coats are easier to manage and dry faster, reducing the chance of smudges and mistakes.
- Steady Your Hand: Rest your wrists on a flat surface while painting. For extra stability, brace your pinky finger against the side of your nail or the table.
- Clean Your Brush: Wipe excess polish from your brush onto the neck of the bottle or a lint-free wipe before applying to the nail. This prevents blobs and uneven lines.
- Work in Sections: If a full nail outline feels daunting, try doing a small section at a time. For example, outline just the tip, or just one side of the cuticle.
- Use Nail Polish Remover Wisely: A small brush dipped in nail polish remover is your best friend for cleaning up wobbly lines. Dip it in remover, wipe off excess on a paper towel, and gently trace along the edge of your intended line to correct mistakes.
- Don’t Rush the Drying Process: Ensure each layer of polish is completely dry before moving on to the next. Patience is crucial for a smudge-free manicure.
- Consider Nail Stencils or Tape: For perfectly straight lines or crisp geometric shapes, nail stencils or striping tape can be a lifesaver. Apply the tape, paint over it (or paint your base, let it dry, apply tape, then paint the outline color), and carefully peel when the paint is still slightly wet or fully dry, depending on the desired effect.
Outline Nail Design Inspiration Table
Here’s a quick reference to spark your creativity:
| Design Type | Base Color Ideas | Outline Color Ideas | Occasion/Vibe |
|---|---|---|---|
| Classic Full Nail Outline | Nude pink, soft beige, clear | Black, white, gold, silver | Chic, minimalist, everyday |
| Reverse French Outline | Milky white, sheer pink, pale blue | Black, deep red, metallic colors | Sophisticated, modern, office-appropriate |
| Geometric Squares | Pastel shades, bright colors | Black, white, contrasting brights | Playful, artistic, trendy |
| Outline Floating Shapes | Any solid color | White, black, neon colors | Edgy, avant-garde, statement |
| Dual-Tone Thin Lines | Any single color | e.g., Pink & Orange, Blue & Purple, Black & Gold | Bold, eye-catching, fashion-forward |
| Matte Outline on Glossy Base | Glossy nude, cream, or bold color | Matte black, matte white, matte grey | Sleek, elegant, high-fashion |
| Glitter Outline | Solid, muted tones | Fine glitter polish (silver, gold, holographic) | Festive, glamorous, special occasions |
Maintaining Your Outline Manicure
Your beautiful outline nails deserve to last! Here’s how to keep them looking fresh:
- Apply a Quality Top Coat: This is your first line of defense against chipping and fading. Reapply every 2-3 days for extra protection.
- Be Gentle: Avoid using your nails as tools. Don’t scrape, pry, or use them to open things.
- Wear Gloves: Protect your nails when doing chores, especially washing dishes or using cleaning chemicals.
- Moisturize Regularly: Keep your cuticles and nails hydrated with cuticle oil and hand cream. Healthy nails look better and are less prone to breakage. Check out some tips on cuticle care from the American Academy of Dermatology for more insights.
- Touch-Ups: If a small chip occurs, you can sometimes carefully touch it up with a tiny bit of your base or outline color and another layer of top coat.
Frequently Asked Questions about Outline Nail Designs
- Q1: Can I do outline nail designs on short nails?
- Absolutely! Outline designs can actually make short nails look longer and more defined. A simple outline around the edge or a small geometric shape can add a stylish touch without overwhelming shorter nail beds. The key is to keep the proportions of your outline in mind.
- Q2: What’s the easiest way to get a straight line?
- For the straightest lines, try using nail striping tape or stencils. Apply the tape where you want your line, paint over it, and carefully remove the tape. Alternatively, a very thin detail brush and a light hand can work wonders, but practicing on paper first is recommended.
- Q3: How do I prevent my outline polish from smudging?
- Allow each layer of polish to dry completely before applying the next. Applying thin coats rather than thick ones also speeds up drying time and reduces smudging. A quick-drying top coat is your best friend here!
- Q4: Can I use regular acrylic paint for nail art outlines?
- While some artists use acrylic paints for nail art, it’s generally recommended to use actual nail polish for outlines, especially for beginners. Nail polish is formulated to adhere to the nail and work with base and top coats for durability. If you do use acrylic paint, you MUST seal it with a good quality top coat specifically designed for nail polish to prevent it from washing off and to protect your nail.
- Q5: What if I’m bad at detailed nail art?
- Outline nail designs are perfect for you! Start with the simplest technique: a single color polish and a thin outline around the entire nail edge. You can also try outlining just the tip or creating simple shapes. Focus on consistency rather than complexity. Don’t be afraid to use cleanup brushes (a small brush dipped in remover) to perfect your lines.
- Q6: How do I choose colors for my outline design?
- Consider contrast! A dark outline on a light base, or a bright outline on a neutral base, will really stand out. Metallics like gold or silver are great for adding a touch of glam to almost any color. You can also play with complementary colors for a bolder look or analogous colors for a softer effect.
Conclusion
See?


