Organic nail designs offer a unique, nature-inspired aesthetic for your manicure. Achieve these chic looks with simple tips for shaping, color palettes, and applying subtle patterns, making natural beauty achievable for any skill level.
Hey nail lovers! Are you ready to bring a touch of natural beauty to your fingertips? Sometimes, you just want your nails to look effortlessly chic, inspired by the organic textures and colors found in nature. Think gentle gradients, subtle earthy tones, and designs that feel as calming as a walk in the woods. It can feel a little daunting to create something that looks so undone yet so put-together, right?
But don’t worry! Mastering organic nail designs is simpler than you think. It’s all about embracing a softer approach, focusing on beautiful colors and flowing lines. Whether you’re a total beginner or looking to expand your nail art skills, I’ve got some fantastic tips and stunning looks that will have you feeling like a nail art pro in no time. Get ready to create manis that are beautifully, naturally yours!
What Exactly Are Organic Nail Designs?
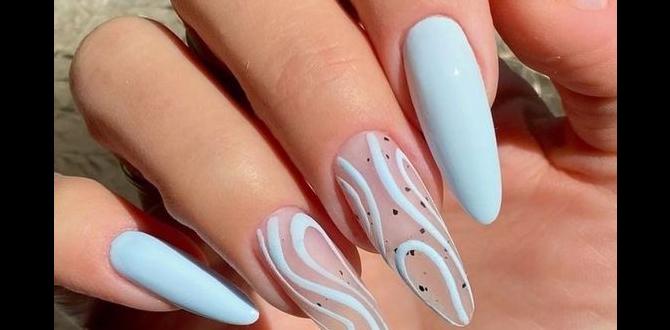
Organic nail designs are all about capturing the beauty and essence of the natural world. Instead of harsh lines and geometric shapes, think soft edges, flowing lines, and color palettes inspired by nature. This could mean mimicking the gentle swirls of marble, the subtle hues of a sunset, the delicate veins of a leaf, or the cloudy patterns in a gemstone. It’s a style that feels relaxed, artistic, and wonderfully unique.
The appeal of organic nail art lies in its understated elegance and its ability to be personalized endlessly. It’s less about perfection and more about creating a mood or a feeling. This approach makes it incredibly beginner-friendly because the “imperfections” often add to the charm!
Why Choose Organic Nail Designs?
You might be wondering, “Why go for an organic look?” Here are some compelling reasons:
- Universally Flattering: Organic designs tend to be adaptable to various nail lengths and shapes, and their softer aesthetic often complements a wide range of skin tones.
- Effortlessly Chic: They offer a sophisticated yet relaxed vibe, perfect for everyday wear or special occasions when you want something refined without being overly flashy.
- Creative Freedom: Unlike super precise designs, organic art allows for more artistic interpretation. It’s about your personal touch and how you see nature translated onto your nails.
- Therapeutic Process: The flowing, sometimes abstract nature of organic designs can be very calming and enjoyable to create.
- Trend-Forward: This style aligns with a broader trend towards natural beauty and minimalist aesthetics, making it a timeless choice.
Genius Tips for Achieving Organic Nail Designs
Ready to dive in? Here are my top tips to help you nail these beautiful organic looks:
Tip 1: Embrace Earthy and Muted Color Palettes
The foundation of organic nail design is often its color story. Think about the colors you see in nature:
- Earth Tones: Shades of beige, taupe, terracotta, sandy browns, and muted olives are perfect starting points.
- Soft Pastels: Think of a foggy morning or a hazy sunset – muted pinks, lavenders, baby blues, and creamy yellows work beautifully.
- Gemstone Hues: Deep blues, emerald greens, soft grays, and pearly whites can mimic the look of natural stones.
- Creamy Neutrals: Off-whites, soft greys, and gentle nudes provide a sophisticated base for more intricate organic elements.
Pro Tip: Don’t be afraid to mix and match these tones. A soft grey base with hints of lavender and white can create a marble effect that feels entirely organic.
Tip 2: Master the Art of Gradient and Ombre
One of the most popular ways to achieve an organic feel is through smooth color transitions. This can be done with:
- Sponge Ombre: Using a makeup sponge to gently dab and blend two or more colors together offers a soft, diffused effect. Start with your base color, then dab a second color onto the sponge and gently press it onto the nail, moving towards the cuticle.
- Brush Swirls: With a fine brush and a slightly thicker polish, you can create soft, wispy swirls that blend into the base color.
- Water Marbling: While a bit more advanced, water marbling can create stunning, unpredictable organic patterns. A quick search for beginner-friendly water marbling tutorials will get you started!
External Resource: For those interested in the science of color mixing and how tones blend, exploring resources like Color Matters can provide a deeper understanding of creating harmonious palettes.
Tip 3: Think Textures and Patterns
Organic doesn’t have to mean plain! You can incorporate subtle textures and patterns that mimic nature:
- Marble Veining: Use a thin brush and a contrasting color (like white on a grey or deep blue base) to draw delicate, irregular lines that resemble marble veins. Don’t make them too uniform!
- Stoneware Effects: Dab on different shades with a sponge or brush to create the mottled look of unpolished stone.
- Cloudy Swirls: Blend white or a lighter shade into a darker, wet base coat using a thin brush or toothpick to create soft, cloudy patterns.
- Subtle Speckles: A very fine brush dipped in a contrasting color can create subtle speckles, reminiscent of bird eggs or natural stones.
Tip 4: Play with Shapes and Lines
Forget sharp corners and straight lines. Organic shapes are all about flow:
- Curvy Lines: Think of the way branches twist or water flows. Use a fine brush to create soft, undulating lines.
- Abstract Blobs: Soft, irregular shapes that blend into each other can create an abstract, organic feel.
- Focus on Negative Space: Sometimes, leaving parts of the nail bare (negative space) can enhance the organic feel, allowing colors and patterns to breathe.
Tip 5: Less is More (Sometimes!)
The beauty of organic designs often lies in their simplicity. You don’t need to cover every inch of your nail with elaborate art. A single accent nail with a subtle marble effect or a delicate swirl can be just as impactful as a full set of detailed designs.
Tip 6: Essential Tools for Organic Nail Art
You don’t need a professional salon to create these looks. Here are some handy tools:
| Tool | Why It’s Great for Organic Designs | Tips for Use |
|---|---|---|
| Fine-tipped Nail Art Brush | Perfect for drawing delicate lines, veins, and wispy swirls. | Clean thoroughly between colors. Use a light hand for subtle effects. |
| Makeup Sponge (Cosmetic Sponge) | Ideal for creating soft gradients, ombre effects, and dappled textures. | Cut into small pieces for easier handling. Dab gently; don’t swipe. |
| Toothpick or Dotting Tool | Useful for swirling colors in water marbling or creating small, organic dots. | Can also be used to gently blend edges of polish. |
| Clear Top Coat | Seals the design and adds a glossy finish, enhancing dimension. | Apply evenly to protect your artwork and add shine. |
| Base Coat | Protects your natural nails and provides a smooth canvas for colored polish. | Always use a good quality base coat! |
| Your Chosen Nail Polishes | The key to your color palette! Having a variety of muted and earthy tones is helpful. | Ensure polishes are not too thick or too thin for the desired effect. |
Tip 7: Don’t Fear Imperfection!
This is the golden rule of organic nail art. Real nature isn’t perfectly symmetrical or uniformly colored. Embrace slight wobbles in your lines or uneven dabs of color. These “flaws” are what make your design look natural and unique!
External Resource: For tips on nail health, which is crucial for any nail art, check out the NHS guide to nail care.
Essential Organic Nail Looks for Beginners
Let’s translate these tips into some gorgeous looks you can try right away!
Look 1: The Ethereal Marble Manicure
This is a classic organic look that’s surprisingly easy to achieve.
- Prep: Start with clean, dry nails. Apply a base coat and let it dry completely.
- Base Color: Apply one or two coats of a neutral or pastel base color (e.g., soft grey, creamy white, or pale beige). Let it dry to the touch.
- Veining: Take a fine-tipped nail art brush and dip it into a contrasting color (like white, black, or a metallic shade). Gently create thin, irregular lines across the nail, mimicking marble veins. Don’t make them too perfect!
- Blend (Optional): If you want a softer look, use a clean, damp brush or a toothpick to very lightly smudge or swirl the lines while the polish is still wet.
- Top Coat: Once dry, apply a clear top coat to seal the design and add shine.
Look 2: The Moody Stone Effect
This design gives your nails a sophisticated, unpolished stone appearance.
- Prep: Base coat applied and dried.
- Base Color: Apply your chosen base color (e.g., deep navy, forest green, or charcoal grey). Let it get slightly tacky, not fully dry.
- Dabbing: Take a makeup sponge and dab it lightly into a lighter shade of your base color or a complementary neutral (e.g., a lighter grey on navy, or beige on green).
- Apply Texture: Gently dab the sponge onto your nail in random spots. Build up the texture by dabbing in different areas with varying pressure. You can also use a crumpled plastic wrap technique for a similar effect by pressing it into a wet polish.
- Deepen (Optional): For more depth, you can use a tiny bit of black or white polish on a very fine brush to add subtle speckles or deeper shadows, mimicking natural rock formations.
- Top Coat: Seal with a glossy top coat. For a more “raw” look, you could even use a matte top coat.
Look 3: The Blended Sunset Ombre
Capture the soft beauty of a sunset on your nails.
- Prep: Base coat on.
- Colors: Choose 2-3 colors that blend well, like a soft pink, a peachy orange, and a creamy yellow, or a gradient of blues and purples.
- Sponge Application: Apply the colors in stripes onto your makeup sponge.
- Gradient: Gently press the sponge onto the nail, pressing from cuticle to tip to create a blended effect. You might need to reapply colors to the sponge and press again to achieve a smooth transition.
- Clean Up: Use a brush with nail polish remover to clean up any excess polish around your cuticles.
- Top Coat: Finish with a clear top coat.
Look 4: The Subtle Vein Accent Nail
Perfect for those who love minimalist nail art.
- Prep: Base coat on.
- Full Color: Paint one or two accent nails with a solid, sophisticated color like nude, light grey, or muted sage green. Let it dry.
- Delicate Lines: Using an ultra-fine brush and a contrasting color (like white, black, or gold), draw a few very thin, delicate lines radiating from the cuticle or meandering across the nail. Think of leaf veins or wood grain.
- Less is More: The key here is to be sparse. Don’t overdo the lines. A few well-placed lines are more effective.
- Top Coat: Seal with a high-shine top coat.
Look 5: The Cloudy Swirl Design
Inspired by soft, wispy clouds or the natural patterns in agate stone.
- Prep: Base coat applied.
- Base Color: Paint your nails with a base color – this could be a light blue, a soft grey, or even a deep, moody color like navy.
- Wet-on-Wet Swirls: While the base color is still wet, take a small amount of white or a lighter shade of your base color on a fine brush. Gently swirl it into the wet base color. You can use a toothpick to help diffuse the edges and create a soft, cloudy effect.
- Don’t Over-Swirl: The goal is a diffused, blended look, not distinct lines. Work quickly before the polish dries.
- Top Coat: Once completely dry, apply a clear top coat.
Maintaining Your Organic Nail Designs
Organic designs are often forgiving, but here’s how to keep them looking great:
- Top Coat is Key: A good quality top coat not only adds shine but also protects your design from chipping and fading. Reapply every few days if needed.
- Be Gentle: Avoid using your nails as tools. Try not to pick at things, and wear gloves when doing chores like washing dishes or cleaning.
- Moisturize: Keep your cuticles and hands moisturized with cuticle oil and hand cream. Healthy nails and skin make any nail art look better.
- Touch-Ups: If a small chip occurs, you can often fix it by carefully applying a tiny bit of top coat to the affected area. For marble or stone effects, a tiny dab of the base color or a fine line with your art brush can often blend away minor imperfections.
Organic Nail Designs vs. Other Styles
It’s helpful to see how organic designs fit into the broader nail art landscape:
| Style Category | Key Characteristics | Organic Design Overlap | Beginner Friendliness |
|---|---|---|---|
| Geometric Nails | Sharp lines, shapes (squares, triangles), symmetry. | Minimal (can incorporate slight curves) | Moderate (straight lines can be tricky) |
| Floral Nail Art | Detailed flowers, leaves, petals. | Can be organic if flowers are abstract or painted with flowing lines. | Moderate to Advanced (requires detail work) |
| Abstract Art | Non-representational, freeform designs. | High overlap – organic designs are a type of abstract art. | High (focus on flow and color, not precision) |
| Minimalist Nails | Simple, clean designs; often uses negative space. | High overlap – organic designs can be very minimalist.
|


