Looking for effortless beauty on your nails? Ombre nude to peach nails offer a sophisticated, warm gradient that’s surprisingly easy to achieve. This chic look blends soft, neutral nudes with a hint of peachy blush, creating a natural yet polished manicure perfect for any occasion. Get ready to rock this trend with our simple guide!
Ever admired those beautifully blended nails that look like a sunset captured on your fingertips? Achieving a smooth transition between colors can seem like a daunting task, especially if you’re new to DIY manicures. But what if I told you that a stunning ombre effect, specifically the gorgeous nude-to-peach shade, is totally within your reach? You’re in the right place! Forget about spending a fortune at the salon; we’re going to break down how to get this effortlessly chic look right at home. Get ready to transform your nails into a work of art that’s both subtle and eye-catching. We’ll cover everything you need, from the right tools to simple techniques that even a beginner can master. Let’s dive into creating your dream ombre nude to peach nails!
Understanding the Appeal of Ombre Nude to Peach Nails
The ombre nude to peach nail trend is incredibly popular for a reason. It strikes a perfect balance between understated elegance and a touch of playful warmth. Think of it as the ideal manicure for those days when you want something a little more special than your everyday polish, but not overtly flashy. This gradient effect creates a natural-looking depth and dimension on each nail. The combination of nude and peach speaks to a desire for soft, flattering tones that complement a wide range of skin tones and outfits. It’s a sophisticated choice that feels both modern and timeless.
Why This Ombre Combination Works So Well
Nude is the ultimate neutral: it’s chic, versatile, and always in style. Peach, on the other hand, adds a soft, warm glow that can make your nails look healthier and more vibrant. When blended together, they create a seamless gradient that is reminiscent of a soft sunrise or a delicate blush. This pairing is universally flattering and can make your hands look more refined. It’s a subtle way to embrace color without being overpowering, making it perfect for work, casual outings, or even more formal events.
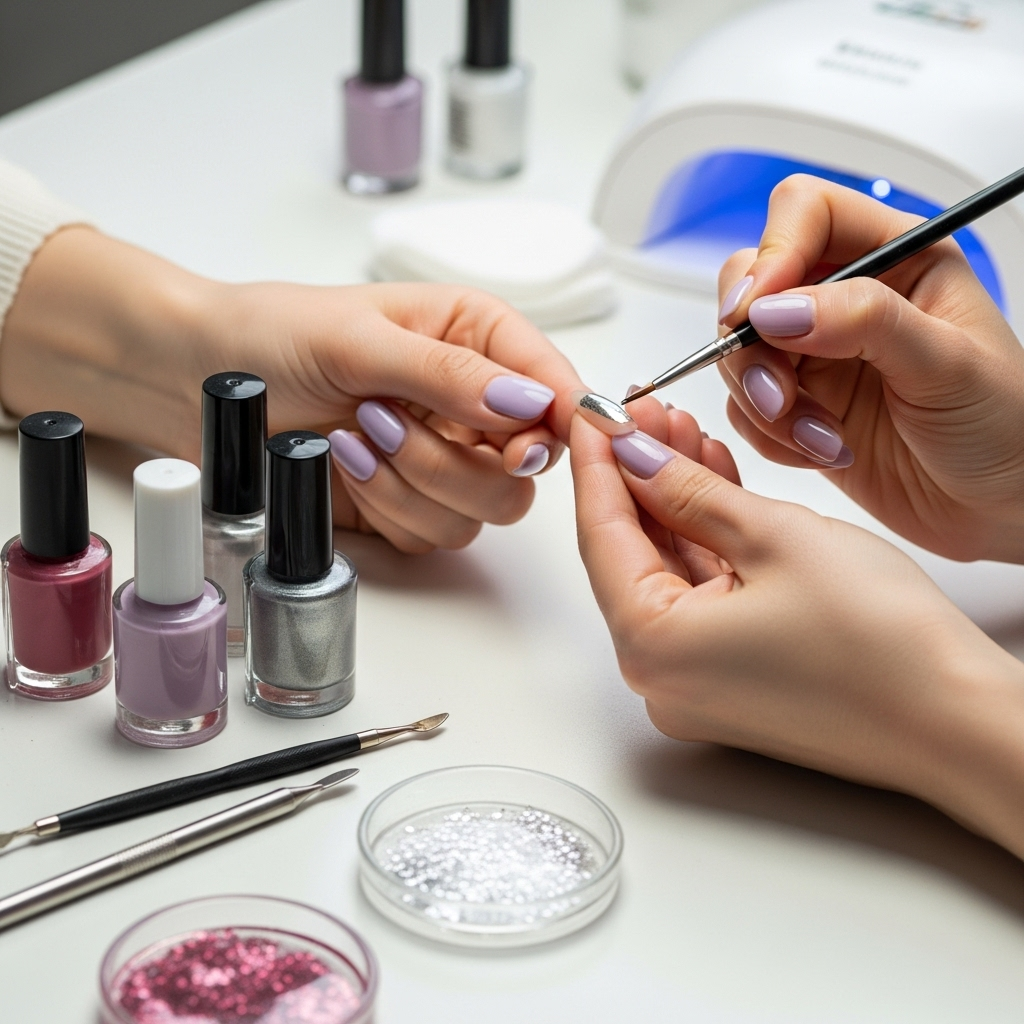
Your Essential Nail Ombre Toolkit
Before we get started with the fun part – creating the look! – let’s gather what you’ll need. Having the right tools makes the process so much smoother and helps you achieve that salon-quality finish. Don’t worry if you don’t have everything right away; many of these are standard nail care items.
Must-Have Supplies for Ombre Nails
- Base Coat: Essential for protecting your natural nails and helping polish adhere.
- Top Coat: Seals your design and adds a glossy shine, extending the life of your manicure.
- Nude Nail Polish: Choose a shade that complements your skin tone.
- Peach Nail Polish: A soft peachy shade works best for this gentle gradient.
- Makeup Sponge or Ombre Sponge: A regular cosmetic sponge works well. You can also find specialized makeup sponges with a finer texture for a smoother blend.
- Small Scissors or Nail File: For cutting the sponge if needed.
- Rubbing Alcohol or Nail Polish Remover: For cleaning up any mistakes.
- Cotton Pads or Q-tips: To apply the remover.
- Optional: Matte Top Coat: For a different finish and aesthetic.
- Optional: Nail Buffer: To smooth the nail surface before applying polish.
Using a makeup sponge is the secret weapon for beginners to achieve a seamless ombre. The porous surface allows you to dab and blend the colors gradually, creating that beautiful gradient effect without needing advanced artistic skills. A good quality sponge can make all the difference in achieving a smooth, professional-looking transition.
Step-by-Step Guide: Creating Your Ombre Nude to Peach Nails
Ready to get painting? This section breaks down the process into simple, manageable steps. Take your time, especially the first few times you try this technique, and remember that practice makes perfect!
Preparation is Key
- Clean Your Nails: Start with clean, dry nails. Remove any old nail polish.
- Shape Your Nails: File your nails to your desired shape.
- Buff (Optional but Recommended): Gently buff the surface of your nails to create a smooth canvas. This also helps polish adhere better.
- Apply Base Coat: Apply one layer of your favorite base coat. Let it dry completely. This step is crucial for preventing nail staining and ensuring your polish lasts longer.
Creating the Ombre Effect
This is where the magic happens! The key is to work relatively quickly so the polish doesn’t dry on the sponge before you can blend it onto your nail.
Method 1: The Makeup Sponge Technique (Beginner Friendly)
- Prepare the Sponge: Cut a clean makeup sponge into a wedge shape. Some sponges come pre-cut into wedges, which are perfect for manicures. Ensure the sponge is dry.
- Apply Polish to Sponge: Apply a stripe of your nude polish and a stripe of your peach polish side-by-side on a flat surface, like a piece of paper or a palette. Alternatively, you can apply the colors directly onto the sponge, making sure the lines are close but not touching.
- Dab onto the Nail: Gently press the sponge onto your nail, starting from the cuticle area and rolling slightly upwards. You want to transfer the polish from the sponge to your nail.
- Repeat for Blend: You’ll likely need to reapply polish to the sponge and dab again to build up the color and smooth the transition. For the second application, position the sponge slightly higher on the nail to focus on the transition area. You can also dab the edge of the sponge lightly to feather the color upwards.
- Building the Color: Continue dabbing and reapplying polish to the sponge as needed. The goal is to gradually build the gradient. Don’t press too hard, as this can create harsh lines. Light, dabbing motions are best.
- One Nail at a Time: It’s best to do one nail at a time, especially when you’re starting out, so the polish doesn’t dry on the sponge.
Method 2: The Toothpick/Fine Brush Technique (For More Control)
If you prefer more precision or don’t have a suitable sponge, a fine-tipped brush or a toothpick can also work, though it requires a bit more patience.
- Apply Base Color: Apply one or two coats of your nude polish to the entire nail and let it dry completely.
- Apply Peach Polish: Apply a thin coat of the peach polish to the tip or upper half of your nail.
- Blend: Immediately take a fine-tipped nail art brush (or a toothpick) dipped in a tiny amount of nail polish remover. Gently blend the edge where the nude and peach polish meet. Work in small, light strokes, gradually pushing the peach down towards the nude color.
- Add Top Coat Carefully: Once you’re happy with the blend, let it dry, then apply a clear top coat. You might need to go over the blended area with a bit more nude polish and re-blend if the transition isn’t smooth enough.
Finishing Touches
- Clean Up Edges: Dip a Q-tip or a fine-tipped brush into nail polish remover and carefully clean up any polish that got on your skin around the nail. This step makes a huge difference in the final appearance!
- Apply Top Coat: Once the ombre is dry to the touch, apply a generous layer of your favorite top coat. This will seal the design, add shine, and help prevent chipping. For an extra smooth finish, ensure your top coat covers the entire nail, including the ombre transition.
- Optional: Matte Finish: If you prefer a matte look, apply a matte top coat instead of a glossy one.
- Allow to Dry: Let your nails dry completely.
Remember, the key to a great ombre is patience and a gentle touch. Don’t be discouraged if your first attempt isn’t perfect. Each try gets you closer to mastering the technique!
Tips for a Flawless Ombre Nude to Peach Manicure
Even with a step-by-step guide, a few extra tips can elevate your ombre game from good to absolutely stunning. These pointers are about refining the look and making sure your masterpiece lasts.
Pro Tips for Beginners
- Layering is Key: Don’t try to achieve full opacity with just one dab of the sponge. Build the color up in thin layers. This results in a smoother transition and less chance of a muddy blend.
- Test the Sponge: Before applying to your nail, dab the polish-laden sponge onto a piece of paper a few times. This removes excess polish and helps you see how the colors are blending on the sponge itself.
- Work Quickly but Methodically: Nail polish dries fast, especially on a sponge. Have your colors ready and your sponge prepared. Once the polish is on the sponge, move efficiently to your nail.
- Skin Protection: For a cleaner finish, you can apply a bit of petroleum jelly or liquid latex around your nails before you start sponging. This acts as a barrier, making cleanup much easier.
- Choose the Right Colors: Opt for polishes that have a good consistency – not too thick and not too watery. A medium consistency typically works best for sponging.
- Consider Skin Tone: While nude and peach are generally flattering, experiment with different shades of nude (from beige to light brown) and peach (from pale coral to soft apricot) to find what best complements your unique skin tone.
A wonderful resource for understanding color theory and how to choose shades that best suit your complexion can be found on resources from cosmetic science institutions, which often provide insights into pigments and their effects. For example, understanding undertones can help you select the perfect nude and peach combination. While not directly nail-specific, the principles of color harmony are universal. You can often find general color psychology and beauty guides through university extension programs or reputable beauty education sites.
Ombre Nude to Peach Nail Variations and Inspiration
Once you’ve mastered the basic nude-to-peach ombre, you can play around with different nuances to create unique looks. The beauty of ombre is its versatility!
Playing with Shades and Finishes
- Deeper Peaches: For a bolder look, try a deeper, more peachy-orange hue blended into a creamy nude.
- Pinky Nudes to Peach: Instead of a true nude, use a nude with a hint of pink for a softer, more romantic feel before blending into peach.
- Glitter Accents: Add a touch of sparkle! A fine glitter polish can be sponged onto the tips or cuticle area, or a holographic top coat can add a subtle shimmer over the ombre.
- Nude to Peach with White: For a brighter, more summery feel, you could try a nude to peach gradient with a tiny bit of white at the very tips.
- Matte vs. Glossy: As mentioned, a matte top coat can give your ombre a sophisticated, velvety appearance, while a glossy finish offers that classic, polished shine.
When to Wear Your Ombre Nude to Peach Nails
This versatile manicure is suitable for almost any occasion. Here are a few ideas:
| Occasion | Why it Works | Tips for Styling |
|---|---|---|
| Everyday Wear/Work | Subtle, professional, and sophisticated. Complements most office attire. | Opt for softer, lighter shades of nude and peach. A glossy finish keeps it classic. |
| Bridesmaid or Wedding Guest | Elegant, romantic, and pairs beautifully with dresses and formal wear. | Consider a peachy nude with a hint of shimmer. A matte top coat can add a modern touch. |
| Spring/Summer Events | The warm, soft tones evoke sunshine and blooming flowers. | Experiment with brighter peach shades or add a subtle glitter accent on one nail. |
| Casual Outings | Chic and stylish without being overdone. Perfect for brunches, shopping, etc. | Feel free to play with slightly bolder peach hues or a matte finish for a trendy vibe. |
The beauty of ombre nude to peach nails is their adaptability. They can be dressed up or down, making them a go-to choice for anyone who loves a polished yet approachable nail look.
Maintaining Your Ombre Nails
To keep your beautiful ombre nude to peach nails looking fresh and flawless for as long as possible, follow these simple maintenance tips:
- Reapply Top Coat: Especially if you notice the shine dulling or edges starting to lift. A quick reapplication of top coat every couple of days can revive your manicure.
- Moisturize: Keep your cuticles and hands moisturized. Dry cuticles can make even the best manicure look unkempt. Apply cuticle oil daily and hand cream regularly.
- Be Gentle: Avoid using your nails as tools. Opening cans, scraping surfaces, or picking at things can lead to chips and cracks.
- Wear Gloves: When doing household chores, especially those involving water or harsh chemicals (like washing dishes or cleaning), wear rubber gloves. This is one of the best ways to protect your manicure.
- Touch-Ups: If you notice a small chip or wear at the tip, you can sometimes camouflage it with a touch of clear polish or carefully blend a little more of the peach shade if needed.
Proper care not only extends the life of your manicure but also contributes to the overall health of your nails. Healthy nails are the best canvas for any nail art!
Frequently Asked Questions About Ombre Nude to Peach Nails
Got questions? We’ve got answers to help you on your ombre journey!
What are the best nude and peach shades for ombre nails?
The best shades depend on your skin tone. For lighter skin, a light beige-pink nude with a soft, pale peach works. For medium tones, try a creamy nude with a slightly more vibrant, apricot-peach. For deeper skin tones, consider a warm brown-toned nude with a richer, coral-peach.
How do I get the transition to be smooth and not streaky?
The key is to use a good quality makeup sponge and to dab gently. Apply the polish to the sponge quickly, then dab onto the nail with a light, rolling motion. Build the color in thin layers rather than trying to achieve full coverage in one go. Reapplying polish to the sponge allows you to layer and blend more effectively.
Can I do ombre nails with regular nail polish?
Absolutely! The makeup sponge technique is specifically designed for regular nail polish. Gel polish can also be used, but the drying process is different (curing under a UV/LED lamp), and blending might require slightly different techniques, often involving specialized brushes.
How long does an ombre nude to peach manicure typically last?
With a good base and top coat, and proper care, a regular nail polish ombre manicure can last anywhere from 5 to 7 days. Gel polish versions can last 2-3 weeks.
My sponge is getting clogged with polish. What should I do?
If your sponge gets too saturated, clean it gently with a small amount of nail polish remover and let it dry, or use a fresh part of the sponge. Ensure you’re dabbing lightly to transfer the polish, not pushing too hard, which can clog the pores faster.
Is the makeup sponge method messy?
It can be a little messy, especially at first. That’s why cleaning up the edges with a Q-tip dipped in remover is an essential step. Protecting your skin beforehand with petroleum jelly also helps immensely with cleanup.
Can I use different types of sponges?
Yes! While standard makeup wedges are popular, some people prefer using denser cosmetic sponges for an even smoother finish, or even textured sponges for a unique effect. Experiment to see what works best for you.
Conclusion
There you have it – your complete guide to achieving stunning ombre nude to peach nails right at home! We’ve covered why this trend is so beloved, gathered your essential toolkit, walked through a simple step-by-step process using the beginner-friendly sponge technique, shared pro tips for perfection, and even explored variations and maintenance. This chic, warm gradient is an effortless way to add a touch of sophistication and subtle color to your look, suitable for any occasion. Remember, the beauty of nail art is in the self-expression, so don’t be afraid to experiment with different shades and finishes. With a little practice, you’ll be creating flawless ombre nails that will have everyone asking where you got them done. So go ahead, embrace this trend, and let your nails shine with understated elegance!