Your guide to negative space French tips is here! Learn how to create this chic, modern nail look easily at home. Master the minimalist vibe for sophisticated nails that are simple yet striking.
Feeling like your nails need a fresh, stylish update? Classic French tips are lovely, but sometimes we crave something a little more… cool. Enter negative space French tips! They’re the buzzy trend that’s been all over your feed, and for good reason. They look super professional and chic, but they’re surprisingly simple to achieve. If you’ve ever looked at your nails and thought, “How do they do that?”, don’t worry! We’re about to break down exactly how to get this effortlessly elegant look right in your own home. Get ready to fall in love with your nails all over again!
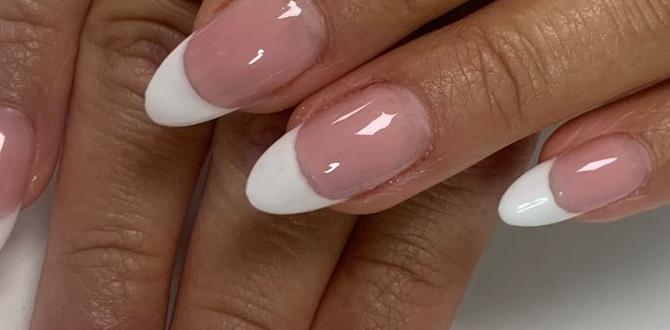
This modern twist on a classic swaps the solid white tip for a design that incorporates the natural nail, creating a peek-a-boo effect. It’s super versatile, works with any outfit, and best of all, it’s beginner-friendly. Let’s dive into making your nails look like they just stepped out of a salon!
Why We Love Negative Space French Tips
So, what’s the big deal about negative space French tips? It’s all about that modern, minimalist magic. They offer a sophisticated edge without being overly complicated. Here are a few reasons why they’re a must-try:
- Chic & Modern: They instantly elevate your look with a contemporary feel.
- Versatile: They complement any style, from casual to formal.
- Low Maintenance: The design often grows out gracefully, meaning fewer touch-ups.
- Creative Freedom: You can play with colors, shapes, and placement.
- Beginner-Friendly: Easier to execute than many other intricate nail art designs.
Essential Tools for Your Negative Space French Tips
Before we get our hands dirty (or, well, beautifully painted!), let’s gather our supplies. Having the right tools makes all the difference, especially when you’re aiming for that clean, crisp look. Don’t worry if you don’t have everything; we’ll cover alternatives too!
Must-Have Tools:
- Base Coat: To protect your natural nails and help polish adhere better. A good quality base coat can prevent staining and ensure a smoother finish. Learn more about the importance of base coats from NailPro.
- Your Chosen Polish Colors: Typically, a nude or sheer pink for the base, and white or a contrasting color for the tips.
- A Fine-Liner Nail Art Brush: This is key for precise lines. Look for one with short, firm bristles.
- Detailing Nail Art Brush: A slightly softer brush for filling in or smoothing.
- Nail Polish Remover: For cleaning up mistakes.
- Cotton Swabs or Lint-Free Wipes: For applying remover precisely.
- Top Coat: To seal your design and add shine.
- Optional: Nail Stencils or Tape: Some people find these helpful for creating straighter lines faster, though a steady hand with a brush is often preferred for negative space.
- Optional: LED/UV Lamp with Gel Polish: If you prefer gel manicures for longevity.
Tool Breakdown:
Let’s get a little more specific. The type of brush you use matters. For negative space French tips, you’re aiming for precision. A fine-liner brush has really thin bristles that allow you to draw delicate lines, perfect for accentuating the tip or creating a gap. A detailing brush can be great for cleaning up edges or gently blending if needed. If you’re new to nail art, practicing with a brush on paper first can help you get a feel for it! For a more solid line, some artists prefer using the edge of the polish brush itself or even a striping tape.
The “Negative Space” Concept Explained
What exactly does “negative space” mean in nail art? Imagine a picture. The main subject is the “positive space.” Everything else – the sky, the background – is the “negative space.” In negative space nail art, we intentionally leave parts of the nail bare, or use sheer colors, allowing the natural nail or a sheer base to show through. For French tips, this means instead of a solid white line across the tip, we create a design that highlights the tip while leaving a clear or sheer section between the tip color and the cuticle. This creates a visually interesting contrast and an airy, sophisticated feel. It’s all about the balance between what’s painted and what’s left unpainted.
Step-by-Step: Creating Chic Negative Space French Tips
Ready to nail this look? Follow these simple steps. We’re going to aim for a classic look with a modern twist, using a nude base and a colored tip with a gap. Don’t worry about perfection on your first try – practice makes progress, and you can always clean up mistakes!
Step 1: Prep Your Nails
This is non-negotiable for any manicure! Start with clean, dry nails. Push back your cuticles gently using an orange stick or a cuticle pusher. If you want a super clean look, you can trim any excess skin, but be careful! Shape your nails to your desired length and style. A square or squoval shape often looks great with French tips, but feel free to rock your favorite shape. Buff your nails lightly to create a smooth surface and remove any natural shine, which helps polish adhere better. Wipe down your nails with nail polish remover or an alcohol wipe to remove any dust or oils.
Step 2: Apply Base Coat
Paint one or two thin coats of your chosen base coat. This protects your nails from staining, especially if you’re using darker colors, and provides a smooth canvas for your polish. Let it dry completely. If you’re using a sheer nude or pink polish as your base color, apply 1-2 thin coats now and let it dry fully.
Step 3: Create the “Negative Space” Line
This is where the magic happens! You have a couple of options here, depending on your comfort level and the look you want:
Option A: Using a Fine-Liner Brush
Dip your fine-liner brush into your tip color polish (let’s say white for this example). Wipe off any excess polish on the rim of the bottle. Starting from one side of the nail, paint a clean, thin line across the free edge where you’d normally have your white tip. Now, here’s the key: leave a small gap of bare nail or your sheer base color between this line and the cuticle area. You can create a small curve descending from the line, leaving that space. Work your way across the nail, ensuring the line connects or ends cleanly. It doesn’t have to be a thick line; a delicate one is often more chic.
Option B: Using a Stencil or Tape
For a perfectly straight line, you can use French tip stencils or striping tape. Apply the stencil or tape where you want your negative space to begin (i.e., the line separating the tip color from the nude base). Paint your chosen tip color over the stencil/tape. Let the polish dry for a minute or two, then carefully peel off the stencil or tape while the polish is still slightly tacky. This will reveal a crisp line. If you’re aiming for the “gap” effect, you’d place your stencil or tape further down the nail, leaving space for the bare nail to be visible.
Pro Tip: For a true negative space effect where the tip floats above the cuticle, you can create a “C” shape or a crescent moon shape with your brush, leaving a significant portion of the nail bare. This is a more artistic approach and might require a few tries.
Step 4: Define the Tip
Now, let’s refine the tip itself. If you used the brush method, you might want to go back with a tiny bit of polish on your brush (or even a clean brush dipped in remover) to sharpen any edges or smooth out imperfections. If you used tape, ensure the edge is clean. Some people like to paint the actual tip color slightly under where the white line is, creating a seamless blend, while others like a distinct edge. For this tutorial, we’re creating a distinct tip with a gap. You can also choose to add a second thin coat of your tip color to ensure opacity.
Step 5: Clean Up
Dip a small, flat brush (or a cotton swab) into nail polish remover. Carefully trace around your cuticle and the edges of your nail design to clean up any smudges or mistakes. This step is crucial for that polished, professional finish. Take your time here!
Step 6: Apply Top Coat
Once your design is completely dry, apply a generous coat of top coat. Make sure to cap the free edge of your nail by running the brush along the tip. This seals in your design, adds shine, and helps prevent chipping. Let it dry thoroughly.
Variations to Try
Negative space French tips are incredibly versatile. Once you’ve mastered the basic technique, you can play around with different looks!
Color Play
Replace the traditional white tip with literally any color. Think bold neons for summer, deep jewel tones for fall, or even metallics like gold or silver for a glam touch. You can also use a sheer color for the tip itself, creating a softer look.
Shape Shifting
Instead of the classic curved tip, experiment with sharp, geometric lines, V-shapes, or asymmetrical designs. You can create a single line down the center of the nail, or two parallel lines for a modern effect.
Double French
Create two parallel lines with a gap in between. For example, a thin white line near the cuticle, then a bare space, then a colored tip. Or vice versa!
Accent Nails
Try negative space French tips on just one or two accent nails and keep the rest of your nails a solid color or a sheer nude for a subtler look.
French Moon Manicure
This is a variation where the negative space is at the cuticle, creating a “moon shape.” You paint the tip and then leave a distinct crescent of bare nail at the base.
Comparing Negative Space Tips vs. Classic French Tips
It’s fun to see how these two popular styles stack up. Both have their place in our nail arsenals!
| Feature | Classic French Tips | Negative Space French Tips |
|---|---|---|
| Visual Appeal | Traditional, clean, bright, defined white tip. | Modern, minimalist, airy, sophisticated, often more subtle. |
| Technique Difficulty | Can be tricky to get perfectly crisp lines; requires precision. | Generally considered easier for beginners due to the intentional gaps and less need for full coverage. |
| Color Options | Typically white tip with a nude/pink base. | Unlimited color choices for the tip and base; can be very experimental. |
| Maintenance & Growth | Growth can be noticeable as the white line moves up. | Growth is often less obvious due to the “bare” sections, making it more durable. |
| Fashion Forwardness | Timeless staple. | Trendy, contemporary, and often seen in fashion editorials. |
Tips for Long-Lasting Negative Space French Tips
To keep your beautiful negative space French tips looking fresh for as long as possible, follow these pro tips:
- Always Use a Base Coat: We can’t stress this enough! It creates a barrier and smooths the nail surface.
- Apply Thin Coats: Thick layers of polish are more prone to chipping and taking forever to dry.
- Cap the Free Edge: When applying your base coat, tip color, and especially your top coat, swipe the brush along the very tip of your nail. This seals the edge and prevents lifting. The National Institute for Occupational Safety and Health (NIOSH) provides important safety guidelines for using chemicals, including nail products, which is a good reminder to work in a well-ventilated area and handle products with care.
- Don’t Skip the Top Coat: A good quality top coat is your best friend for shine and durability. Reapply every couple of days if needed.
- Be Gentle: Avoid using your nails as tools. Opening cans or scraping things with your tips can lead to chipping.
- Moisturize: Keeping your cuticles and hands moisturized can prevent dryness that can sometimes lead to polish lifting or peeling.
Frequently Asked Questions (FAQ)
Q1: What is the easiest way to do negative space French tips at home?
The easiest way is to use a fine-liner nail art brush with a steady hand. You paint the tip color only on the free edge, leaving a deliberate gap between it and your cuticle. For straighter lines, you can try using striping tape as a guide while the polish is still wet.
Q2: Do I need special polish for negative space French tips?
No, you don’t need special polish. You can use your regular nail polish. A sheer nude or pink polish is great for the base, and any color you like for the tips. A good fine-liner brush is more important than the specific polish type.
Q3: How do I get my negative space French tips to look clean and not messy?
Key steps are: prepping your nails thoroughly, using a clean brush or tool for precision, taking your time, and cleaning up edges with a brush dipped in nail polish remover. Applying thin coats also helps avoid bulkiness.
Q4: Can I use gel polish for negative space French tips?
Absolutely! Gel polish can give you a super durable and high-shine finish. You’ll follow the same steps but cure each layer (base coat, color, top coat) under a UV or LED lamp. Gel polish often allows for easier correction before curing.
Q5: What if my “gap” isn’t perfectly even on all nails?
Don’t stress! Hand-painted nails are unique. Slight variations add to their charm and character. If you’re really bothered, you can try using nail stencils specifically designed for French tips to create more uniform shapes. The beauty of hand-painted art is its individuality.
Q6: How long do negative space French tips usually last?
With a good base coat, careful application, and a strong top coat, traditional nail polish negative space French tips can last anywhere from 5-10 days. Gel versions can last 2-3 weeks. The negative space design itself can also make them appear less “grown out” over time compared to classic French tips.
Conclusion
See? Negative space French tips are totally achievable and oh-so-chic! They’re a fantastic way to refresh your manicure, adding a modern, sophisticated touch that’s surprisingly easy to do yourself. Whether you opt for a classic nude base with a crisp white tip or experiment with bold colors and shapes, this trend is all about embracing clean lines and intentional design. Remember to prep well, take your time with the application, and don’t be afraid to clean up those edges for a salon-worthy finish. Grab your favorite polish, a fine-liner brush, and get ready to rock this essential and endlessly stylish nail look. Happy polishing!

