Natural nail designs are achievable and beautiful! This guide offers essential tips and step-by-step ideas for creating stunning manicures right at home, celebrating the elegance of your own nails with simple techniques and a creative touch.
Are you dreaming of gorgeous nails but feel like nail art is just too complicated? You’re not alone! Many of us admire beautiful manicures, only to feel overwhelmed by fancy tools or intricate designs. The good news is, you don’t need a salon to have stunning nails. Embracing your natural nail shape and length is totally chic, and decorating them can be super fun and easy! We’ll show you how to make your natural nails shine with simple, proven designs that anyone can do.
Get ready to discover how simple and rewarding it is to create your own beautiful nail art. We’ll break down everything you need to know, from basic prep to creating eye-catching looks. Let’s dive in and unlock your at-home nail design potential!
Why Natural Nail Designs Are a Smart & Stylish Choice
Choosing to work with your natural nails isn’t just a trend; it’s a celebration of your unique beauty! Natural nails are less prone to damage compared to extensions or acrylics, and when cared for properly, they can look incredibly elegant. Plus, embracing natural nail designs saves you time and money. You get to express your creativity without a big commitment, making it a perfect choice for busy bees and budget-savvy beauty lovers. Thinking about your nail health is also a big win! For more information on nail health and care, the American Academy of Dermatology has some excellent resources.
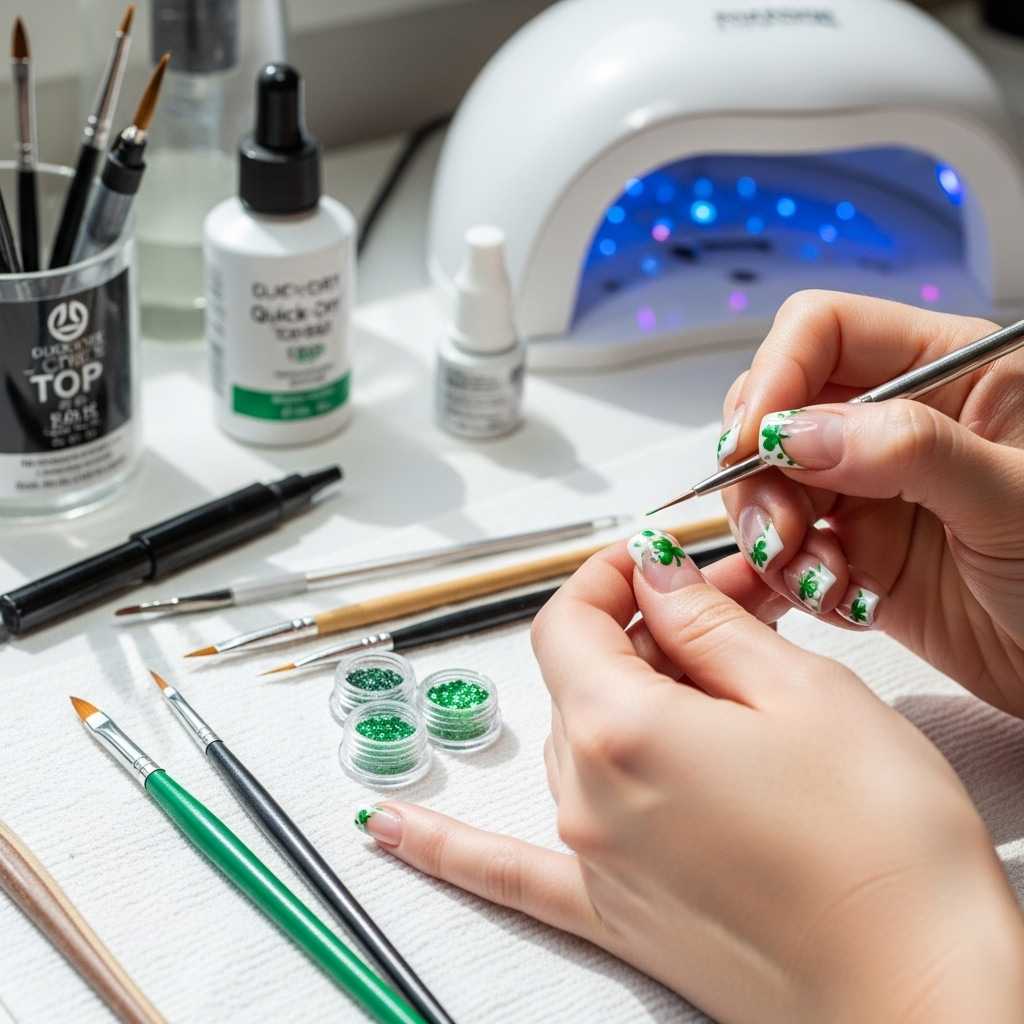
Essential Tools for Natural Nail Design Magic
You don’t need a professional kit to create amazing natural nail designs. A few basic tools can make a world of difference. Having the right supplies makes the process smoother and the results look much more polished. Think of these as your essential sidekicks in the quest for fabulous nails!
Must-Have Tools:
- Nail File: For shaping your nails. Opt for a fine-grit file (around 240 grit or higher) to avoid damaging the nail.
- Nail Buffer: A 4-way buffer can smooth ridges, add shine, and prepare your nails for polish.
- Cuticle Pusher/Orange Stick: To gently push back your cuticles. Be gentle!
- Base Coat: Protects your natural nail and helps polish adhere better.
- Top Coat: Seals your design, adds shine, and prevents chipping.
- Nail Polish Remover: For quick cleanups and correcting mistakes.
- Cotton Pads or Lint-Free Wipes: For cleaner application.
- Fine-Tipped Brushes or Dotting Tools: For adding details and designs. Even a toothpick can work in a pinch!
- Tweezers: Useful for placing small embellishments like rhinestones.
Step-by-Step: Prepping Your Natural Nails
The secret to long-lasting and beautiful natural nail designs is in the prep! Taking a few extra minutes here will make all the difference in how your manicure holds up and looks. It’s like building a strong foundation for a beautiful house – it just works better!
- Clean Claws: Start by removing any old polish with nail polish remover. Wash your hands with soap and water and dry them thoroughly.
- Shape Up: Gently file your nails into your desired shape. Always file in one direction to prevent splitting.
- Cuticle Care: Apply a tiny amount of cuticle oil or a cuticle remover solution to your cuticles. Let it sit for a minute, then gently push back the cuticles with a cuticle pusher or orange stick. Trim any excess dead skin very carefully if needed, but often pushing back is enough.
- Buff It Out: Use the smoothing step on your nail buffer to gently even out any ridges. Follow with the shine step for a natural gleam.
- Clean Again: Wipe your nails with a lint-free wipe or cotton pad lightly dampened with nail polish remover to get rid of any dust or oils. This ensures your polish will stick properly.
- Base Coat Bliss: Apply a thin, even layer of your favorite base coat. Let it dry completely. This guards your nails and gives the color something to grip onto.
Beginner-Friendly Natural Nail Designs: Easy & Chic
Ready to get creative? These designs are perfect for beginners and require minimal fuss. They look impressive but are surprisingly simple to achieve. Let’s add some flair to your fabulous natural nails!
1. The Classic French Manicure Makeover
Forget the stark white tips! A modern French manicure uses soft colors or even a hint of sparkle. It’s timeless and elegant.
How-To:
- After applying your base coat, paint your nails with a sheer nude, pale pink, or milky white polish. Let it dry.
- Using a fine-tipped brush or a white nail polish pen, carefully draw a line along the tip of your nail. For a softer look, use a nude or colored polish instead of white.
- Alternatively, use a French tip guide sticker for a clean line.
- Once dry, apply a generous layer of top coat.
2. Simple Dotting Designs
Dots are your best friend for adding a playful touch without much effort. They can be varied in size and color to create unique patterns.
How-To:
- Apply your base coat and one or two coats of your base color polish. Let it dry completely.
- Dip a dotting tool (or the rounded end of a toothpick or bobby pin) into a contrasting nail polish color.
- Gently press the dotting tool onto your nail to create a dot.
- Repeat to create patterns like outlines, scattered dots, or lines of dots. Experiment with different sizes by using different tools.
- Finish with a clear top coat.
3. Gradient (Ombre) Nails
This design looks super professional but is surprisingly easy. It’s a beautiful blend of colors that fades seamlessly.
How-To:
- Apply your base coat and let it dry.
- Paint your nails with your lightest color. Let it dry.
- Grab a makeup sponge (a clean one!). Apply two or three stripes of different nail polish colors onto the sponge, side by side. Think of colors that blend well, like pinks and oranges, or blues and purples.
- Quickly press the sponge onto your natural nail. You might need to dab it a couple of times to get the perfect blend.
- Repeat for each nail.
- Clean up any polish that got on your skin with a brush dipped in nail polish remover.
- Once dry, seal the look with a thick layer of top coat. This also helps to smooth out the sponge texture.
4. Minimalist Lines and Geometric Shapes
Clean lines and simple shapes add a modern, sophisticated vibe. You only need a steady hand and good polish!
How-To:
- Apply your base coat and your main polish color. Let it dry completely.
- Using a fine-tipped nail art brush or a striper polish, carefully draw a straight line across your nail, or create a simple geometric shape like a triangle or a square near the tip or base.
- For perfect straight lines, you can use striping tape. Apply the tape where you want the line, paint over it, and immediately remove the tape while the polish is still wet.
- Let it dry and seal with a top coat.
5. Glitter Accents
A touch of glitter can elevate any natural nail design. It’s perfect for adding a bit of sparkle without being over the top.
How-To:
- Apply your base coat and a coat or two of your chosen polish color. Let it dry completely.
- For a glitter tip: Dip a fine brush into a glitter polish and carefully paint a French tip or a sweeping stroke of glitter onto the tips of your nails.
- For a glitter accent nail: Paint just one nail with a solid glitter polish, or apply glitter to the base or a section of the nail.
- For a full glitter look on one nail: Apply a dense glitter polish over your dried base color. A second coat might be needed for full opacity.
- Seal everything with a good top coat.
Advanced (But Still Achievable!) Natural Nail Designs
Feeling a little bolder? These designs take a tiny bit more practice but are still totally manageable for the ambitious beginner. They offer a bit more flair and individuality.
1. Floral Accents
Dainty flowers can add a touch of romance to your nails. You don’t need to be an artist!
How-To:
- Start with a base coat and a solid color polish (pastels, nudes, or even a deep jewel tone work well). Let it dry.
- Using a fine-tipped brush and a contrasting color (like white, pink, or yellow), create small dots for petals. You can make 3-5 dots in a circle or slightly overlapping.
- In the center of the petals, add a smaller dot of a different color (like yellow or gold) for the flower’s center.
- Alternatively, use a dotting tool to create small dots that, when viewed together, resemble tiny flowers.
- Let dry thoroughly before applying a top coat.
2. Marble Effect
This chic look mimics natural stone and is surprisingly achievable with a bit of patience. It looks sophisticated and unique.
How-To:
- Apply your base coat and a light-colored polish (white, ivory, or a very pale grey) as your base. Let it dry.
- On a piece of foil or a palette, add a few drops of black or dark grey nail polish and a drop of clear polish or nail polish thinner. Swirl them together lightly with a toothpick, creating thin, wispy lines of color – don’t overmix!
- Gently dip a fine brush into this mixture.
- Lightly drag the brush across your nail in random, irregular strokes to mimic marble veins. Don’t press too hard.
- Repeat with subtle additions if needed, but keep it light and airy.
- Let it dry completely and seal with a thick, glossy top coat.
3. Decal & Stamping Fun
Nail decals and stamping plates are a crafter’s dream! They offer intricate designs with minimal effort.
How-To (Decals):
- Apply your base coat and color polish. Let it dry.
- Carefully peel a nail decal from its backing.
- Place it onto your nail where desired.
- Gently press down to ensure it adheres well.
- Seal with a top coat. Some decals may require a top coat over them, while others advise against it to prevent smudging. Check the decal instructions.
How-To (Stamping):
- Apply your base coat and color polish. Let it dry thoroughly.
- Apply a thick coat of a contrasting stamping polish onto your chosen design on the stamping plate.
- Scrape off the excess polish quickly with a scraper card at a 45-degree angle.
- Immediately roll a stamper tool over the design to pick it up.
- While the polish on your nail is still slightly damp, roll the stamper tool over your nail to transfer the design.
- Clean up any stray polish and seal with a top coat specifically designed for stamping (some regular top coats can smudge the design) or a quick-dry top coat.
Nail Care Tips for Healthy, Strong Natural Nails
Beautiful nail designs start with healthy nails! Taking care of your natural nails ensures they look great even without polish. Consistent care builds strength and resilience.
- Moisturize Daily: Keep your cuticles and nails hydrated with cuticle oil or hand cream, especially after washing your hands or removing polish.
- Protect Your Nails: Wear gloves when doing household chores, gardening, or anything that involves prolonged contact with water or harsh chemicals.
- Avoid Harsh Removers: Opt for acetone-free nail polish removers when possible, as acetone can be very drying.
- Don’t Bite or Pick: Resist the urge to bite your nails or pick at your cuticles. This can lead to damage and infection.
- Healthy Diet: A balanced diet rich in vitamins and minerals (like biotin, Vitamin E, and zinc) can contribute to stronger nails.
- Gentle Filing: As mentioned, always file in one direction with a fine-grit file to prevent splitting and peeling.
- Give Your Nails a Break: Occasionally skip polish for a week or two to let your natural nails breathe and recover.
Choosing the Right Nail Polish for Natural Designs
The polish itself can make or break your natural nail design. Here’s a quick guide:
| Polish Type | Best For | Beginner Friendly? | Notes |
|---|---|---|---|
| Opaque Creams | Solid colors, base colors, French tips | Yes | Great coverage, easy to apply. |
| Sheer/Jelly Polishes | Layering, subtle color, French tips, gradients | Yes | Build color intensity by adding more coats. |
| Metallics/Shimmers | Accent nails, tips, full coverage | Yes | Can hide minor imperfections due to their finish. |
| Glitter Polishes | Accent nails, tips, full coverage | Yes | Easy to apply, hides mistakes well. May require a thick top coat to smooth. |
| Fine-Tipped Nail Art Polishes | Lines, dots, intricate details | Medium | Convenient for detailed work, but requires a steady hand. |
| Stamping Polishes | Nail stamping designs | Medium | Highly pigmented for clear transfers. |
When selecting polishes, consider their formula. A polish that glides on smoothly without being too thick or too streaky will make application much easier for beginners.
Frequently Asked Questions About Natural Nail Designs
Got more questions? We’ve got answers!
Q1: How can I make my natural nail polish last longer without chipping?
A: Proper nail prep is key! Ensure your nails are clean, dry, and free of oils. Apply a good base coat, and seal your design with a quick-dry top coat. Don’t forget to “cap” the free edge of your nail by running the brush horizontally across the tip when applying polish and top coat.
Q2: My natural nails are weak and break easily. Can I still do designs?
A: Absolutely! Focus on nail health first. Use a strengthening polish, moisturize regularly, and consider supplements like biotin. For designs, opt for gentler application methods and avoid anything that puts too much pressure on the nail. Simple, clean looks are often best for weaker nails.
Q3: What’s the easiest natural nail design for a complete beginner?
A: Simple one-color manicures are beautiful on their own! For a step up, try a glitter accent nail or scattering a few dots with a toothpick. These are forgiving and add a touch of personality.
Q4: How do I prevent polish from getting on my skin?
A: Applying a thin layer of latex-free liquid latex or a specialized peel-off base around your cuticles before you start can create a barrier. Alternatively, use a fine-tipped brush dipped in nail polish remover to carefully clean up any mistakes after polishing.
Q5: Can I do nail art if my nails are short?
A: Definitely! Short nails are fantastic for nail art. Designs like minimalist dots, simple stripes, or a glitter accent nail look stunning and are very practical. Focus on designs that complement the nail shape.
Q6: How often should I change my nail polish?
A: Most manicures last 1-2 weeks. It’s a good idea to remove polish and reapply if it starts to chip significantly to prevent snagging and further damage. Giving your nails a break between polishes for a few days is also beneficial.
Conclusion: Embrace Your Inner Nail Artist!
See? Creating beautiful natural nail designs is totally within your reach! We’ve explored essential tools, simple prep steps, and a variety of designs from classic to trendy, all perfect for beginners. Remember, the goal is to have fun and express yourself. Your natural nails are a wonderful canvas, and with these proven, essential techniques, you can achieve gorgeous manicures that make you feel confident and stylish. Don’t be afraid to experiment, mix and match ideas, and discover what you love best. Happy designing!