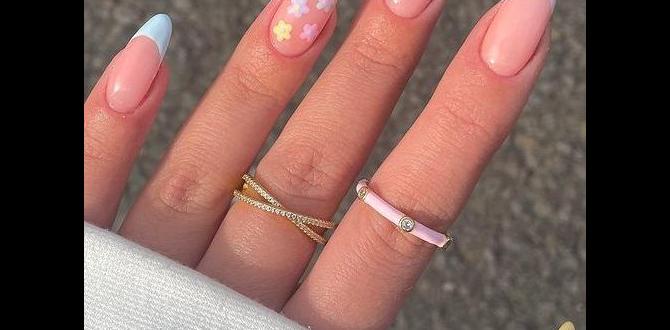
Nail designs for fair skin are surprisingly versatile! The key is choosing shades that beautifully complement your light complexion, making your hands pop. Think soft pastels, classic nudes, bold jewel tones, and subtle metallics. Discover gorgeous, easy-to-achieve looks that will have your nails looking stunning.
Hey nail lovers! Ever feel a little lost when picking out nail polish colors, especially with fair skin? It can seem tricky, right? You want something that looks amazing and truly enhances your natural beauty. Sometimes, certain colors can wash you out, or just not have that “wow” factor. But don’t worry! Finding the perfect nail designs for fair skin is totally achievable, and it’s actually quite fun. We’re going to dive into a world of colors and styles that will make your fair skin glow. Get ready to discover your new favorite looks!
Why Fair Skin Needs Special Nail Color Consideration
Fair skin tones, often characterized by light, porcelain, or creamy complexions, can be wonderfully diverse. However, they can also be sensitive to certain color undertones. For instance, if your fair skin has cool undertones (often with pink or blue hues), shades that are too yellow or orange might clash. Conversely, if your skin has warm undertones (with hints of peach or golden hues), very stark, cool-toned colors might appear too harsh. The goal is to find nail colors that harmonize with your specific skin undertone, creating a cohesive and flattering look. This isn’t about limitations; it’s about unlocking the most radiant possibilities for your beautiful fair skin!
Understanding Undertones: The Secret to Flawless Nails
To truly master nail designs for fair skin, understanding your skin’s undertone is your superpower! It’s not about how light or dark your skin is overall, but the subtle hue lying beneath the surface. Your undertone can be cool, warm, or neutral.
- Cool Undertones: If your skin tends to look pink, rosy, or bluish, you likely have cool undertones. Veins on your wrist might appear blue, and silver jewelry often looks best.
- Warm Undertones: If your skin has a peachy, golden, or yellow hue, you probably have warm undertones. Your wrist veins might look greenish, and gold jewelry often flatters you most.
- Neutral Undertones: This is a blend of both! Your skin has a balance of pink and yellow, and both silver and gold jewelry might look great. Your veins might be a mix of blue and green.
Knowing your undertone helps you pick nail polish shades that won’t fight with your complexion. For example, cool undertones often shine with blues, purples, and pinks, while warm undertones are often complemented by corals, oranges, and warm reds. Neutral undertones have the widest range of flexibility!
Top Nail Color Families for Fair Skin
When it comes to nail designs for fair skin, certain color palettes are simply magic. They enhance your natural tone without overpowering it. Here’s a breakdown of the most flattering color groups:
1. Soft Pastels: The Delicate Dream
Pastels are a no-brainer for fair skin! They’re soft, ethereal, and instantly add a touch of sweetness. Think of them as the gentle whisper of color that complements, rather than shouts.
- Baby Blue: A dreamy, soft blue that’s incredibly chic and works beautifully with cool undertones.
- Lavender/Lilac: These purple hues are sophisticated and universally flattering.
- Mint Green: A refreshing and subtle green that adds a unique twist.
- Pale Pink: From blush to rose, these are classic for a reason.
- Peach/Coral: Lighter, softer versions of these warmer tones can be stunning on fair skin with warm or neutral undertones.
Pro Tip: For cooler undertones, lean towards blues, purples, and cooler pinks. For warmer undertones, opt for softer peaches and pale corals.
These colors are perfect for everyday wear, spring and summer vibes, or when you want a clean, polished look. They are versatile enough for a simple solid color or a base for delicate nail art.
2. Classic Nudes & Neutrals: Effortless Elegance
Nude nail polish is the ultimate chameleon. The trick is finding your perfect nude – one that’s a shade or two darker than your natural skin tone for depth, or one that closely matches for a sophisticated “my nails, but better” look. Neutrals offer a chic, minimalist approach.
- Peachy Nudes: Ideal for warm undertones, these have a slight hint of color that wakes up the skin.
- Creamy Beiges: Universally flattering, these neutral tones are sophisticated and blend seamlessly.
- Rosy Nudes: Perfect for cool undertones, adding a subtle pink flush.
- Taupes: A beautiful blend of gray and brown, chic and modern.
- Soft Grays: Muted and elegant, especially nice for a contemporary look.
Application Tip: To find your perfect nude, swipe a few shades on your nails. The one that looks like a slightly enhanced version of your own nail bed is your winner. Avoid nudes that are too light or too close a match, as they can sometimes blend in too much and look like you have no polish at all.
Consider exploring different finishes too – a matte nude can look incredibly sophisticated, while a sheer nude offers a clean, healthy glow. Sheer nudes are especially forgiving for beginners.
3. Jewel Tones: Richness and Radiance
Don’t shy away from deeper, richer colors! Jewel tones are surprisingly stunning on fair skin, providing a beautiful contrast that makes your nails stand out in an elegant way.
- Emerald Green: A deep, jewel-like green that’s incredibly chic and sophisticated.
- Sapphire Blue: A rich, true blue that’s bold yet elegant.
- Ruby Red: A classic, deep red is always a winner, especially for a glamorous statement.
- Amethyst Purple: Velvety and deep, this rich purple is regal.
- Deep Teal: A darker shade of blue-green that’s unique and captivating.
Why they work: These colors offer a beautiful contrast against fair skin without being harsh. They add a touch of luxury and drama. For those with cooler undertones, the blues and purples are particularly striking. For warmer undertones, a deep ruby or emerald can provide a lovely rich depth.
These are fantastic for evenings out, the fall and winter months, or anytime you want to feel a little more polished and bold. A single coat of a rich jewel tone can transform your look.
4. Metallics & Glitters: A Touch of Glamour
Metallics and glitters are fabulous for adding sparkle and dimension to nail designs for fair skin. They catch the light beautifully and can elevate any look from simple to sensational.
- Rose Gold: A favorite for a reason! This warm metallic is incredibly flattering on most fair skin tones, especially those with warm or neutral undertones.
- Silver/Chrome: Sleek, modern, and futuristic. Silver looks amazing, particularly on cooler undertones. A chrome finish is incredibly eye-catching.
- Gold: Opt for lighter, brighter golds for fair skin. Yellow golds can sometimes look too brassy, but a softer, champagne gold is divine.
- Iridescent/Holographic Finishes: These multi-dimensional glitters reflect light in stunning ways, adding a magical touch.
- Subtle Glitters: Think fine glitter polishes in shades of pink, blue, or silver that add a delicate shimmer.
Tip for application: For a smooth metallic look, ensure your nails are perfectly prepped as these finishes can highlight imperfections. For glitter, consider applying it over a solid color base or using a technique like a glitter gradient.
Metallics and glitters are perfect for accent nails, special occasions, or when you just want to add a bit of fun and festivity to your manicure.
Genius Nail Design Ideas for Fair Skin
Now that we have our color families sorted, let’s talk designs! These ideas are beginner-friendly and can be adapted to suit your personal style.
1. The Subtle French Manicure Upgrade
The classic French manicure gets a modern update that’s perfect for fair skin.
- Start with a sheer nude or pale pink base coat. Apply two thin coats for an even color.
- Instead of a stark white tip, use a soft pastel (like lavender or baby blue) or a subtle metallic (like rose gold or silver) for the tip.
- Use a fine nail art brush or a clean stencil to create the tip.
- Seal with a glossy top coat.
Why it’s genius: It’s a softer take on a timeless look, and the colored tip adds a touch of personality without being overwhelming. This is perfect for a polished yet playful vibe.
2. The Gradient (Ombre) Effect
This stunning technique blends two or more colors seamlessly for a beautiful watercolor or sunset effect.
- Start with a light base color (e.g., white or a pale pastel).
- Choose two complementary colors that are a few shades apart.
- Apply a thin layer of your base color and let it dry.
- Using a makeup sponge (a regular kitchen sponge cut into small pieces works well!), apply stripes of your chosen colors side-by-side.
- Gently dab the sponge onto your nail, building up the color and blend. You might need a few dabs.
- While the polish is still slightly wet, use a cleanup brush dipped in nail polish remover to neaten the edges.
- Apply a glitter top coat or a thick glossy top coat to smooth out the sponge texture.
Why it’s genius: It looks incredibly intricate but is surprisingly simple to achieve with a sponge. It’s a fantastic way to combine your favorite shades and works beautifully with pastels, nudes, or even soft jewel tones. This technique is especially forgiving for beginners as the blending hides minor imperfections.
3. Accent Nail with Metallic or Glitter
This is the easiest way to add some sparkle without committing to a full glitter mani.
- Paint all your nails with a solid color that complements your fair skin. Think a soft blue, a classic nude, or a gentle rose.
- On one accent nail (usually the ring finger), either paint it entirely with a metallic polish (rose gold is a winner!) or apply a glitter polish.
- Alternatively, you can use nail art stickers or simple glitter tape for a clean, defined look on the accent nail.
- Finish all nails with a top coat.
Why it’s genius: It provides a focal point and a pop of glamour without being over-the-top. It’s a fantastic gateway into nail art for beginners!
4. Minimalist Dotting or Lines
Simple geometric details can add a touch of modern artistry.
- Apply your chosen base color (a nude, pastel, or even a deep jewel tone).
- Using a dotting tool (or the tip of a bobby pin!), place small dots along the cuticle line, at the base of the nail, or scattered across the nail. Use a contrasting color like white, gold, or black.
- For lines, use a very fine nail art brush or striping tape. Create a single thin line horizontally across the nail, vertically, or delicately along the tip.
- Let dry completely and seal with a top coat.
Why it’s genius: It’s incredibly chic, modern, and requires minimal effort and skill, making it perfect for beginners. It adds just enough detail to make your manicure special.
5. The “My Nails, But Better” Sheer Polish
Sometimes, the most elegant look is the simplest.
- Choose a sheer polish that’s close to your natural nail color but with a slight tint – think sheer rosy pink, peachy nude, or milky white.
- Apply one or two thin coats. The goal is to even out your nail color and add a subtle, healthy-looking sheen.
- Ensure even application and clean up any polish on your cuticles.
- Finish with a high-shine top coat.
Why it’s genius: It’s the ultimate low-maintenance, high-impact look. It makes your nails look perfectly groomed, clean, and subtly polished, ideal for any occasion and especially forgiving if your nails aren’t perfectly shaped. For more info on nail care that supports beautiful polish application, check out resources from the American Academy of Dermatology.
Essential Tools for Beginner Nail Art
You don’t need a professional salon to create beautiful nail designs for fair skin! A few basic tools can open up a world of creativity.
| Tool | What it Does | Beginner Tip |
|---|---|---|
| Nail Polish Remover & Cotton Pads | Essential for cleaning up mistakes and removing old polish. | Keep a steady hand and use a fine brush dipped in remover for precision cleanup. |
| Top Coat | Seals your design, adds shine, and prevents chipping. A quick-dry top coat is a lifesaver! | Always apply a top coat – it makes your manicure last so much longer. |
| Base Coat | Protects your natural nails from staining (especially with darker colors) and helps polish adhere better. | This step is crucial for nail health and ensuring a smooth finish. |
| Dotting Tools | Comes with various ball-tip sizes for creating dots, swirls, and small details. | Dip the ball tool into polish and gently press onto the nail. Experiment with pressure for different dot sizes. |
| Fine Nail Art Brush | For drawing thin lines, swirls, and detailed patterns. | Load just a tiny bit of polish onto the tip for control when drawing thin lines. |
| Makeup Sponges | Perfect for creating gradient (ombre) effects. | Cut into small pieces so you have a fresh surface for each nail. |
| Nail Files & Buffers | To shape your nails and smooth out ridges for a perfect canvas. | File in one direction to avoid weakening the nail. A buffer gives a smooth, natural shine. |
Having these tools on hand means you can tackle many of the designs we’ve discussed with confidence. Remember, practice makes perfect, and even simple tools can yield impressive results!
Nail Care Tips for Fair Skin
Beautiful nail designs start with healthy nails! Here are some essential care tips that are particularly beneficial for fair skin tones.
- Keep Nails Clean and Dry: Moisture can lead to polish peeling and nail weakness. Wash hands thoroughly and dry them completely.
- Moisturize Regularly: Use a good hand lotion and cuticle oil daily. This keeps your skin soft and plump, making any nail color look more flattering.
- Always Use a Base Coat: As mentioned, this prevents staining. Fair skin can sometimes show discoloration more easily, so a good base coat is a must, especially with vampy reds or deep blues.
- Gentle Removal: Avoid harsh removers that can dry out your nails and the surrounding skin. Opt for acetone-free removers if possible.
- Shape Matters: A well-maintained nail shape—whether it’s round, square, or squoval—enhances the overall look of your manicure. For fair skin, softer shapes like round or squoval often appear most natural and flattering.
- Consider Nail Strengtheners: If your nails are prone to breaking or peeling, a nail strengthener can be a game-changer.
Taking a little extra time for nail and hand care will make your polish application smoother and the final look far more polished and attractive, no matter what nail designs for fair skin you choose.
FAQ: Your Nail Design Questions Answered
Q1: What nail polish colors should I avoid with fair skin?
A1: Generally, avoid polishes that are extremely close to your skin tone without any contrast, as they can disappear. Also, very harsh neons can sometimes create a stark contrast that, depending on your undertone, might not be the most flattering. Always consider how the color interacts with your specific skin tone.
Q2: Are matte


