Nail art has become a popular trend in beauty and fashion, with people of all ages and backgrounds embracing the creative and fun ways to express themselves through their manicures.
However, not everyone has the time or budget to visit a nail salon regularly to achieve the latest trendy designs. That’s where DIY nail tutorials come in. With the right techniques and a little practice, anyone can create stunning and unique nail designs from the comfort of their home.
We have compiled over 20 super easy nail designs you can do yourself without any professional help. From simple and minimalistic designs to more intricate and eye-catching patterns, we have curated diverse styles that inspire you to get creative with your nails. Whether you’re into floral designs, geometric patterns, or even nail decals, our tutorials have covered you.
1.Floral Easy Nail Designs
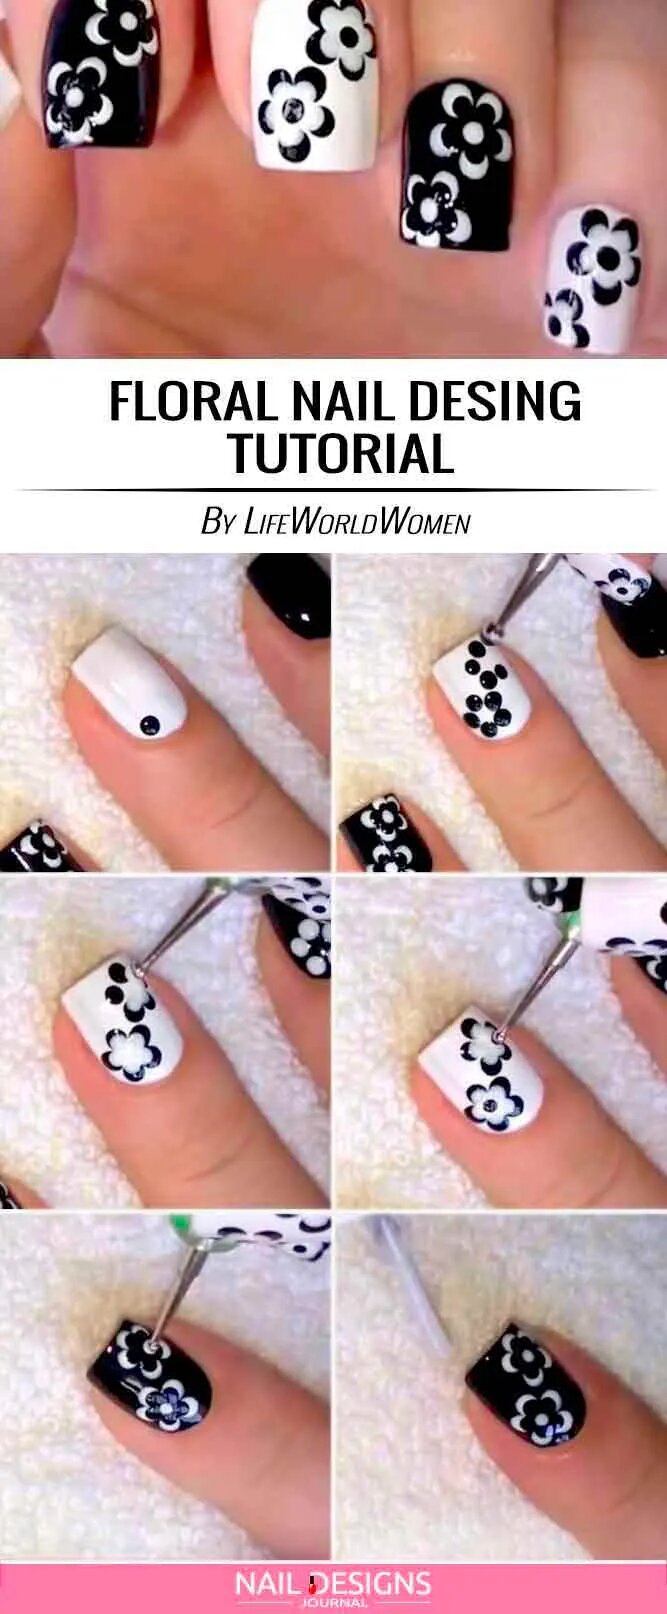
Floral, easy nail designs are a great way to add a touch of femininity and elegance to your manicure. Whether you’re a beginner or an experienced nail artist, floral designs can be achieved with just a few simple steps. Start by choosing your base color – pastel shades such as light pink or baby blue work well for a soft and delicate look.
Next, select a few complementary colors for your flowers – think bright and vibrant hues like red, yellow, and purple. Using a dotting tool or toothpick, create small dots on your nails to form the center of the flowers. Then, draw curved lines around the dots using a thin brush or nail art pen to create petals.
Repeat this process on each nail until you have achieved the desired floral design. Finish off with a top coat to seal in your design, add shine, and have spring on your fingernails. With these easy steps, you’ll have beautiful floral nails perfect for any occasion.
2.Marble Nail Art Tutorial
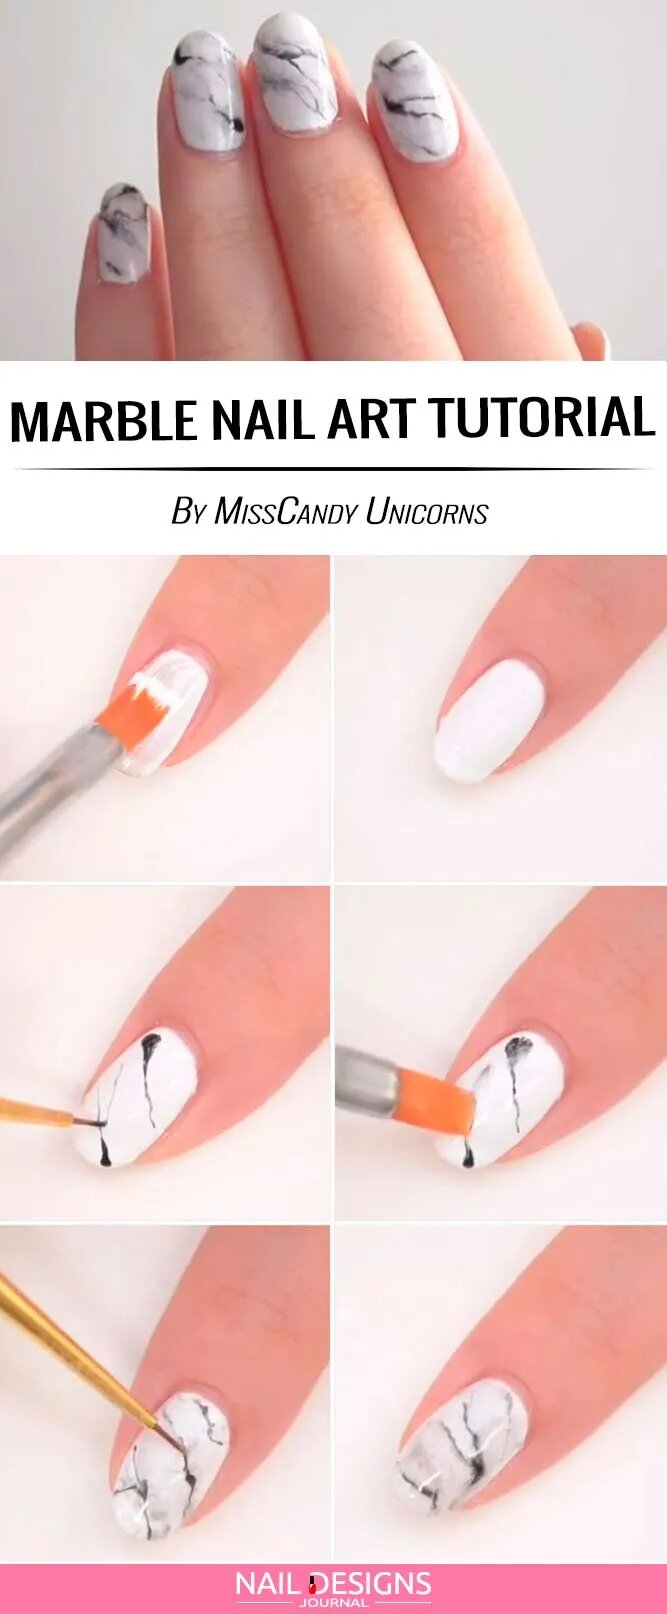
Creating marble nail art can be fun and easy to add a unique touch to your manicure. To achieve this look, you will need a few basic supplies: a base coat, two or more nail polish colors of your choice, a small cup or dish filled with room temperature water, and a toothpick or thin brush for creating the marble effect.
Start by applying a base coat to protect your nails and allow them to dry completely. Next, choose two or more nail polish colors that complement each other and drop them onto a clean surface, like a paper plate, one at a time.
Use the toothpick or brush to gently swirl the colors on the clean surface until you achieve the desired marble effect. Once you’re satisfied with the design, carefully dip one finger at a time into the water, allowing the excess polish to stick to your finger. Remove excess polish from your skin using a cotton swab dipped in nail polish remover. Finish off with a top coat to seal your design and give it a glossy finish.
3.Fall Dry Marble Nail Art
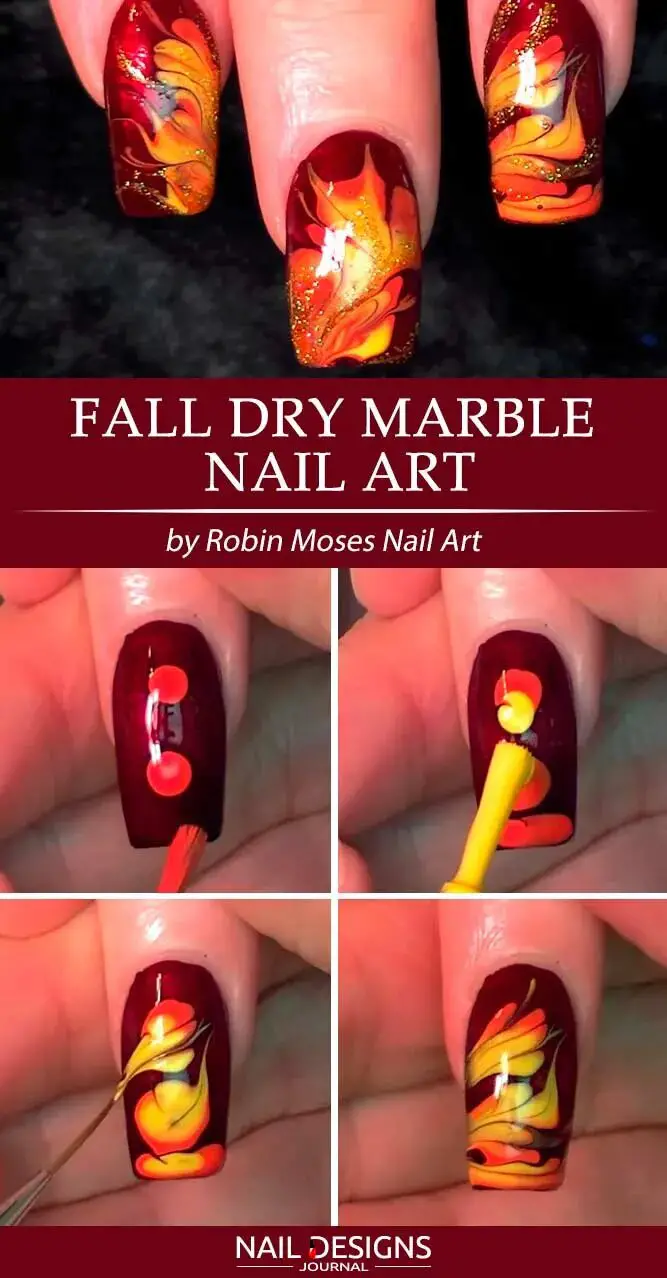
Fall is the perfect time to experiment with new nail art designs, and one of the easiest and trendiest options is fall dry marble nail art. This design marbles your nails using different fall-inspired colors such as deep reds, burnt oranges, and warm browns. To achieve this look, apply a base coat to protect your nails. Then, apply a thin layer of your chosen base color and let it dry completely.
Next, add a few drops of accent colors onto a plastic wrap or aluminum foil. Use a toothpick or dotting tool to swirl the colors together and create a marbled effect. Dip a sponge into the mixture and gently dab it onto your nails, creating the desired pattern. Finish off with a top coat to seal your design and give it a glossy finish.
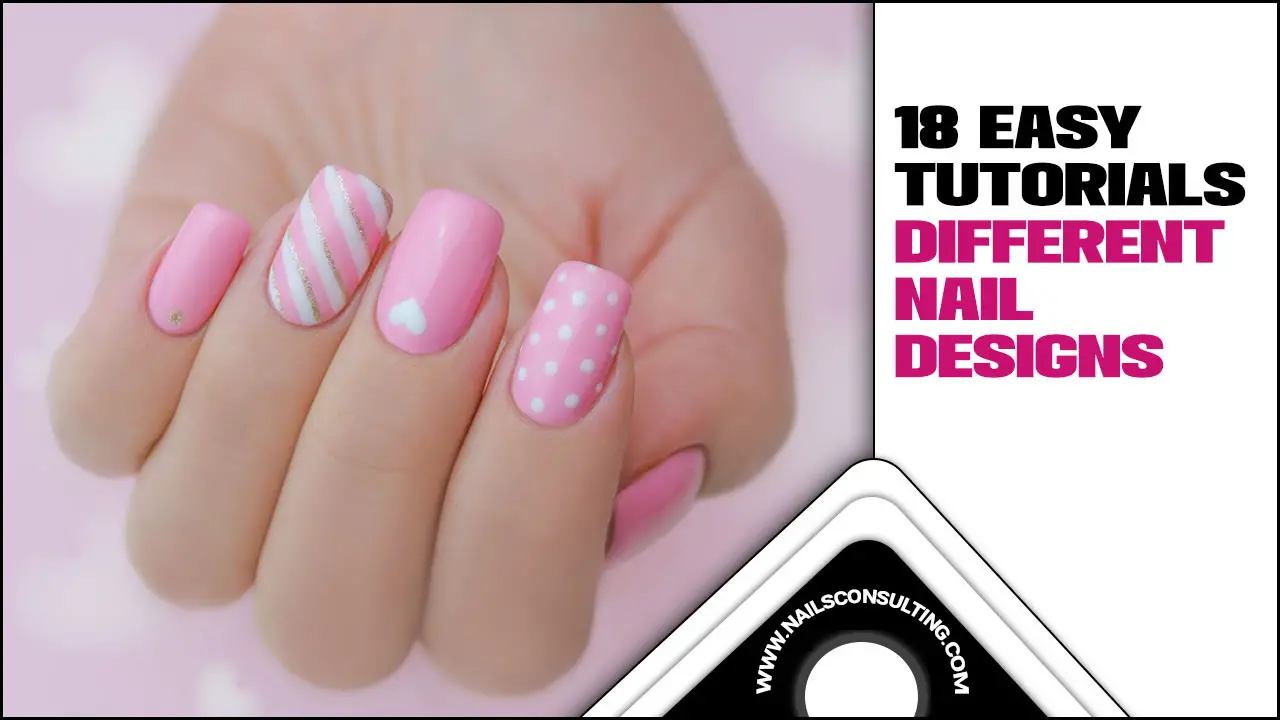
4.Nail Art Polka Dots And Bows
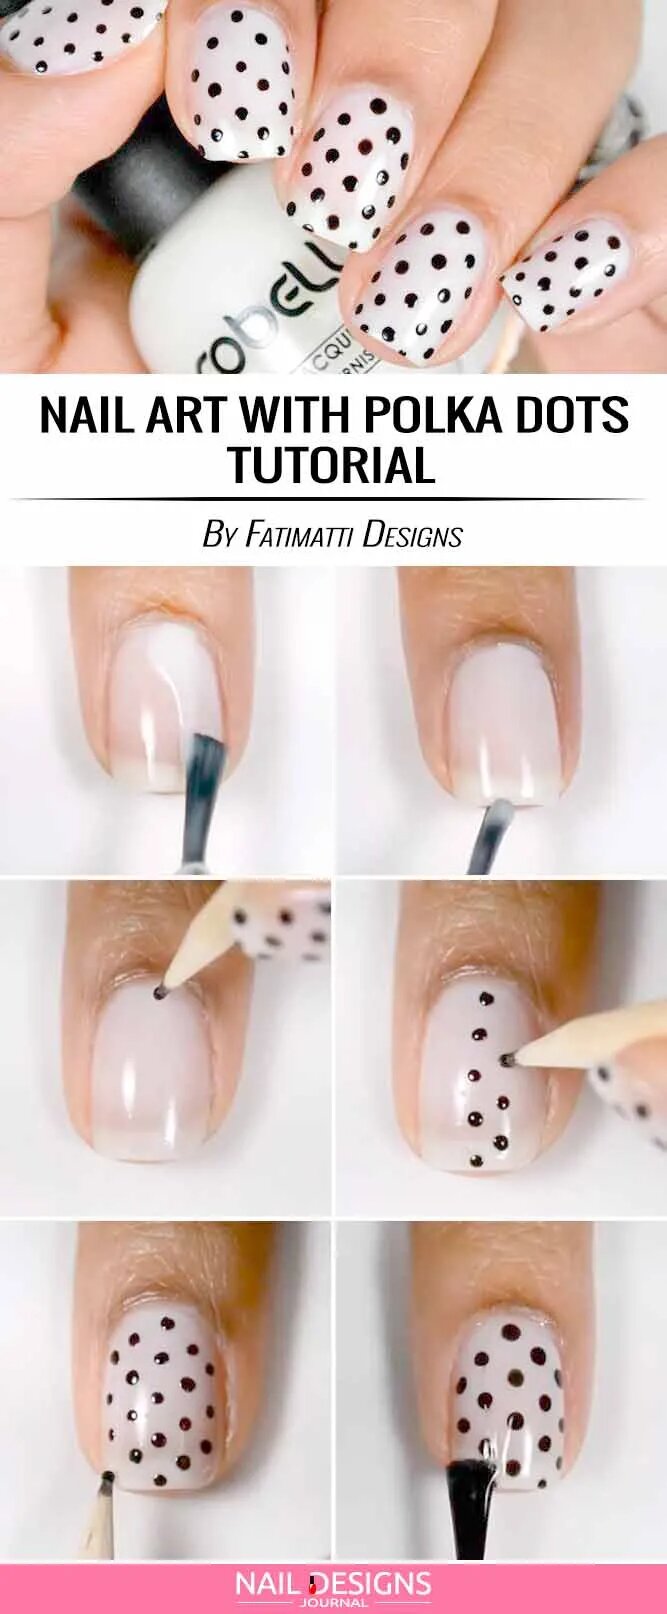
Creating nail art with polka dots and bows is a fun and easy way to add flair to your nails. We recommend reading our comprehensive nail brush guide to enhance your nail design skills. To create polka dot nails, start by applying a base coat and allowing it to dry.
Then, dip the tip of a toothpick or a dotting tool into your chosen nail polish color and gently dab it onto your nails in a polka dot pattern. You can create different sizes and arrangements of dots for a playful look. To add bows to your nails, start by applying a base coat and allowing it to dry.
Then, using a thin nail art brush or a toothpick, create two loops in the shape of a bow on one side of your nail. Fill in the bow shape with your chosen nail polish color and allow it to dry. Finish off with a top coat to seal your design and add shine. With these simple techniques, you can easily achieve adorable polka dot and bow nail art at home.
5.Easy Nail Art Done With Dotting Tool
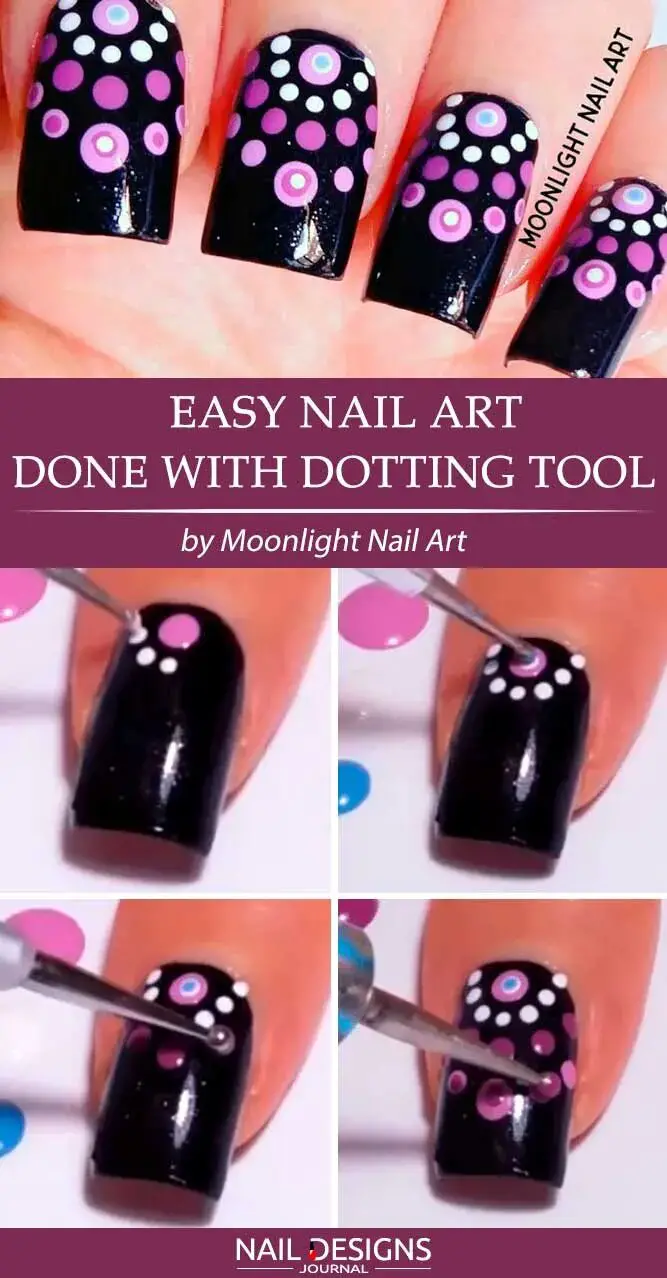
Creating easy nail art designs using a dotting tool is a fun and simple way to add creativity to your manicure. With just a few basic tools and patience, you can create a masterpiece of stunning designs that will impress everyone who sees them. To get started, gather your dotting tools, which can be found at most beauty supply stores or online.
Next, choose your nail polish colors and apply a base coat to protect your nails. Once the base coat is dry, dip the larger end of the dotting tool into the desired nail polish color and gently press it onto your nail to create dots.
You can experiment with different sizes and patterns to achieve your desired look. Remember to let each layer of polish dry before moving on to the next step. Finish off with a top coat to seal your design and give it a glossy finish.
6.Sparkly Geometric Nail Art
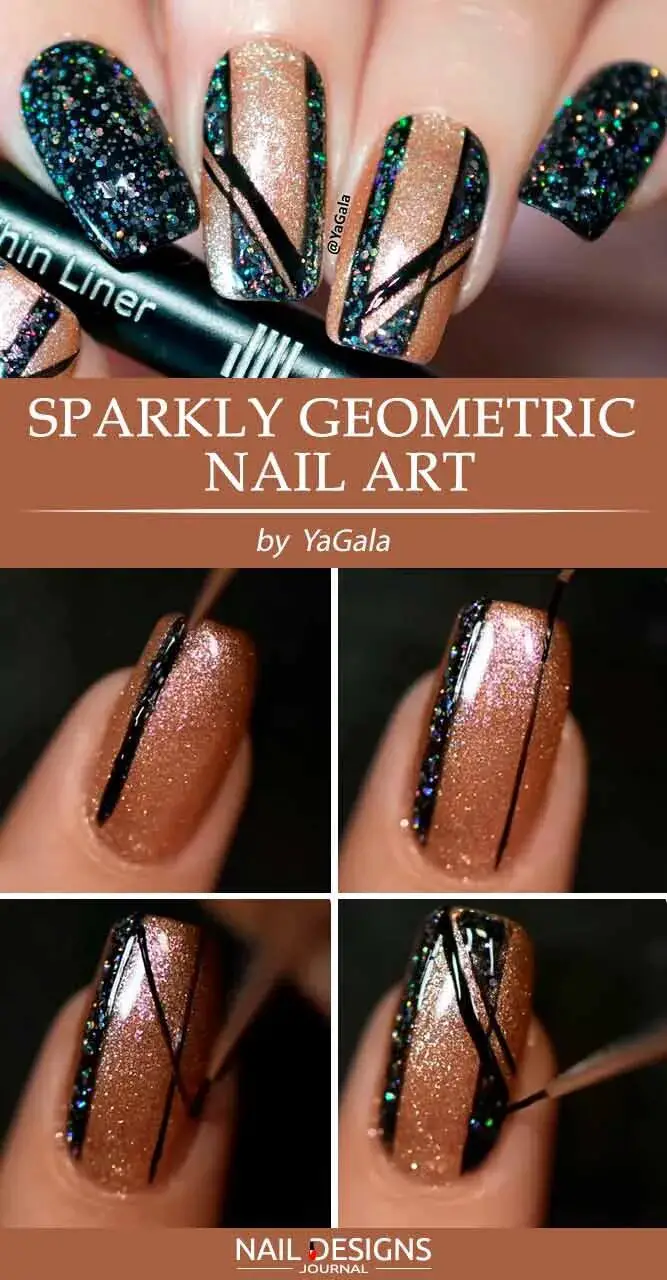
This design combines the elegance of geometric shapes with the glamour of sparkles, creating a sophisticated and playful look. Apply a base coat to protect your nails to achieve this triangle design. Then, choose two contrasting nail polish colors – one for the base and one for the geometric shapes.
Apply the base color and allow it to dry completely. Next, using a thin brush or tape, create your desired geometric shapes on each nail, including a triangle. Once your shapes are in place, carefully fill them in with the second nail polish colour. Finally, apply a clear coat layer to seal your design and add extra shine.
7.Fall Nail Art Tutorial
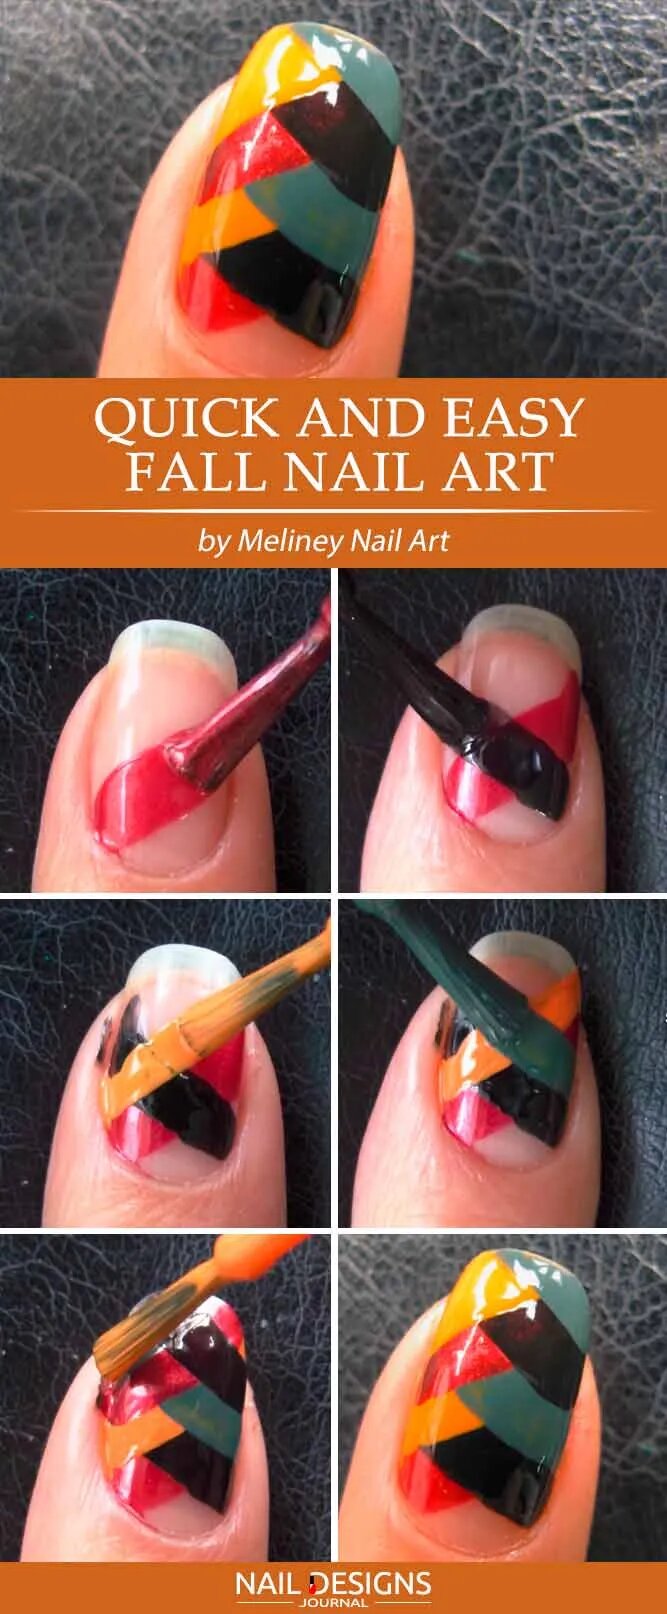
Fall is the perfect time to experiment with new nail designs and embrace the cozy vibes of the season. With this easy DIY tutorial, you can create a stunning fall-inspired nail art look at home. Here’s what you’ll need:
- Base coat: Apply a clear base coat to protect your nails and create a smooth surface.
- Fall colors: Choose a mix of warm, earthy shades like burnt orange, deep burgundy, and rich brown.
- Leaf decals or stencils will add a festive touch to your design.
- Top coat: Finish your design with a glossy coat for long-lasting wear.
Start by applying your chosen fall color as the base coat on each nail. Once dry, use the leaf decals or stencils to create leaf designs on some of your nails. You can place them randomly or create a pattern – it’s up to you. Next, take another fall color and use a thin brush or dotting tool to add small dots or lines around the leaves for extra detail. Once everything is dry, seal your design with a sticker for a professional finish.
8.Easy Autumn Flowers Nail Art
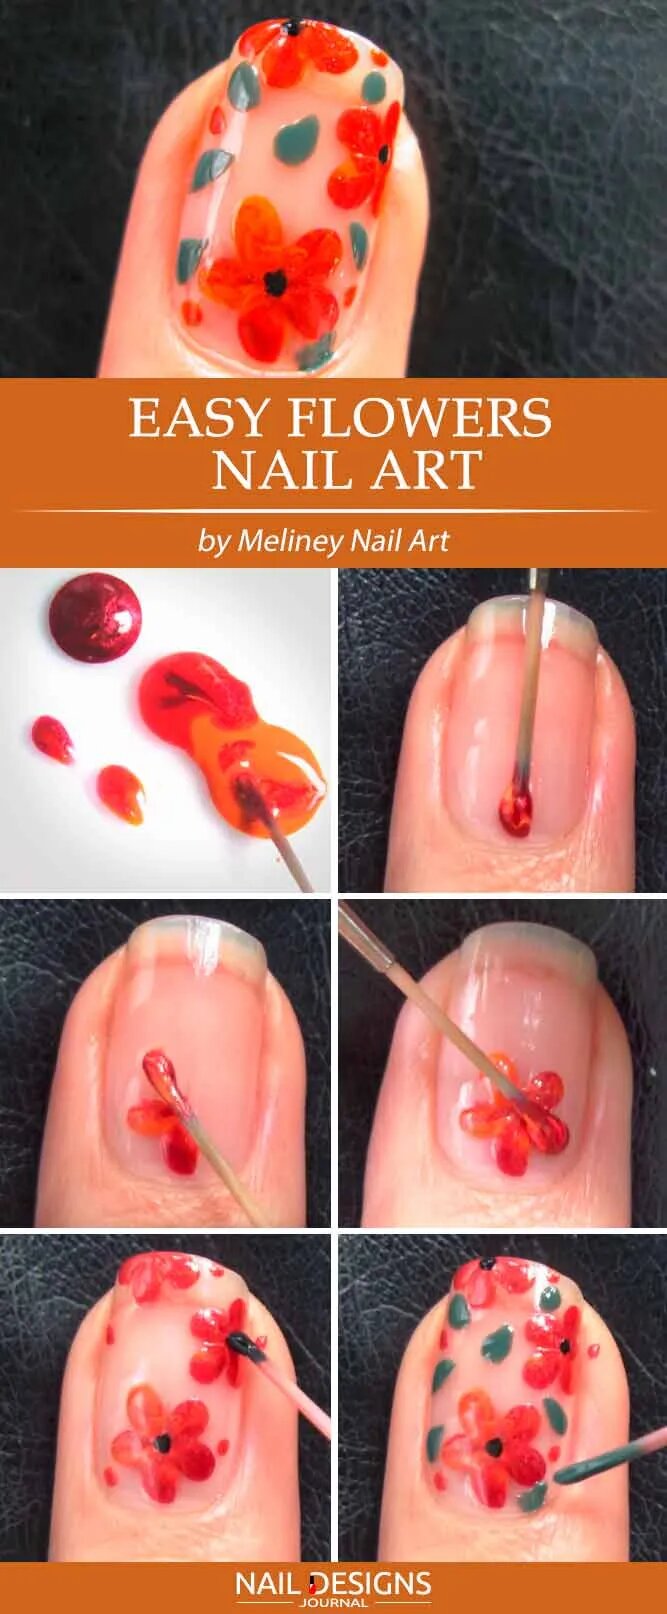
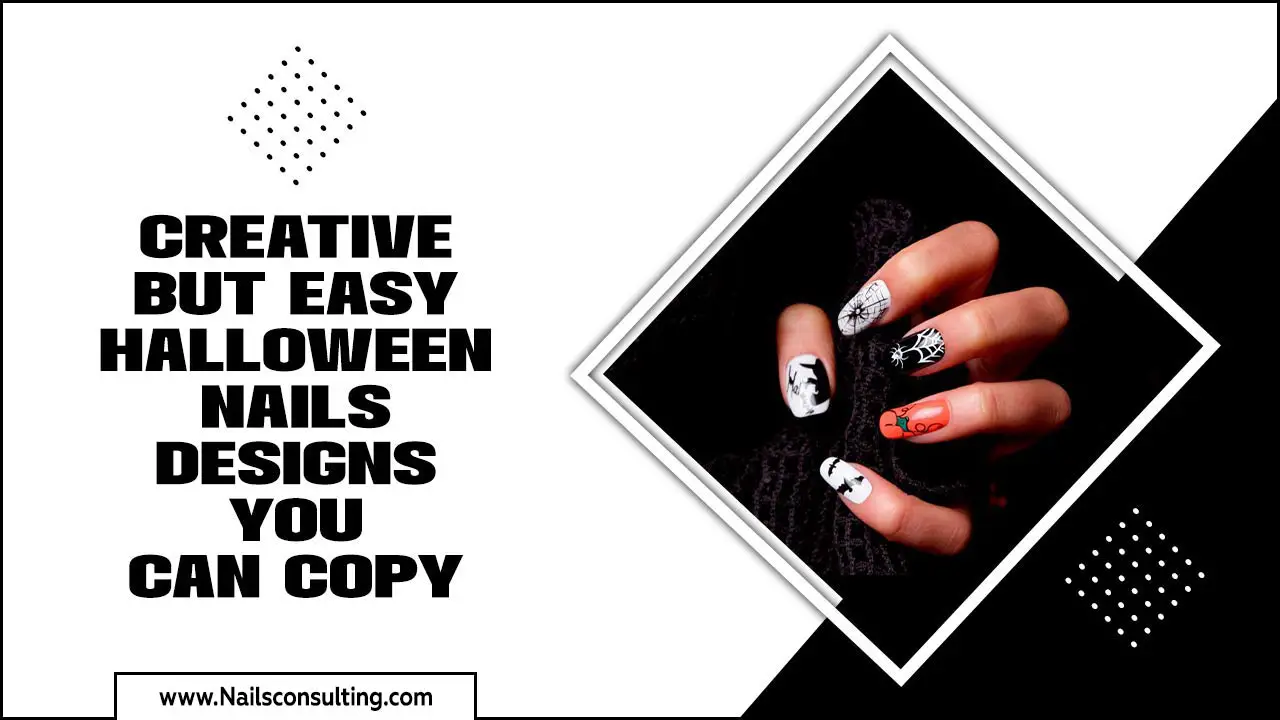
Creating autumn flower nail art is a fun and easy way to add a touch of seasonal flair to your manicure. To achieve this look for Halloween, start by applying a base coat to protect your nails. Once dry, paint your nails with a neutral or autumn-inspired color, such as deep red or burnt orange.
Next, use a small dotting tool or toothpick to create flower petals by making small dots in a circle shape on your nails. You can use shades of yellow, orange, and brown for a realistic fall flower look. Finally, add the finishing touch by applying a top coat to seal in your design and give it a glossy finish. This spooky yet cute Halloween-inspired nail art design is perfect for a Halloween party! What do you think? Also, it’s super quick and easy to do.
9.Ombre Nail Art Tutorial
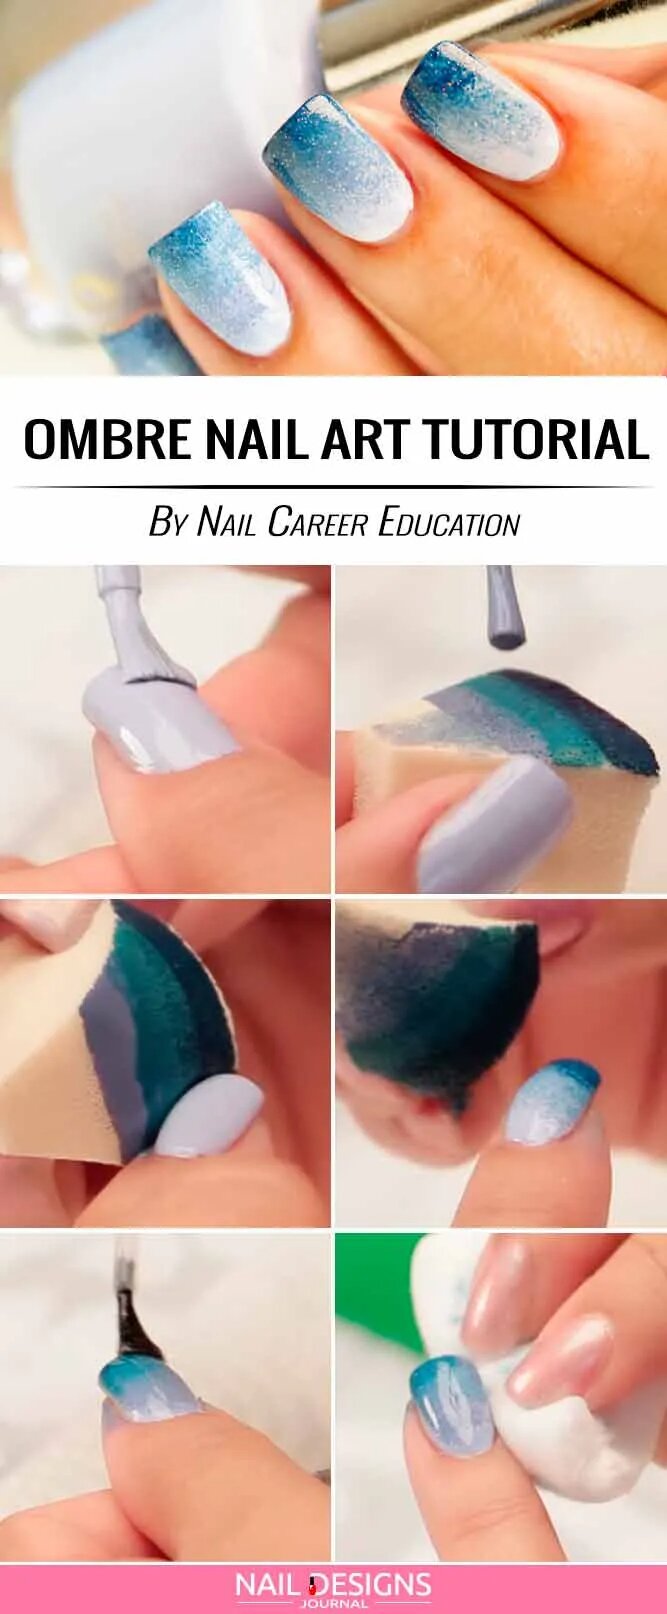
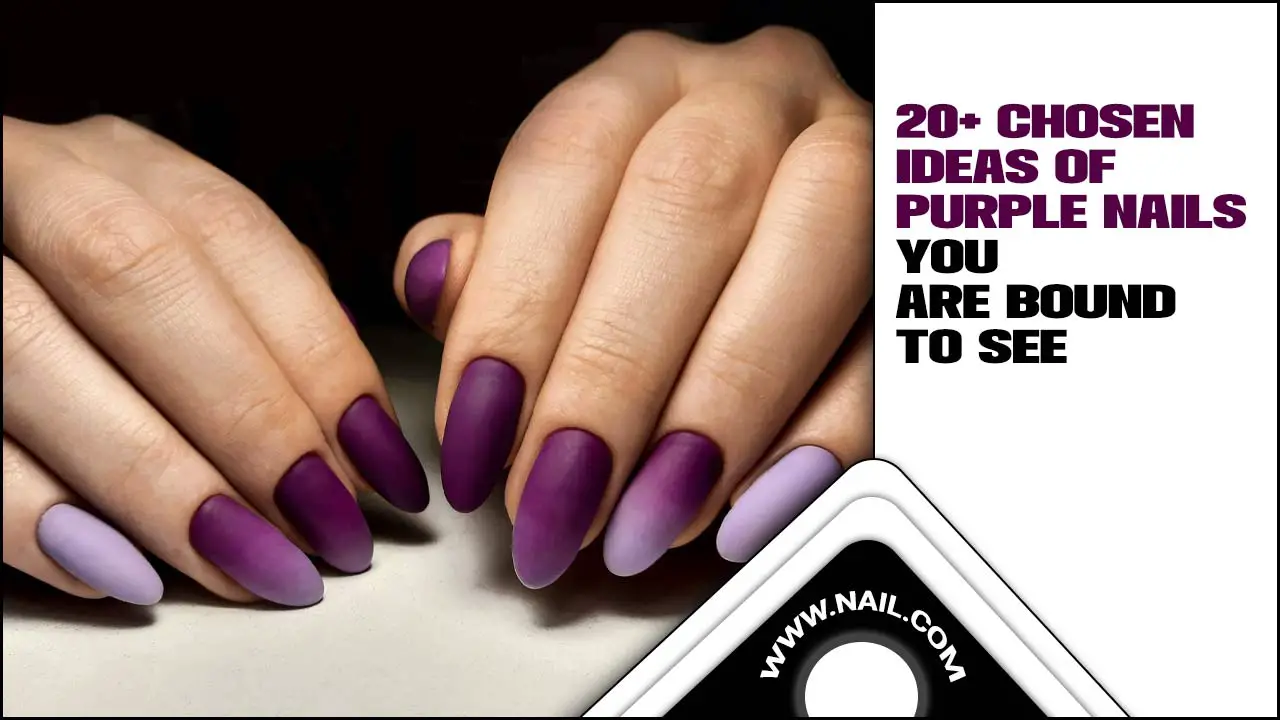
Creating ombre nail art is easier than you might think. Follow these simple steps to achieve a stunning ombre look on your nails:
- Apply a base coat to protect your nails and help the polish adhere better.
- Choose two or more nail polish colors that blend well for your ombre effect. For example, you could use shades of blue or pink for a soft gradient look.
- Paint your nails with the lightest color as the base coat and let them dry completely.
- Take a makeup sponge and apply a thin layer of the darkest color at the tip of the sponge.
- Gently dab the sponge onto your nail, starting from the tip and working towards the base, creating a gradient effect.
- Repeat this process with each subsequent color, blending them.
- Clean up any excess polish around your nails using a small brush dipped in acetone or nail polish remover.
- Finish off with a top coat to seal in your design and add shine.
You can create beautiful ombre nail art at home with a little practice!
10.Strawberry Reverse Manicure Stamping Step-By-Step
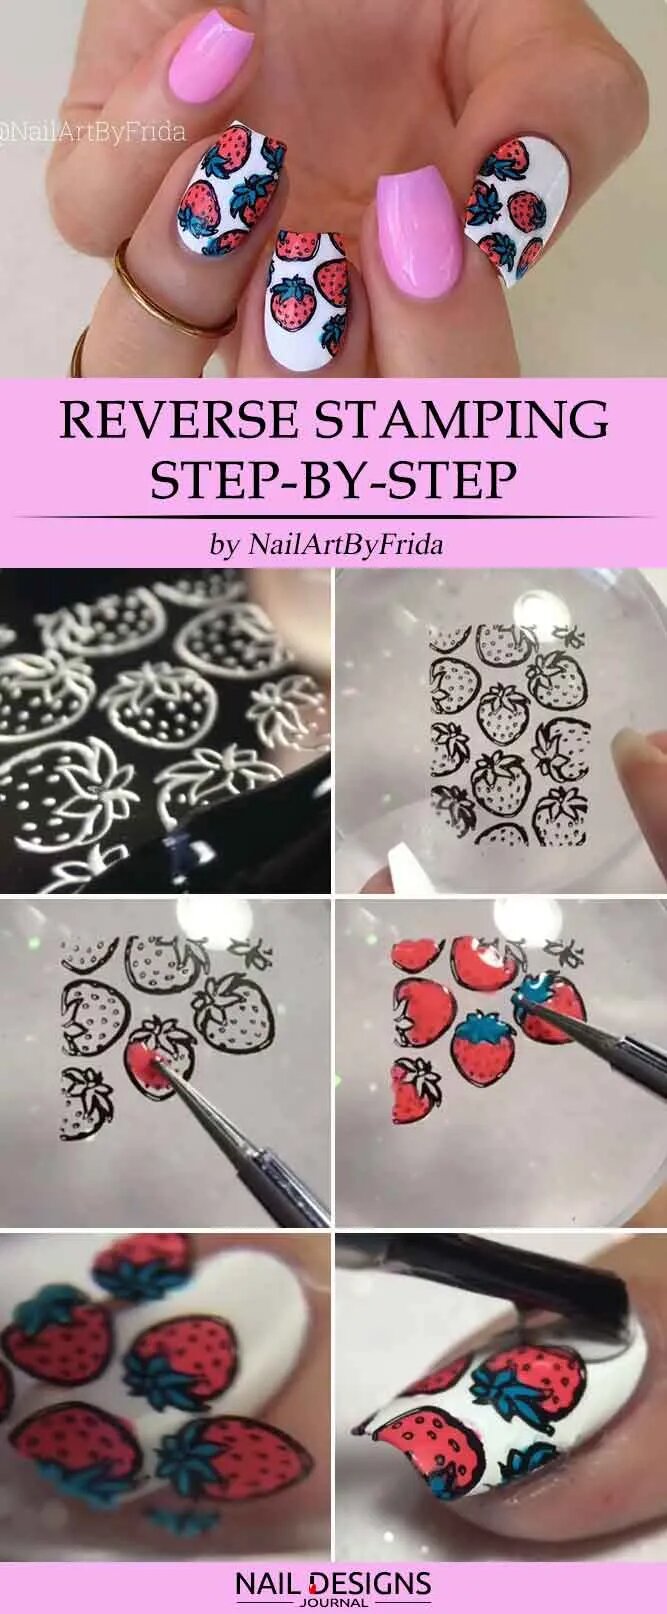
Creating a strawberry reverse manicure stamping design is easier than you might think. Follow these step-by-step instructions to achieve this cute and unique nail design:
- Apply a base coat to protect your nails and help the polish adhere better.
- Apply a light pink or red polish as the base color. Allow it to dry completely.
- Take white nail polish and use a small dotting tool or toothpick to create the seeds of the strawberry. Make random dots near the cuticle area of each nail.
- Once the white polish has dried, apply a top coat to seal in the design and add shine.
- Add green leaves using a thin nail art brush and green polish at the top of each strawberry for an extra touch.
This strawberry reverse manicure stamping design is perfect for adding a fun and fruity twist to your nails. Get creative with different colours and experiment with other fruit designs to create unique nail art.
11.Simple Idea For Everyday Manicure
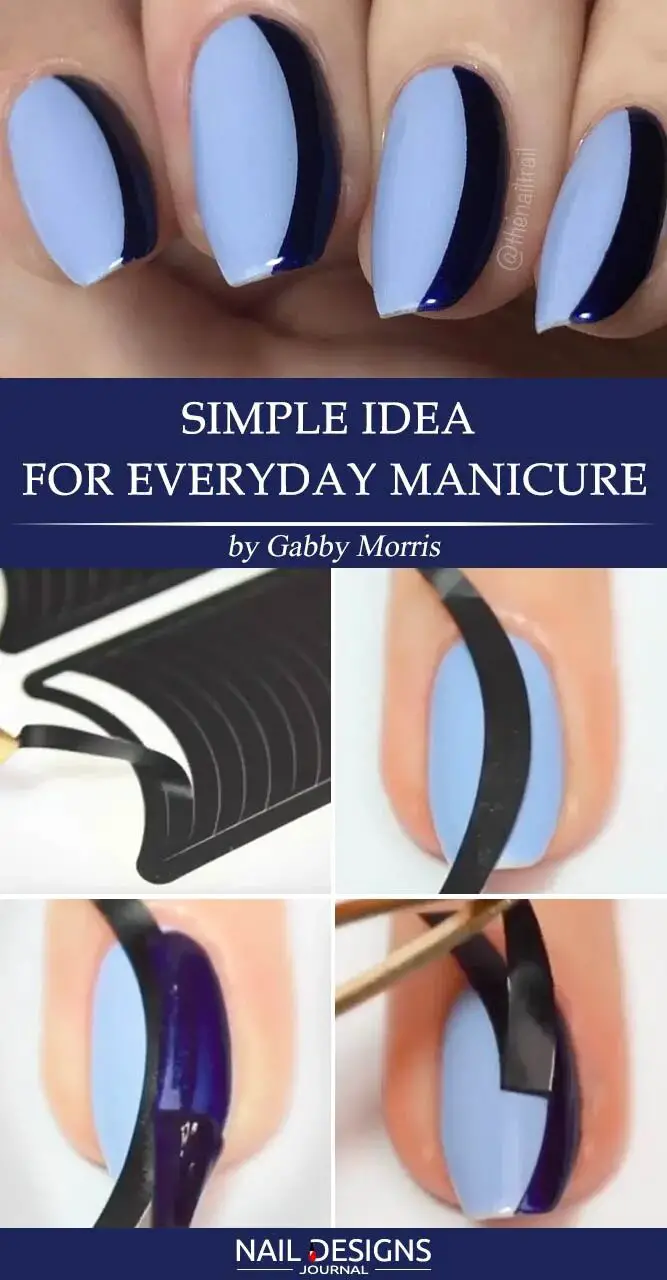
When it comes to nail designs, sometimes simple is best. Consider a simple colour block design for an everyday manicure that is easy to achieve at home. Start by painting your nails with a base color of your choice. Once dry, use striping tape or nail vinyl to create straight lines across your nails in a contrasting color.
Apply the second color over the exposed portion of your nails and carefully remove the tape or vinyl. Finish with a glossy top coat for a polished look. This simple yet stylish design is perfect for any occasion and can be easily customized with different colour combinations to suit your style.
12.Elegant 3-D Nails Art In Simple Steps
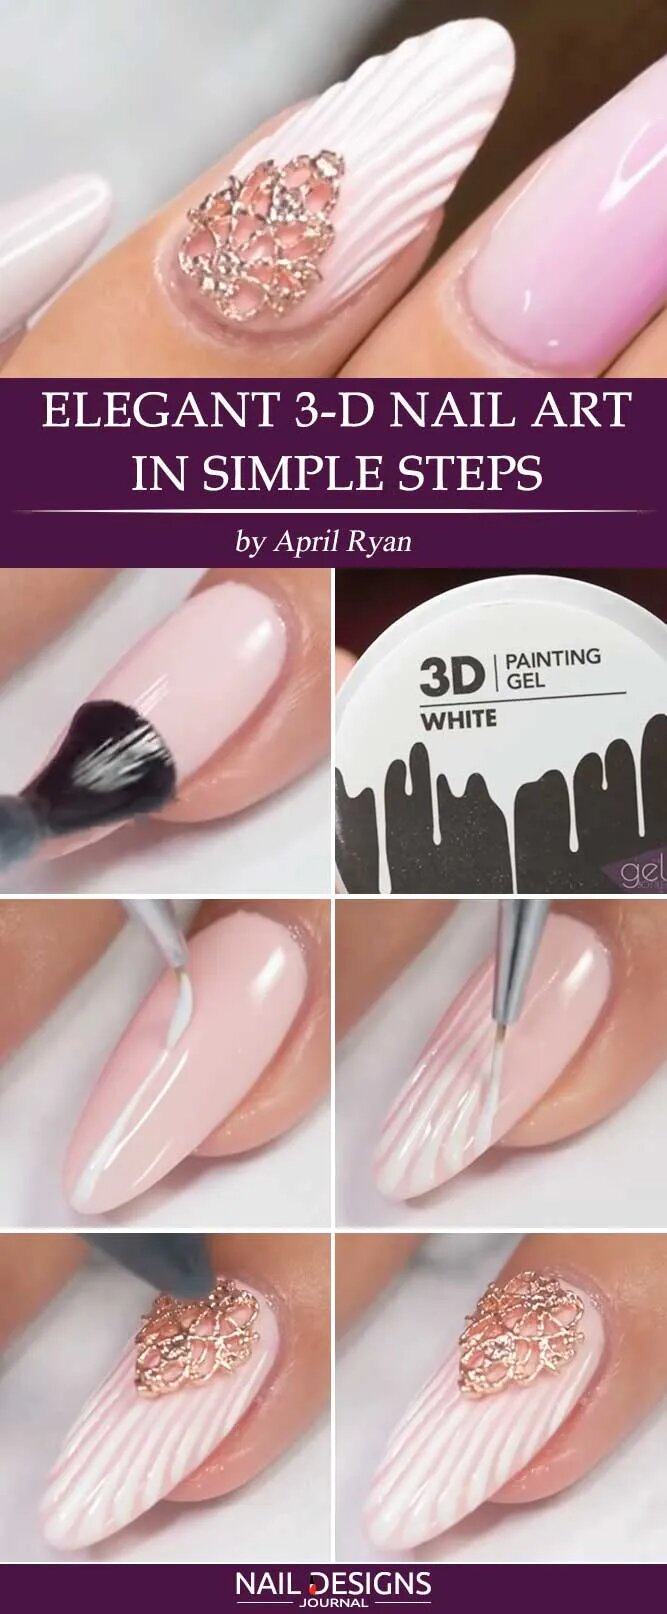
Creating elegant 3-D nail art doesn’t have to be complicated. With a few simple steps, you can achieve stunning nail designs that will make your nails the envy of everyone around you. Here’s how to create elegant 3-D nail art:
- Prep your nails: Start by cleaning and shaping your nails. Remove any old polish and gently push back your cuticles.
- Apply a base coat: Apply a clear base coat to protect your nails and create a smooth surface for the nail art.
- Choose your design: Decide on the design you want to create. It could be flowers, bows, or any other 3-D element you like.
- Gather your materials: Collect the materials you’ll need, such as nail glue, 3-D decorations, and tweezers for precision application.
- Apply the decorations: Use tweezers to carefully pick up the 3-D decorations and place them onto your nails while the nail polish is still wet.
- Secure with top coat: Once you’re satisfied with the placement of the 3-D decorations, apply a layer of clear top coat to seal everything in place and add shine.
- Let it dry: Let your nails dry completely before doing anything else to avoid smudging or damaging your beautiful 3-D nail art.
Following these simple steps, you can easily create elegant 3-D nail art to elevate your manicure game to the next level.
13.Geometric Gradient Nails
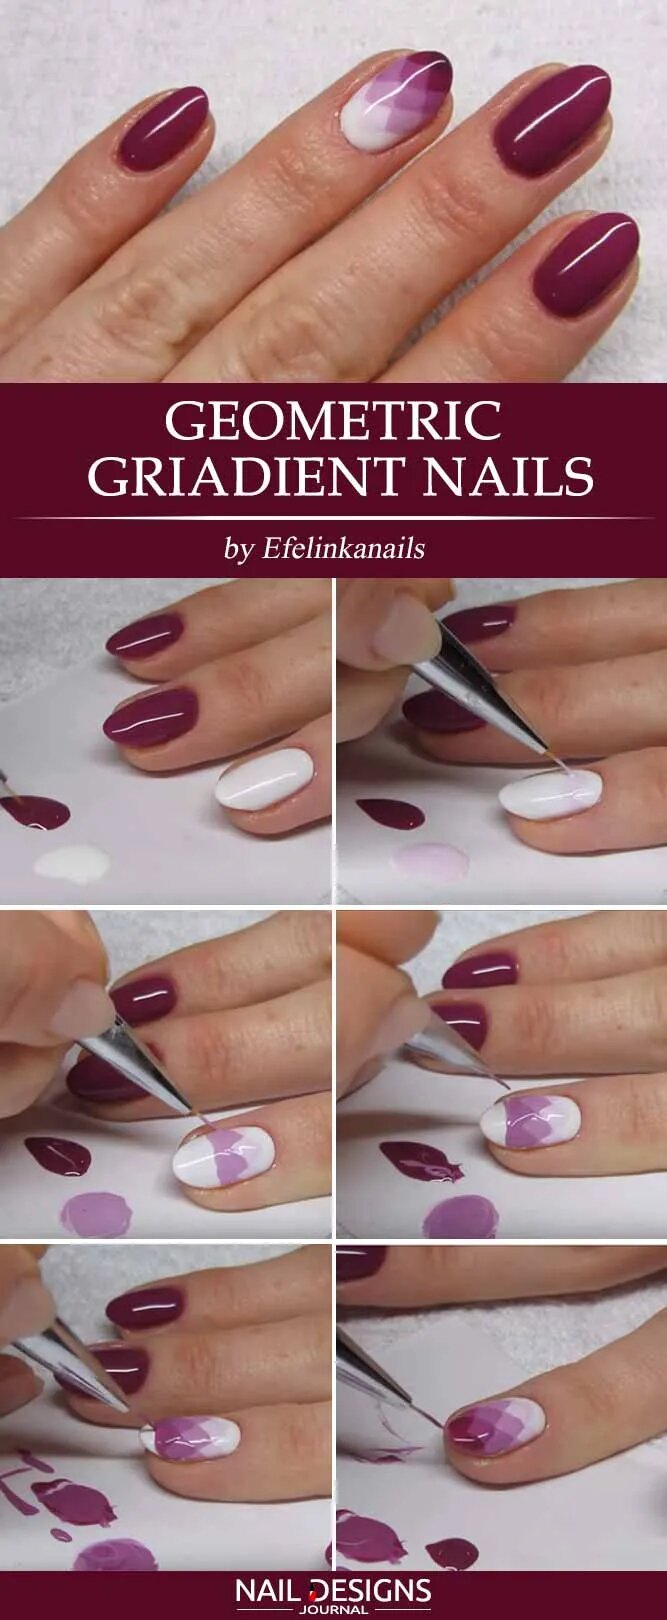
Creating geometric gradient nails is a fun and easy way to add some unique flair to your nail art. To achieve this look, apply a base coat to protect your nails. Then, choose two or more complementary nail polish colors that you want to use for your design. Begin by painting your nails with the lightest shade as the base color.
Once dry, apply striping or scotch tape in a geometric pattern of your choice on each nail. Next, apply the second color over the exposed areas of the nail, creating a gradient effect. Remove the tape carefully while the polish is wet to reveal clean lines.
Finish off with a top coat to seal your design and add shine. For extra glamour, you can add a touch of gold nail polish to the tips of your nails or as an accent color on one or two nails. This will give your geometric gradient nails a stunning and eye-catching look.
14.Simple Black And White Nail Design
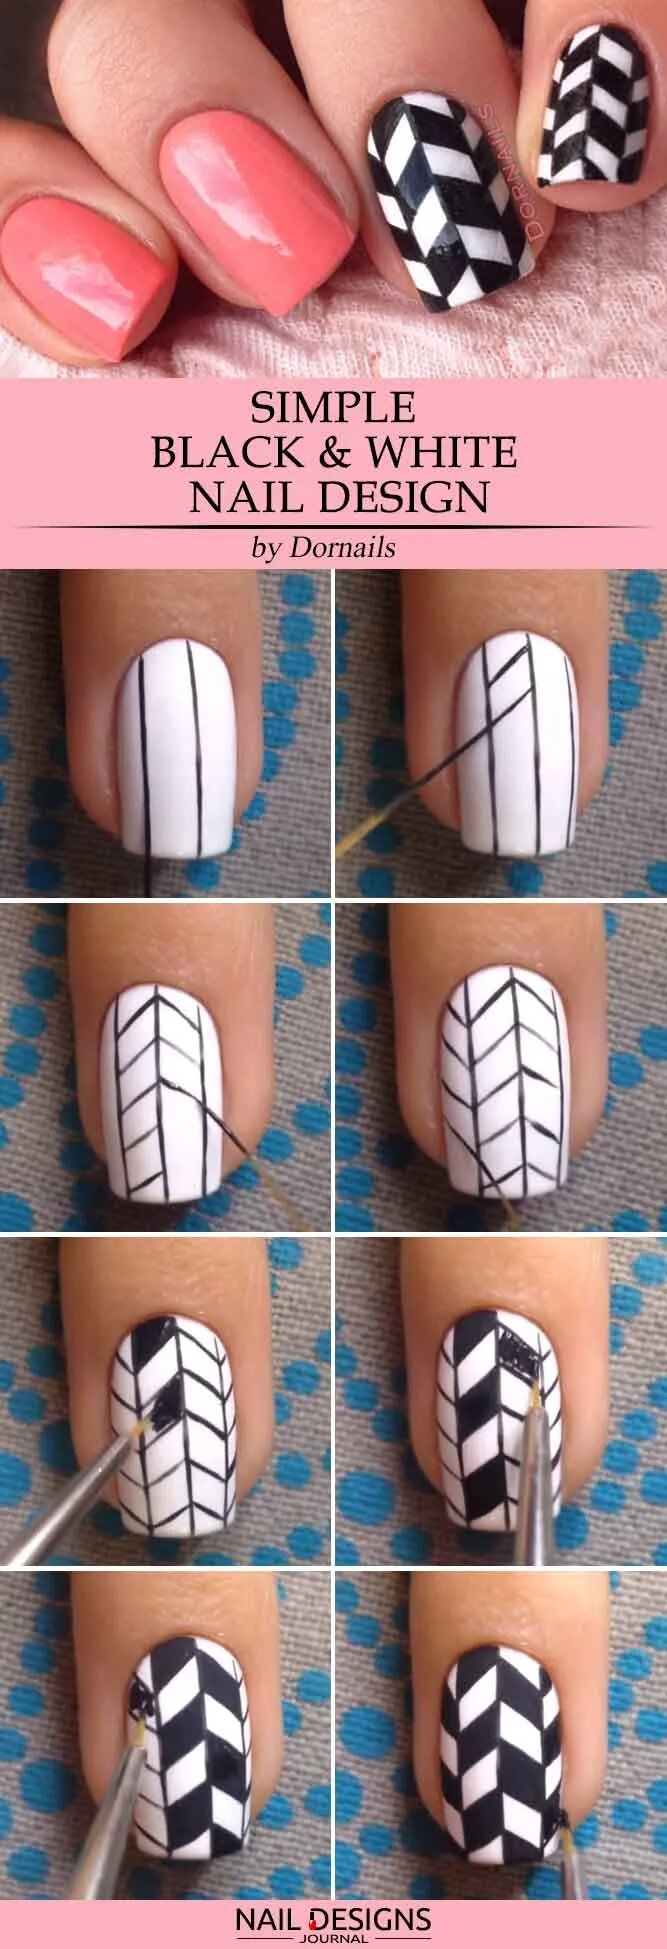
Creating a simple black-and-white nail design is a great way to achieve a chic and sophisticated look without too much effort. Start by applying a base coat to protect your nails and ensure your design lasts longer. Once the base coat is dry, paint all your nails with black nail polish as the base color.
Then, using a thin brush or a toothpick, create small dots or lines with white nail polish on each nail. You can get creative with the placement and pattern of the dots or lines to make your design unique. Finish off with a top coat to seal your design and add shine.
Apply gloss (SpaRitual Nourish Fast Dry Vegan Top Coat, $20) to lock in the design. This simple black-and-white nail design is perfect for any occasion and will make a statement.
15.Striped Nail Art For Beginners
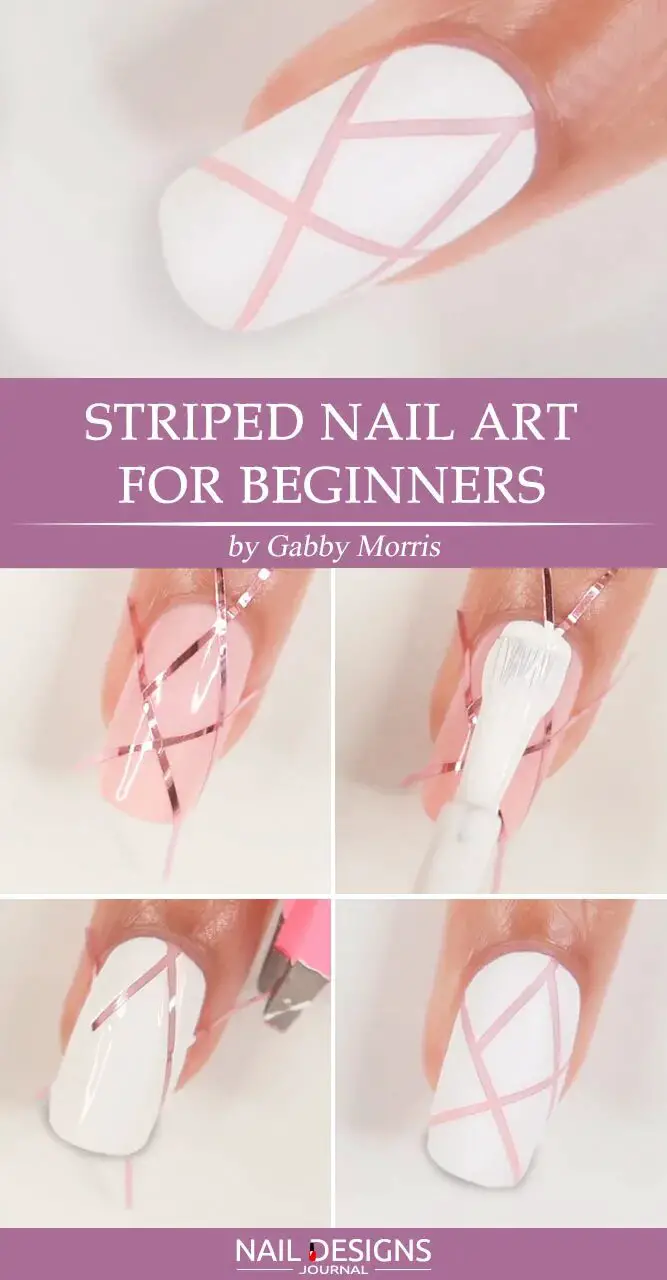
Creating striped nail art is a super easy DIY project that even beginners can master. You only need basic supplies like different nail polish colors, striping tape or a thin brush, and a clear topcoat. Start by applying a base coat to protect your nails and let it dry completely.
Then, choose two or more colors for your stripes and paint your nails with the lightest color as a base. Once dry, apply striping tape or a thin brush to create straight lines across your nails in the desired pattern.
Fill in the spaces with your chosen colors, like the brilliant starburst technique, and let them dry before carefully removing the tape. Finish off with a layer of clear topcoat for a glossy finish, and voila! You have effortlessly chic striped nail art that will impress everyone around you.
16.Gradient French Tip Nails Using Striping Tape
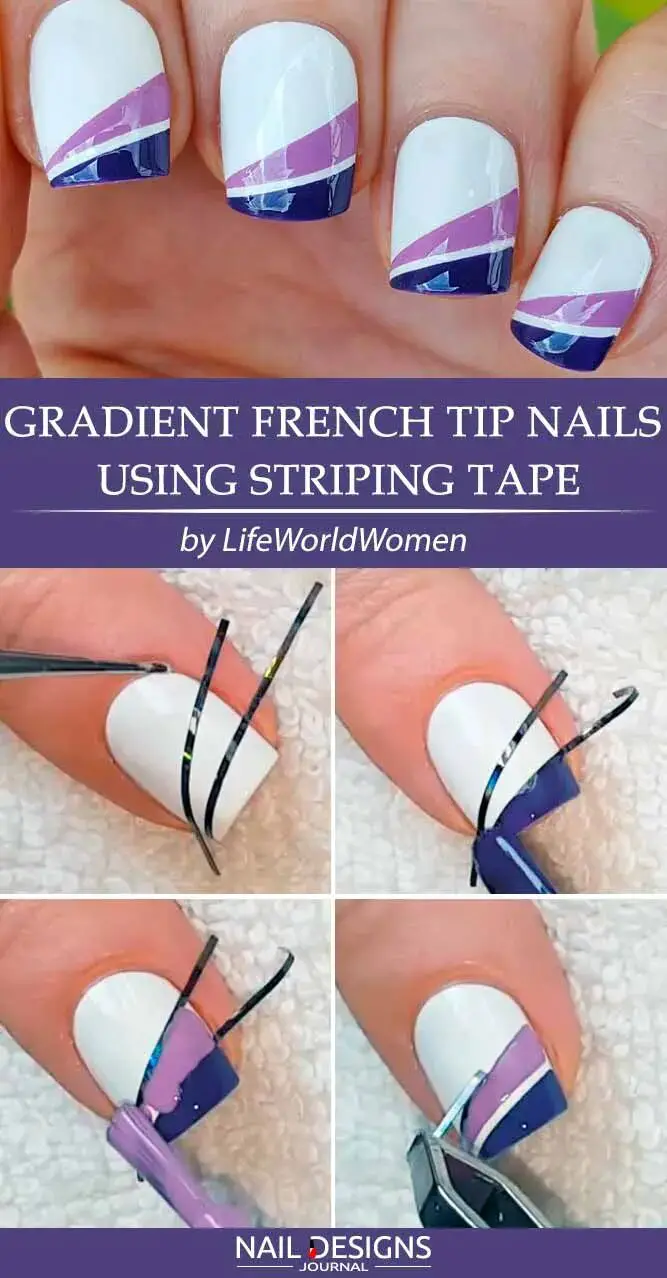
Creating a gradient French tip design on your nails is easier than you might think. Using striping tape, you can achieve a clean and precise look without needing advanced nail art skills. Here’s how to do it:
- Apply a base coat to protect your nails and create a smooth surface.
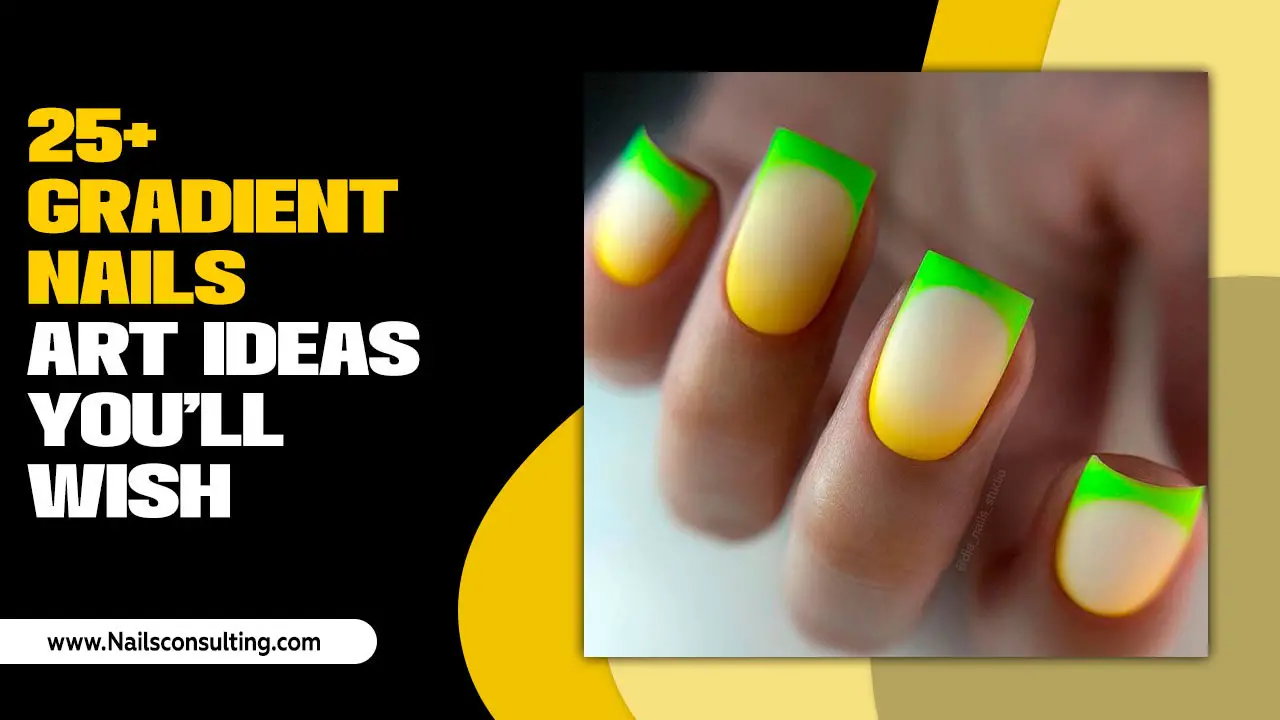
- Once the base coat is dry, apply a light-coloured polish to your entire nail.
- Cut small strips of striping tape and place them diagonally across your nails, leaving the tips exposed.
- Apply a darker shade of polish to the exposed tips of your nails, creating a gradient effect.
- Carefully remove the striping tape while the polish is still wet to reveal clean lines.
- Finish with a top coat to seal in your design and add shine.
With just a few simple steps, you can achieve a stunning gradient French tip design that will impress everyone who sees your manicure. So grab some striping tape and get creative with your nail art!
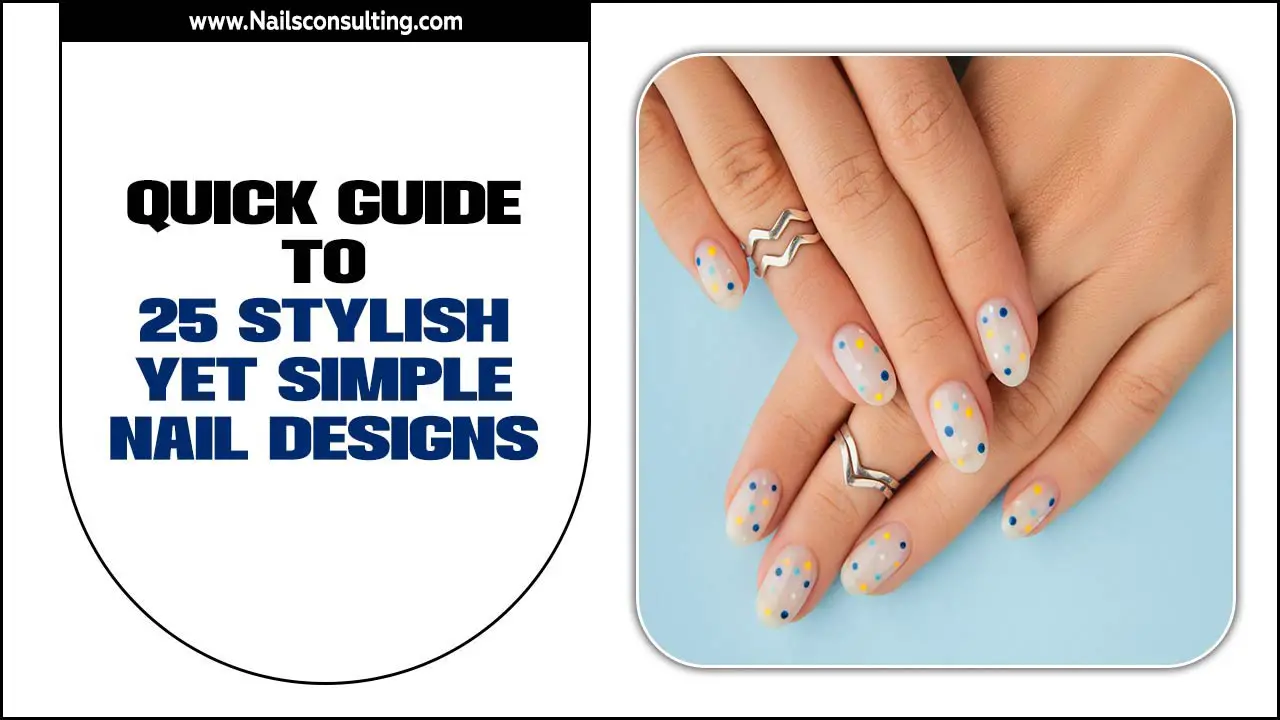
17.Easy Negative Space Nails With Colorful Dots
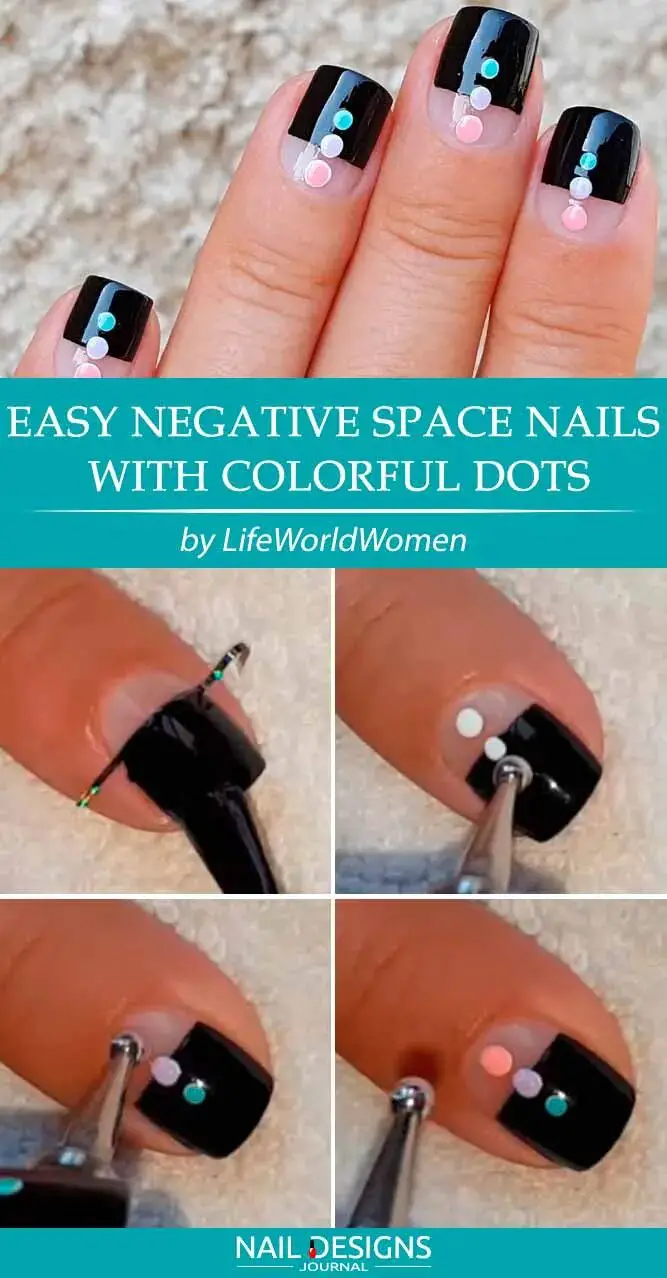
Negative space nails with colorful dots are a super easy and trendy nail design you can do at home. This design is perfect for those who want a fun and playful look without too much effort. To achieve this look, apply a base coat to protect your nails.
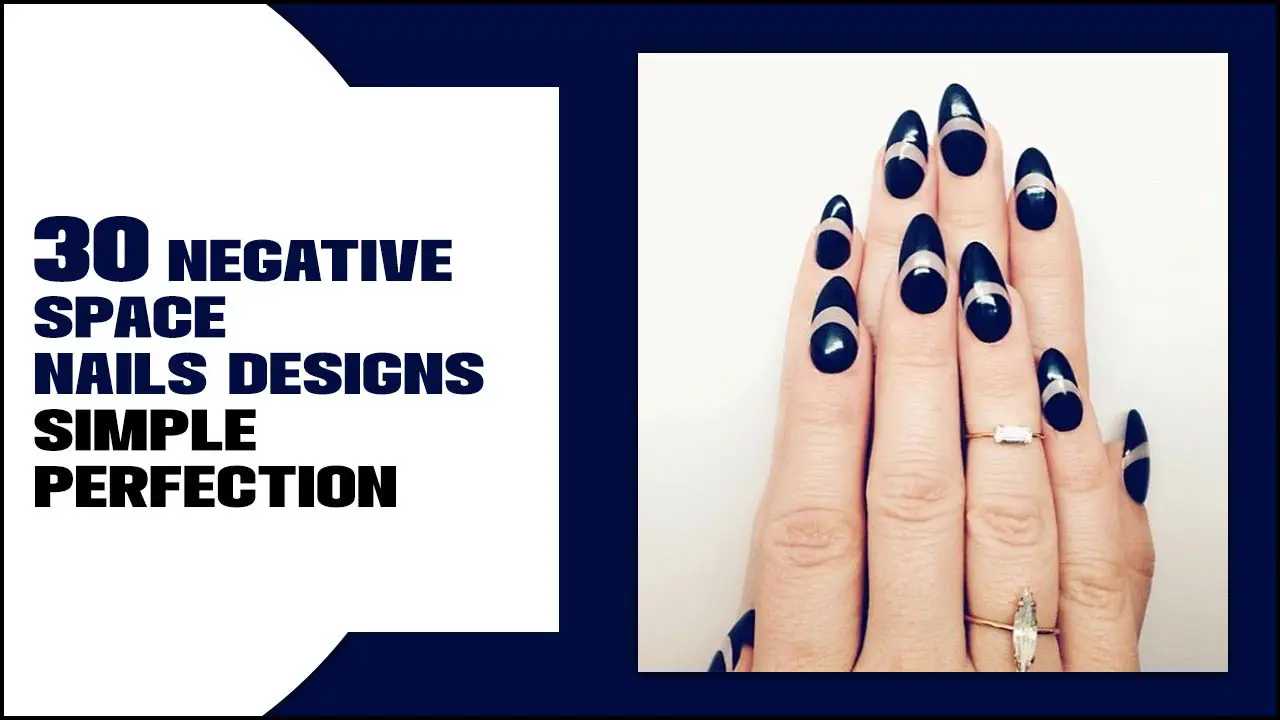
Then, please choose a color for the negative space part of your nails and apply it in a geometric shape or pattern. Leave some parts of your nails unpainted to create a negative space effect. Next, dip a dotting tool or toothpick into different nail polish colours to create colorful dots on the painted areas of your nails.
You can play around with different sizes and placements of the dots to create your desired look. Finish off with a layer of top coat to seal your design and give it a glossy finish. With this simple tutorial, you’ll have eye-catching negative space nails with colorful dots in no time!
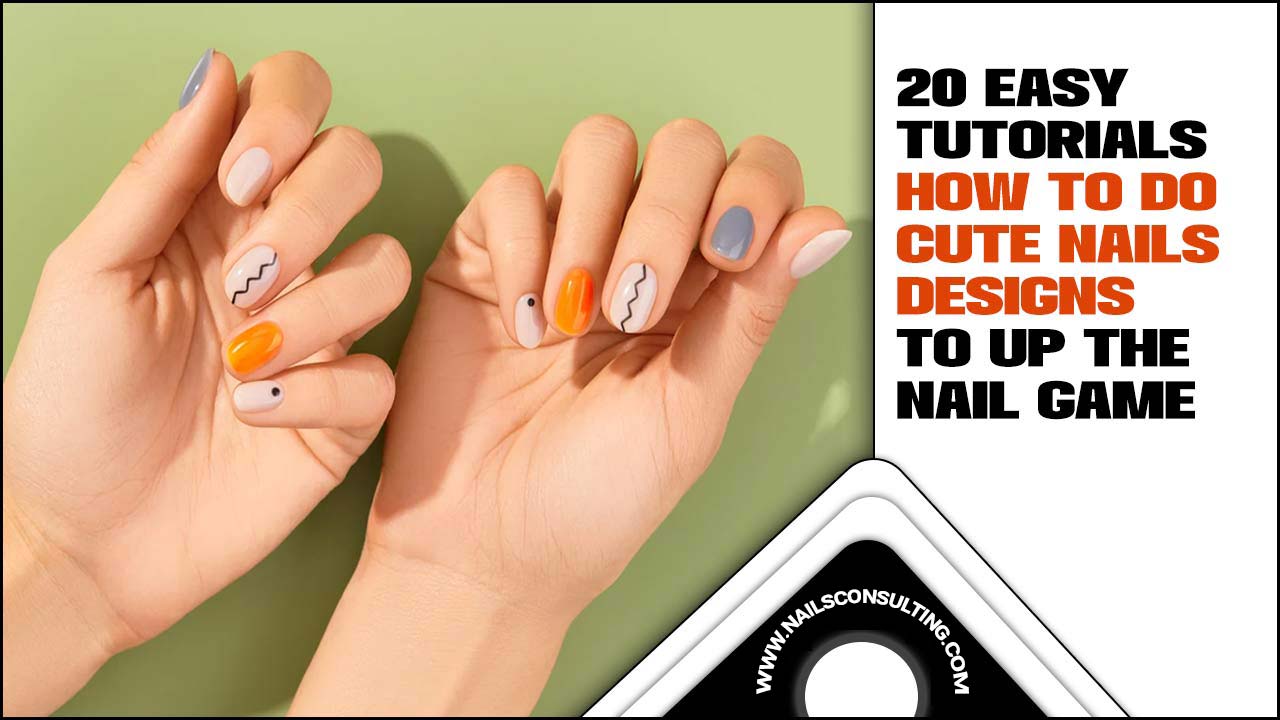
18.Super Easy White And Purple Nail Design
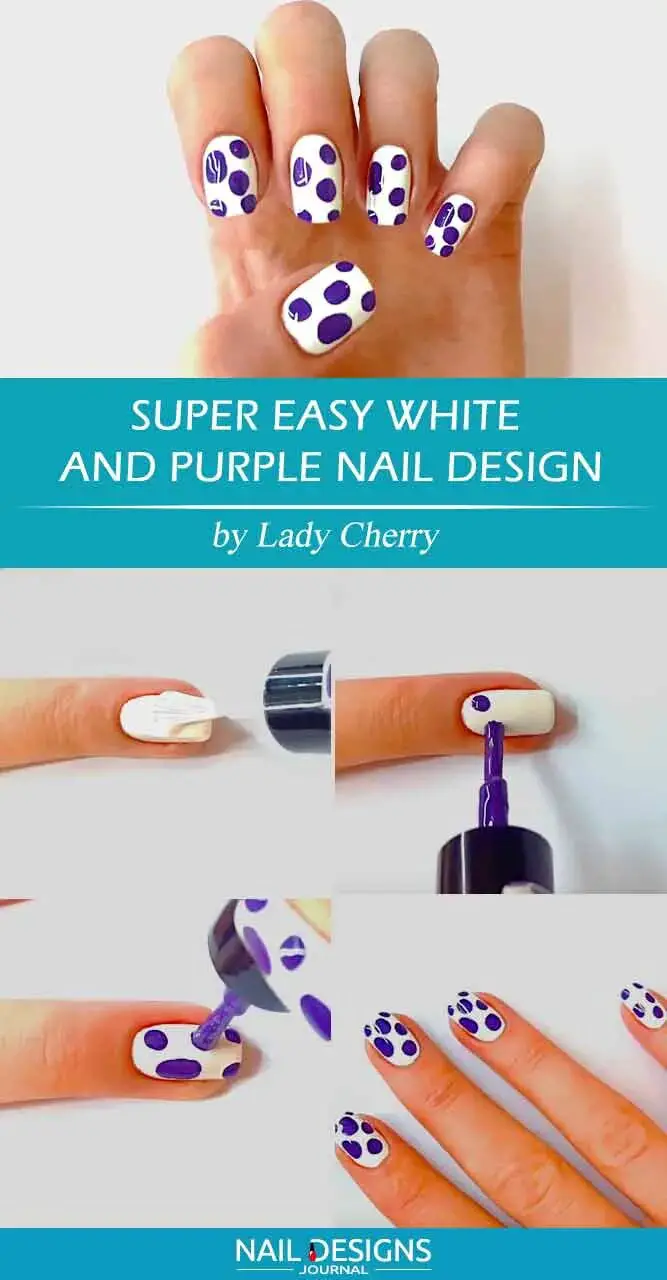
Creating a super easy white base and purple nail design is a great way to add a touch of elegance to your manicure. To achieve this look, apply a base coat to protect your nails. Once dry, apply two coats of white nail polish as your base color. Next, take a thin brush or a toothpick and dip it into a deep purple nail polish.
Use the brush or toothpick to create small dots or lines on your nails, creating a pattern that suits your style. Allow the design to dry completely before applying a top coat to seal in the design and add shine. This simple yet stylish white base and purple nail design will turn heads and elevate your overall look. You can also use other bright colors over your white base to create different variations of this design.
19.Sweet White And Orange Nails Art
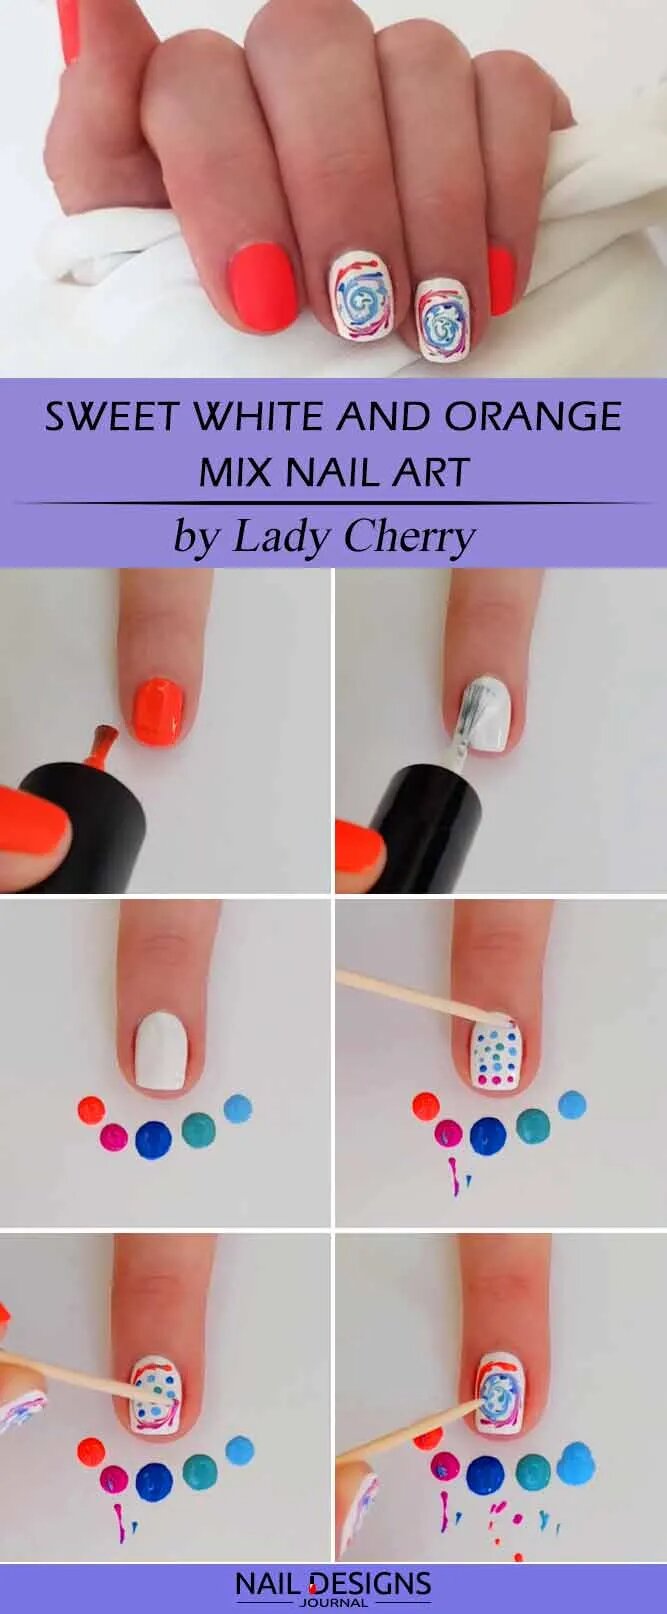
This simple yet eye-catching design can be easily achieved with just a few steps. Start by applying a base coat to protect your nails and allow them to dry. Then, let it dry completely with a white polish as the base color. Next, take an orange nail polish and create small dots or lines on your nails using a dotting tool or a toothpick.
You can get creative with the pattern and placement of the dots or lines to add your personal touch. Finish off with a top coat to seal the design and add shine. You can also incorporate a touch of blue polish into the design to create a more vibrant look. The result is a beautiful, summery nail look that will turn heads wherever you go. You can also experiment with different nail colors for a different look.
20.Fresh And Simple Multicolored Nails
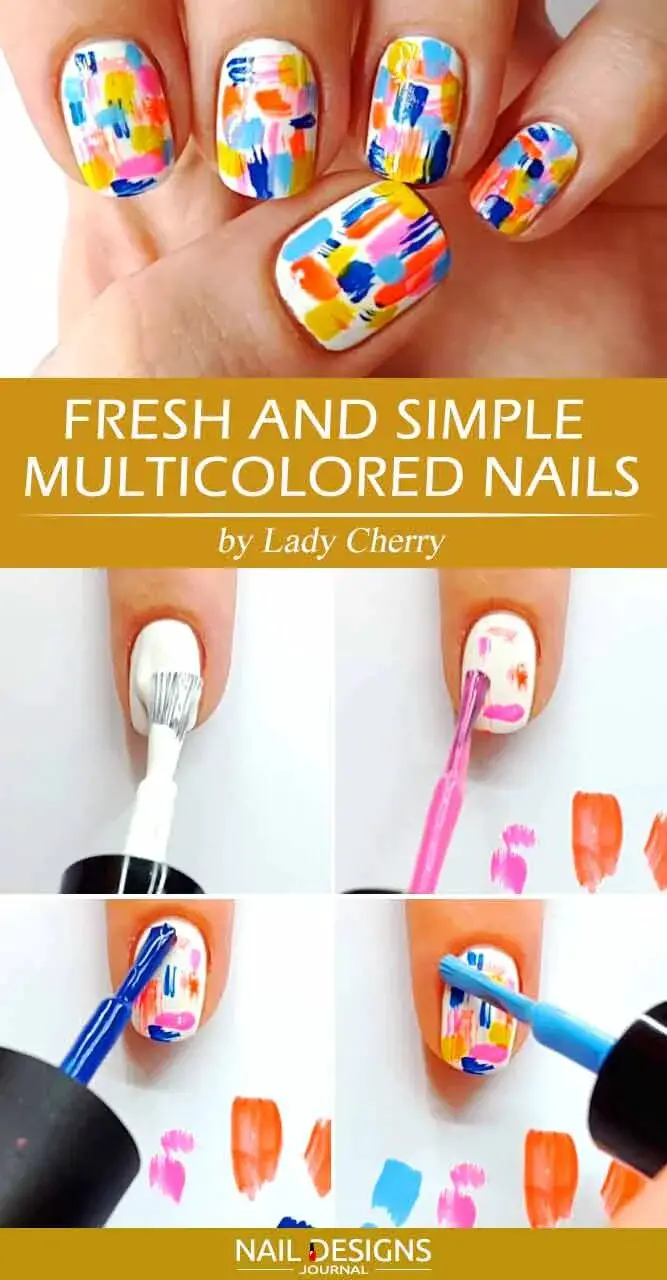
Fresh and simple multicolored nails are a fun and easy way to add color to your look. Apply a base coat to protect your nails to achieve this confetti-inspired look. Once dry, choose two or three complementary colors and paint each nail a different color combo.
If desired, you can use tape or nail striping tape to create clean lines between the colors. Allow the first coat to dry completely before applying a second coat for full coverage. Finish with a top coat to seal in the color and add shine. This multicolored nail design, reminiscent of confetti, is perfect for those who want to add a touch of creativity to their manicure without spending hours at the salon.
21.Matte Stamping Leaves Nail Art
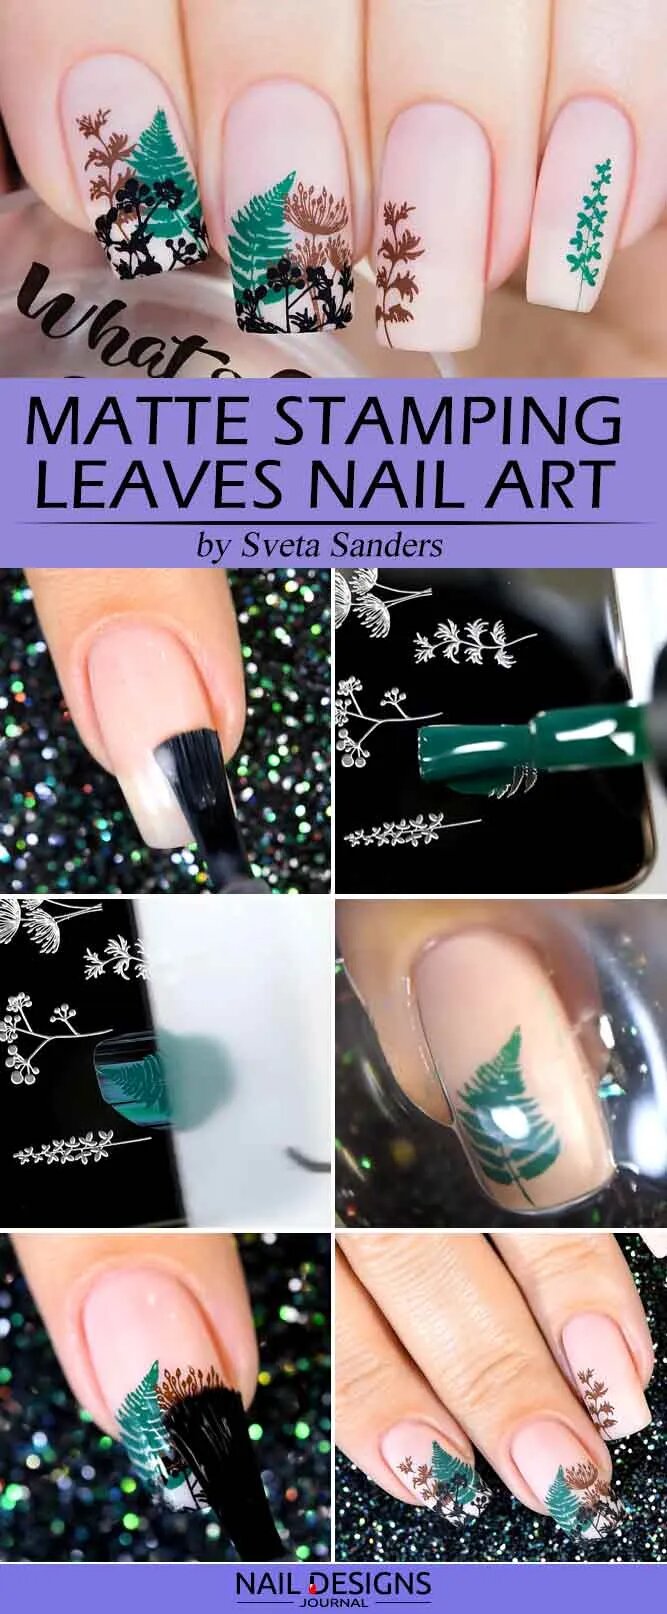
Creating a matte stamping leaves nail art design is easier than you might think. To achieve this look, apply a base coat to protect your nails. Once dry, apply a matte top coat for a smooth and velvety finish. Next, choose a leaf pattern stamping plate and apply nail polish to the desired leaf design.
Use a scraper to remove excess polish, and quickly press the stamper onto the plate to transfer the design onto your nail. Repeat this process for each nail, cleaning the stamping plate and stamper between uses. Finish with a top coat to seal your design, and enjoy your beautiful matte stamping leaves nail art!
22.Purple Fluid Art Nail Art Tutorial
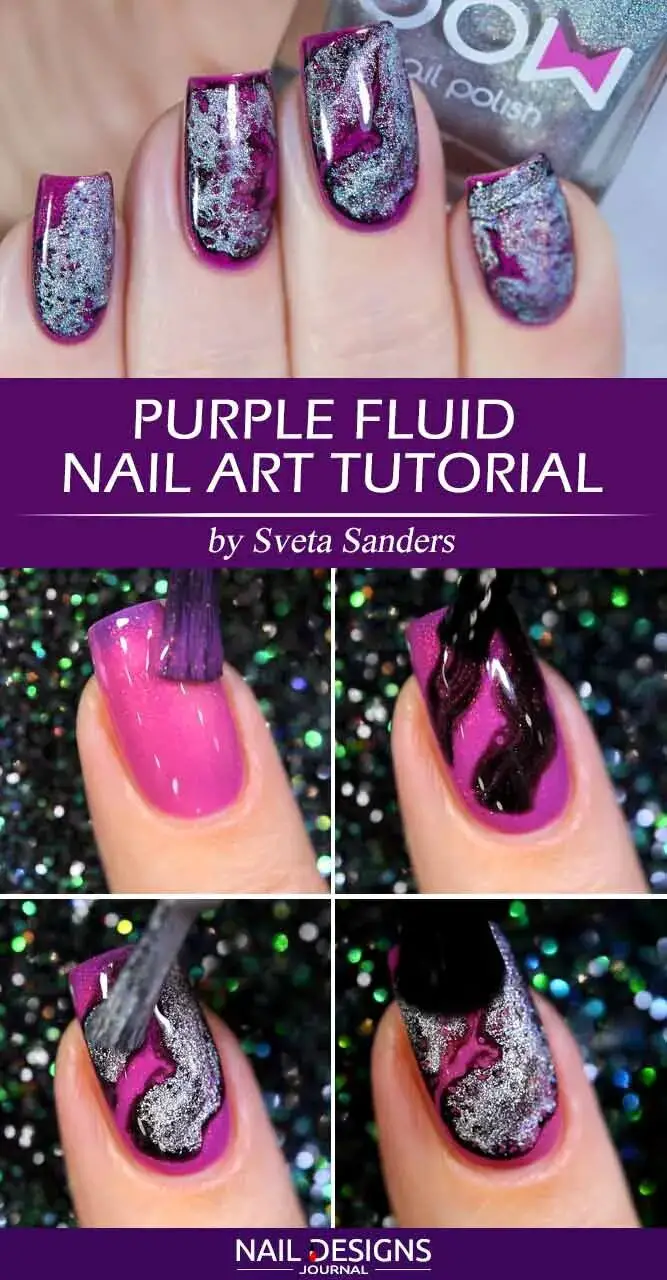
Creating a stunning purple fluid art nail design is easier than you might think. With just a few simple steps, you can achieve a beautiful and unique look with all your friends asking where you got your nails done. To start, gather your supplies: a base coat, a purple nail polish, a clear top coat, and some liquid latex or tape for easy cleanup. Begin by applying a base coat to protect your natural nails.
Once dry, apply two coats of your chosen purple nail polish, allowing each coat to dry completely. Now it’s time for the fun part – creating the fluid art effect. Take a small plastic wrap and crumple it up, then dip it into another shade of purple polish. Gently dab the plastic wrap onto your nails, moving it around to create swirls and patterns. Repeat this step with additional shades if desired.
Once you’re happy with the design, remove any excess polish from your skin using liquid latex or tape. Finish off with a clear top coat to seal your design and give it a glossy finish. To add an extra pop of color, add a few drops of blue nail polish in between the swirls and patterns. This will create a vibrant and eye-catching look. Finally, complete the design with a top coat to ensure long-lasting wear.

