Minimalist nail designs with neutral shades offer a chic, versatile, and sophisticated way to elevate your style with minimal effort. These designs focus on clean lines, subtle accents, and a refined palette, perfect for any occasion and incredibly easy to achieve at home.
Are you looking for that perfect nail look that’s both stylish and incredibly easy to pull off? Sometimes, we want a manicure that pairs with everything, feels polished, and doesn’t require hours of effort or complicated techniques. If you’ve ever stared at a wall of nail polish colors, feeling overwhelmed, or found yourself wishing for a simpler, more elegant approach to nail art, you’re in the right place! Minimalist nail designs with neutral shades are the answer. They’re chic, understated, and surprisingly versatile. In this guide, we’ll walk you through everything you need to know to create these stunning looks yourself, making sophisticated nails accessible to everyone.
Discovering the Allure of Neutral Shades for Minimalist Nails
Neutral shades – think soft beiges, creamy whites, muted grays, gentle taupes, and warm nudes – are the unsung heroes of any nail lover’s collection. Their magic lies in their adaptability. They’re like the perfect little black dress for your nails: always in style, always appropriate, and incredibly easy to build upon. Unlike bold colors that can sometimes clash or demand attention, neutrals provide a sophisticated canvas that enhances your natural beauty and complements any outfit or occasion. Whether you’re heading to a job interview, a casual brunch, or a formal event, neutral nails whisper elegance rather than shout it.
Why Minimalist Nail Designs Work So Well
Minimalism in nail design is all about strategic simplicity. It’s not about having no design, but rather about having purposeful design. This often involves focusing on one or two key elements – a clean shape, a subtle accent, a hint of metallic, or a negative space element – rather than overwhelming the nail with busy patterns. When paired with neutral shades, this minimalist approach creates a look that is:
- Timeless: Neutral colors and simple designs never go out of style.
- Versatile: They match every outfit and skin tone.
- Sophisticated: They exude an air of understated elegance.
- Easy to Maintain: Grow-out is less noticeable, and touch-ups are simple.
- Beginner-Friendly: They don’t require advanced artistic skills.
Essential Tools for Your Minimalist Nail Journey
Before we dive into the fun designs, let’s gather our essentials. You don’t need a professional salon setup to create beautiful minimalist nails. Most of these items are likely already in your beauty stash or are easy to find at your local drugstore.
Here’s a quick rundown of what you’ll need:
- Nail File & Buffer: For shaping your nails and smoothing the surface.
- Cuticle Pusher/Orange Stick: To gently push back and tidy your cuticles.
- Base Coat: Protects your natural nails and helps polish adhere.
- Neutral Nail Polishes: Your chosen shades of beige, cream, nude, gray, or taupe.
- Top Coat: Seals your design, adds shine, and extends wear.
- Optional: Fine-tipped Nail Art Brush or Dotting Tool: For adding subtle details.
- Optional: Metallic Polish or Foil Accents: For a touch of glam.
- Nail Polish Remover & Cotton Pads: For clean-up mistakes.
Having good quality tools can make a significant difference. For instance, a good nail file not only shapes your nails effectively but also prevents snagging and breakage. Buffing your nails gently can create a smooth base for polish, ensuring a more even and professional-looking finish.
Step-by-Step: Achieving Perfect Neutral Minimalist Manicures
Creating minimalist nail designs with neutral shades is all about precision and clean application. Here’s a general method that works for many of these styles.
Step 1: Prep Your Nails for Perfection
Proper nail preparation is key to a long-lasting and beautiful manicure. Start by removing any old polish. Gently push back your cuticles using an orange stick or cuticle pusher. Avoid cutting them unless absolutely necessary; healthy cuticles frame your nails perfectly. Shape your nails with a nail file to your desired length and shape. A quick swipe with a nail buffer will smooth out any ridges and create a clean surface for polish.
Step 2: Apply Your Base Coat
Never skip this step! A good base coat not only prevents your natural nails from staining (especially important with lighter polishes) but also creates a smooth surface for your color to adhere to, helping your manicure last longer. Let it dry completely.
Step 3: The Neutral Polish Application
This is where your chosen neutral shade comes into play. Apply your first coat thinly and evenly. Work from the base of the nail towards the tip, using three strokes: one down the center, and one on each side. Allow this coat to dry for a minute or two before applying the second coat. A second coat will ensure full opacity and a flawless finish. Again, apply thinly and evenly, and let it dry thoroughly before moving on to any design elements.
Step 4: Adding Your Minimalist Touch (Design Variations Below!)
Once your neutral base is dry, it’s time to add your minimalist flair. We’ll explore specific design ideas in the next section, but generally, this involves adding a subtle line, a dot, a geometric shape, or a metallic accent using a fine brush, dotting tool, or even the tip of your polish brush.
Step 5: Seal with a Top Coat
This is the grand finale! Apply a generous layer of your favorite high-shine top coat. This seals in your design, adds a beautiful glossy finish, and protects your manicure from chipping. Make sure to cap the free edge of your nail by running the brush along the very tip of your nail. This is a pro trick that significantly improves durability.
Step 6: Clean Up and Dry
Carefully clean up any polish that may have smudged onto your skin using a small brush dipped in nail polish remover. Let your nails dry completely before engaging in any vigorous activities. Patience here will be rewarded with a longer-lasting manicure!
Chic Minimalist Nail Designs to Try Now
Now for the fun part! Here are some simple yet incredibly stylish minimalist nail designs using neutral shades that you can easily recreate.
1. The Classic Monochromatic Elegance
This is the epitome of minimalist chic: a single, flawlessly applied neutral shade. The key here is the perfect application. A creamy nude, a soft beige, or a sophisticated pale gray can look incredibly polished.
- How-to: Follow steps 1-3 and Step 6 above. Ensure absolutely perfect, streak-free application.
- Why it works: It’s clean, classic, and makes your hands look instantly well-groomed.
2. Subtle French Tips in Neutral Tones
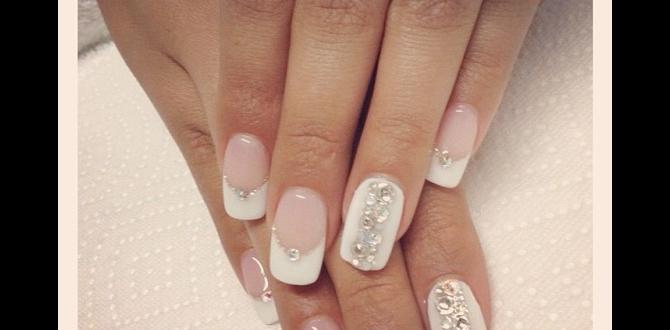
Forget the stark white! Update the classic French manicure with soft, neutral tips. Think a creamy beige base with a slightly darker taupe tip, or a soft greige base with a sheer white tip. This is a more modern and understated take.
- How-to:
- Apply your chosen neutral base color (steps 1-3).
- Once dry, use a fine-tipped brush or a nail art stencil to paint a thin line of a slightly darker or complementary neutral shade across the tip of each nail.
- Alternatively, use a sheer white or beige polish for a softer contrast.
- Seal with a top coat (Step 5).
- Why it works: It adds a touch of definition without being overpowering. It’s sophisticated and draws attention to the natural shape of your nail.
3. The Single Accent Nail
Choose one nail (usually the ring finger) to have a subtle design while the others remain a solid neutral shade. This keeps the look minimal but adds an interesting focal point.
- How-to:
- Paint all nails with your base neutral color (steps 1-3). Let fully dry.
- On your accent nail, use a fine brush to add a simple detail:
- A thin vertical line down the center.
- A small dot near the cuticle.
- A geometric shape like a tiny triangle or square near the tip or base.
- A thin metallic line (gold, rose gold, or silver).
- Let the accent design dry completely.
- Apply top coat to all nails (Step 5).
- Why it works: It provides a hint of personality and artistry without overwhelming the classic neutral base.
4. Negative Space Designs
Negative space refers to leaving parts of your natural nail visible. This creates a modern, airy feel. Think geometric shapes or lines overlaying the bare nail.
- How-to:
- Start with clean, prepped nails (Step 1).
- Apply a clear base coat (Step 2).
- Using a fine-tipped brush and a neutral color (or metallic accent), paint a simple shape or line, leaving the natural nail showing through. Examples: a single horizontal line across the middle, a V-shape at the tip, or two diagonal lines forming an X.
- Let it dry completely.
- Apply a clear top coat over the design and the entire nail (Step 5).
- Why it works: It’s incredibly modern and chic. The contrast between the polish and the bare nail is subtle yet striking, and it’s very forgiving in application.
5. The Subtle Gradient/Ombre
A soft ombre effect using two harmonious neutral shades offers depth and sophistication. This is a more advanced technique but can be simplified.
- How-to (Using a Sponge):
- Apply your lighter neutral shade as a base coat and let it dry.
- Apply a slightly darker neutral shade to a makeup sponge.
- Gently dab the sponge onto the tip of your nail, blending upwards slightly.
- Repeat for desired opacity, cleaning up any excess polish on your skin.
- Apply a top coat to smooth out the texture and add shine (Step 5).
- Why it works: It adds dimension and a touch of subtle artistry without using bold colors.
6. Polka Dots with a Twist
Small, strategically placed dots in a complementary neutral or metallic shade can add a playful yet elegant touch.
- How-to:
- Apply your base neutral color (steps 1-3).
- Using a dotting tool or the tip of a fine brush, place a few small dots along the cuticle line, at the tip, or as a diagonal scattering.
- Seal with a top coat (Step 5).
- Why it works: It’s a sweet, understated detail that adds visual interest.
Choosing Your Perfect Neutral Palette
The beauty of neutrals is their broad appeal. However, selecting shades that complement your skin tone can make them even more flattering. Here’s a simple guide:
| Skin Tone | Flattering Neutral Shades | Tips |
|---|---|---|
| Fair/Light | Sheer pink-beiges, soft milky whites, pale grays, cool-toned nudes. | Avoid very yellow-toned or stark white polishes, which can wash you out. |
| Medium/Olive | Warm beiges, peachy nudes, medium taupes, warm grays, soft caramel tones. | These tones often look great with a wider range of neutrals. |
| Deep/Dark | Rich caramels, deep taupes, warm browns, espresso shades, creamy off-whites. | Bold, rich neutrals often pop beautifully. Darker shades can also look stunning. |
When in doubt, opt for shades that are within one or two shades lighter or darker than your natural skin tone for a universally flattering look. Knowing your undertones (cool, warm, or neutral) can also guide your selection. For example, those with cool undertones might prefer polishes with blue or pink undertones, while warm undertones might lean towards yellow or peach undertones.
Maintaining Your Minimalist Manicure
Minimalist designs are often appreciated for their longevity and ease of maintenance, but a few tips will help them look their best:
- Reapply Top Coat: Every 2-3 days, apply another thin layer of top coat. This refreshes the shine and adds an extra protective shield, especially for your accent details.
- Moisturize: Keep your hands and cuticles hydrated with a good hand cream and cuticle oil. Dry cuticles can make even the most perfect manicure look unkempt.
- Protect Your Nails: Wear gloves when doing chores like washing dishes or cleaning with harsh chemicals. This prevents the polish from chipping and your nails from drying out.
- Touch Ups: If a tiny chip occurs on a solid-colored nail, you can sometimes carefully dab a little polish onto the spot and seal with top coat. For intricate designs, it might be easier to just redo the nail.
The Benefits of Minimalist Nail Art
Beyond aesthetics, embracing minimalist nail designs with neutral shades offers several practical and emotional benefits:
- Time-Saving: These designs are generally much quicker to apply than complex nail art.
- Cost-Effective: You can achieve salon-worthy results at home with a few basic polishes.
- Reduces Decision Fatigue: When your nails always look good, you spend less time worrying about them.
- Boosts Confidence: Well-maintained, stylish nails can make you feel more put-together and confident in your appearance.
- Focus on Health: The emphasis on clean application and base/top coats encourages healthier nail habits. As the American Academy of Dermatology notes, proper nail care is essential for healthy nails.
Troubleshooting Common Minimalist Nail Design Issues
Even the simplest designs can hit a snag. Here are common problems and their solutions:
| Problem | Solution |
|---|---|
| Streaky Polish Application | Apply polish in thinner coats. Ensure your brush isn’t overloaded. For ultimate smoothness, try a high-quality top coat that smoothes out imperfections. |
| Smudging When Adding Details | Ensure your base color is completely dry before adding any designs. You can also use quick-dry sprays or drops to speed up drying time between coats. |
| Uneven Lines or Dots | Practice makes perfect! Use a steady hand and a fine-tipped brush or dotting tool. Dip your tool in polish sparingly. Clean up mistakes immediately with a small brush dipped in remover. |
| Design Looks Too Plain | Consider adding a subtle metallic accent (a thin line, a tiny dot) or a slightly different neutral shade for contrast. Even a touch of shimmer can elevate a design. |
| Polish Chips Quickly | Ensure you’re using a good base and top coat. Cap the free edge of your nail with your top coat. Avoid exposing nails to harsh chemicals without gloves. Reapply top coat every few days. |
Frequently Asked Questions About Minimalist Neutral Nails
Q1: What are the best neutral shades for beginners?
A1: Start with classic nudes, soft beiges, or muted grays. These are incredibly forgiving and pair well with almost anything. Look for shades that complement your natural skin tone.
Q2: How can I make my neutral polish look more interesting without being too complex?
A2: Try a single accent nail with a simple metallic line, a tiny dot near the cuticle, or a subtle negative space design. These small touches add flair without being overwhelming.
Q3: Is it okay to mix and match neutral shades on different nails?
A3: Absolutely! Opting for different, yet harmonious, neutral shades on each nail can create a chic, modern look. For instance, use a beige on one hand and a taupe on the other, or vary them across all ten fingers.
<p


