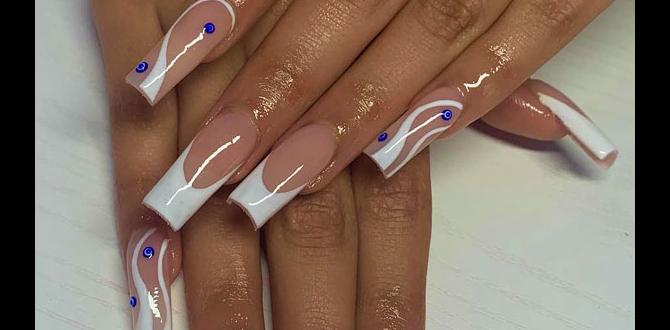
Minimalist line nail art is an achievable, chic way to elevate your manicure with simple, clean lines. It’s perfect for beginners, offering versatile looks with just a few essential tools and techniques. This guide breaks down everything you need to create stunning line designs effortlessly.
Hey nail lovers! Lisa Drew here from Nailerguy, and I’m so excited to talk about one of my favorite nail art trends: minimalist line designs. Are you tired of complicated nail art tutorials that seem impossible to follow? Do you dream of having stylish, sophisticated nails without spending hours at the salon or struggling at home? You’re not alone! Many of us want that elegant touch, but the thought of intricate patterns can be a bit daunting. Well, get ready to be amazed because creating beautiful minimalist line nail art is easier than you think. We’ll dive into the simple tools you need, a step-by-step process, and tons of inspiration to get you started on your nail art journey. Let’s make your nails look amazing, with minimal fuss!
Why Minimalist Line Nail Art? The Chic Appeal of Simplicity
Minimalist line nail art is more than just a trend; it’s a statement of elegance and modern simplicity. Think clean, crisp lines that speak volumes without being loud. This style is incredibly versatile, seamlessly fitting into any occasion, from a casual day out to a formal event. It’s the perfect canvas for expressing your personal style in a subtle yet impactful way. What makes it truly brilliant is its accessibility. You don’t need to be a professional artist to achieve stunning results. With a few basic tools and a little patience, you can transform your nails into miniature pieces of art.
The beauty of minimalist line art lies in its understated sophistication. It complements any outfit and can be customized to match your mood or the season. Whether you prefer a single delicate line or a more complex geometric pattern, the focus remains on clean execution and precise lines. This approach to nail art offers a chic alternative to bold, intricate designs, proving that sometimes, less truly is more.
Getting Started: Essential Tools for Your Minimalist Line Art Kit
You don’t need a whole arsenal of fancy gadgets to create beautiful minimalist line nail art. A few key items will set you up for success. Think of these as your go-to squad for achieving those clean, crisp lines.
The Must-Have Nail Art Tools:
- Fine-Tip Nail Art Brushes: These are your primary tools for drawing lines. Look for brushes with very fine, precise tips. A couple of different sizes can be helpful – one for super-fine details and another slightly thicker one for bolder lines. Brands like What’s Up Nails offer a great selection for various techniques.
- Dotting Tools: While not directly for lines, dotting tools are fantastic for creating small accents or as starting/ending points for your lines. They come in various sizes, allowing for different dot dimensions.
- Striping Tape: This is a lifesaver for creating perfectly straight, even lines. It’s a sticky tape that you apply to your nail, paint over, and then carefully peel off to reveal a sharp line.
- Base Coat & Top Coat: Essential for any manicure! Your base coat protects your natural nails and provides a smooth surface. Your top coat seals your design, adds shine, and helps it last longer.
- Nail Polish Colors: For minimalist designs, classic colors like black, white, nude, and metallics are popular. However, feel free to experiment with any colors you love!
- Nail Polish Remover & Cotton Swabs/Pads: For cleaning up any mistakes and ensuring precision.
- Lint-Free Wipes: These are crucial for cleaning your brushes between dips into polish, preventing color contamination and ensuring sharp lines.
Having these basics ready will make the process much smoother and more enjoyable. Remember, quality tools can make a significant difference in the final look of your nail art!
The Prep Work: Setting the Stage for Perfect Lines
Just like any good artwork, a successful nail design starts with proper preparation. Taking a few extra minutes to get your nails ready will ensure your minimalist line art looks polished and lasts longer. It’s all about creating a clean, smooth canvas.
Step-by-Step Nail Prep:
- Clean Your Nails: Start by removing any old nail polish. Make sure your nails are completely free of residue.
- Shape Your Nails: File your nails into your desired shape – square, round, almond, or stiletto. Ensure all nails are even in length and shape for a cohesive look.
- Push Back Cuticles: Gently push back your cuticles using a cuticle pusher. This creates more surface area for your nail art and gives a neater appearance.
- Buff Your Nails (Optional but Recommended): Lightly buff the surface of your nails to smooth out any ridges and create a slight grip for the polish. Be gentle; you don’t want to thin your nails.
- Apply Base Coat: Apply one thin, even layer of your favorite base coat. This protects your nails from staining and helps your polish adhere better. Let it dry completely.
This prep routine is fundamental to achieving a professional-looking manicure, no matter what design you choose. It ensures your line art has a smooth surface to grace and will adhere beautifully.
Effortless Line Art Techniques for Beginners
Now for the fun part! Let’s dive into some easy techniques to create stunning minimalist line nail art. These methods are designed for beginners and require minimal practice.
Technique 1: The Freehand Fine-Line Flow
This is where your fine-tip brushes come into play. It’s all about embracing the art of drawing directly onto the nail.
How-To:
- Choose Your Polish: Start with a base color on your nails, fully dried. Now, dip your fine-tip brush into your chosen line color (e.g., black polish on a nude nail).
- Wipe Off Excess: Gently wipe off any excess polish on the brush onto a lint-free wipe or the lip of the polish bottle. You want just enough polish to create a smooth line, not a blob.
- Steady Your Hand: Rest your pinky finger on a flat surface or your other hand. This provides stability.
- Draw Your Lines: Gently glide the brush across your nail. Start with simple designs: a single vertical or horizontal line, a few parallel lines, or a simple geometric shape like a triangle or square. Vary the thickness by applying more or less pressure.
- Let It Dry: Allow the lines to dry completely before applying a top coat.
Don’t be discouraged if your first attempt isn’t perfect. Practice makes progress! Even slightly shaky lines can add a unique, handcrafted charm.
Technique 2: Striping Tape for Precision Lines
For those who crave perfectly straight lines, striping tape is your best friend. It’s a game-changer for achieving sharp, clean edges.
How-To:
- Paint Your Base Color: Apply your base polish color and let it dry thoroughly. This is crucial; if the base isn’t dry, the tape will peel it off.
- Apply the Tape: Carefully place a strip of nail art striping tape onto your nail. Press it down firmly, ensuring there are no air bubbles or lifted edges. Trim any excess tape sticking out.
- Paint Over the Tape: Apply your contrasting polish color over the taped section. You can paint just the taped area, or cover the entire nail for a bolder look.
- Peel While Wet: This is the key step! While the second layer of polish is still wet (or slightly tacky, not fully dry), carefully and slowly peel off the striping tape. If you wait for it to dry completely, you risk chipping the polish.
- Allow to Dry: Let the newly painted lines and the rest of the nail dry completely.
- Apply Top Coat: Once everything is dry, seal your design with a generous layer of top coat.
This technique is fantastic for creating geometric patterns, French tips with a modern twist, or segmented color blocks. You can layer multiple strips of tape to create intricate designs.
Technique 3: The Dotting Tool Accent
Dots are a simple yet effective element in minimalist nail art. They can stand alone or be incorporated into line designs.
How-To:
- Create Your Base: Have your base polish color dried on your nails.
- Dip and Dot: Dip the tip of your dotting tool into a small amount of polish.
- Place the Dot: Gently press the dotting tool onto your nail to create a perfect circle. Start with one dot, or create a pattern of dots.
- Vary Sizes: Use different sized dotting tools for varied dot appearances.
- Combine with Lines (Optional): You can use dots as anchors for lines, or place them strategically around your line designs for added visual interest.
Dots are incredibly forgiving and add a touch of playfulness to the clean lines of minimalist art.
Exploring Minimalist Line Nail Art Designs
The possibilities with minimalist line art are endless! Here are a few popular and beginner-friendly design ideas to get your creativity flowing.
Design Ideas:
- The Single Sophisticate: A single, thin horizontal or vertical line across the center or edge of a nude or sheer polish nail.
- Geometric Grid: Use striping tape to create a grid pattern on one or all nails. You can paint the entire grid or just fill in some of the squares with contrasting colors.
- Crescent Moon Lines: Draw a delicate curve along the cuticle line or the tip of the nail.
- Diagonal Dash: A simple diagonal line from one corner of the nail to the opposite side.
- Mixed Media Magic: Combine techniques! For example, use striping tape for a clean base line and then add a freehand dotting detail.
- Negative Space Lines: Paint lines over a clear or “naked” nail base, letting the natural nail show through. This is incredibly chic and modern.
- Color Block Lines: Use striping tape to divide a nail into sections and fill them with different colors.
These are just starting points. Don’t be afraid to experiment and put your own spin on them!
A Quick Look at Minimalist Line Nail Art Inspiration
Visual inspiration is key to unlocking your creative potential. Minimalist line nail art often draws from modern art, architecture, and graphic design principles. The emphasis is on clean shapes, balanced compositions, and thoughtful use of negative space.
Inspiration Sources:
- Architecture: Think of the clean lines and geometric shapes found in modern buildings.
- Graphic Design: Explore logos and typography for inspiration in line weight and placement.
- Nature: The veins of a leaf, the patterns in marble, or the simple structure of a feather can all spark ideas.
- Fashion: Observe runway trends for color palettes and silhouette inspirations.
- Abstract Art: Artists like Mondrian or Malevich used simple lines and blocks of color effectively.
Looking for more visual ideas to spark your imagination? Websites like Pinterest and Instagram are treasure troves of minimalist nail art. Search for hashtags like #minimalistlinenailart, #linenails, #simplenailart, and #modernnails.
Maintaining Your Minimalist Masterpiece
You’ve created a beautiful minimalist line nail art design – now you want to make it last! Proper care and a good top coat are essential.
Tips for Longevity:
- Cap the Edges: When applying your top coat, make sure to swipe it gently across the free edge (the tip) of your nail. This seals the polish and helps prevent chipping.
- Be Gentle: Avoid using your nails as tools (like opening cans or scraping).
- Moisturize: Keep your hands and cuticles moisturized with cuticle oil or hand cream. Healthy cuticles contribute to the overall polished look.
- Touch-Ups: For very minor chips or wear and tear, you can sometimes do a small touch-up with polish and a fine brush.
With a little care, your minimalist line nails can stay looking fresh and fabulous for days!
Table: Comparing Nail Art Tools
To help you choose the right tools for your minimalist line nail art journey, here’s a quick comparison of some essential items and their primary uses.
| Tool | Primary Use | Beginner Friendliness | Notes |
|---|---|---|---|
| Fine-Tip Nail Art Brush | Drawing thin, precise lines; intricate details. | Moderate (requires steady hand) | Essential for freehand designs. |
| Striping Tape | Creating perfectly straight, clean lines; geometric patterns. | High | Great for beginners wanting sharp edges. |
| Dotting Tool | Creating dots of various sizes; accents. | High | Versatile for simple embellishments. |
| Base Coat | Protecting natural nails, creating a smooth surface. | High | Crucial for nail health and polish adhesion. |
| Top Coat | Sealing designs, adding shine, extending wear. | High | Vital for durability and finish. |
Frequently Asked Questions (FAQ) About Minimalist Line Nail Art
We’ve covered a lot of ground, but you might still have a few questions. Here are some common queries beginner nail artists have about minimalist line nail art.
Q1: What’s the best polish consistency for drawing lines?
A: You want a polish that isn’t too thick or too watery. A slightly thinner consistency is easier to control with a brush. If your polish is too thick, you can add a drop of nail polish thinner (not remover!) to loosen it up. Always wipe excess product off your brush before drawing.
Q2: My lines always look shaky. What can I do?
A: Steadiness is key! Rest your pinky finger on your desk or your other hand for support. Try drawing in one continuous motion rather than stopping and starting. If you’re struggling with freehand, striping tape is an excellent alternative for perfectly straight lines.
Q3: Can I use any nail polish for line art?
A: Yes, you can use most nail polishes. However, polishes specifically designed for nail art or those with a finer brush tip often offer better control for detailed lines. Regular polishes work well too, especially with fine-tip brushes.
Q4: How soon can I apply a top coat after drawing lines?
A: Let your line art dry completely before applying a top coat, especially if you used regular nail polish. If the lines are still wet or even tacky, the top coat can smudge them. For striping tape designs, you must peel the tape while the color is still wet!
Q5: What’s the difference between a nail art brush and a regular polish brush?
A: Nail art brushes are specifically designed with very fine tips and controlled bristle lengths, allowing for precision and detail. Regular polish brushes are typically wider and designed for faster, broader coverage of the nail surface.
Q6: How do I clean my nail art brushes?
A: After each use, gently wipe excess polish from your brush using a lint-free wipe or cotton pad. Then, dip the brush in nail polish remover (or isopropyl alcohol) and wipe again until clean. Store them flat or upright with the bristles up once dry to maintain their shape.
Conclusion
Minimalist line nail art is your invitation to sophisticated self-expression, proving that you don’t need complex techniques to achieve stunning results. You’ve learned about the essential tools, the importance of preparation, and simple, effective techniques like freehand drawing and striping tape. Whether you opt for a single, elegant stroke or a series of precise geometric lines, the power of simplicity is undeniable.
Remember, the journey of nail art is one of fun and exploration. Don’t be afraid to experiment with different colors, line thicknesses, and placements. Embrace imperfections as part of your unique style, and celebrate each manicure you create. With these tips and a little practice, your nails will be showcasing chic, minimalist designs that are both effortless and eye-catching. So grab your favorite polishes, your fine-tip brushes, and let your creativity flow. Happy polishing!

