Metallic foil accent nails offer a chic, dazzling way to elevate any manicure. Achieve a professional, glamorous look at home with simple steps and everyday tools for stunning results that turn heads.
Want to add a little sparkle and sophistication to your fingertips? Metallic foil accent nails are your secret weapon! They’re super trendy, surprisingly easy to do, and instantly make your manicure look like you just stepped out of a salon. But maybe you’re thinking, “Foil? How tricky is that?” Don’t worry! This guide is here to show you just how simple it is to create these stunning nail looks. We’ll break it all down, step-by-step, so you can get gorgeous, shimmering nails with confidence.
You’ll discover all the tricks and tips to make your metallic foil accents shine. We’ll cover what you need, how to apply them perfectly, and even some fun ideas to spark your creativity. Get ready to transform your nails from ordinary to extraordinary!
What Are Metallic Foil Accent Nails?
Metallic foil accent nails are a dazzling nail art technique where small pieces or full strips of iridescent or metallic foil are applied to the nails. These foils come in a mesmerizing range of colors, finishes, and patterns, from classic silver and gold to vibrant holographic shades and intricate designs. Unlike traditional nail polish, foil offers a unique, reflective sheen that catches the light beautifully, providing a stunning, almost mirror-like effect. They’re often used to create focal points – or “accents” – on one or two nails, or to add a striking border or detail to a whole set, making them incredibly versatile for any occasion.
The beauty of foil accents lies in their ability to add a high-impact, luxurious look without requiring advanced artistic skills. They are a fantastic way for beginners to experiment with nail art and for seasoned enthusiasts to quickly achieve a salon-quality finish. Whether you’re aiming for subtle shimmer or bold statement nails, metallic foils can deliver.
Why Choose Metallic Foil Accent Nails?
There are so many reasons why metallic foil accent nails have become a go-to for nail lovers everywhere. They’re not just pretty; they’re practical and empowering!
- Instant Glamour: A touch of metallic foil instantly elevates any base color, adding a sophisticated and eye-catching sparkle.
- Versatility: From subtle hints on a single nail to a full-on metallic statement, foils can adapt to any style, from minimalist chic to bold and edgy.
- Easy Application: You don’t need to be a nail art pro! With the right technique, applying foils is surprisingly straightforward.
- Long-Lasting: When applied correctly with a good top coat, foil accents can stay put and look fabulous for your entire manicure wear.
- Trend-Forward: Metallic looks are always in style, and foil accents are a modern, fresh way to rock the trend.
- Creativity Unleashed: Foils come in endless colors, finishes, and patterns, offering boundless possibilities for unique designs.
Essential Tools & Materials for Foil Accents
Getting started with metallic foil accent nails is easier than you think! You probably already have some of these items in your nail kit. Here’s what you’ll need to make your DIY foil manicure a dazzling success:
The Must-Haves:
- Nail Polish Base Coat: To protect your natural nails and create a smooth canvas.
- Your Chosen Nail Polish Color(s): This will be your base color, creating a beautiful contrast or complement to your foil.
- Nail Foil Adhesive (or Specific Foil Glue): This is the magic ingredient that makes the foil stick! Look for specially designed foil glue or a transfer polish.
- Nail Transfer Foil: Available in rolls, sheets, or pre-cut pieces. Choose your favorite colors and finishes!
- Tweezers or an Orangewood Stick: For precise placement of the foil.
- Nail File and Buffer: To shape and smooth your nails for a perfect finish.
- Nail Polish Top Coat: To seal everything in and add shine. A quick-dry top coat is a lifesaver!
Optional (But Super Helpful!) Items:
- Cuticle Pusher: To prep your nail bed.
- Rubbing Alcohol or Nail Polish Remover: For cleaning nail surfaces.
- Small Scissors: If you plan to cut your foil into specific shapes.
- Dotting Tool: For applying adhesive in small, precise areas if needed.
Step-by-Step: How to Apply Metallic Foil Accent Nails
Ready to get your hands on this dazzling trend? Follow these simple steps to create your own gorgeous metallic foil accent nails at home. It’s easier than you think!
Step 1: Prep Your Nails
Just like any great manicure, preparation is key! Start by ensuring your nails are clean and dry. Gently push back your cuticles with an orangewood stick or cuticle pusher. Shape your nails using a nail file to your desired length and style. Then, buff your nails lightly to create a smooth surface. Wipe your nails with rubbing alcohol or nail polish remover to remove any oils and dust. This helps your polish and foil adhere better.
Step 2: Apply Your Base Color
Apply one or two thin coats of your chosen nail polish color. Let each coat dry completely before applying the next. This is crucial! If your base color isn’t dry, the foil might smudge. Patience here will pay off with a cleaner, more professional look.
Step 3: Apply the Nail Foil Adhesive
This is where the magic begins! Once your base color is completely dry, it’s time to apply the special nail foil adhesive.
- Using Foil Glue: Apply a thin, even layer of the foil glue to the entire nail or to the specific areas where you want the foil to adhere.
- Using Foil Polish: Some polishes are designed to be used as adhesive. Apply a thin layer of this polish to your nail.
Let the adhesive dry until it becomes tacky. This usually takes about 30 seconds to a couple of minutes, depending on the product. It shouldn’t be wet, but you should be able to feel a slight stickiness when you gently touch it with your finger (or a clean tool). For best results, consult the drying time instructions on your specific adhesive product.
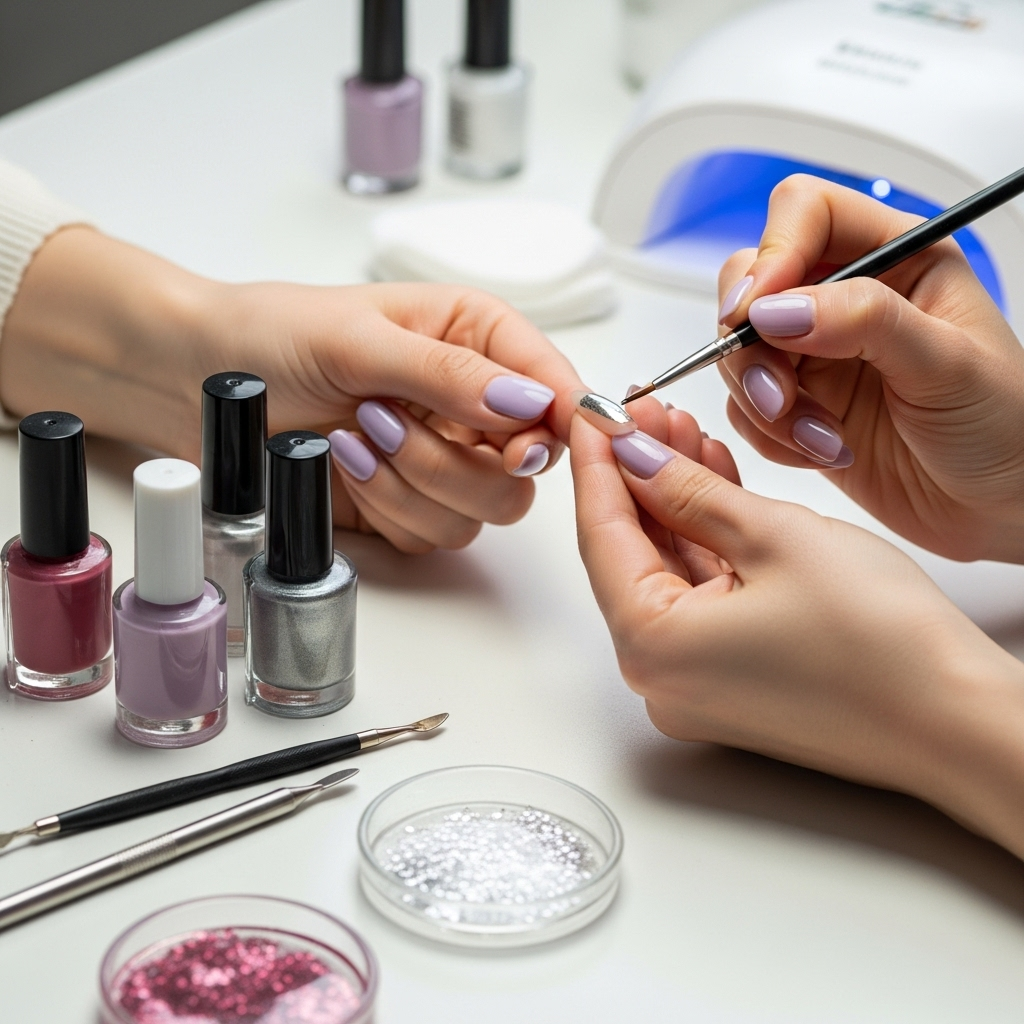
Step 4: Apply the Foil
Now for the fun part! Take your metallic transfer foil. Place the colored side of the foil up, facing you, and the silver or dull side down onto your tacky adhesive.
- Press Down Firmly: Gently but firmly press the foil onto the tacky adhesive using your fingertip, tweezers, or an orangewood stick.
- Rubbing Technique: You can gently rub over the foil with your finger or the back of a spoon for a few seconds to ensure good contact.
The goal is to transfer the metallic design from the foil onto your nail. You’ll want to ensure full contact with the tacky surface.
Step 5: Remove the Foil
This is the moment of truth! Slowly and carefully peel the backing of the foil away from your nail.
- Peel Slowly: Start at one corner and peel the foil back in a smooth motion.
- Reveal Your Design: You should see the metallic design transfer onto your nail where the adhesive was applied!
If some areas didn’t transfer, don’t worry! You can reapply adhesive to those spots, let it get tacky again, and try pressing the foil down again.
Step 6: Seal Your Masterpiece!
Once you’re happy with the foil transfer, it’s time to protect your stunning accent. Apply a good quality, chip-resistant top coat over the entire nail, ensuring you seal the edges of the foil. This not only makes your manicure last longer but also gives it a beautiful, glossy finish. Be gentle when applying the top coat to avoid smudging the foil.
Creative Ways to Use Metallic Foil Accents
Metallic foil isn’t just for a full nail overlay! Its versatility allows for a huge range of creative applications. Here are some popular and stunning ways to incorporate metallic foils into your manicures:
1. The Classic Accent Nail
This is perhaps the most popular way to use foils. Apply a solid color to all nails except one or two. Then, use foil on those accent nails to create a striking contrast and focal point. This is elegant, chic, and doesn’t overwhelm the look.
2. Geometric Designs & Borders
Cut small pieces of foil into strips or geometric shapes. Apply them strategically to your nails using your foil adhesive. You can create sharp borders along your cuticle line, a diagonal line across the nail, or even abstract shapes. This adds a modern, edgy vibe.
3. Ombré or Gradient Effect
For a softer, more diffused look, you can create an ombré effect. Apply foil to only a portion of the nail, or use a sponge to lightly dab foil pieces onto the nail, blending them into the base color. This looks particularly stunning with holographic foils.
4. Full Nail Overlay
Want to go all out? Cover your entire nail with a sheet of metallic foil for a stunning, mirror-like finish. This is bold, glamorous, and perfect for special occasions. Ensure you use plenty of adhesive and press the foil down very smoothly for the best results.
5. Crushed Foil Effect
This technique involves crinkling a piece of foil before applying it. Once applied, it creates a beautiful, textured, shattered glass effect. It’s dynamic and catches the light in a unique way.
6. Abstract Art
Tear or cut foil into random shapes and apply them haphazardly over a tacky adhesive. This creates a uniquely abstract, artistic look that ensures no two nails are exactly alike.
7. Delicate Details
Use tiny pieces of foil, applied with tweezers, to create small accents like dots, stars, or even fine lines. This is ideal for adding a subtle touch of shimmer to an otherwise simple manicure.
Comparing Foil Types: What’s the Difference?
The world of nail foils is vast and exciting! Understanding the different types can help you choose the perfect finish for your desired look. Here’s a quick rundown:
| Foil Type | Description | Best For | Tips |
|---|---|---|---|
| Transfer Foils (Rolls/Sheets) | These are the most common type. They have a metallic design on one side and a clear or colored backing. The design transfers to the nail with adhesive. Available in a huge variety of colors, patterns, and finishes (mirror, holographic, iridescent). | All-over nails, accent nails, geometric designs, borders, ombré effects. | Ensure full contact with tacky adhesive. Peel backing smoothly. |
| Crushed/Flake Foils | These are irregular-shaped tiny pieces of foil, often sold loose. They create a textured, mosaic-like appearance. | Textured full nails, scattered accents, “shattered glass” effect. | Apply over a fully tacky adhesive. Can be applied slightly less precisely for a natural “crushed” look. |
| Holographic Foils | A type of transfer foil that reflects a rainbow of colors under light. They come in various patterns (e.g., solid, starry, patterned). | Statement accent nails, full nail overlays for maximum impact. | Can be very vibrant; pair with simpler base colors. |
| Iridescent Foils | These foils shift colors subtly depending on the light and angle, often with a pearly or pearlescent sheen. | Soft, ethereal accents, subtle full nail applications. | Offers a softer shimmer than holographic foils. |
Tips for Achieving a Flawless Foil Finish
Even with simple steps, a few expert tips can make the difference between a good foil mani and a truly spectacular one. Here’s how to ensure your metallic accents are on point:
- Use a Quality Adhesive: This is non-negotiable! A good foil glue or transfer polish will make the foil adhere much better and last longer. Some people even find clear nail glue works if applied very thinly and allowed to dry until super tacky.
- Patience with Drying Times: Don’t rush the drying process for your base color or your adhesive. Applying foil to a wet or not-tacky-enough surface will lead to smudges and poor transfer.
- Cleanliness is Key: Always start with clean, oil-free nails. Oils from your fingers can prevent proper adhesion.
- Press Firmly and Evenly: When applying the foil, ensure you press down with consistent pressure over the entire design area. This helps transfer the foil design thoroughly.
- Smooth Removal: Peel the foil backing away slowly and steadily. If you notice a spot didn’t transfer, you can often go back over it with a second application of adhesive.
- Seal with a Good Top Coat: A high-quality top coat will not only add shine but also help prevent the foil from lifting or peeling prematurely. Apply it carefully, ensuring you cap the free edge of your nail.
- Avoid Thick Top Coats Initially: Some very thick top coats can sometimes cause foil to wrinkle or lift. Start with a standard, good-quality top coat. If you find this occurring, try a gel top coat for ultimate sealing power, or a thinner quick-dry formula.
- Practice Small Areas First: If you’re new to foils, try applying them to just a small part of your nail first. This allows you to get a feel for the product before committing to a full nail.
Troubleshooting Common Foil Nail Issues
Even with the best intentions, sometimes things don’t go perfectly! Don’t get discouraged. Here are some common issues with foil accent nails and simple solutions:
- Issue: Foil Not Transferring Properly (Patchy areas)
- Cause: Adhesive wasn’t sticky enough, or foil wasn’t pressed down firmly.
- Solution: Reapply adhesive to the patchy spots, let it dry until fully tacky, then press the foil again, ensuring firm pressure. You can also try a different brand of adhesive.
- Issue: Foil Smudging or Wrinkling During Application or Top Coat
- Cause: Base color or adhesive not fully dry; top coat applied too thickly or too aggressively.
- Solution: Ensure all layers are bone dry before applying foil. When applying top coat, use a light touch and smooth strokes, or try a quick-dry top coat that seals the foil quickly. Allow the foil to ‘set’ for a minute or two after application before touching it.
- Issue: Foil Lifting or Peeling at the Edges Shortly After Application
- Cause: Edges of the nail weren’t sealed properly with the top coat.
- Solution: Ensure your top coat adequately covers and seals the edges (free edge) of your nail where the foil meets the polish. Reapply top coat carefully to any lifting edges if possible.
- Issue: Foil Tears During Removal
- Cause: Foil was too thin, or removal was too rushed.
- Solution: Peel the foil backing away slowly and smoothly. If the foil is particularly delicate, try using a softer tool for pressing instead of a fingernail.
- Issue: Adhesive Shows Through Foil (Dull Spots Instead of Shiny)
- Cause: Adhesive might be too thick, or the wrong type of adhesive was used.
- Solution: Ensure you’re using a thin, even layer of foil adhesive. Some glues, when applied too thickly, can remain cloudy rather than drying clear and tacky. Try a dedicated foil transfer gel or liquid adhesive.
How Long Do Metallic Foil Accent Nails Last?
With proper application and care, your metallic foil accent nails can last as long as a standard manicure, typically between 7 to 14 days. The longevity depends on several factors:
- Quality of Products Used: High-quality nail foil, adhesive, and top coat will generally perform better and last longer.
- Nail Preparation: Thoroughly cleaning and buffing your nails ensures a good base for adhesion.
- Application Technique: Ensuring the foil is fully transferred and edges are well-sealed is crucial.
- Top Coat Coverage: A robust top coat that fully covers and seals the foil and edges is key to preventing chipping and lifting.
- Daily Activities: Your lifestyle plays a role. Frequent use of your hands for harsh tasks (like typing extensively, manual labor, or prolonged exposure to water) can shorten the lifespan of any manicure, including foil accents.
To maximize