Dive into dazzling metallic chrome nail designs! This guide shows beginners how to achieve stunning, mirror-like finishes and offers fresh inspiration for your next manicure. Get ready to transform your nails with these essential tips and vibrant ideas.
Are you ready to add some serious sparkle and sleekness to your fingertips? Metallic chrome nails have taken the beauty world by storm, offering a futuristic and high-shine look that’s surprisingly easy to achieve. If you’ve ever looked at those incredibly reflective nails and thought, “I could never do that,” think again! This guide is designed just for you, our amazing nail lovers, whether you’re just dipping your toes into nail art or already a seasoned pro looking for new inspiration. We’ll break down everything you need to know, from the essential tools to the most breathtaking design ideas, making those dazzling chrome nails totally achievable. Get ready to shine!
Let’s explore the world of metallic chrome nail designs and discover just how fun and simple it can be to rock this trend. We’ll cover the basics, share some super cool design ideas, and make sure you feel confident and prepared to create your own masterpieces. Prepare to be inspired!
What is Metallic Chrome Nail Design?
Metallic chrome nails are a type of nail art that mimics the look of polished metal. They achieve a high-shine, mirror-like finish that reflects light beautifully. This isn’t your typical glitter polish; it’s a smooth, reflective surface that can come in a spectrum of colors, from classic silver and gold to vibrant blues, pinks, and even iridescent shades. The key to the chrome effect is usually a special powder or pigment applied over a specific base layer of polish, creating a seamless, ultra-glossy coating.
This trend is popular because it offers a sophisticated yet edgy look. It’s incredibly versatile, fitting in whether you’re dressing up for a special occasion or adding a touch of glam to your everyday style. Plus, the reflective quality makes your nails stand out and catch everyone’s eye. It’s like wearing jewelry right on your fingertips!
Why Choose Metallic Chrome Nails?
There are so many reasons to fall in love with metallic chrome nails. They offer a unique aesthetic that’s hard to beat. Here are a few highlights:
- Unmatched Shine: Forget subtle gloss. Chrome delivers a full-on, eye-catching mirror finish.
- Versatility: From minimalist single-color chrome to intricate designs, the possibilities are endless.
- Modern & Trendy: Chrome nails are a current and stylish choice that always looks chic.
- Focal Point: They act as a statement accessory, elevating any outfit.
- Durability (with proper application): When done correctly, chrome manicures can last, just like a good gel polish.
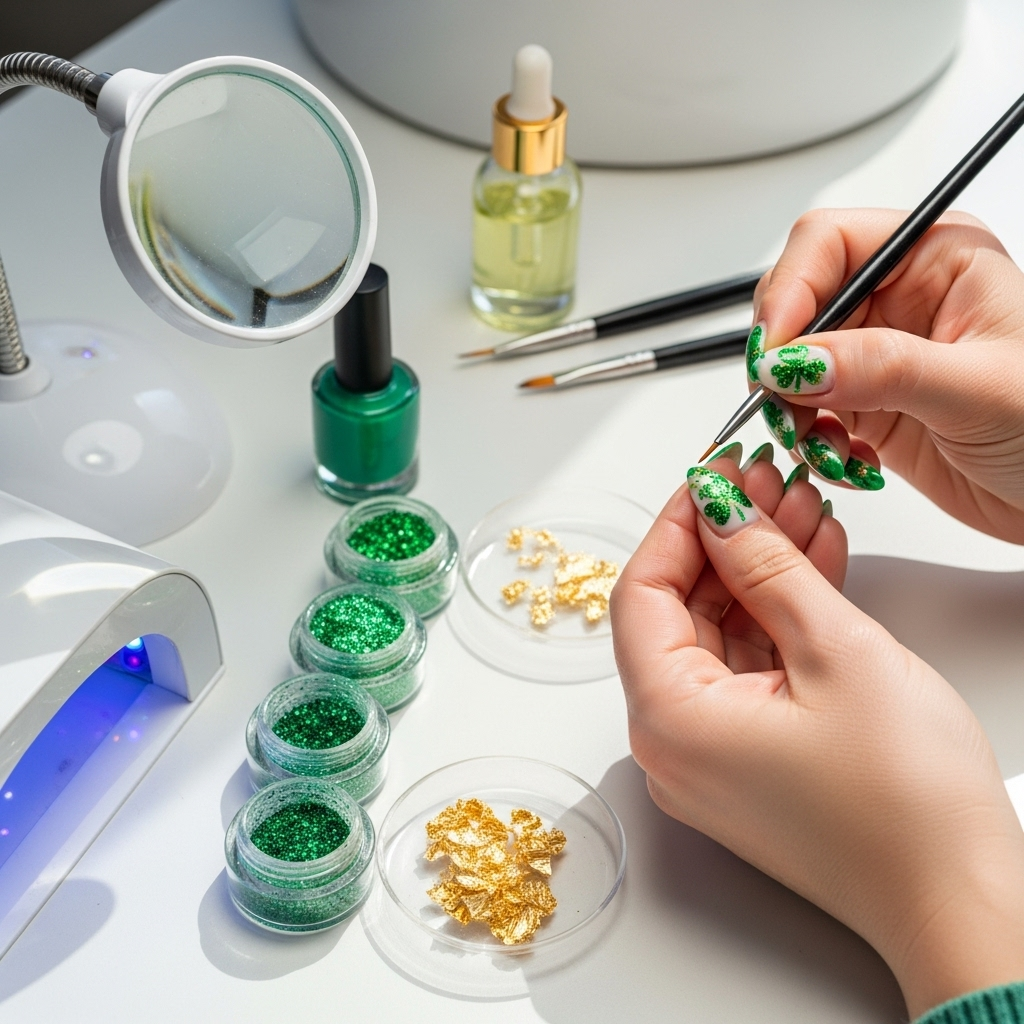
Essential Tools & Products for Your Chrome Manicure
Getting that perfect chrome finish at home is totally doable with the right setup. Don’t worry if you’re new to this; we’ll explain each item simply. You don’t need a professional salon to create salon-worthy nails! Here’s what you should have on hand to achieve stunning metallic chrome nail designs:
1. Base & Top Coats
Every great manicure starts with a solid foundation. For chrome, you’ll need:
- Base Coat: This protects your natural nails and helps your colored polish adhere better.
- No-Wipe Gel Top Coat: This is crucial! A standard top coat with a sticky layer won’t work for chrome powder application. You need a gel top coat that cures tack-free. This allows the chrome powder to adhere perfectly. You can find these specifically labeled for chrome or mirror powder application. Check out reputable brands like OPI, Gelish, or even more budget-friendly options like Beetles Gel Polish, which often have excellent no-wipe top coats.
Tip: Make sure your gel top coat is fully cured under the UV/LED lamp before applying the powder. A slightly tacky, but not sticky, surface is ideal.
2. Colored Gel Polish (for the base color)
While you can apply chrome powder directly over a cured no-wipe top coat for a pure mirror effect, using a colored gel polish as a base underneath the chrome can create stunning variations. Black is a classic and popular choice as it makes the chrome color pop vibrantly. However, you can experiment with any color! Imagine a rose gold chrome over a nude base, or a deep blue chrome over a black base for an otherworldly effect.
Brands to Consider: Essie Gel Couture, CND Shellac, or ASP Gel Polish are reliable choices for a smooth, even color application.
3. Chrome Nail Powder (or Pigment)
This is the star of the show! Chrome powders are finely milled pigments that give your nails their metallic sheen. They come in a vast array of colors:
- Silver/Mirror Chrome: The classic, ultra-reflective choice.
- Gold Chrome: For a luxurious, warm glow.
- Rose Gold Chrome: A popular and elegant option.
- Iridescent/Holographic Chrome: Shifts colors in the light, offering a magical, multi-dimensional effect.
- Colored Chromes: Think vibrant blues, purples, pinks, greens, and blacks.
Where to Buy: Nail supply stores, online beauty retailers like Amazon, or dedicated nail art websites are great places to find these. Look for powders with good reviews to ensure a smooth application and intense shine.
Application Tools: Most chrome powders come with a small applicator sponge. You can also use a silicone nail art brush or even your fingertip (wear gloves if you prefer!).
Pro Tip: For the most intense shine, some users find that a finer grain powder works best. Experiment to see what you prefer!
4. UV/LED Nail Lamp
This is non-negotiable for gel polishes and curing the no-wipe top coat properly. These lamps use UV or LED light to harden gel products, making them durable and long-lasting. They are relatively inexpensive and widely available online.
Key Features: Look for a lamp with multiple wattage settings (e.g., 36W or 48W) for faster curing and a timer function for accuracy. Brands like SUNUV or Melody Susie are popular and effective.
5. Essential Nail Tools
While not specific to chrome, standard manicure tools are essential:
- Nail file and buffer
- Cuticle pusher or orangewood stick
- Alcohol wipes or lint-free wipes (for cleaning the nail surface)
- Isopropan_ol alcohol (to remove any residual tackiness after powder application, if needed)
These items ensure your nails are prepped and clean for the best application and longest wear.
Step-by-Step Guide: How to Apply Metallic Chrome Nails
Ready to get that stunning chrome look? Follow these simple steps, and you’ll be shining in no time! This process is straightforward and perfect for beginners.
Preparation is Key:
- Shape and Buff: Start by shaping your nails to your desired length and form using a nail file. Gently buff your nail surface to remove any natural shine. This helps with adhesion.
- Cleanse: Wipe your nails with an alcohol wipe or lint-free wipe to remove dust and oils.
- Apply Base Coat: Apply a thin layer of your gel base coat and cure it under your UV/LED lamp according to the lamp’s instructions (usually 30-60 seconds).
Applying the Color (Optional but Recommended):
- Apply Colored Gel Polish: Apply a thin, even layer of your chosen colored gel polish (e.g., black). Cure under the lamp. For a more opaque color, apply a second coat and cure again.
The Chrome Magic:
- Apply No-Wipe Gel Top Coat: Apply a thin, even layer of your no-wipe gel top coat. This is the critical layer for the chrome powder. Cure this layer under the lamp for the recommended time (usually 60 seconds). Do NOT wipe off any sticky residue, as there shouldn’t be any! The surface should be smooth and shiny.
- Apply Chrome Powder: Dip your applicator tool (sponge, silicone brush, or fingertip) into the chrome powder. Gently rub the powder onto the cured no-wipe top coat. Use small, circular motions to ensure even coverage. You’ll see the chrome effect appear as you rub. Focus on getting full coverage over the entire nail surface.
- Buff and Blend: Continue rubbing until the entire nail has auniform, metallic sheen. If you notice any patches, gently tap or rub more powder into them.
- Clean Up Edges: Use a small brush or orangewood stick to carefully clean any powder from the cuticle area or sidewalls for a neat finish.
Sealing the Deal:
- Apply Second No-Wipe Top Coat: Apply another thin layer of the no-wipe gel top coat over the powdered surface. This seals in the chrome pigment and provides extra shine and protection. Make sure to cap the free edge of your nail to prevent chipping. Cure under the lamp for the recommended time.
- Final Cleanse (Optional): Some people like to wipe their nails with an alcohol wipe at this stage to ensure no residual powder is left behind, though this is usually unnecessary if you used a good no-wipe top coat.
And there you have it! Beautiful, reflective metallic chrome nails. This method also works for applying regular gel polish and sealing it with a top coat, so you’re learning a versatile skill!
Metallic Chrome Nail Design Inspiration: Stunning Essentials
Now that you know how to apply the chrome finish, let’s talk about how to make it truly shine with stunning designs! Chrome is incredibly versatile and can be the star of the show or a dazzling accent. Here are some essential ideas to get your creative juices flowing:
1. The Classic Mirror Finish
Sometimes, simple is best. A full-coverage, flawless mirror finish on all nails is incredibly chic and modern. Silver chrome is the quintessential choice, offering that ultra-reflective, almost liquid-metal look. Gold chrome provides warmth and luxury, while rose gold adds a touch of romantic elegance. This look requires precise application but pays off with a sophisticated statement.
Why it’s an essential: It’s the foundation of chrome nails. Mastering the full mirror finish is key to more intricate designs.
2. Chrome French Tips
Give the classic French manicure a futuristic twist! Instead of white tips, opt for a shimmering chrome color. You can use silver chrome for a sharp, modern look, or a colored chrome like iridescent blue for a playful vibe. This is a fantastic way to introduce chrome into your routine if you prefer a more understated nail style.
How to achieve: Apply your base color (or clear polish), then use a fine brush or stencil to carefully paint the chrome tip over a cured no-wipe top coat. Seal with another top coat.
3. Ombre Chrome
This technique blends two or more colors seamlessly, with a metallic chrome finish. Imagine a gradient from a deep black base fading into a shimmering silver, or a soft pink blending into rose gold. Ombre chrome is mesmerizing and adds depth and dimension to your nails.
How to achieve: Apply your base colors as desired, then carefully apply the chrome powder, focusing on blending the colors where they meet. Or, apply chrome powder over a gradient of gel polish.
4. Chrome Accents
Not ready for full chrome nails? Use chrome as an accent! This can be a single chrome stripe down the center of a matte or glossy nail, a geometric chrome outline, or a shimmer detail on just one or two nails. It’s a subtle yet impactful way to incorporate the trend.
Design ideas: A thin chrome line on a nude nail, a chrome half-moon at the cuticle, or chrome geometric shapes on a contrasting color. Stamping plates designed for chrome can also be a great tool here.
5. Chrome Paired with Matte Finish
The contrast between a high-shine chrome and a velvety matte finish is incredibly striking. You can have full chrome nails with matte top coat applied strategically, or alternate between chrome accent nails and matte base color nails. This creates a sophisticated, textured look.
Tip: Ensure your matte top coat is also a no-wipe formula if you plan to apply chrome over it. Otherwise, apply chrome first, seal it, then add a matte top coat to the desired areas.
6. Iridescent & Holographic Chrome
Step into another dimension with iridescent or holographic chrome powders. These powders shift through a spectrum of colors depending on the light and angle, creating a magical, almost ethereal effect. They can be used as a full-coverage finish or as accents.
Why they’re stunning: The color-changing properties make these nails endlessly fascinating and eye-catching. They are perfect for festivals, parties, or whenever you want to feel otherworldly.
7. Chrome Animal Print
Get wild with chrome! Think leopard spots in silver chrome on a black base, or zebra stripes in gold chrome. You can also create chrome textures that mimic snakeskin or other animal prints. This is a bold choice that’s sure to turn heads.
Tip: Use fine detail brushes to paint the animal print pattern with gel polish, cure it, then apply chrome powder over the design for a truly unique effect. Or, stamp the design with chrome polish.
8. Chrome Geometric Designs
Sharp lines and geometric shapes look incredible with a metallic chrome finish. Use tape or stencils to create clean lines, squares, triangles, or even more intricate patterns in chrome. This creates a modern, architectural look.
How to achieve: Apply your base color, cure. Apply no-wipe top coat, cure. Use striping tape or stencils to create your design, then carefully apply chrome powder to the taped areas. Remove tape and seal.
9. Chrome Glow-in-the-Dark Accents
For a surprise element, consider combining chrome with glow-in-the-dark polish. You can create designs where parts of the nail are chrome, and other parts are glow-in-the-dark, or apply chrome over a glow-in-the-dark base for a subtle shimmer that becomes magical when the lights go out.
Where to find products: Look for gel polish brands that offer glow-in-the-dark formulas. Experiment with applying chrome over them.
10. Mixed Media Chrome
Don’t be afraid to combine chrome with other nail art elements! Think chrome accents on top of intricate hand-painted designs, chrome paired with rhinestones, or chrome French tips with a delicate floral design. The key is balance to ensure the chrome remains a feature without overwhelming the design.
Consider this: A simple chrome finish on one nail, with intricate pastel art on the others. Or, chrome swirls over a solid color base.
Tips for Long-Lasting Chrome Nails
Achieving that stunning chrome finish is one thing, but making sure it lasts is another! Here are some pro tips to ensure your metallic masterpiece stays pristine:
- Proper Nail Prep: Always ensure your nails are clean, dry, and free of oils or old polish. Buffing the nail surface creates a better canvas.
- Use the Right Products: A good quality no-wipe gel top coat is essential. Cheap or old top coats might not cure properly, leading to patchiness or the chrome not adhering.
- Thin Layers are Key: Apply gel polish, base coat, and top coat in thin, even layers. Thick layers can wrinkle or not cure properly, affecting the final look and longevity.
- Cure Properly: Ensure you cure each layer for the full recommended time under a good quality UV/LED lamp. Under-curing is a common reason for lifting or peeling.
- Seal Those Edges: When applying your final top coat, make sure to “cap” the free edge of your nail. This means running the brush along the very tip of your nail to seal the polish and prevent chipping.
- Be Gentle: Avoid using your nails as tools. Don’t scrape, pry, or pick at things with your fingernails, as this can damage the polish and the chrome layer.
- Wear Gloves: When doing household chores, especially involving water or harsh chemicals, wear gloves to protect your manicure.
- Moisturize: Keep your cuticles and surrounding skin moisturized with cuticle oil. Healthy skin around the nails contributes to the overall health and appearance of your manicure.
By following these simple tips, you can extend the life of your beautiful chrome nails and enjoy their dazzling shine for longer!
Troubleshooting Common Chrome Nail Issues
Even with the best intentions, sometimes things don’t go perfectly. Don’t get discouraged! Here are some common issues and how to fix them:
Issue: Patchy or Uneven Chrome Application
- Cause: Not enough powder, uneven application, or the no-wipe top coat wasn’t fully cured or wasn’t truly “no-wipe.”
- Solution: Ensure you use enough powder and rub it in with consistent pressure. If it’s still patchy, you might need to apply another thin layer of no-wipe top coat (cure it!) and reapply the powder. Double-check your top coat is specifically for chrome.
Issue: Chrome Powder Not Sticking
- Cause: The no-wipe top coat was wiped clean after curing, or it’s an old/inferior product that isn’t tack-free.
- Solution: Resist the urge to wipe! The surface should be shiny but not sticky. If you accidentally wiped it, reapply the no-wipe top coat and cure it again before applying powder.
Issue: Chrome Looks Dull or Chalky
This is often due to a few things:
- Cause: Using too much powder, rubbing too hard after the surface is fully covered, or not applying a clear top coat to seal it in with sufficient shine.
- Solution: Apply just enough powder to get the shine. Once the whole nail is covered and reflective, stop rubbing. Ensure your final top coat is applied thinly and cures properly to lock in the high gloss.
Issue: Chrome Lifting or Peeling at the Edges
- Cause: Not capping the free edge with the top coat, or the base gel layers weren’t cured properly.
- Solution: Always cap the free edge with every gel layer (base, color, and top coats). Ensure thorough curing of all gel layers.
Issue: Difficulty Applying Powder Around Cuticles
- Cause: The powder can stick to the gel top coat on the cuticle skin, making it hard to get a clean line.
- Solution: Use a small, stiff brush (like a detail brush or an old eyeshadow brush) or an orangewood stick to carefully push the powder away from the cuticle area before sealing with the final top coat. A clean-up brush dipped in alcohol can also help refine the edges.
Don’t worry if your first few attempts aren’t perfect. Practice makes perfect! Each manicure is a learning opportunity.
Table: Chrome Powder Color Trends & Inspiration
To help you choose your next dazzling shade, here’s a quick guide to popular chrome powder colors and some design ideas for each:
| Chrome Color | Vibe/Style | Best For | Design Inspiration |
|---|---|---|---|
| Classic Silver/Mirror | Futuristic, Sleek, Ultra-Modern | Full coverage, French tips, Geometric designs | Mirror finish on all nails; silver French tips on a nude base; silver chrome stripes on a matte black nail. |
| Gold Chrome | Luxurious, Glamorous, Warm | Accents, Full coverage, Edges/Borders | Full gold chrome nails; gold chrome half-moon at the cuticle; gold chrome outline over a deep red or emerald green. |
| Rose Gold Chrome | Elegant, Romantic, Trendy | Full coverage, Ombre, Delicate accents | Full rose gold nails; rose gold to pink ombre; subtle rose gold glitter accents. |
| Iridescent/Holographic | Magical, Ethereal, Playful | Full coverage, Base for other art, Shifting effects | Shifting rainbow chrome on all nails; iridescent chrome on accent nails; holographic chrome French tips. |
| Colored Chromes (Blue, Purple, Pink) | Bold, Unique, Expressive | Full coverage, Color-blocking, Themed nails | Deep blue chrome for a starry night effect; vibrant pink chrome for a bold statement; purple chrome for a royal look. |
| Black Chrome | Edgy, Mysterious, Sophisticated | Full coverage, Subtle shine, Dark aesthetics | A deep, glossy black mirror finish; black chrome over a galaxy-print nail; black chrome with subtle texture. |
External Link: Understanding Nail Polish Ingredients
To ensure you’re using safe and high-quality products, it’s beneficial to understand what goes into your nail care routine. The U.S. Food & Drug Administration (FDA) provides valuable information on cosmetic ingredients, including those found in nail polishes. Understanding these ingredients can help you make informed choices for your beauty purchases and ensure your nail health.
Frequently Asked Questions (FAQ)
Here are some common questions beginners have about metallic chrome nails:
1. Do I really need a UV/LED lamp for chrome nails?
Yes, absolutely! Chrome powder is applied over a gel polish system, and gel polishes need to be cured under a UV or LED lamp to harden. You can’t achieve the proper chrome effect with regular nail polish unless you’re using pre-made chrome effect stickers, which are a different product.
2. Can I use regular nail polish with chrome powder?
No, standard air-drying nail polish will not work with chrome powder. The chrome pigment adheres to the sticky layer of uncured gel polish, specifically a no-wipe gel top coat. Regular polish dries too quickly and doesn’t have the right surface for the powder to adhere to.
3. How do I remove my metallic chrome nails?
You remove them just like regular gel polish. Soak a cotton ball with acetone-based nail polish remover, place it on your nail, and wrap it with foil. Let it sit for about 10-15 minutes, then gently scrape off the softened gel with an orangewood stick or cuticle pusher. Be patient, as forcing it off can damage your natural nails.
4. Can I put regular top coat over the chrome powder?
It’s highly recommended to use a no-wipe gel top coat to seal the chrome powder. Regular top coats typically have a sticky inhibition layer after curing, which can smudge or ruin the smooth chrome finish. A no-wipe gel top coat ensures a clean, mirror-like shine.
5. How long do metallic chrome nails typically last?
With proper application and care, metallic chrome gel nails can last anywhere from 2 to 3 weeks, similar to other gel manicures. Longevity depends on your nail care routine, how well the nails were prepped and sealed, and your daily activities.
6. Are chrome nail powders safe for my natural nails?
When applied and removed correctly, chrome nail powders themselves are generally safe. The main concern is the use of gel polish and the filing of the nail surface during prep. Always ensure you’re using quality products and follow proper removal procedures to avoid damaging your natural nails.
Conclusion
Metallic chrome nail designs are an incredible way to express your personal style and add a touch of futuristic glamour to your look. Whether you’re drawn to the ultimate mirror-shine finish, the subtle elegance of chrome French tips, or the mesmerizing play of colors in an ombre effect, there’s a chrome design for everyone. We’ve walked through the essential tools, a step-by-step application guide perfect for beginners, and a wealth of inspiration to spark your creativity. Remember, practice is key, and don’t be afraid to experiment with different colors and designs.
By following the tips for preparation, application, and aftercare, you can achieve stunning, long-lasting chrome manicures right at home. You’ve got this! So go ahead, grab your gel polish, that shimmering chrome powder, and your UV/LED lamp. It’s time to let your nails shine brighter than ever and embrace this dazzling trend with confidence. Happy polishing!