Mental Health Nail Designs: Stunning, Essential Guides to Expressing Yourself and Finding Support Through Art.
Dive into the vibrant world of mental health nail designs! These creative manicures aren’t just beautiful; they’re powerful tools for self-expression and raising awareness. Learn how to create stunning looks and understand the supportive community behind this trend. Let’s get started on your colorful journey to self-care!
What Are Mental Health Nail Designs?
Mental health nail designs are more than just pretty polish; they’re a form of wearable art that brings attention to mental well-being. These designs often incorporate symbols, colors, or messages that represent support, awareness, and personal journeys related to mental health. Think calming colors like blues and greens, uplifting patterns, or even small, delicate symbols like a semicolon or a ribbon. They’re a beautiful way to express solidarity, start conversations, and feel more connected to a supportive community.
Why Are Mental Health Nail Designs Becoming So Popular?
In recent years, there’s been a growing conversation around mental health, breaking down the stigma and encouraging open discussion. As our society becomes more accepting of talking about mental well-being, people are looking for new ways to express themselves and show their support. Nail art is a personal and creative outlet that’s highly visible. By adorning their nails with designs that symbolize mental health awareness, individuals can subtly share their experiences, connect with others who understand, and even prompt curious questions that can lead to meaningful conversations. It’s a way to wear your heart on your fingertips and advocate for a cause that touches so many lives.
The Power of Color and Symbolism in Nail Art for Mental Health
Color psychology plays a huge role in how we feel, and this is powerfully utilized in mental health nail designs. Certain colors are associated with specific emotions and mental states, making them ideal for conveying messages without words. Similarly, various symbols have long been recognized as representing hope, resilience, and support. Incorporating these elements into nail art allows for a deeply personal and nuanced form of expression.
Color Meanings in Mental Health Nail Designs:
- Blue: Often associated with calmness, serenity, and stability. It can represent peace and a sense of clarity.
- Green: Symbolizes growth, renewal, hope, and balance. It’s a color of healing and nature.
- Yellow: Evokes happiness, optimism, and cheerfulness. It can represent sunshine and overcoming darkness.
- Purple: Frequently linked to creativity, spirituality, and self-respect. It can symbolize inner strength.
- Pink: Represents compassion, love, and nurturing. It can signify self-love and kindness.
- Orange: Associated with enthusiasm, warmth, and encouragement. It can be a sign of motivation and vibrancy.
Common Symbols and Their Meanings:
- Semicolon (;): Represents a sentence that could have ended but didn’t – a metaphor for continuing life and overcoming struggles. It’s a powerful symbol of hope and resilience.
- Ribbons: Different colored ribbons represent various mental health causes, such as teal for generalized anxiety disorder and periwinkle for epilepsy or ADHD awareness.
- Butterflies: Symbolize transformation, metamorphosis, and hope, reflecting the journey of healing and finding beauty after hardship.
- Hearts: Universally represent love, self-care, and compassion.
- Anatomical Heart: Can represent acknowledging and embracing the full spectrum of emotions, both the physical and emotional aspects of well-being.
- Sun/Sunflowers: Signify hope, positivity, and the ability to “turn towards the light” even in difficult times.
- Infinity Symbol (∞): Represents endless possibilities, hope, and resilience.
Stunning Mental Health Nail Designs for Beginners: Easy & Expressive Ideas
You don’t need to be a pro to create meaningful and beautiful mental health nail designs. Many designs are simple and effective, using basic techniques and thoughtful color choices. Here are some ideas perfect for beginners to get started, focusing on accessibility and impact.
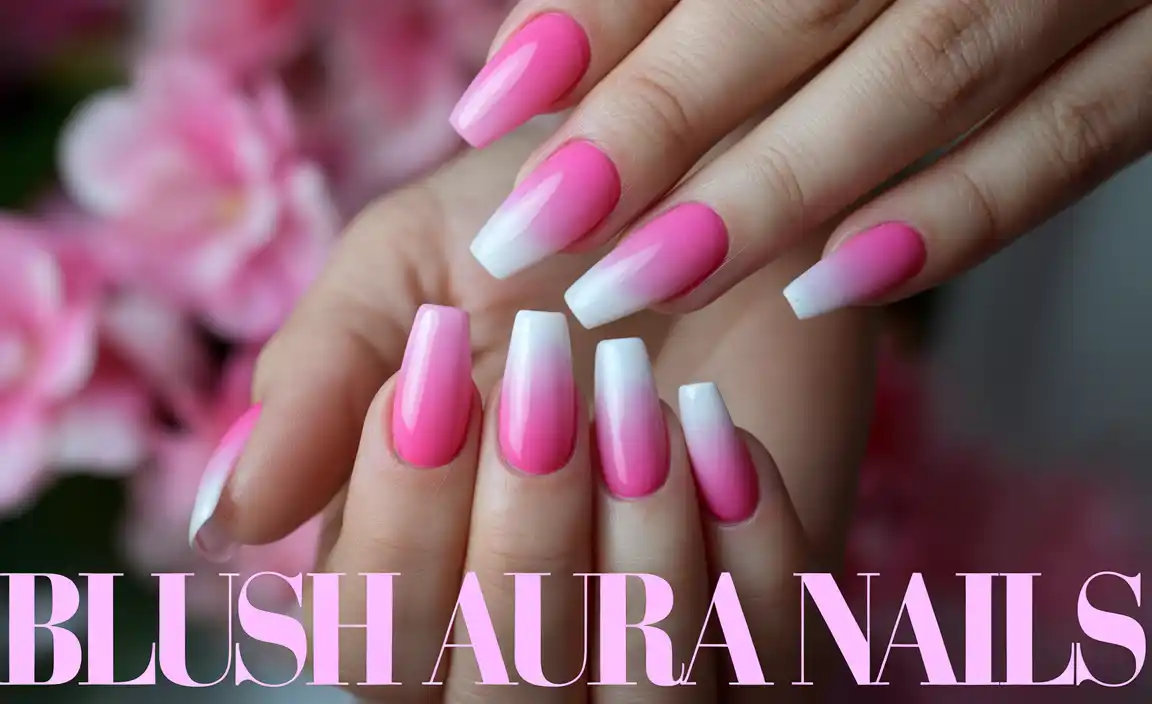
1. The Calming Ombré
Ombré nails, where colors blend seamlessly into one another, are surprisingly easy to achieve and look incredibly chic. For a calming effect, blend shades of blue and green, or soft pastels like lavender and pink.
How to do it:
- Start with a base coat and let it dry.
- Paint your nails with your lightest shade.
- While the polish is still wet, dab a slightly darker shade onto a makeup sponge or a dedicated nail art sponge.
- Gently press the sponge onto your nail, rolling it slightly to blend the colors. You might need a few passes to build the gradient.
- Carefully clean up any polish that got on your skin with a brush dipped in nail polish remover.
- Apply a top coat to seal the design and add shine.
2. The Simple Semicolon Statement
The semicolon is a potent symbol of mental health awareness. A single, well-placed semicolon can make a powerful artistic statement.
How to do it:
- Paint all your nails with a solid color. Neutrals like nude, white, or a soft pastel work wonderfully.
- Once dry, use a striping brush or a fine-tipped nail art pen to carefully paint a small semicolon on one or two accent nails.
- Alternatively, you can use tiny nail art stickers or rhinestones to create the shape.
- Finish with a clear top coat.
3. The Hopeful Butterfly Accent
Butterflies symbolize transformation and are a beautiful emblem of overcoming challenges. A simple butterfly on an accent nail adds a touch of hope to any manicure.
How to do it:
- Apply your chosen base color to all nails.
- On an accent nail, use a fine brush or striper to paint a basic butterfly shape. You can do this by creating two dots for the upper wings and two slightly larger dots for the lower wings, then connecting them with a body line.
- Alternatively, use butterfly nail art stickers for a quick and easy option.
- Add a touch of glitter or a pop of contrasting color to the wings if you feel adventurous!
- Seal with a top coat.
4. The “You Are Enough” Typography
Positive affirmations can be a powerful tool for mental well-being. Simple typography on nails delivers a gentle reminder.
How to do it:
- Choose a simple polish color as your base.
- Using a very fine brush or a nail art pen, write a short, encouraging phrase like “You Are Enough” or “Breathe” on one or two nails.
- Keep the lettering clean and straightforward.
- A clear top coat will make your message last.
5. The “Mental Health Matters” Ribbon
Representing a cause with a ribbon is a classic way to show support. A simple ribbon design is easy to replicate.
How to do it:
- Paint your nails in your desired base color.
- On an accent nail, paint a simple loop shape with a thin tail, resembling a ribbon.
- You can use different colors for the ribbon depending on what cause you wish to highlight. For example, teal is often used for anxiety awareness.
- Ensure your lines are clean and defined.
- Apply a durable top coat.
Intermediate Mental Health Nail Designs: Stepping Up Your Artistry
Ready to move beyond the basics? These intermediate designs incorporate slightly more detailed techniques and creative combinations, allowing for richer expression. They still remain achievable for dedicated beginners.
1. The Supportive Color Block
Color blocking is a stylish way to combine different hues. For mental health designs, choose complementary colors that evoke specific emotions or represent different aspects of well-being. Think a calming blue paired with a hopeful yellow, or a grounding green with a soft pink.
How to do it:
- Apply a base coat and let it dry completely.
- Decide on your color blocks. You can divide a nail horizontally, vertically, or diagonally.
- Use nail tape or a steady hand with a fine brush to create crisp lines between your colors.
- Paint one section with your first color and let it dry.
- Carefully apply the second color to the adjacent section, ensuring you paint up to the tape or line.
- Remove the tape while the polish is still slightly wet to prevent peeling.
- Repeat for any additional colors.
- Finish with a top coat.
2. The Sunrise/Sunset Gradient
Representing the dawn of hope or the peaceful end of a day, a sunrise or sunset gradient is both beautiful and symbolic. These often involve blending warmer tones like orange, yellow, and pink.
How to do it:
- Apply a dark base (like a deep blue or black) if you want the colors to pop more, or a white base for softer hues.
- Using a makeup sponge, dab on shades of yellow, orange, and pink, blending them together as you press onto the nail. Work quickly before the polish dries.
- You can add a touch of purple or red for depth.
- Layer colors to build intensity.
- Clean up edges and seal with a top coat.
3. The Minimalist Mountain Range
Mountains can symbolize overcoming challenges and reaching new heights. A minimalist interpretation with simple peaks is elegant and meaningful.
How to do it:
- Apply a sky-blue or soft gray base coat.
- Using a fine brush and a darker shade of blue or gray, paint a few simple mountain peak shapes. Keep the lines clean and sharp.
- You can add a tiny yellow dot for a sun or moon.
- Let dry and apply a top coat.
4. The Anatomical Heart Outline
An anatomical heart design can represent embracing all emotions, acknowledging the physical and emotional aspects of mental health. An outline is a sophisticated and delicate approach.
How to do it:
- Paint your nails in a solid color – perhaps a deep red, a soft pink, or even black for a dramatic look.
- With a very fine brush and a contrasting color (like white, gold, or red), carefully draw the outline of an anatomical heart. Break it down into segments: the top curves, the bottom point, and the internal chambers if you’re feeling ambitious.
- Focus on clean lines; perfection isn’t necessary, but intention is.
- Seal with a durable top coat.
5. The “Kindness” Word Art
Similar to “You Are Enough,” this design uses typography but can be more elaborate, perhaps incorporating script fonts or different colors for each letter.
How to do it:
- Apply a base polish.
- Using nail art pens or fine brushes, write out the word “Kindness,” “Hope,” or even a short quote related to mental well-being.
- Experiment with different fonts or letter styles. You can vary the thickness of the lines or use multiple colors.
- Consider adding small decorative elements around the text, like tiny dots or subtle swirls.
- Once dry, secure with a top coat.
Advanced Mental Health Nail Designs: Showcasing Your Skills
For those who love to dive deep into nail art, these advanced designs offer more complexity and artistic freedom. They might involve more intricate details, layering, or the use of specialty products.
1. The Abstract Emotional Landscape
This design is all about capturing a feeling or a mental state through abstract art. It’s less about specific symbols and more about the interplay of colors, textures, and lines to evoke an emotional response.
How to do it:
- Start with a base coat.
- Use fluid brushstrokes with various colors. Think about how you want to express a feeling: swirling blues and grays for sadness, bright yellows and oranges for joy, or a mix of calming and vibrant tones for complexity.
- You can use different tools: marbling techniques, splatter paint, or even applying polish directly from the brush with varied pressure.
- Incorporate metallic accents, glitter, or even matte finishes for added dimension.
- There’s no “right” or “wrong” here – it’s about personal expression.
- Seal with a durable top coat.
2. The “You Matter” Stamped Design
Stamping allows for intricate repeating patterns or precise text that can be hard to achieve freehand. You can find stamping plates with positive affirmations or mental health symbols.
How to do it:
- Apply a base coat and a solid color polish.
- Apply stamping polish onto your chosen design on the stamping plate.
- Scrape off the excess polish with a scraper card.
- Quickly pick up the design with a stamper.
- Press the stamper firmly onto your nail.
- Repeat on other nails or use different designs on each.
- Clean up the stamper and plate for your next use.
- Seal with a top coat.
3. The Empowering Sunflower Bloom
Sunflowers are symbols of growth, positivity, and resilience. Painting a detailed sunflower can be a rewarding advanced project.
How to do it:
- Start with a base of sky blue or a warm yellow.
- Using brown and black, create the textured center of the sunflower.
- With yellow and orange, paint the petals. Start with larger strokes for the base of the petal and add finer lines for texture and depth. Layering and shading are key here.
- You can add subtle green leaves and stems.
- For extra detail, use a fine brush to add highlights or tiny dark lines to mimic shadows and dimension.
- Finish with a glossy top coat.
4. The Intertwined Ribbons of Hope
Instead of a simple ribbon, try creating an illusion of multiple, intertwined ribbons of different colors, perhaps forming a symbolic knot or pattern.
How to do it:
- Choose 3-4 complementary colors, each representing a different aspect of mental health or a specific cause.
- On an accent nail, begin painting one ribbon shape.
- Allow it to dry partially, then carefully layer the next ribbon, making it appear to weave over and under the first. This requires precision and understanding how the light would hit the shapes.
- Use shading to give the ribbons a 3D effect and make them appear to overlap realistically.
- This technique may require multiple layers and careful attention to detail.
- Seal with a generous top coat for a smooth finish.
5. The Gentle Aura Effect
The aura nail trend involves creating a soft, blended halo of color around a central point on the nail, often with a subtle glitter or shimmer effect. This can symbolize inner light or a protective energy.
How to do it:
- Apply a base color, often a neutral or dark shade.
- Choose your aura colors. Using a fine brush or a specialized aura sponge, gently dab and blend colors outward from an imaginary center point on your nail.
- You can add a sheer layer of glitter polish over the top for an ethereal glow.
- Clean up any stray marks and apply a smooth, glossy top coat.
Essential Tools and Products for Mental Health Nail Designs
To bring these stunning mental health nail designs to life, having the right tools makes a world of difference! You don’t need a professional salon’s worth of equipment; a few key items will have you creating beautiful art in no time. Let’s get your nail art kit ready!
Must-Have Tools:
- Nail Polish Remover: For cleaning up mistakes and prepping nails. Acetone-based removers are generally more effective.
- Cotton Pads/Balls: For applying remover.
- Base Coat: Protects your natural nails and helps polish adhere better.
- Top Coat: Seals your design, adds shine, and increases longevity. A good quick-dry top coat is a lifesaver!
- Fine-Tipped Brushes: A set of detailing brushes in various sizes (00, 0, 000) is crucial for intricate lines, dots, and small designs.
- Striper Brush: A long, thin brush perfect for drawing straight lines and curves.
- Dotting Tools: These have small metal balls on the end of handles, perfect for creating dots of various sizes, flowers, or simple patterns.
- Nail Art Pens: Pre-filled with polish and equipped with fine tips, these are great for beginners who want to draw lines, dots, and simple shapes.
- Makeup Sponges: Ideal for creating ombré and gradient effects. A regular kitchen sponge cut into small pieces works too!
- Nail Files and Buffers: To shape and smooth your nails before you start painting.
- Cuticle Pusher/Orange Stick: For grooming your cuticles and cleaning up edges.
- Isopropyl Alcohol (70% or 90%): Can be used as a final nail

