Jelly nail designs offer a playful, translucent shimmer perfect for a fun, trendy manicure. They’re achievable at home with the right techniques and a few key supplies, giving you salon-worthy nails with customizable color and visual appeal.
Ever scroll through your feed and see those dreamy, see-through nails that look like colorful gemstones? Those are jelly nails, and they’re not as complicated to achieve as you might think!
Many of us love the idea of a unique manicure, but the thought of intricate designs or special techniques can feel daunting. You might worry about needing expensive tools or spending hours trying to replicate a look you saw online. The good news is that jelly nail designs are surprisingly beginner-friendly and incredibly fun to experiment with.
Whether you’re aiming for a subtle candy tint or a bold, vibrant statement, this guide will walk you through everything you need to know. Get ready to discover how to create stunning jelly nails right at your fingertips!
What Exactly Are Jelly Nails?
Jelly nails, also known as “jelly manicures” or “jelly polish nails,” are a nail trend characterized by their translucent, vibrant colors. Unlike traditional opaque polishes, jelly polishes have a sheer finish that allows light to pass through, giving them a beautiful, glass-like or candy-like appearance.
This effect is achieved by using a sheer gel polish or a specially formulated jelly polish. When applied in thin layers, these polishes create a luminous depth and a soft, glowing color that’s incredibly eye-catching. They can be worn alone for a minimalist lick of color or used as a base for more elaborate nail art.
The popularity of jelly nails has surged due to their versatility. They’re perfect for summer, offering a playful and lighthearted vibe, but their unique aesthetic makes them a year-round favorite for those who love to stand out. Plus, the translucent quality means they can beautifully complement a variety of skin tones.
Why Are Jelly Nails So Popular?
The allure of jelly nails lies in their unique visual appeal and the creative possibilities they unlock. Here’s why they’ve captured the hearts of so many nail art enthusiasts:
- The Luminous Effect: The sheer, translucent finish creates a beautiful glow that traditional polishes can’t replicate. It’s like wearing tiny stained-glass windows on your fingertips!
- Versatile Color Options: From delicate pastels to bold, saturated hues, jelly polishes come in a rainbow of colors, allowing for endless customization to match any outfit or mood.
- Nail Art Foundation: Jelly polishes are fantastic for layering. They can be used to create ombré effects, marbled patterns, or as a colored base for intricate designs.
- Chic and Playful: They strike a perfect balance between sophisticated and fun. Whether you opt for a single color or a multi-colored design, jelly nails always make a statement.
- Beginner-Friendly: While they look complex, the application of jelly polish is straightforward, making them an accessible trend for DIY manicures.
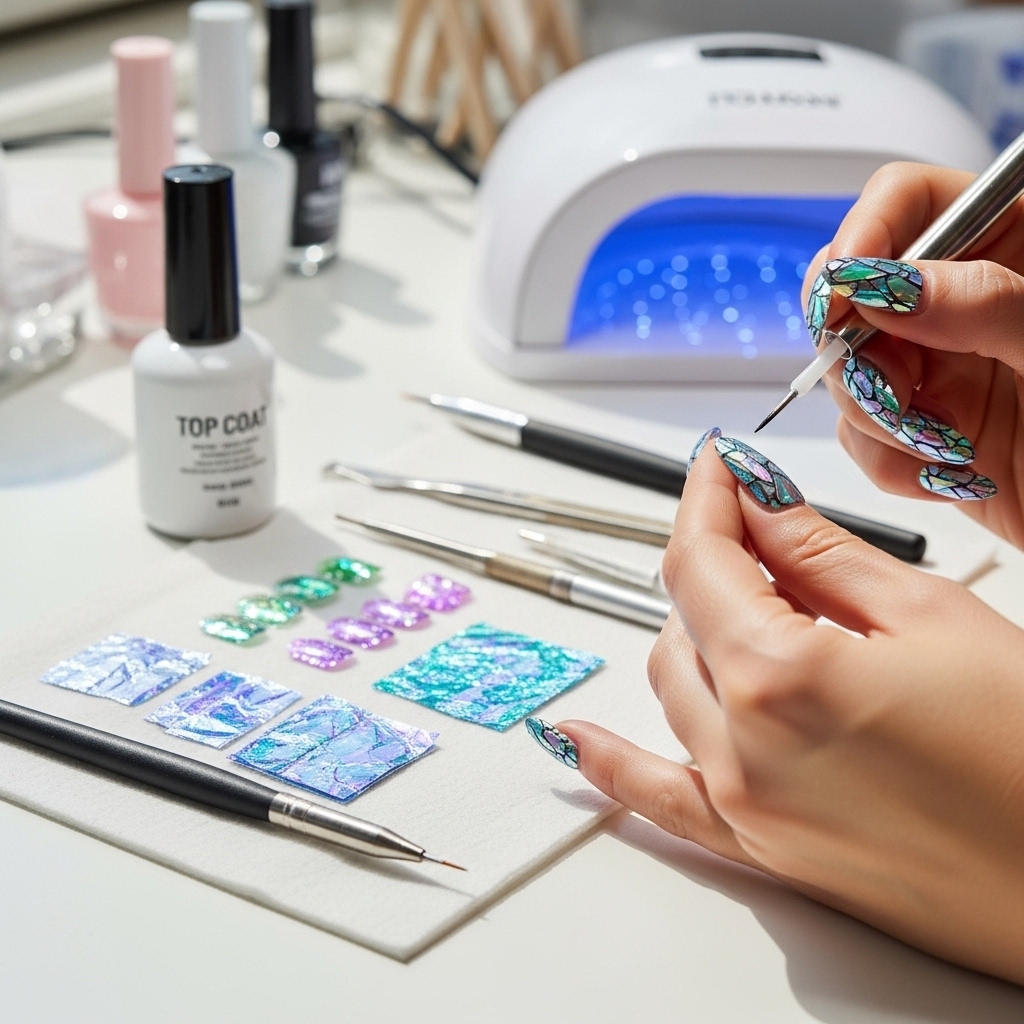
Essential Supplies for Jelly Nail Designs
Getting started with jelly nails at home is easier than you think! You don’t need a ton of specialized equipment, but a few key items will make the process smooth and ensure stunning results. Here’s your must-have list:
The Core Components:
- Jelly Gel Polishes: These are specially formulated sheer polishes that provide the signature translucent color. They come in both UV/LED gel formulations and traditional lacquer. Gel polishes offer better longevity and shine. Explore brands like Unpolish for a wide range of vibrant shades.
- Base Coat: As with any gel manicure, a good quality base coat is crucial for nail protection and polish adhesion.
- Top Coat: A glossy top coat will seal your design, add extra shine, and protect your manicure from chipping. A no-wipe top coat is often preferred to avoid dulling the jelly effect.
- UV/LED Nail Lamp: If you’re using gel polishes, this is non-negotiable. It cures (dries and hardens) the gel layers. These lamps are readily available and relatively inexpensive for home use.
Application Tools:
- Nail File and Buffer: To shape your nails and create a smooth surface for polish application.
- Cuticle Pusher: To gently push back your cuticles for a clean canvas.
- Lint-Free Wipes: For cleaning the nail surface and removing excess product.
- Alcohol or Cleanser: To dehydrate the nail plate before applying the base coat.
- Optional: Top Coat Polish Clear: Sometimes, you’ll want a clear polish to mix with your jelly color, dilute it, or create specific effects.
Step-by-Step Guide to Creating Jelly Nails
Ready to dive in? Creating your own jelly nails is a rewarding process. Follow these easy steps for a flawless, vibrant manicure!
Preparation is Key:
- Cleanse Your Nails: Start by pushing back your cuticles gently with a cuticle pusher.
- Shape Your Nails: Use a nail file to shape your nails to your desired length and form.
- Buff the Surface: Lightly buff the surface of your nails with a nail buffer. This helps the base coat adhere better. Don’t over-buff; just a light sweep to remove shine.
- Clean and Dehydrate: Wipe your nails with a lint-free wipe soaked in alcohol or a nail cleanser. This removes any dust and oils, ensuring a smooth application.
Applying the Jelly Polish:
- Apply Base Coat: Apply a thin, even layer of your base coat. Cure it under your UV/LED lamp according to the manufacturer’s instructions (usually 30-60 seconds).
- Apply the First Thin Layer of Jelly Polish: This is where the magic happens! Apply a very thin layer of your chosen jelly polish. The key is thin layers to maintain the translucency. Don’t worry if it looks streaky or uneven; that’s normal for jelly polishes. Cure this layer under the lamp. You can find excellent resources on proper gel application techniques from institutions like the Nail Care Pros, which often share best practices learned from industry professionals.
- Apply Subsequent Layers: For a more saturated color, apply another thin layer of jelly polish. Cure again. Repeat this process, adding thin layers until you achieve your desired color intensity and depth. Remember, each layer adds opacity, so stop when you’re happy with the translucent effect.
- Apply Top Coat: Once you’ve achieved your perfect jelly color, apply a thin layer of your glossy top coat. Make sure to cap the free edge of the nail to prevent chipping. Cure the top coat under the lamp.
- Clean Up: If you’re using a no-wipe top coat, you’re done after curing! If your top coat requires wiping, use a lint-free wipe soaked in alcohol to remove the sticky residue.
Stunning Jelly Nail Design Ideas for Beginners
Jelly nails are a fantastic canvas for creativity! Even if you’re new to nail art, these simple yet stunning designs are perfect for dipping your toes (or fingertips!) into the world of jelly manicures.
1. Classic Jelly Single Color
This is the easiest and most elegant way to rock the jelly trend. Simply apply your chosen jelly polish in thin layers until you reach your desired opacity. It’s chic, vibrant, and perfect for any occasion.
2. Jelly Ombre
Create a beautiful gradient effect by blending two complementary jelly colors.
- Apply your base coat and cure.
- Apply a thin layer of your lighter jelly color and cure.
- Apply a thin layer of your darker jelly color to the tips or a portion of the nail.
- Using a fine brush, gently blend the two colors together where they meet.
- Cure the blended layer.
- Repeat with another thin layer of each color if needed, blending again, and cure.
- Apply top coat and cure.
This is a great way to play with color transitions!
3. Jelly French Tips
A playful twist on the classic French manicure.
- Apply your colored jelly polish over the entire nail and cure.
- Using a fine-tip brush or a French tip guide, paint the tips of your nails with a contrasting jelly color or a sheer white/nude jelly.
- Cure the tips.
- Apply top coat over the entire nail and cure.
This offers a subtle pop of color and texture.
4. Jelly with Glitters or Flakes
Add a touch of sparkle!
- Apply your jelly polish in thin layers, curing each layer.
- On your last jelly layer (before top coat), sprinkle fine glitters or iridescent flakes onto the wet polish.
- Gently pat them in to embed them.
- Cure the nail.
- Apply a thick layer of top coat to encapsulate the glitter/flakes smoothly. Cure again.
This gives your jelly nails an extra dimension of shine and texture.
5. Jelly Swirls and Marbling
This looks intricate but can be simplified.
- Apply your base color jelly and cure.
- Apply small dots or lines of a contrasting jelly color onto the nail.
- Use a fine nail art tool (like a dotting tool or thin brush) to gently swirl the colors together, creating a marble effect.
- Make sure not to over-swirl, or the colors will become muddy.
- Cure the design.
- Apply top coat and cure.
This technique allows for fluid, organic patterns.
6. Jelly Accent Nails
If you want to try a bolder design but keep it simple, pick one or two nails for a full jelly color and leave the others as a nude or French manicure. Or, apply a sheer jelly color over a French tip for a subtle, colorful accent.
Tip: For any design involving multiple colors or enhancements, applying a clear gel polish layer before adding glitters, flakes, or doing swirls can help contain them and create a smoother surface for your jelly color application.
Jelly Nail Colors: A Palette of Possibilities
The beauty of jelly nails lies in their vibrant, translucent color palette. Unlike opaque polishes, jelly colors offer a lighter, more playful feel, making them perfect for a wide range of aesthetics. Here’s a look at some popular jelly nail color families and the vibes they create:
| Color Family | Shade Examples | Vibe & Occasion | Pairing Ideas |
|---|---|---|---|
| Reds & Pinks | Cherry Red, Strawberry Pink, Watermelon, Coral | Sweet, flirty, bold, feminine. Perfect for summer, dates, or a vibrant statement. | Pair with rose gold accents, white tips, or subtle glitter. |
| Oranges & Yellows | Tangerine, Peach, Lemon Sorbet, Buttercup | Sunny, cheerful, energetic, warm. Ideal for spring, festivals, or adding a pop of brightness. | Works well with gold foil, brown accents, or nude bases. |
| Greens & Blues | Lime Green, Mint Green, Turquoise, Sky Blue, Royal Blue | Fresh, cool, calming, oceanic. Great for beach vacations, spa days, or a sophisticated pop. | Complement with silver accents, white details, or clear layers. |
| Purples & Pinks (Deeper Tones) | Grape, Lavender, Fuchsia, Magenta | Regal, mysterious, glamorous, playful. Suitable for evening events or a bold fashion statement. | Can be paired with holographic glitters, black details, or a deep nude base. |
| Nudes & Pastels | Milky Pink, Sheer Beige, Baby Blue, Light Peach | Subtle, elegant, minimalist, soft. Perfect for everyday wear, bridal looks, or a refined touch. | Excellent as a base for other designs, or with delicate white line art. |
When choosing your jelly colors, consider your skin tone and personal style. Lighter, warmer tones often suit olive or warm undertones, while cooler tones can beautifully complement fair or cool undertones. However, these are just guidelines – the best color is always the one that makes you feel fabulous!
Tips for Achieving Flawless Application
Even with the simplest designs, a little attention to detail can elevate your jelly nails from good to absolutely gorgeous. Here are some pro tips to help you achieve a perfect, salon-quality finish:
- Thin Layers are Your Best Friend: I can’t stress this enough! Thick layers of jelly polish can look gloopy and defeat the purpose of the translucent effect. Build up the color gradually with multiple thin coats.
- Cure Each Layer Properly: Don’t rush the curing process. Ensure each thin layer of polish (base coat, jelly color, top coat) is fully cured under the lamp before moving to the next step. Incomplete curing can lead to peeling, lifting, and a dull finish.
- Cap the Free Edge: When applying your base coat, jelly color, and especially your top coat, be sure to “cap” the free edge of your nail. This means running your brush along the very tip of your nail. This creates a seal that helps prevent chipping and extends the wear of your manicure.
- Clean Up Before Curing: If you get any polish on your skin, clean it up with a small brush or orangewood stick (dipped in alcohol for gel polish) before you cure it. It’s much harder to remove once it’s hardened.
- Experiment with Clear Polish: For a softer jelly look or to create a custom shade, mix a small amount of your colored jelly polish with a clear gel polish. This is a fantastic way to control color intensity and can be great for ombré or subtle color washes.
- Don’t Over-Buff: While buffing is important for adhesion, over-buffing can thin your natural nails and make them prone to breakage. A light, even buff is all you need.
- Invest in Quality Tools: Using good quality brushes, files, and polishes can make a noticeable difference in the ease of application and the final look of your nails.
Maintaining Your Jelly Nails
Once you’ve created your stunning jelly nail designs, you’ll want them to last as long as possible! Proper care will keep them looking vibrant and chip-free.
- Avoid Harsh Chemicals: While gel polish is durable, prolonged exposure to harsh cleaning chemicals, solvents, or even certain skincare products can dull the shine or weaken the polish adhesion over time. Wear gloves when doing chores!
- Moisturize Regularly: Keep your cuticles and the skin around your nails hydrated by applying cuticle oil daily. Healthy cuticles contribute to the overall health of your nails and can prevent lifting.
- File Gently, Don’t Clip: If your nails grow unevenly or you need a minor touch-up, use a fine-grit nail file. Avoid clipping your gel-encased nails, as this can risk damaging the gel structure.
- Be Mindful of Impacts: While jelly nails are strong, they aren’t indestructible. Try to avoid using your nails as tools (like opening cans or scraping labels) to prevent chipping or breaking.
- Touch-Ups are Possible: If you notice a small chip or scratch, you can often carefully file it smooth and apply an extra layer of top coat to seal it. For more significant damage, it might be time for a soak-off and reapplication.
Frequently Asked Questions About Jelly Nail Designs
What is the difference between jelly polish and regular nail polish?
Jelly polish is translucent, allowing light to pass through for a glass-like or candy-like effect. Regular polish is opaque and covers the nail surface completely without significant transparency.
Can I achieve jelly nails with regular nail polish?
Yes, you can create a jelly effect with regular polish by adding a clear top coat or clear polish to your colored polish to make it sheer. However, gel jelly polishes give a much more vibrant and long-lasting effect.
How many layers of jelly polish should I use?
The number of layers depends on the desired color intensity. Start with one thin layer and add more, curing each layer, until you achieve your preferred translucent shade. Usually, 2-4 thin layers are sufficient.
How long do jelly gel nails typically last?