Want stunning holographic chrome nails at home? This easy tutorial breaks down the shimmering, iridescent look with simple steps and tips, perfect for beginners to create eye-catching manicures that catch the light and turn heads.
Getting that mesmerizing holographic chrome effect on your nails might seem super complex, but trust me, it’s totally achievable right in your own home! Many of us dream of nails that shift with every flicker of light, showing off a rainbow of colors. But when we try it ourselves, things can get… messy. We might end up with uneven powder, smudges, or a finish that just doesn’t pop. Don’t worry, though! I’m here to guide you through it. We’ll make this trending look feel effortless and fun. Get ready to discover how easy it is to get salon-worthy holographic chrome nails with just a few key steps.
—
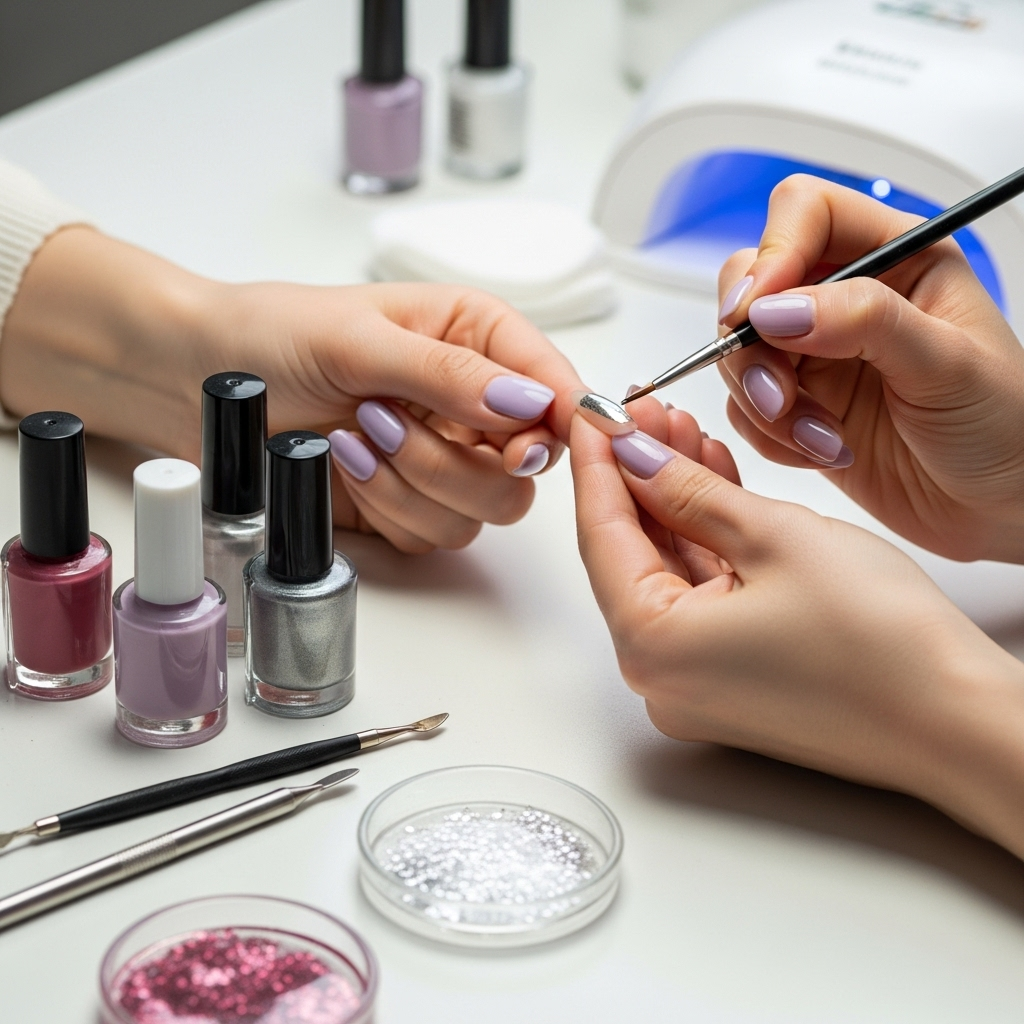
Your Essential Holographic Chrome Nails Toolkit
Before we dive into the magic, let’s gather our supplies! Having everything ready makes the process so much smoother. Think of this as your personal nail art starter pack.
What You’ll Need:
Base Coat: A good quality base coat protects your natural nails and helps your polish adhere better.
Black Gel Polish: A dark base, especially black, makes holographic chrome powder truly shine. You’ll need a UV/LED lamp to cure gel polish.
No-Wipe Gel Top Coat: This is super important! Regular top coats can make the chrome powder stick unevenly. A no-wipe formula is designed for this very purpose.
Holographic Chrome Powder: This is the star of the show! You can find these in various finishes, but a finely milled, iridescent one works best for that intense holograph effect. Look for a reputable brand to ensure good quality and vibrant color payoff.
Silicone Applicator Tool or Eyeshadow Sponge: These are perfect for smoothly buffing the powder onto your nails.
Nail Buffer: A fine-grit buffer (around 240 grit) helps smooth any imperfections.
Rubbing Alcohol or Nail Cleanser: To clean and prep your nails.
Cuticle Pusher and Oil: For neat cuticles and a finished look.
Optional: Top Coat (Regular Gel or Regular Polish): For an extra layer of protection if desired, after the chrome is applied and sealed.
Why a No-Wipe Top Coat?
A no-wipe gel top coat doesn’t leave a sticky “tacky” layer after curing under the UV/LED lamp. This tacky layer on regular top coats can interfere with the smooth application of chrome powder, leading to a duller or patchy finish. The no-wipe formula provides a perfectly smooth canvas for the holographic particles to adhere to, creating that seamless, mirror-like shine. For more on nail product science, the U.S. Food & Drug Administration offers great insights into cosmetic product ingredients and safety.
—
Step-by-Step: Achieving Holographic Chrome Dreams
Alright, let’s get down to the fun part – making those holographic chrome nails a reality! Follow these steps carefully, and you’ll be amazed at the results.
Step 1: Prep Your Nails Like a Pro
Good prep is the key to any amazing manicure, especially for chrome finishes.
Cleanliness is next to godliness: Wash your hands thoroughly.
Shape it up: File your nails to your desired shape. Almond, square, or stiletto – whatever makes you feel fabulous!
Cuticle care: Gently push back your cuticles with a cuticle pusher. Trim any hangnails or excess skin if needed, but be gentle! Healthy cuticles frame your nails beautifully.
Buff and smooth: Lightly buff the surface of your nails with a fine-grit buffer. This removes any natural oils and creates a smooth surface for the polish to adhere to. Don’t overdo it; you just want to remove shine, not thin your nails.
Cleanse: Wipe each nail with rubbing alcohol or a nail cleanser to remove any dust and oils.
Step 2: The Black Base for Brilliance
This dark foundation is crucial for making your holographic effect pop!
Apply base coat: Apply a thin, even layer of your gel base coat.
Cure: Cure this layer under your UV/LED lamp according to the lamp’s instructions (usually 30-60 seconds).
First coat of black: Apply a thin layer of your black gel polish.
Cure: Cure again under the lamp.
Second coat of black: Apply another thin layer of black gel polish for full opacity.
Cure: Cure thoroughly. Make sure this layer is fully cured, as any uncured gel will prevent the chrome from adhering.
Step 3: The Magic Layer – No-Wipe Top Coat
This is where the chrome powder will grab its shine.
Apply no-wipe top coat: Apply a thin, even layer of your no-wipe gel top coat over the cured black gel polish. Ensure you cap the free edge (the tip of your nail) to prevent lifting.
Cure: Cure this layer under your UV/LED lamp. This layer should not feel sticky after curing.
Step 4: Buffing in the Holographic Shine
Now for the exciting part!
Dip and buff: Using your silicone applicator or sponge, pick up a small amount of holographic chrome powder. Gently begin to buff the powder onto the cured no-wipe top coat.
Work it in: Use a tapping and then a gentle buffing motion. You want to cover the entire nail surface evenly. You’ll see the holographic shine start to appear as you work.
Build intensity: If you want a more intense effect, add a little more powder and continue buffing until you achieve your desired level of shimmer and color shift. Make sure to get into the edges and cuticle area.
Buff away excess: Once you’re happy with the coverage, use a clean part of the applicator or a soft brush to gently brush away any loose powder.
Step 5: Smoothing and Sealing for Longevity
We need to lock in that sparkle!
Gentle buffing (optional): If you notice any rough spots or streaks from the powder application, you can very gently buff the surface with a fine-grit buffer (like a 240 grit) to smooth it out. Be very careful not to buff through the chrome layer.
Cleanse again: Wipe each nail with rubbing alcohol or nail cleanser to remove any remaining loose powder dust.
Seal with top coat: Apply a final layer of your no-wipe gel top coat. Again, make sure to cap the free edge. This seals the chrome powder and protects your stunning new manicure.
Cure: Cure this final layer under your UV/LED lamp.
Step 6: Finishing Touches
Apply cuticle oil: Once the nails are cool, apply a generous amount of cuticle oil around each nail bed. This rehydrates the skin after the prep and curing process, leaving your hands looking and feeling healthy.
Admire: And voilà! You have gorgeous holographic chrome nails.
—
Troubleshooting Common Holographic Chrome Nail Issues
Even with a tutorial, sometimes things don’t go perfectly the first time. Here are some common hiccups and how to fix them:
| Problem | Cause | Solution |
| :——————————- | :——————————————————————— | :——————————————————————————————————————————————————————————— |
| Patchy or Uneven Powder | Insufficient application of the no-wipe top coat, or it wasn’t fully cured. | Ensure the no-wipe top coat is applied thinly and evenly. Cure it thoroughly under the lamp. Try buffing the powder more vigorously. Always ensure your black gel base is also fully cured. |
| Dull or Muted Chrome Effect | The powder wasn’t buffed in properly, or the wrong top coat was used. | Buff the powder gently but firmly until the shine appears. Make sure you are using a no-wipe gel top coat specifically designed for chrome powders. |
| Chrome Rubbing Off Easily | Insufficient top coat sealing, or the top coat wasn’t cured properly. | Apply a thin, even layer of the no-wipe top coat and cap the free edge. Cure it for the full recommended time, ensuring it’s completely hard. |
| Powder Not Sticking | The black gel layer underneath was not fully cured, or the nail wasn’t clean. | Always ensure all gel layers, especially the black base, are cured according to your lamp’s instructions. Cleanse nails thoroughly before applying base coats and after buffing. |
| Smudged Chrome Finish | Touching the nail surface before applying the final top coat. | Be very careful not to touch the chrome layer with anything other than your applicator and brush. Always follow the buffing step with a cleansing step before the final top coat. |
—
Caring for Your Holographic Chrome Nails
To keep your stunning holographic chrome nails looking fabulous for as long as possible, follow these simple care tips:
Be gentle: Chrome finishes can be prone to scratching if you’re not careful. Avoid using your nails as tools (like to scrape or open things).
Moisturize: Keep your hands and nails hydrated by regularly applying hand lotion and cuticle oil. Dryness can make edges lift and affect the overall appearance.
Avoid harsh chemicals: Prolonged exposure to harsh cleaning chemicals can degrade the top coat and ultimately affect the chrome. If you’re doing housework, wear gloves! For more on protecting your skin from chemicals, you can check out resources on safe cleaning practices.
Touch-ups: If you notice a slight imperfection, a gently buff and a fresh layer of top coat on that specific nail can often do the trick.
—
Why Holographic Chrome Nails Are a Must-Try
Holographic chrome nails offer something truly special. It’s not just a color, it’s an experience!
Pros:
Mesmerizing Visuals: The shifting rainbow effect is eye-catching and unique.
Versatile: Looks stunning over any base color, though black is most popular for maximum holographic impact.
Trendy: A major nail art trend that always feels fresh and exciting.
DIY Friendly: With the right tools and techniques, it’s surprisingly achievable at home.
Expressive: Adds a bold, glamorous, and fun element to any look.
Cons:
Requires Specific Products: You’ll need a no-wipe gel top coat and holographic chrome powder.
Can be Delicate: Requires careful application and maintenance to avoid chipping or dulling.
Learning Curve: The buffing technique might take a little practice to perfect.
—
Frequently Asked Questions About Holographic Chrome Nails
Here are answers to some common questions beginners have about achieving this look.
Q1: Can I do holographic chrome nails with regular nail polish?
While you can achieve a chrome-like effect with regular polish using mirror nail polish, the true, intense holographic shimmer that shifts through a rainbow of colors is best achieved with the specific holographic chrome powders used over a gel base. Regular polish doesn’t cure hard enough to provide the smooth surface necessary for the powder to adhere and create that dazzling effect.
Q2: Do I really need a UV/LED lamp for holographic chrome nails?
Yes, when using gel polish and a no-wipe gel top coat, a UV/LED lamp is essential for curing the gel layers. Gel polish needs this specific light source to harden properly, creating the durable base and smooth surface required for the holographic chrome powder to embed and shine. Regular polish simply air dries and won’t create the right foundation.
Q3: How long do holographic chrome nails typically last?
When applied correctly using gel products and sealed with a good no-wipe top coat, holographic chrome nails can last anywhere from 2 to 4 weeks. Longevity depends on your aftercare, how well you protected your nails from damage, and the quality of the products used. Remember to wear gloves for chores to extend their life!
Q4: Can I use a different color base instead of black?
Absolutely! While black creates the most dramatic and intense holographic effect because it absorbs light, experimenting with other dark colors like navy blue, deep purple, or even a dark grey can give you stunning, nuanced holographic results. Lighter colors will also show the holographic shimmer, but it will be more subtle and prismatic.
Q5: How do I remove holographic chrome nails?
Removal is similar to removing other gel manicures. You’ll typically want to use a gel nail polish remover, which is usually acetone-based. Soak cotton balls in the remover, place them over the nails, wrap with foil, and let them sit for about 10-15 minutes. Then, gently scrape off the softened gel with a cuticle pusher or gel remover tool. Avoid picking or peeling, as this can damage your natural nails.
Q6: My powder looks gritty or uneven. What did I do wrong?
This often happens if the no-wipe top coat wasn’t fully cured, or if you didn’t buff the powder in thoroughly enough. Make sure your top coat is hardened under the lamp. Then, use a firm but gentle buffing motion with your applicator tool to ensure the powder is pressed smoothly and evenly onto the nail surface. Sometimes, a light buff with a fine-grit file before the final top coat can help smooth out any textures, but be extremely careful not to buff through the metallic layer.
—
Conclusion: Shine On!
There you have it – your complete guide to creating absolutely stunning holographic chrome nails at home! We’ve walked through gathering your essential tools, prepping your nails for the perfect canvas, applying the mesmerizing powder, and sealing it all in for a durable, dazzling finish. Remember, the key lies in proper prep, using a no-wipe gel top coat, and a little patience with the buffing technique.
Don’t be discouraged if your first attempt isn’t absolutely flawless. Nail art is a journey, and every practice run gets you closer to perfection. The beauty of holographic chrome is its dynamic nature; it catches the light in the most magical ways, making your nails the undeniable center of attention. It’s a fantastic way to add a touch of futuristic glamour or playful sparkle to any outfit or occasion. So go ahead, experiment, and let your nails do the talking. You’ve got this, and I can’t wait to see how brilliantly you shine!