Chic holographic chrome nail designs are surprisingly simple to achieve at home, giving your nails a dazzling, futuristic shimmer. This guide breaks down the process and shares stunning design ideas for beginners to elevate their manicure game effortlessly.
Want nails that catch the light and turn heads? Holographic chrome nails are a dazzling trend that feels super futuristic and, honestly, a little bit magical. You might see them and think they’re only for salon pros, but I’m here to show you that you can totally rock this look yourself! It’s all about understanding a few key steps and having the right tools. Don’t worry if you’ve never done anything like this before; my goal is to make it totally doable and fun for you. Get ready to become your own nail artist!
What Exactly Are Holographic Chrome Nails?
Holographic chrome nails are a type of nail finish that creates a stunning, iridescent, and almost metallic sheen. Unlike traditional chrome powder which gives a uniform mirrored effect, holographic chrome has an added dimension. It refracts light into a spectrum of rainbow colors, creating a captivating, multi-dimensional shimmer that shifts as you move your hands. Think of a unicorn’s horn or the inside of a seashell – that’s the kind of ethereal glow we’re aiming for! This effect is achieved by applying a special holographic chrome powder over a specific base color and sealing it with a top coat.
Why Are Holographic Chrome Nails So Popular?
These nails are popular for so many reasons! They’re incredibly eye-catching and add a unique, glamorous touch to any look. Whether you’re dressing up for a night out or just want to add some sparkle to your everyday, holographic chrome nails deliver. They offer a futuristic vibe that’s also surprisingly versatile, fitting in with everything from edgy styles to more elegant aesthetics. Plus, the holographic effect means your nails look different and amazing from every angle, reflecting a beautiful array of colors.
Is It Difficult to Achieve Holographic Chrome Nails at Home?
The great news is, no! While it might seem intimidating, achieving holographic chrome nails at home is quite beginner-friendly once you know the process. It mainly involves using a specific type of powder and a good base coat and No-Wipe Top Coat. With a little patience and the right steps, you’ll be amazed at the professional-looking results you can achieve right at your kitchen table. I’ll walk you through everything you need so you can confidently try this trend yourself!
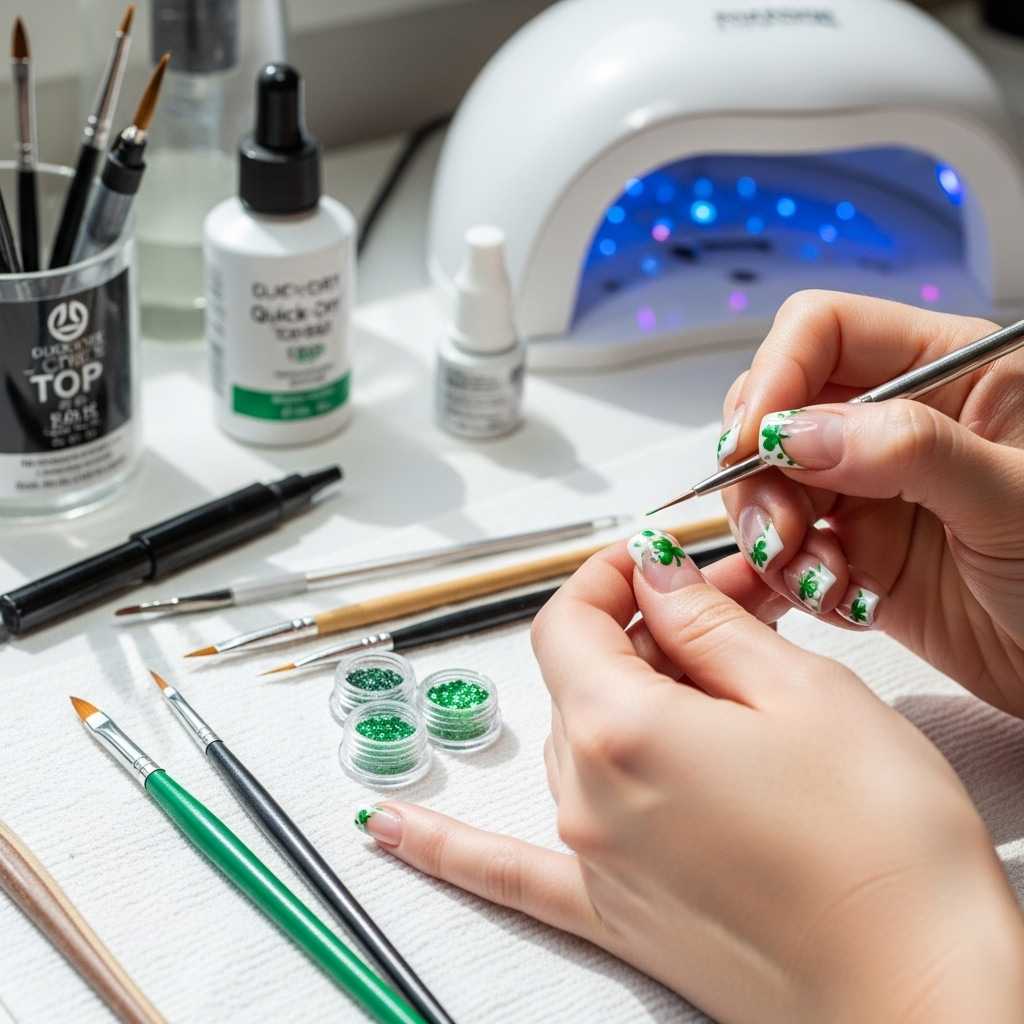
Essential Tools and Materials for Holographic Chrome Nails
Before we dive into the fun part, let’s gather our supplies. Having the right tools makes all the difference and ensures a smooth, beautiful finish. Don’t worry if you don’t have everything right away; you can build your nail art kit over time!
For a DIY Holographic Chrome Manicure, You’ll Need:
- Base Coat: A good quality base coat is crucial for nail health and helps your nail polish adhere better.
- Your Choice of Nail Polish Color: A dark color (like black or deep navy) is often recommended as a base for holographic chrome to make the effect pop. However, lighter colors can create a softer, ethereal look.
- No-Wipe Gel Top Coat: This is essential! A regular gel top coat that requires wiping with alcohol will remove the chrome effect. Look for one specifically labeled “no-wipe.”
- Holographic Chrome Powder: This is the magic ingredient! There are many brands available, often sold in small pots or as loose powders.
- Silicone Applicator or Eyeshadow Sponge: These tools are perfect for picking up and buffing the powder onto the nail.
- UV/LED Nail Lamp: Gel polish and gel top coats require curing under a UV or LED lamp to harden.
- Nail File & Buffer: To prep your nails.
- Cuticle Pusher: To gently push back cuticles for a clean nail surface.
- Alcohol Wipes or Rubbing Alcohol: For cleaning the nails before application.
- Optional: Top Coat (Regular or Gel): If you want to add an extra layer of protection or a different finish over your design.
Step-by-Step: How to Apply Holographic Chrome Powder
Ready to get started? Follow these simple steps for a show-stopping holographic chrome manicure. Remember to work in a well-lit area and take your time – practice makes perfect!
| Step | Action | Pro-Tip |
|---|---|---|
| 1 | Prep Your Nails: File your nails to your desired shape. Gently push back your cuticles. Cleanse your nail surface with an alcohol wipe to remove any oils or dust. | Ensure your nails are completely dry and free of any cuticle residue for the best adhesion. |
| 2 | Apply Base Polish: Paint your nails with your chosen base color (e.g., black for a bold look). Apply two thin coats for full opacity. | Allow each coat to dry completely before applying the next. This prevents air bubbles and ensures an even color. |
| 3 | Cure the Base Polish: Place your nails under a UV/LED lamp according to the polish manufacturer’s instructions (usually 30-60 seconds). | Ensure your nails are fully cured. Undercured polish can affect the chrome application. |
| 4 | Apply No-Wipe Gel Top Coat: Apply a thin, even layer of your no-wipe gel top coat over the colored polish. Be careful not to get it on your cuticles. | This layer is critical. A thick layer might not cure properly, affecting the powder application. A truly “no-wipe” top coat will remain slightly tacky after curing, which is ideal for gripping the powder. |
| 5 | Cure the No-Wipe Top Coat: Cure this layer under your UV/LED lamp again. | Make sure it’s fully cured, but still has that slight tackiness if your top coat is designed to be that way. |
| 6 | Apply Holographic Chrome Powder: Dip your silicone applicator or sponge into the holographic chrome powder. Gently dab and rub the powder onto the cured no-wipe top coat. Work in small sections and ensure even coverage across the entire nail surface. | Use a light touch. Buffing too hard can sometimes lift the gel. Focus on building up the color and shine gradually. |
| 7 | Buff to a Shine: Continue buffing until the entire nail has a smooth, consistent holographic chrome finish. You should see the rainbow effect appearing. | You can use a clean finger or a separate clean applicator to gently buff out any streaks or rough spots. |
| 8 | Clean Up Excess Powder: Gently brush away any loose powder from around your nails and cuticles. A soft brush is great for this. | Avoid touching the applied chrome directly with your fingers to prevent smudging. |
| 9 | Apply Final Top Coat: Apply a final layer of no-wipe gel top coat over the entire nail to seal in the chrome powder and add extra shine. | This second layer of top coat is essential for durability and to prevent the chrome from chipping or rubbing off. Ensure it’s fully cured. Some people like to apply a second layer of top coat for extra protection. |
| 10 | Cure and Enjoy: Cure the final top coat under your UV/LED lamp. Once cured and cooled, admire your gorgeous holographic chrome nails! | Wash your hands with soap and water after the manicure to remove any residual powder. |
Chic Holographic Chrome Nail Design Ideas to Try
Now that you know the basic application, let’s get creative! The holographic chrome effect can be used in so many stunning ways, from full-coverage dazzle to subtle accent nails.
1. Full Holographic Chrome
This is the classic look. Apply the holographic chrome powder over your entire nail. It’s bold, futuristic, and incredibly chic. It works beautifully over black for a deep, intense rainbow effect, or over white for a lighter, more ethereal glow. You can even experiment with different base colors like deep blues, purples, or even reds to see how they alter the holographic spectrum.
2. Holographic Chrome French Tips
Elevate the traditional French manicure! Instead of white tips, use your holographic chrome powder to create the tips. Apply your nude or sheer base, create your smile line, and then carefully apply the chrome powder only to the tip area before the final top coat. This offers a sophisticated shimmer that’s perfect for any occasion.
3. Ombre Holographic Chrome
Blend the holographic effect with a smooth transition. You can create a holographic ombre by applying the chrome powder strategically, fading it from the tip of the nail down towards the cuticle, or vice versa. Another way is to do a color ombre with your base polish and then apply the chrome over the entire nail for an integrated, multi-dimensional look.
4. Accent Nail with Holographic Chrome
If a full set feels like too much, try an accent nail! Choose one or two nails (like your ring fingers) to cover completely in holographic chrome, and keep the rest of your nails a solid complementary color. This is a subtle yet impactful way to incorporate the trend.
5. Holographic Chrome Accents & Details
Use the chrome powder to add small details to your existing nail art. Think holographic chrome polka dots, stripes, or even a small geometric shape over a solid color nail. You can achieve this by using a fine brush or stencils to apply the chrome powder precisely where you want it.
6. Chrome Over Nail Art
Paint a simple design (like flowers, stars, or lines) with gel polish, cure it, and then apply the holographic chrome powder over the top. This can create a slightly frosted or pearlescent look to your existing art, adding a new dimension without being too overpowering. Be mindful this might slightly alter the colors of your art.
7. The “Jelly Sandwich” Effect
This advanced technique involves layering. Apply a sheer jelly-like colored gel polish, cure it, then apply the holographic chrome powder, cure it, and then apply another layer of the same jelly polish and cure again. This traps the chrome between layers, creating a unique, glowing depth.
Tips for a Flawless Holographic Chrome Finish
Achieving that seamless, mirror-like shine takes a little finesse. Here are some insider tips:
- Use a Black Base: To really make the holographic colors pop and get that intense rainbow effect, a black gel polish base is your best friend.
- Thin Layers are Key: Whether it’s your base color, the no-wipe top coat, or the chrome powder application, thin, even layers are crucial for a smooth, professional finish. Thick layers can lead to curing issues and a bumpy texture.
- Don’t Skip the No-Wipe Top Coat: I can’t stress this enough! A regular top coat that requires cleansing will ruin your chrome.
- Buff, Buff, Buff: Be patient with the buffing process. Gentle, repetitive circular motions will help you achieve an even and high-shine finish.
- Seal It Well: Make sure your final top coat is applied evenly and cured properly. This is what locks in the magic.
- Cleanliness is Crucial: Before you start, make sure your nails and your tools are clean and free of oils or dust.
Maintaining Your Holographic Chrome Nails
These nails are stunning, and you’ll want them to last! Here’s how to keep them looking fabulous:
- Wear Gloves: When doing household chores, gardening, or anything that involves prolonged water exposure or harsh chemicals, wear gloves. This protects your manicure from damage and discoloration.
- Avoid Harsh Chemicals: Cleaning supplies, acetone (used in nail polish remover), and even some perfumes can break down the top coat and affect the chrome finish.
- Moisturize: Keep your hands and cuticles hydrated. Dryness can lead to chipping and lift your polish.
- Be Gentle: Try not to use your nails as tools, like scraping or prying.
- Touch-Ups: If you get a small chip, you might be able to carefully touch it up with a no-wipe top coat and a tiny bit more chrome powder, but this can be tricky to blend seamlessly.
Troubleshooting Common Holographic Chrome Nail Issues
Even with the best intentions, sometimes things don’t go perfectly. Here are a few common issues and how to fix them:
Issue: The Chrome Doesn’t Stick or Look Shiny
Possible Causes & Solutions:
- Base was not sticky enough: The no-wipe top coat needs to be cured correctly but ideally still have some tackiness. If it’s fully cured and matte, the powder won’t adhere. Try curing your no-wipe top coat for slightly less time (but still enough to be dry to the touch) or ensure you’re using a quality no-wipe top coat.
- Too much powder was removed: You might have buffed too aggressively or cleaned the nail too much after applying the powder.
- Base color wasn’t fully cured: Make sure your colored gel polish is completely cured before applying the no-wipe top coat.
Issue: Streaky or Uneven Finish
Possible Causes & Solutions:
- Uneven application of powder: Ensure you’re using a good applicator and buffing in consistent, circular motions. Don’t press too hard.
- Uneven application of no-wipe top coat: The layer of no-wipe top coat needs to be perfectly smooth for the chrome to go on evenly.
- Powder not finely milled: Sometimes the quality of the chrome powder can affect the finish. Try a different brand.
Issue: The Chrome Rubs Off After a Few Days
Possible Causes & Solutions:
- Top coat not sealed properly: Ensure your final top coat is applied in a thin, even layer and fully cured. A second layer of top coat can help with durability.
- Contact with harsh chemicals: As mentioned before, protecting your nails with gloves is key.
- Base gel wasn’t fully cured: If the underlying gel layers aren’t fully cured, the entire manicure can weaken.
Frequently Asked Questions About Holographic Chrome Nails
Q1: Can I use regular nail polish with holographic chrome powder?
A1: No, holographic chrome powder typically works best with gel polish and a UV/LED lamp. Regular nail polish doesn’t provide the sticky surface needed for the powder to adhere and won’t cure properly. You’ll get a much better, longer-lasting effect with gel.
Q2: Do I need a special top coat for holographic chrome?
A2: Yes, you absolutely need a “no-wipe” gel top coat. If you try to wipe off a regular gel top coat with alcohol, it will remove the chrome powder. Look for top coats specifically labeled as “no-wipe.”
Q3: Can I use any color base coat under holographic chrome?
A3: You can! Black is fantastic for intense rainbow effects. White or lighter colors create a softer, more pearlescent look. Even pastels or nudes can give unique results. Experiment to find your favorite!
Q4: How long do holographic chrome nails last?
A4: When applied correctly with gel polish and sealed with a good top coat, holographic chrome nails can last as long as a standard gel manicure, typically 2-3 weeks. Proper care and avoiding harsh chemicals will help them last.
Q5: Is holographic chrome powder safe for my nails?
A5: Like all nail products, it’s important to use holographic chrome powder as directed. Ensure you use a good base coat to protect your natural nail, follow the application steps carefully, and cure properly with a UV/LED lamp. It’s considered safe when used correctly within the realm of gel manicures.
Q6: Can I achieve holographic chrome effects without a UV/LED lamp?
A6: Unfortunately, no. The holographic chrome powder needs to be applied over a gel top coat that is cured under a UV/LED lamp to adhere properly and achieve the shiny, mirrored finish. Regular nail polish won’t work for this technique.
Q7: How do I remove holographic chrome nails?
A7: You remove them just like any other gel manicure, usually by soaking in acetone. You may need to gently file off the top layer of the top coat first to allow the acetone to penetrate. Always be gentle to avoid damaging your natural nails. You can find more detailed instructions on removing gel polish from reputable sources like the Nail Alliance.
Conclusion
There you have it – your complete guide to achieving stunning holographic chrome nail designs! We’ve covered what makes them unique, the essential tools you’ll need, a step-by-step application process that’s totally beginner-friendly, and a variety of creative design ideas to inspire you. Remember, the key is good prep, the right no-wipe top coat, and a little bit of patient buffing. Don’t be afraid to experiment with different base colors and designs to find what truly expresses your personal style. With these tips and tricks, you’re well on your way to mastering the holographic chrome trend and giving your nails that dazzling, futuristic glow. Happy polishing!