Halloween is approaching, and it’s time to start planning the perfect costume and decorations. Take your Halloween creativity to the next level with some spooky nail designs.
Whether you’re attending a costume party or want to get into the spooky spirit, these easy Halloween nail designs, including Halloween nail art designs, are the perfect way to add a unique touch to your look. From cute and playful to creepy and gory, there’s a design for everyone to try. You don’t have to be a professional nail artist to achieve these looks.
You can recreate these designs at home with a few simple tools and some basic techniques. So put away those boring, plain nails and get ready to impress with these creative but easy Halloween nail designs you can copy. Let’s dive into the world of creepy, cute, and captivating nail art that will have everyone asking where you got your nails done.
1.Simple Witch Boots Halloween Manicure For Your Party Look
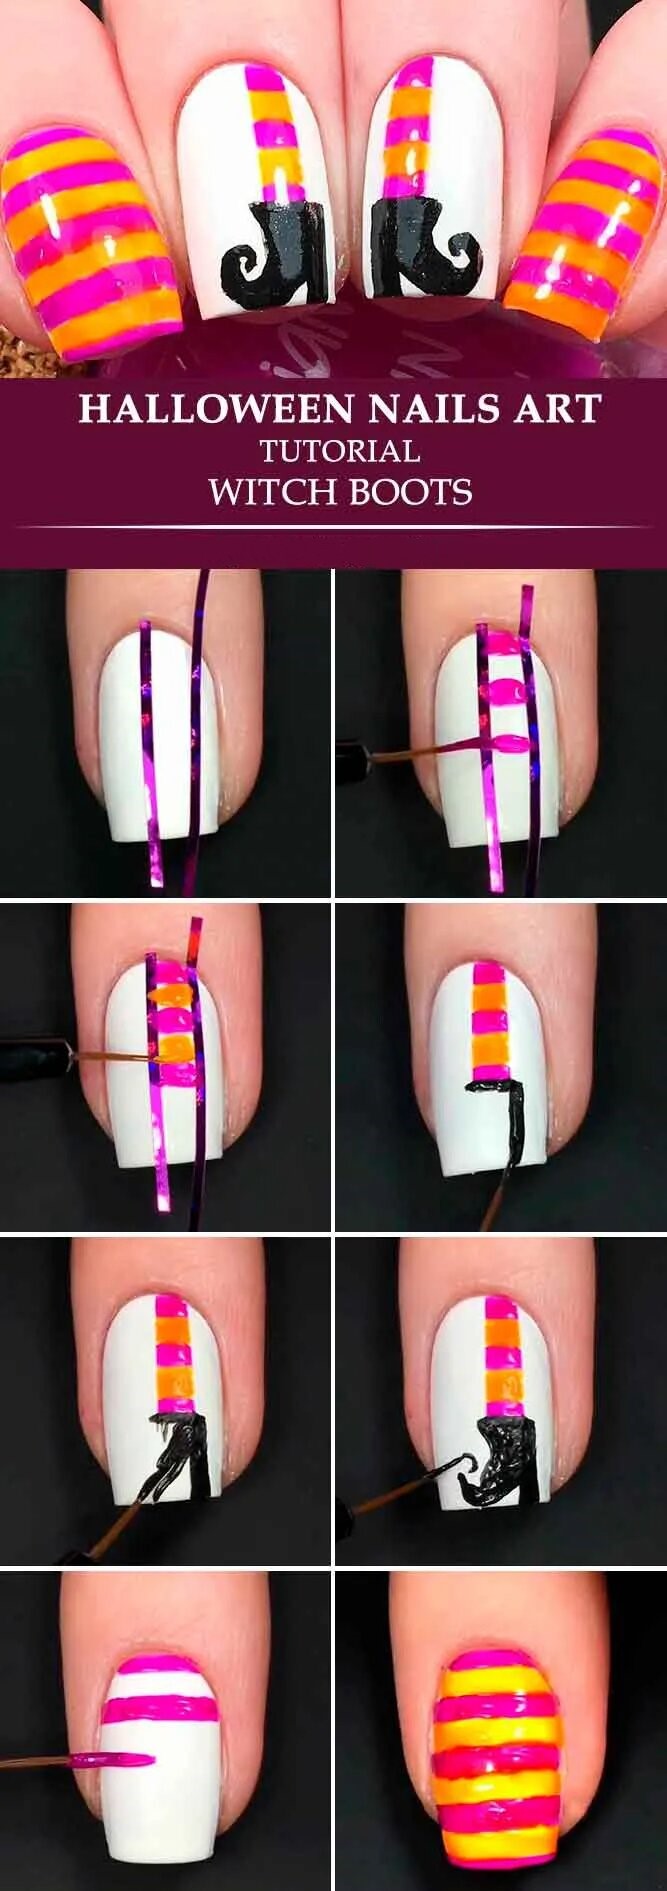
This design is perfect for adding a funky touch to your party look. Start by painting your nails black and let them dry completely. Then, using a thin brush or a toothpick, create two curved lines starting at the top of your nail and extending to the tip to look like a witch’s boot.
Fill the shape with contrasting colours like purple or green to make it stand out. Use a dotting tool or nail art pen to add details like buckles or stars. Finish with a glossy top coat to seal your design and give it a polished look. With this simple witch boot manicure, you’ll be ready to cast some spells and rock the Halloween party.
2.Black Cat Halloween Nails Tutorial
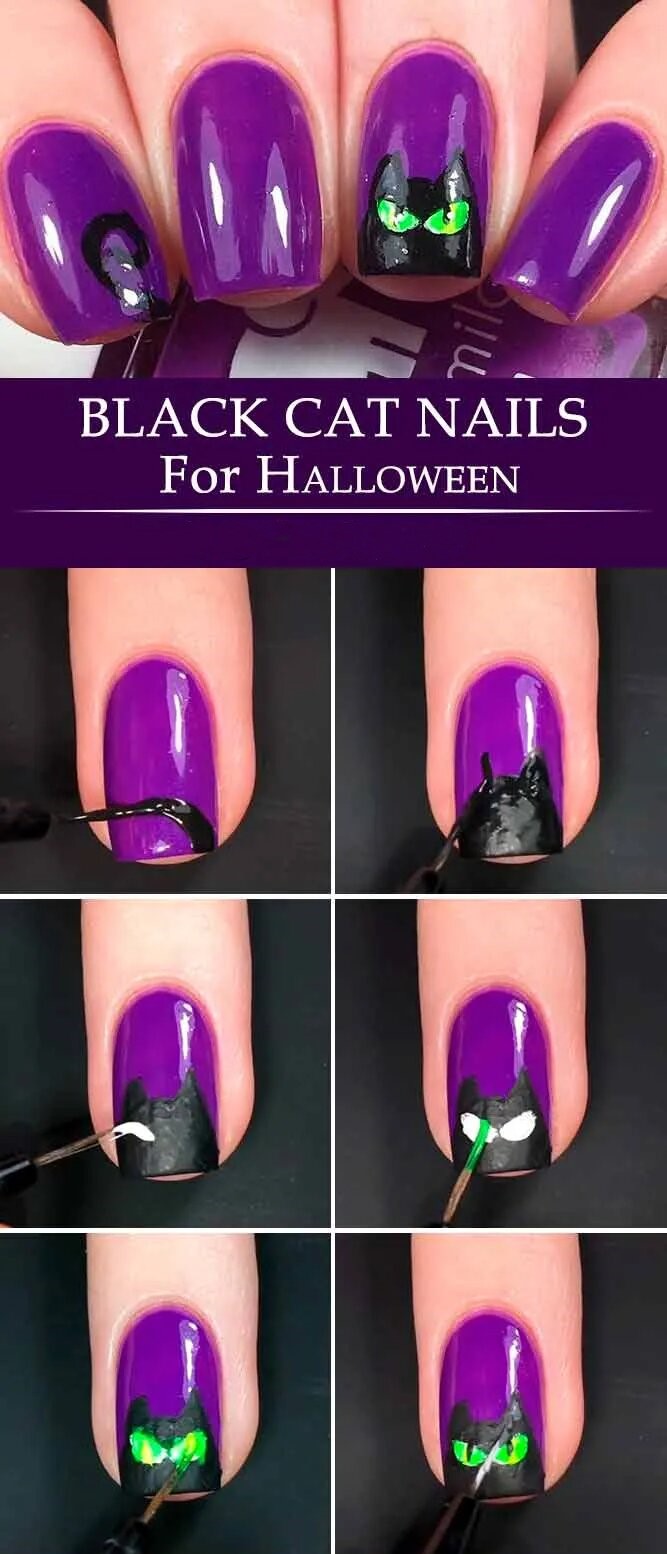
Creating a black cat Halloween nail design is a fun and easy way to add spooky vibes to your look. To get started, you’ll need black nail polish, a fine-tip brush or nail art pen, a brush set, and white nail polish. Begin by painting your nails with the black polish as a base.
Once it’s dry, use the fine-tip brush or nail art pen to draw a small triangle on the top half of each nail for the cat’s ears. Then, create two small dots for the eyes and a curved line for the mouth using the same brush or pen. Finish off the design by adding tiny whiskers using the white polish and your nail brush.
3.Jack Skellington Halloween Nails Designs
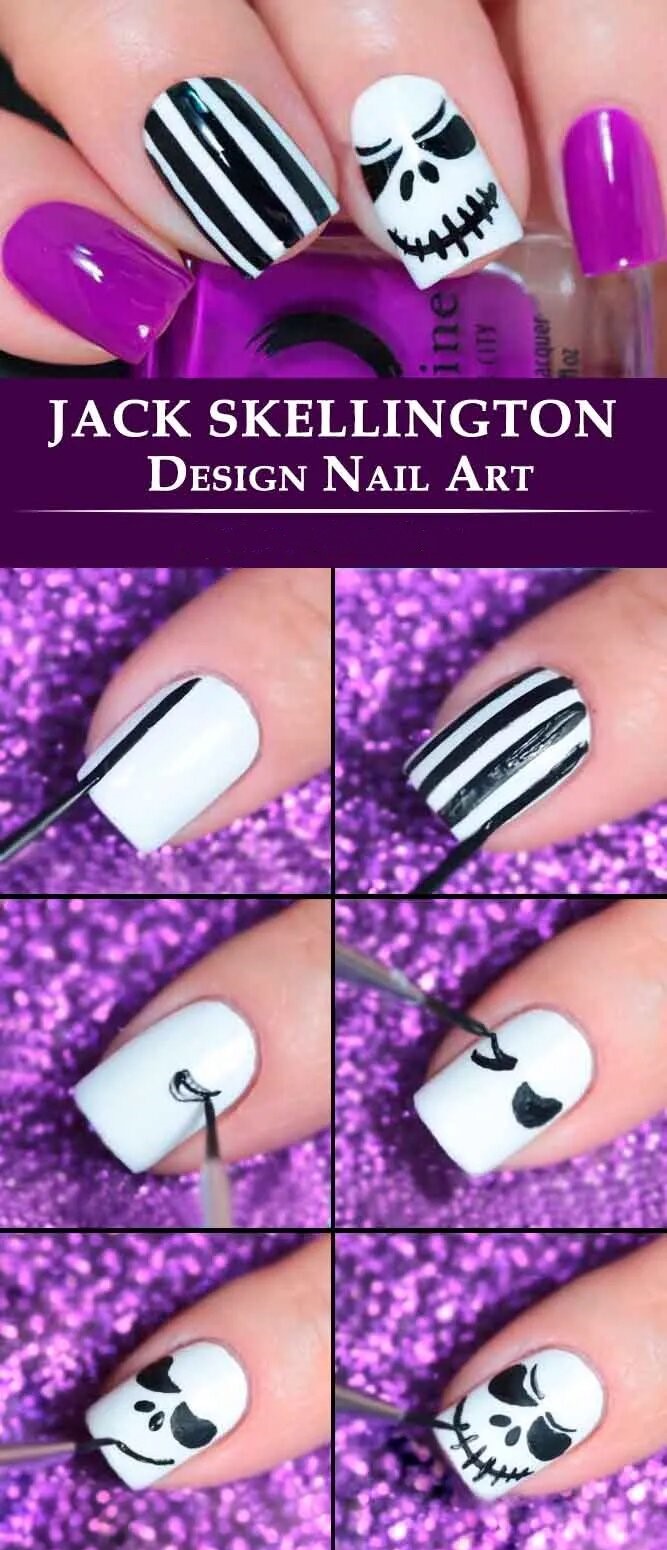
This ghostly character is instantly recognizable and can be recreated on your nails with just a few simple steps. Start by painting your nails white as a base color. Then, draw Jack’s face on one or more of your nails using a thin brush or a black nail art pen.
If you’re not an artist, don’t worry – Jack Skellington’s beauty is in its simplicity. Just outline her eyes, nose and face in black and add some stitches to her face to complete the look. Finish with a top coat to seal your design, and you’ll have a spooktacular set of Jack Skellington Halloween nails that will dazzle.
4.Magnetic Spooky Eyes Easy Halloween Nails
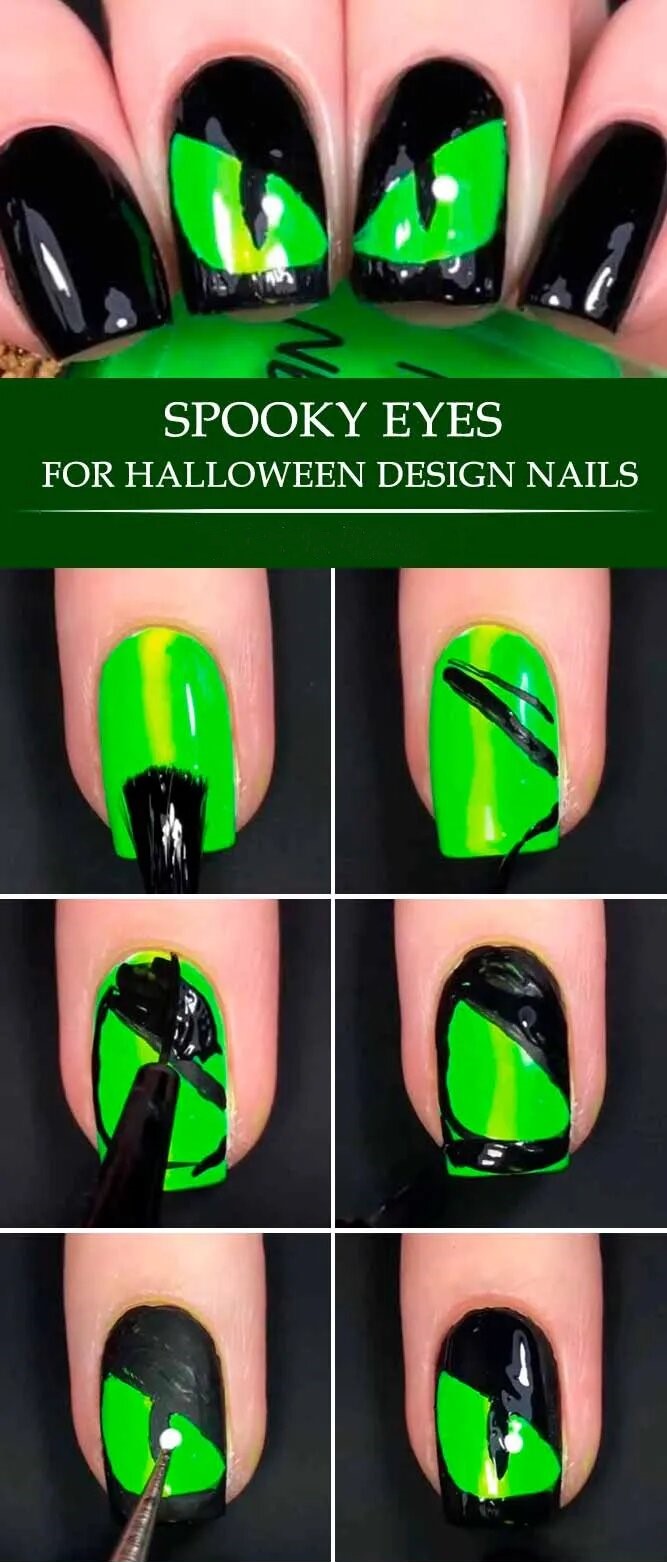
Get in the Halloween spirit with these magnetic spooky eyes and easy Halloween nail designs. This design is perfect for those who want to add a touch of spookiness to their nails without going overboard. All you need is black nail polish, a magnet, and some white or glow-in-the-dark nail polish.
Start by applying a base coat of black polish and allowing it to dry. Then, apply a layer of white or glow-in-the-dark polish on top. Before it dries completely, hold the magnet close to your nail and watch as the spooky eyes magically appear. It’s a simple yet effective way to create a fun and festive look for Halloween!
5.Bloody And Stylish Vampire Easy Halloween Nails Tutorial

This tutorial will guide you through the steps to achieve this spooky yet fashionable look. Start by applying a base coat to protect your nails. Then, paint your nails with a deep red polish as the base color. Once dry, use a thin brush or toothpick to create ” blood ” drips using black or dark red nail polish.
You can add some rhinestones or glitter to represent vampire fangs or drops of blood for added drama. Finish off with a glossy top coat to seal your design and give it a professional finish. With these vampire nails, you’ll be sure to turn heads at any Halloween party, especially with the accent of the ring finger and the addition of Alpine Snow.
6.Black And Orange Hues For Halloween Nail Ideas
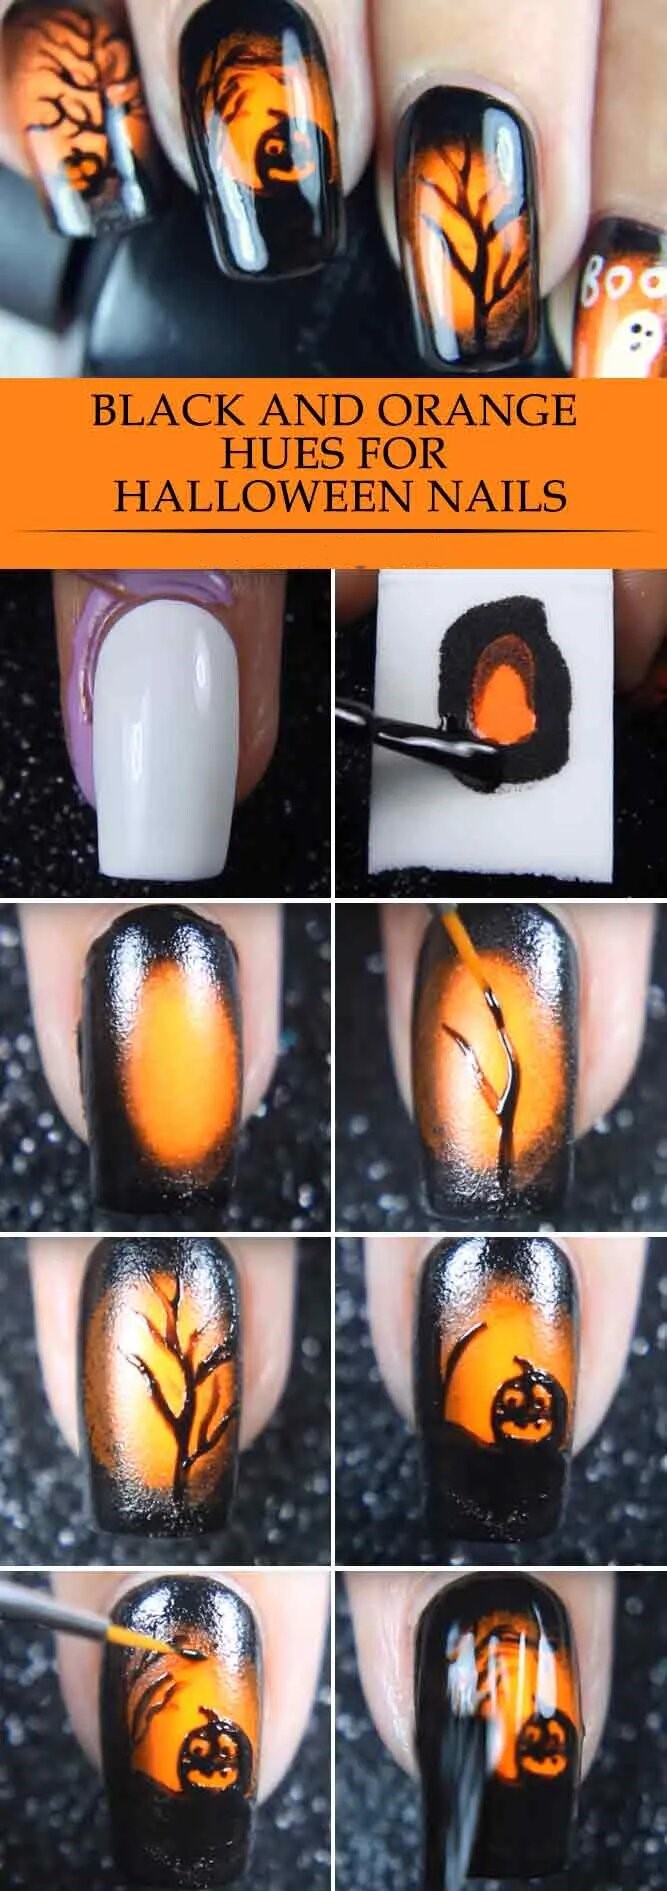
Regarding Halloween nail designs, black and orange hues, including pumpkin orange, are a classic choice that never goes out of style. These colors instantly evoke the spooky and festive spirit of the holiday.
From simple black and orange alternating stripes to intricate Halloween-themed nail art, there are endless possibilities for incorporating these iconic colors, including classic black, into your Halloween nail look. Whether you opt for a chic and minimalistic design or go all out with spiders, pumpkins, and ghosts, black and orange hues, including pumpkin orange, will make your nails stand out this Halloween season.
7.Frankenstein Halloween Manicure
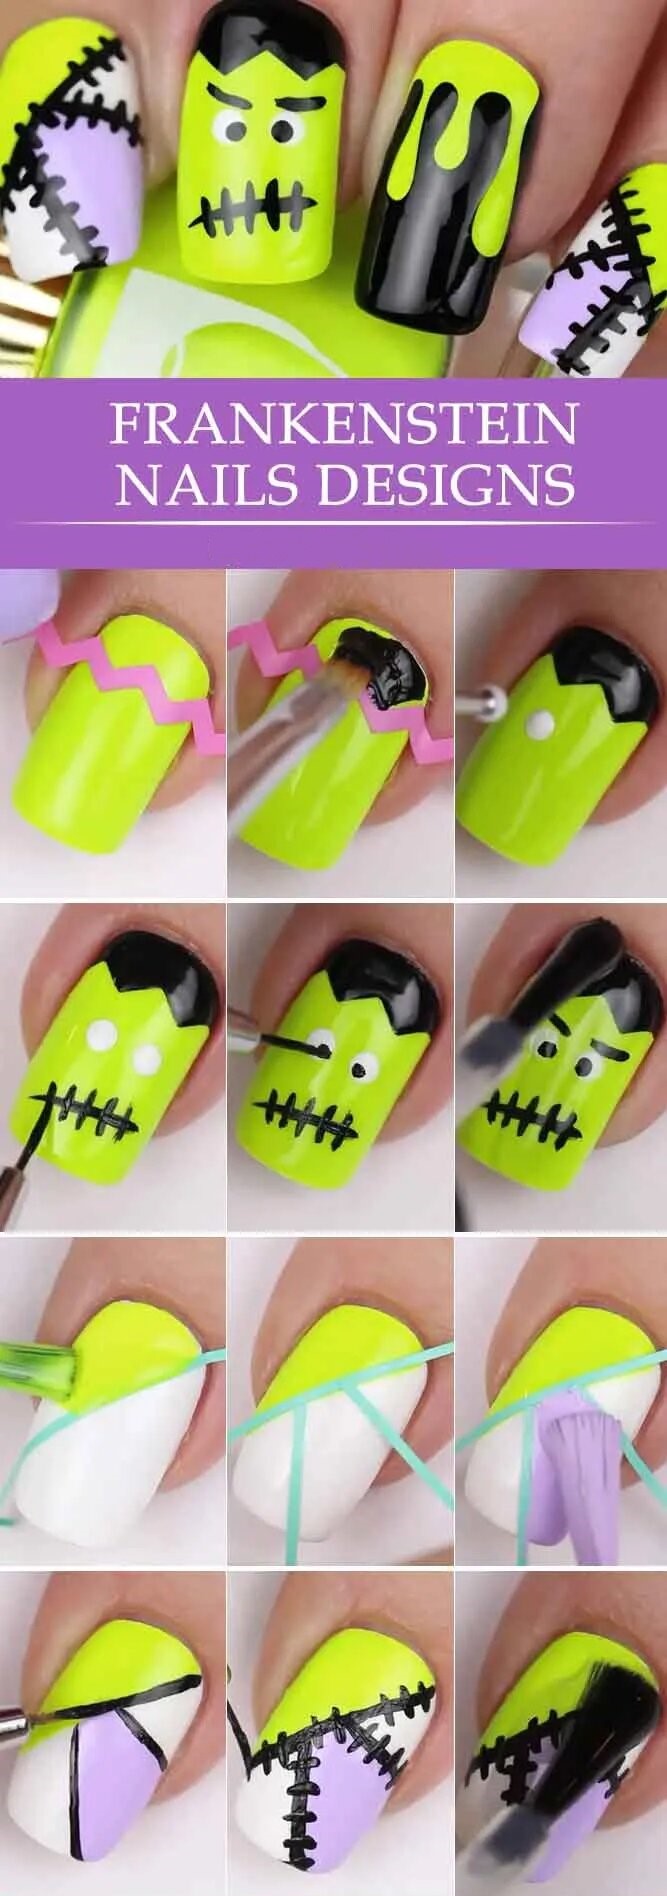
Creating a Frankenstein-inspired Halloween manicure is a fun and easy way to get into the spooky spirit. Start by painting your nails with a base coat of green polish. Once dry, use a black nail art pen or thin brush to draw on the iconic Frankenstein stitches across each nail.
For an extra touch, you can add googly eyes or small rhinestones for Frankenstein’s bolts. Finish off with a top coat to seal your design and ensure it lasts throughout all your Halloween festivities. With this simple yet creative nail design, you’ll be ready to show off your Halloween spirit in style.
8.Easy Halloween Nails With Colorful Eyes
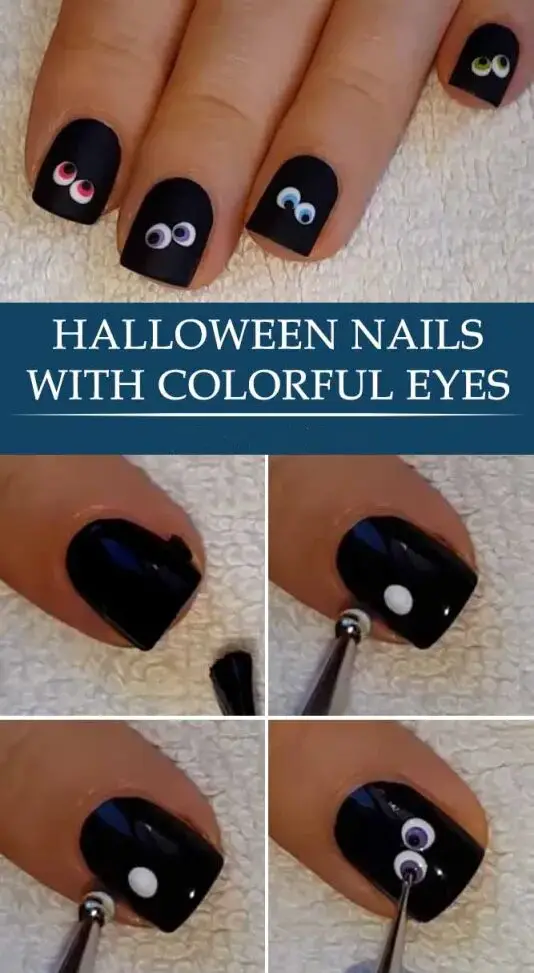
This design is perfect for adding a spooky touch to your nails without too much effort. Start by painting your nails with a base color, such as black or orange. Then, using a thin brush or dotting tool, create different-sized circles in various colors on each nail to represent the eyes.
You can add black pupils or white highlights to make the eyes pop. Finish off with a top coat to seal your design and ensure it lasts throughout your Halloween festivities. With these colorful eyes on your nails, you’ll have a spook-tacular manicure that will turn heads.
9.Sugar Skull Halloween Nail Art
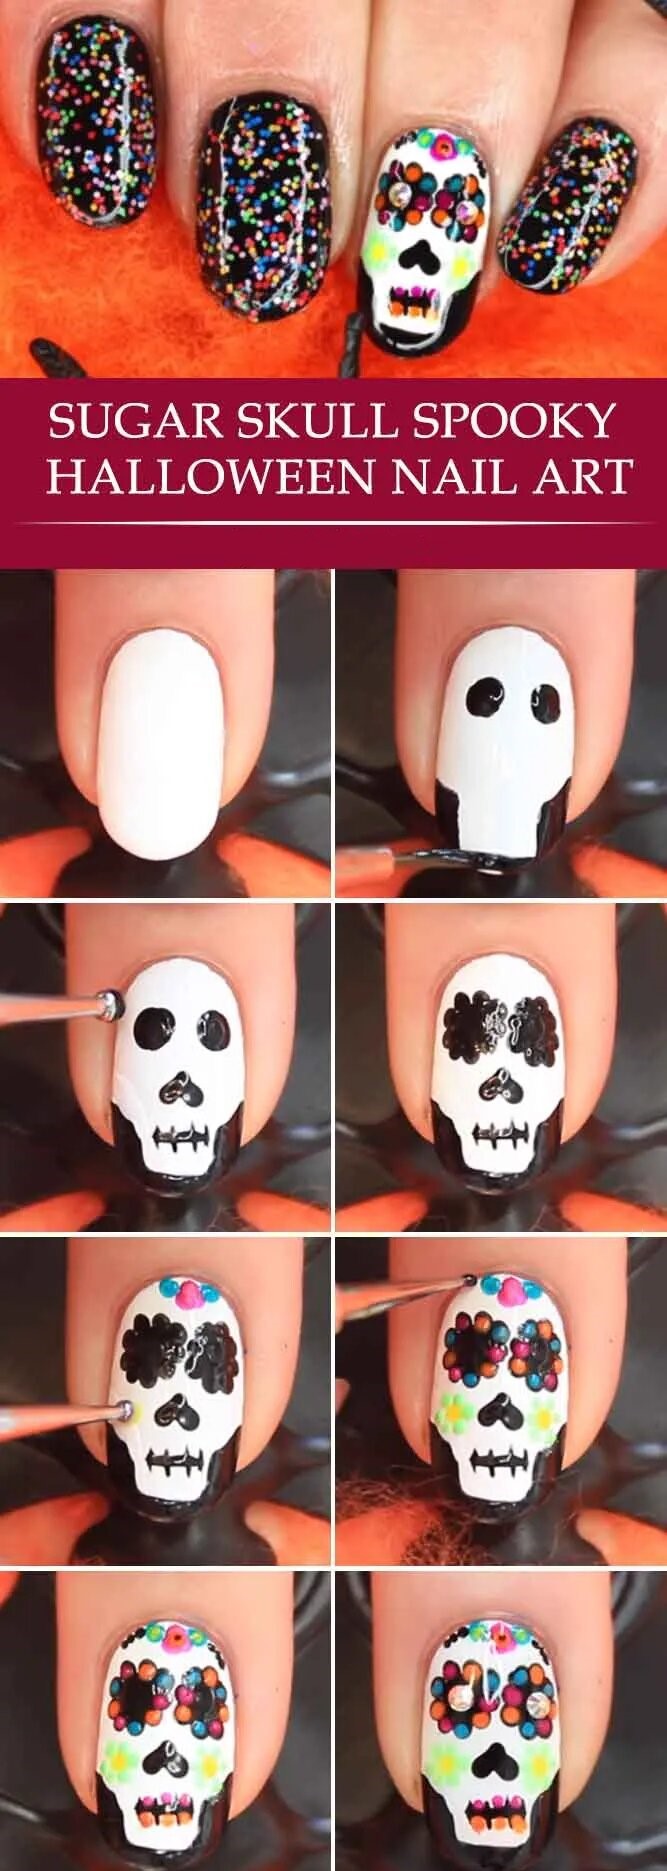
Sugar skull nail art is a popular Halloween choice, combining spooky and colorful elements. To achieve this look, apply a white base coat to your nails. Then, use a thin brush or a toothpick to create the intricate designs typically associated with sugar skulls. Think vibrant flowers, decorative patterns, and intricate details like hearts and swirls. You can use colours, black, red, yellow, and blue to make your sugar skull design pop.
Finish off with a clear top coat to seal in your masterpiece. With sugar skull nail art, you can add a touch of festive flair to your Halloween look without spending hours at the salon. Additionally, you can incorporate abstract lines, graphic shapes, and even candy corn for a more creative and unique twist on the traditional sugar skull design.
10.Sweet Cat Design For Halloween Nails
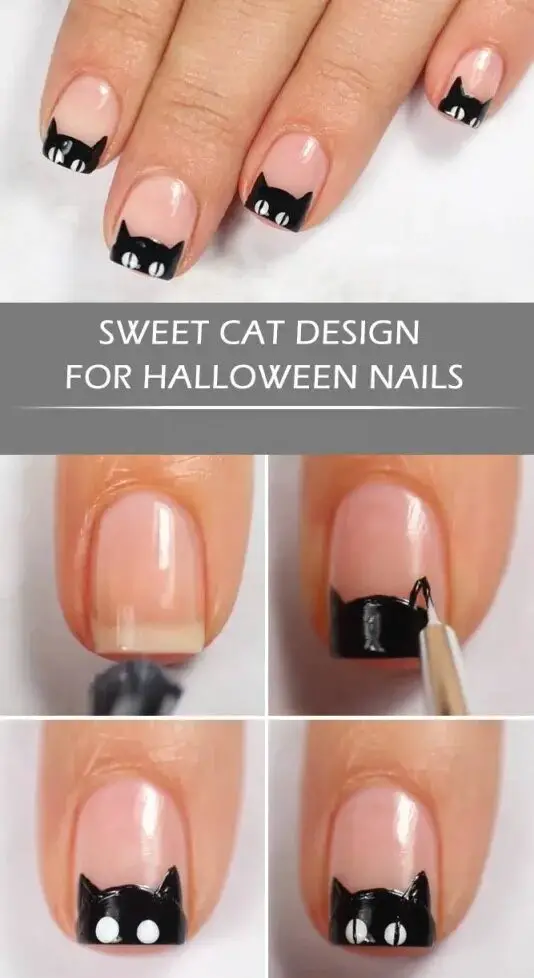
This adorable design features a black cat with yellow eyes on a bright orange background, perfect for entering the Halloween spirit. To create this look, paint your nails with a vibrant orange polish. Once dry, use a thin brush or a nail art pen to draw on the cat’s head and ears using black polish.
Next, use yellow or green polish to add two small dots for the eyes. Finish the design by adding whiskers and a little pink nose using a fine-tipped brush or dotting tool. Seal in your masterpiece with a top coat, and you’ll have purr-fectly festive nails that will impress you.
11.Not Scary Moon Nails
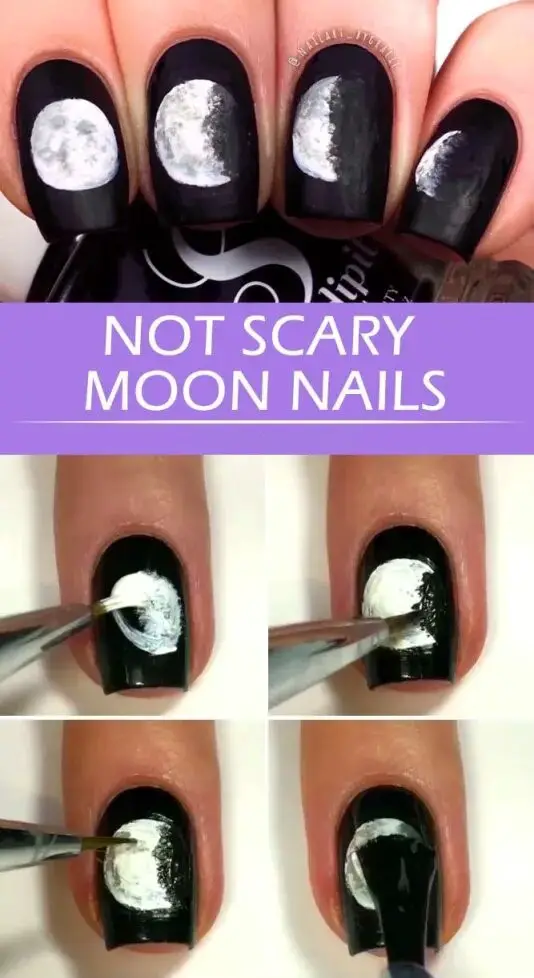
This design features a delicate crescent moon on a dark background, also known as a half moon, creating a celestial and mystical vibe. Paint your nails with a black or deep blue base color to achieve this chic design. Then, using a thin nail art brush or a toothpick, create a small white crescent shape near the cuticle of each nail.
You can add some silver or gold glitter to represent stars in the night sky for an added touch of magic. Finish off with a glossy top coat to seal the design and give your nails a polished look. With not-scary half-moon nails, you can embrace the Halloween spirit while keeping your manicure cute and elegant.
12.Spirited Away Easy Halloween Nails
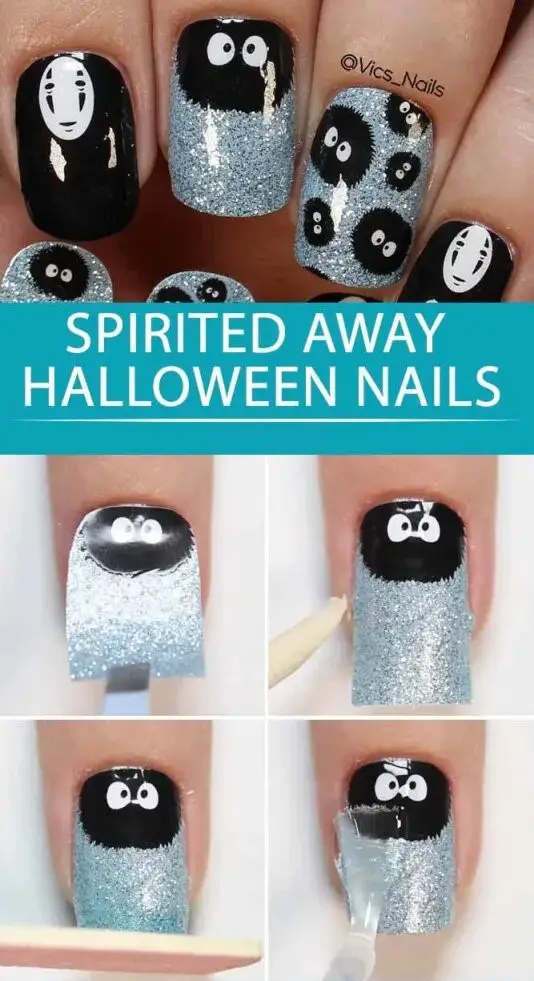
Add a touch of whimsy to your Halloween nails with Spirited Away-inspired designs. These easy nail art ideas are perfect for those who want to showcase their love for Studio Ghibli while keeping it spooky.
There are endless possibilities, from No-Face and Chihiro to Haku and the iconic bathhouse. Whether you opt for a simple accent nail or go all out with a full set of Spirited Away-themed designs, these nail art ideas will impress at any Halloween gathering.
13.Lovely Gradient Easy Halloween Nails
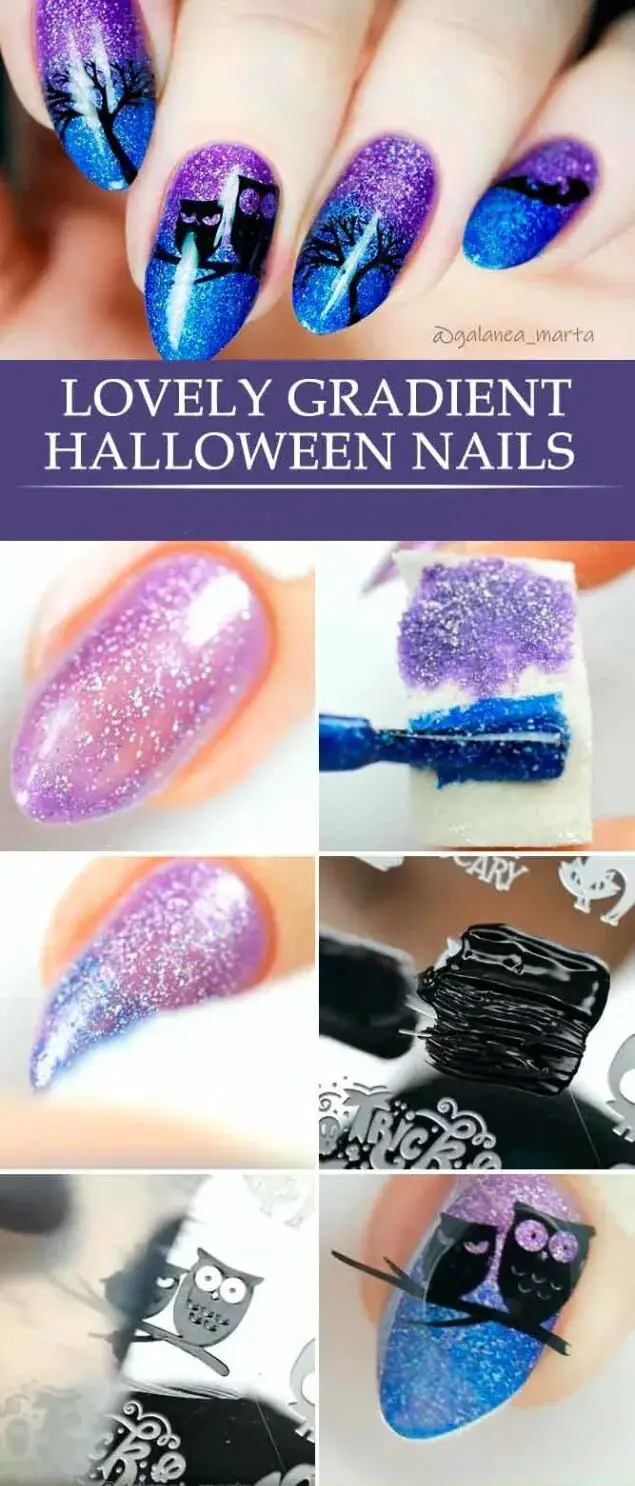
This design allows you to play with different colors and create a spooky and festive look for a holiday. Apply a pale pink base coat to protect your nails to achieve this look. Then, choose two or more colors that complement each other and create a gradient effect.
You can use a makeup sponge to dab the colors onto your nails, starting with the darkest shade at the base and gradually fading into the lighter shade towards the tip. Finish off with a top coat for added shine and protection. This gradient design is easy to do and allows for endless color combinations, making it perfect for Halloween festivities.
14.Neon Skull Nails Tutorial
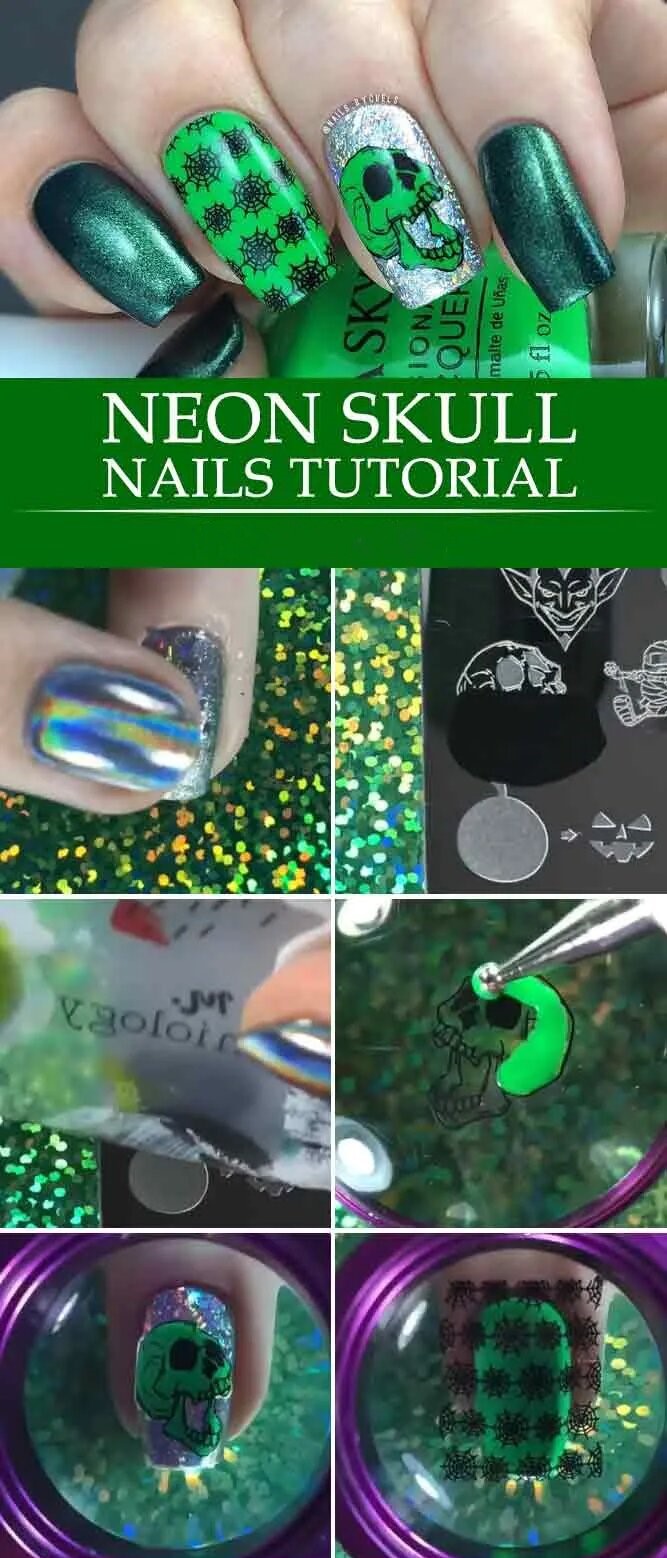
This tutorial will guide you through the steps to achieve this spooky and vibrant look. Start by applying a base coat to protect your nails. Then, paint your nails with a bright neon color of your choice.
Once dry, use a fine brush or dotting tool to create the outline of a skull on each nail using black nail polish. Fill in the skull shape with white polish, leaving gaps for the eyes and nose. Next, use black polish to add details such as teeth and eye sockets. Finish off with a top coat to seal your design and give it a glossy finish with bright colors.
15.Simple Skeleton Mermaids Nails Design
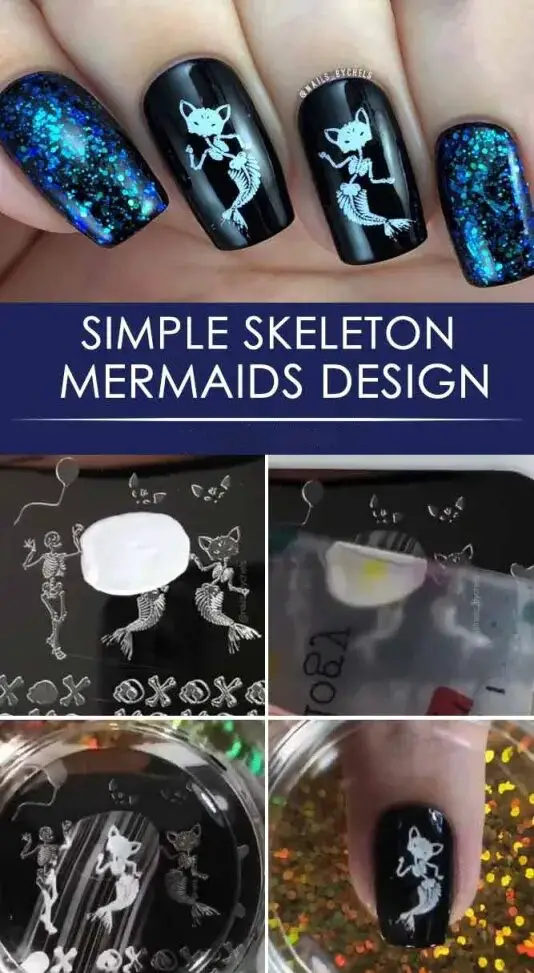
This unique twist on a classic Halloween theme combines the spooky allure of skeletons with the mystical beauty of mermaids. To achieve this look, paint your nails a black or dark blue base color. Then, use white nail polish to create skeletal shapes on each nail, focusing on the finger joints and tips.
Next, add a pop of color by painting scales in shades of green or purple along the sides of each nail. Finish off the design with a layer of clear topcoat to seal in your masterpiece. With these simple steps, you can rock a stunning and original Halloween nail design that will turn heads at any costume party.
16.Cute Ghosts Nails Tutorials
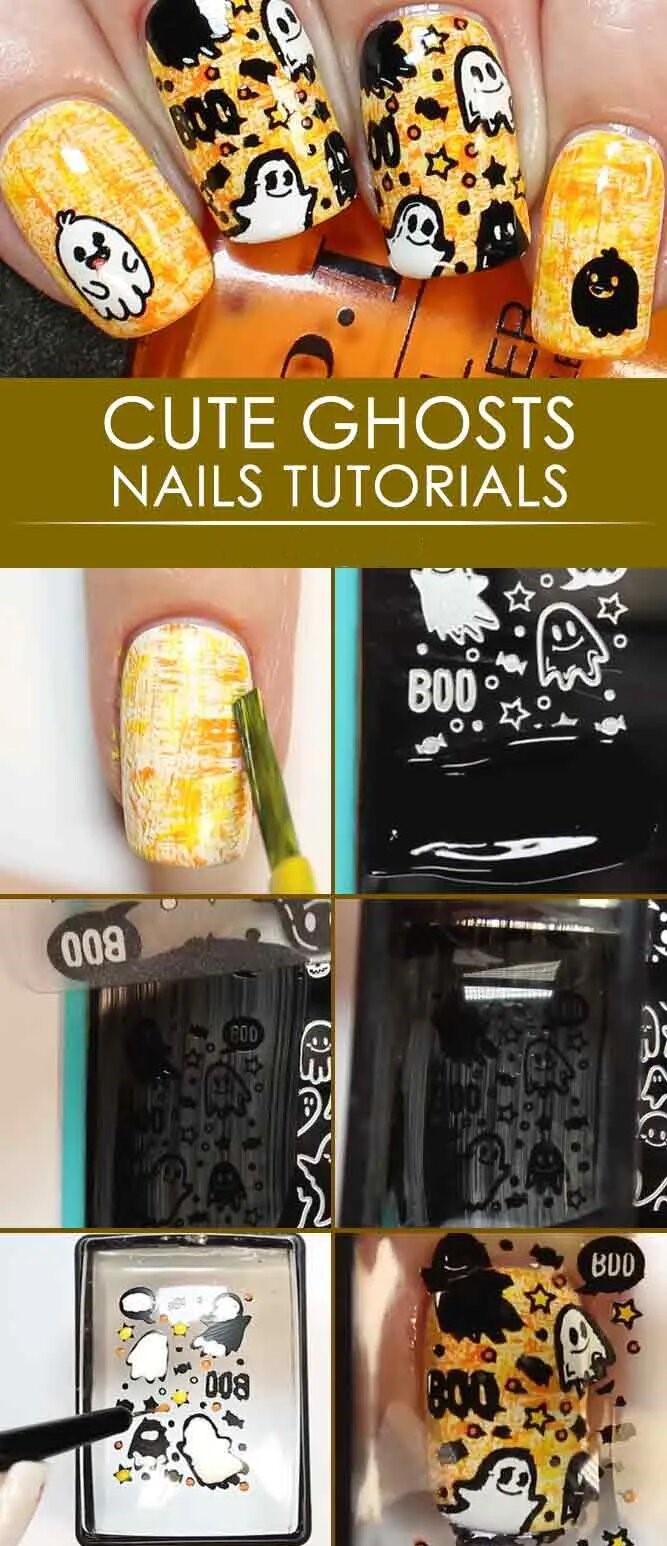
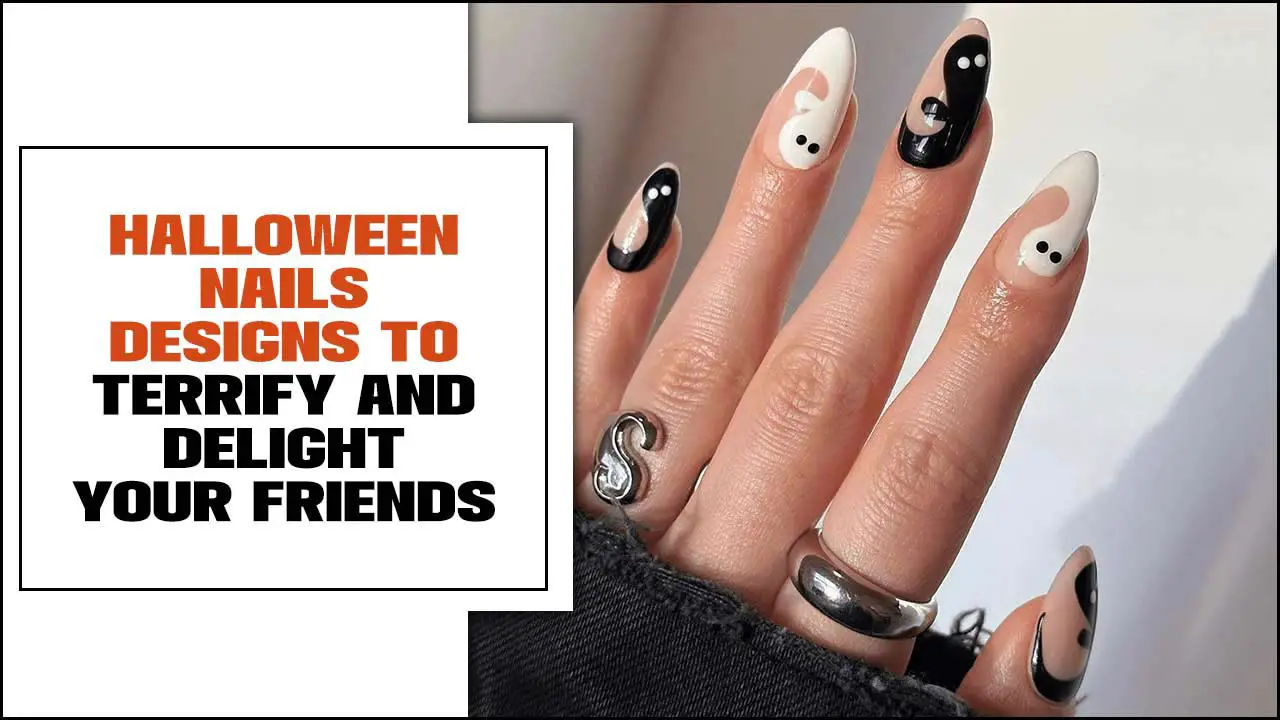
These spooky yet adorable nail art designs, including the cute ghost nails design, are perfect for Halloween parties or just to add a festive touch to your everyday look. To create ghost nails, start by painting your nails with a white base coat.
Once dry, use a thin brush or a toothpick to create the outline of a ghost shape using black nail polish. Fill in the shape with white nail polish and add two small dots for the eyes using black polish or a dotting tool. Finish off with a top coat to seal your Halloween design, and rock those cute ghost nails all season long!
17.Simple Bloody Mani For Halloween
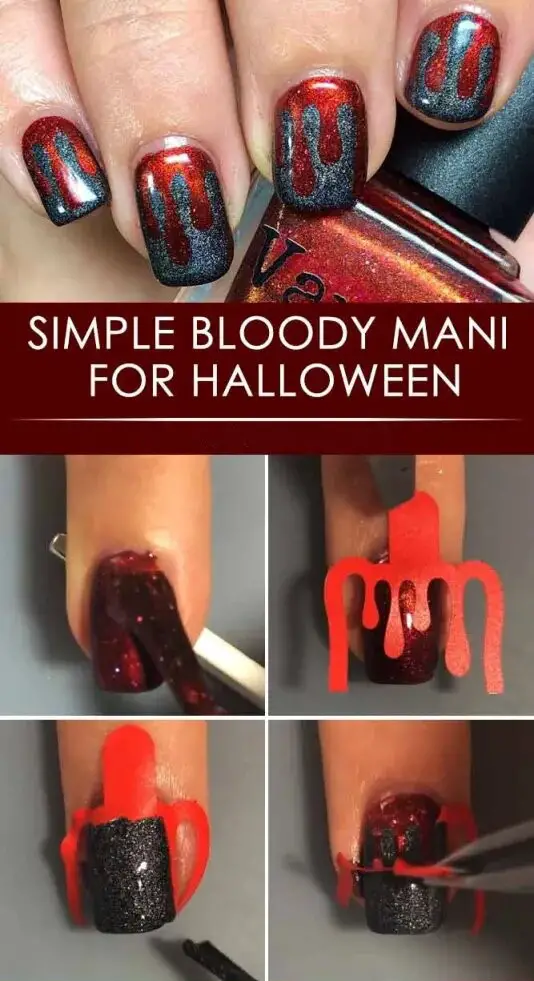
Halloween nail design, a bloody mani, is the perfect choice. Start by painting your nails with a deep red polish as the base color. Once dry, use a thin brush or toothpick dipped in black polish to create small lines and splatters that resemble blood drips.
For an added touch of gore, you can use a toothpick to apply some fake blood or red nail polish around the cuticles to create a more realistic effect. Finish off with a glossy top coat to seal your design and give it a polished matte finish. This simple bloody mani gives you the perfect Halloween nails to turn heads.
18.Halloween Gradient Nails Tutorial
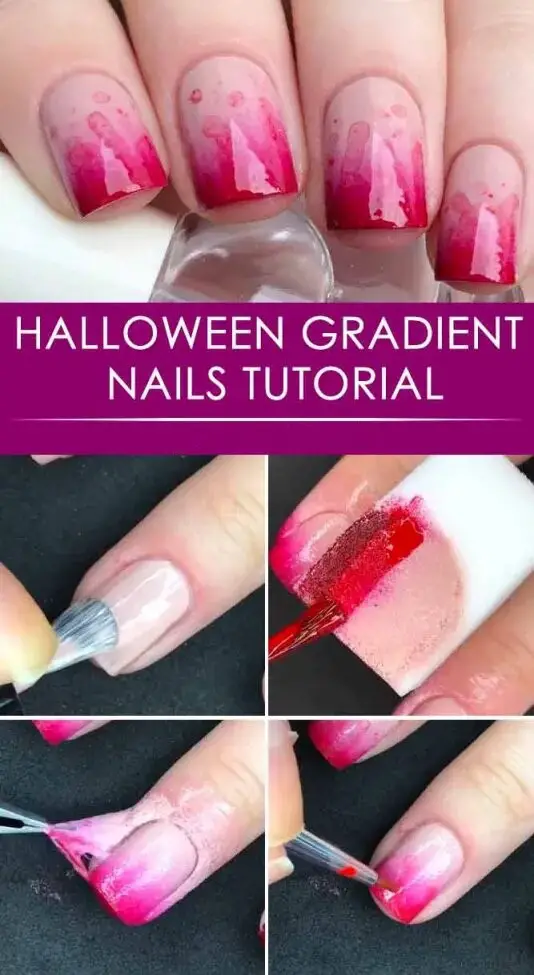
Creating a gradient effect on your nails is a fun and easy way to add Halloween flair to your manicure. To achieve this look, apply a base coat to protect your nails. Once the base coat is dry, choose two or three Halloween-inspired nail polish colors that complement each other. Using a makeup sponge or a small piece of sponge, apply the colors to the sponge in a gradient pattern.
Gently dab the sponge onto your nails, starting at the cuticle and working towards the tip. Repeat this step until you achieve your desired opacity and blend between colors. Finish off with a top coat to seal your design and give it a glossy finish. With this simple tutorial, you can create stunning gradient Halloween nails that will impress.
19.Beautiful Mummy Nails Art
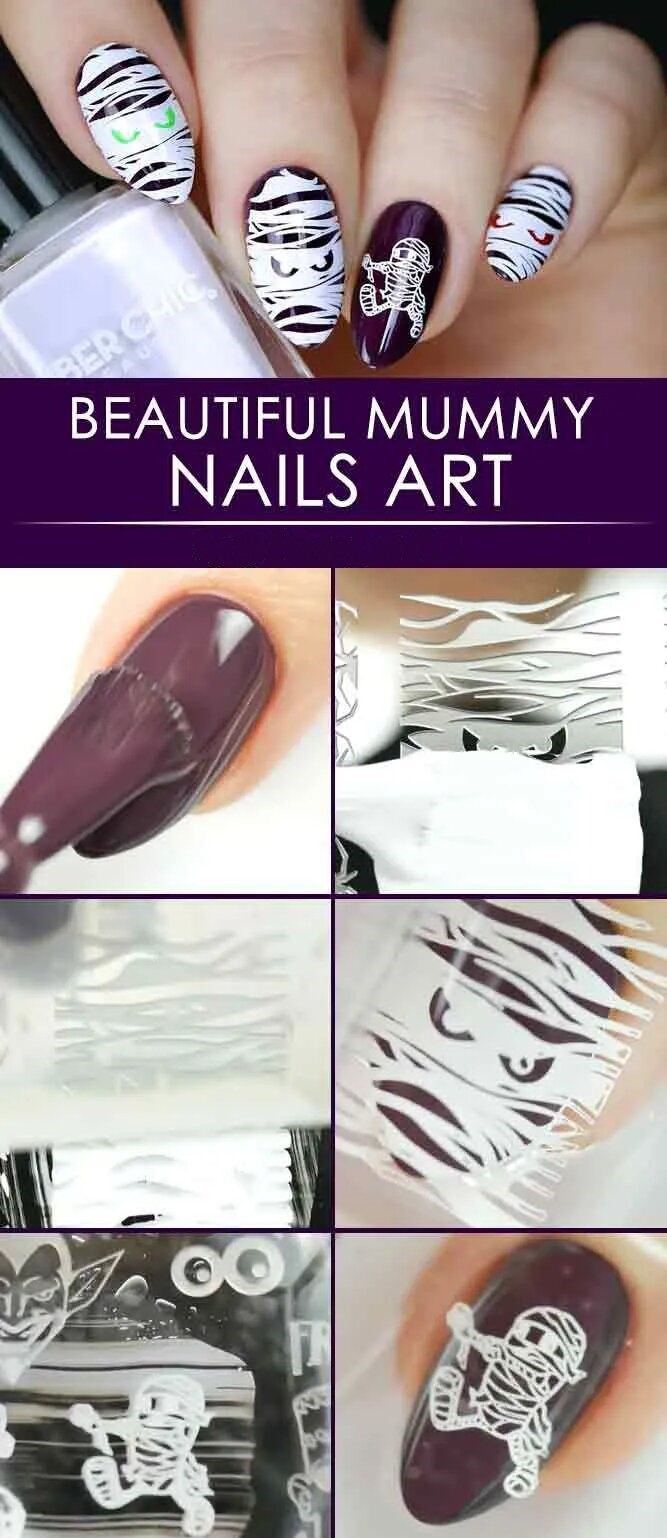
This creative design is easy to achieve and will make a statement. Start by applying a base coat and let it dry. Then, using white nail polish, create thin, wavy lines across your nails to mimic a mummy’s bandages. You can use a toothpick or a thin brush for more precision.
Once the white polish has dried, add depth and dimension by lightly brushing on some gray or black polish in certain areas. Finish off with a top coat for long-lasting wear. With these mummy nails, you’ll be sure to turn heads at any Halloween party.
20.Haunted House Easy Halloween Nails With Water Decals
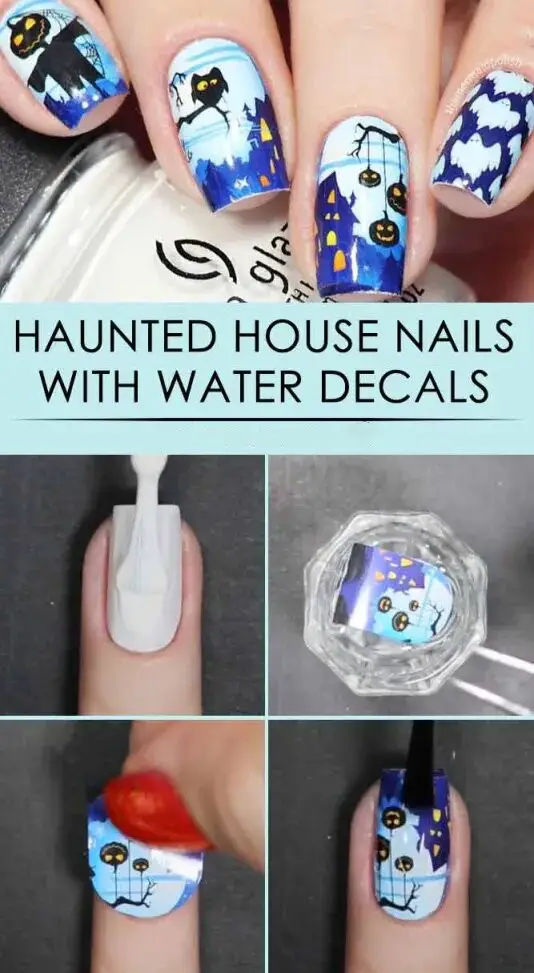
This design is perfect for those who want a spooky and festive look without spending hours on intricate nail art. Water decals, like Olive & June’s Nail Art Stickers, are a great option because they are easy to apply and can create detailed designs with minimal effort.
Simply choose your desired haunted house design, cut out the decal, soak it in water, and then apply it to your nails. Finish off with a top coat to seal the design, and you’ll have a hauntingly beautiful manicure in no time.
21.Grey Nails With Castle Accent
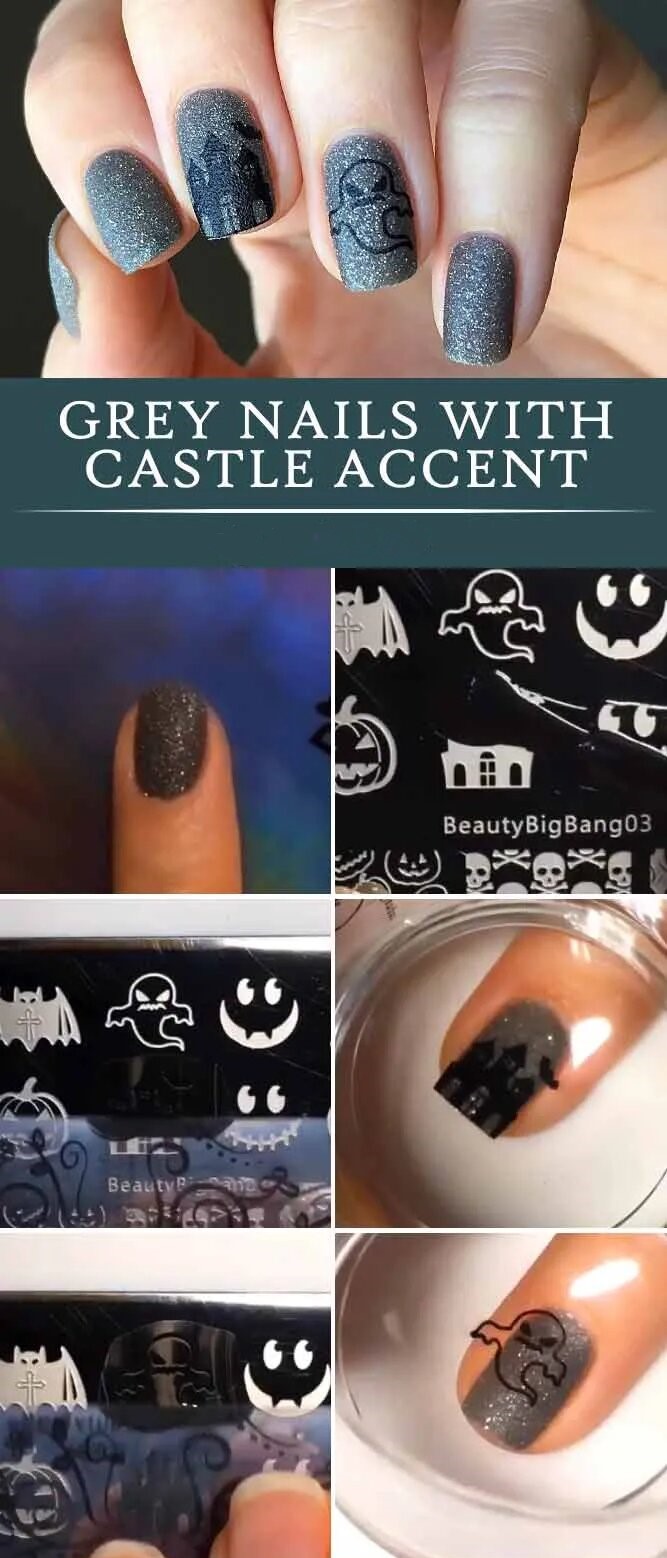
This design is perfect for adding a touch of spookiness to your Halloween look without being too over-the-top. Start by painting your nails with a grey polish as the base color. Once dry, use a black nail art pen or thin brush to draw a small castle on one accent nail.
To make it look more intricate, you can add details like windows, doors, and turrets. Finish off with a top coat to seal your design and give it a glossy finish. With this simple yet eye-catching nail design, you’ll be ready to show off your Halloween spirit in style!
22.Fantastic Glitter Pumpkin Nails
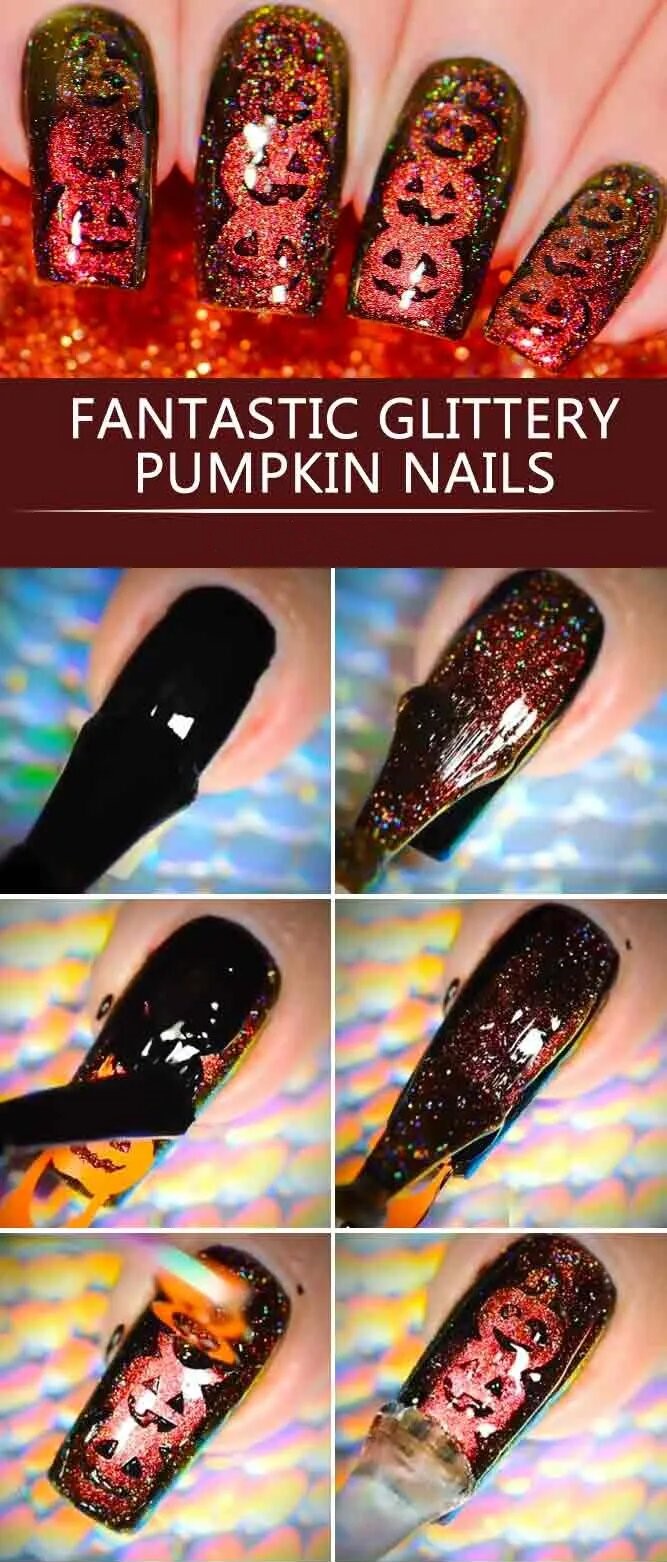
Get into the Halloween spirit with these fantastic glitter pumpkin nails! These adorable nail designs are perfect for adding a touch of festive fun to your look. Start by painting your nails with a base color, such as orange or black. Then, using a fine-tipped brush or a toothpick, create small pumpkin shapes on each nail.
Once the pumpkins are dry, add some sparkle by applying a layer of glitter polish over the top. Finish off with a clear top coat to seal your design and ensure long-lasting wear. These glitter pumpkin nails will make a statement and make you feel festive all season long!
23.Bloody Nails Tutorial
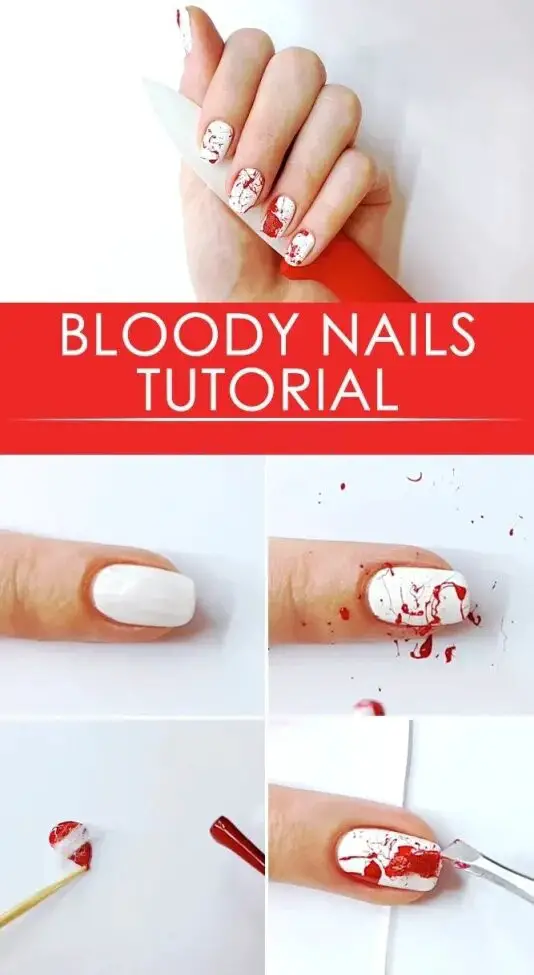
Creating a spooky and festive Halloween nail design doesn’t have to be complicated. One easy and creative option is the bloody nails tutorial. Apply a clear base coat to protect your natural nails to achieve this look. Then, apply a red polish as the base color. Once dry, use a thin brush or toothpick dipped in black polish to create random streaks and splatters of blood drops on the nails.
You can also add a touch of white or clear polish to create a dripping effect. Finish with a glossy top coat for a polished finish. This simple yet effective Halloween nail design will make a statement at any Halloween gathering.
24.3D Spiders Nails With Negative Space
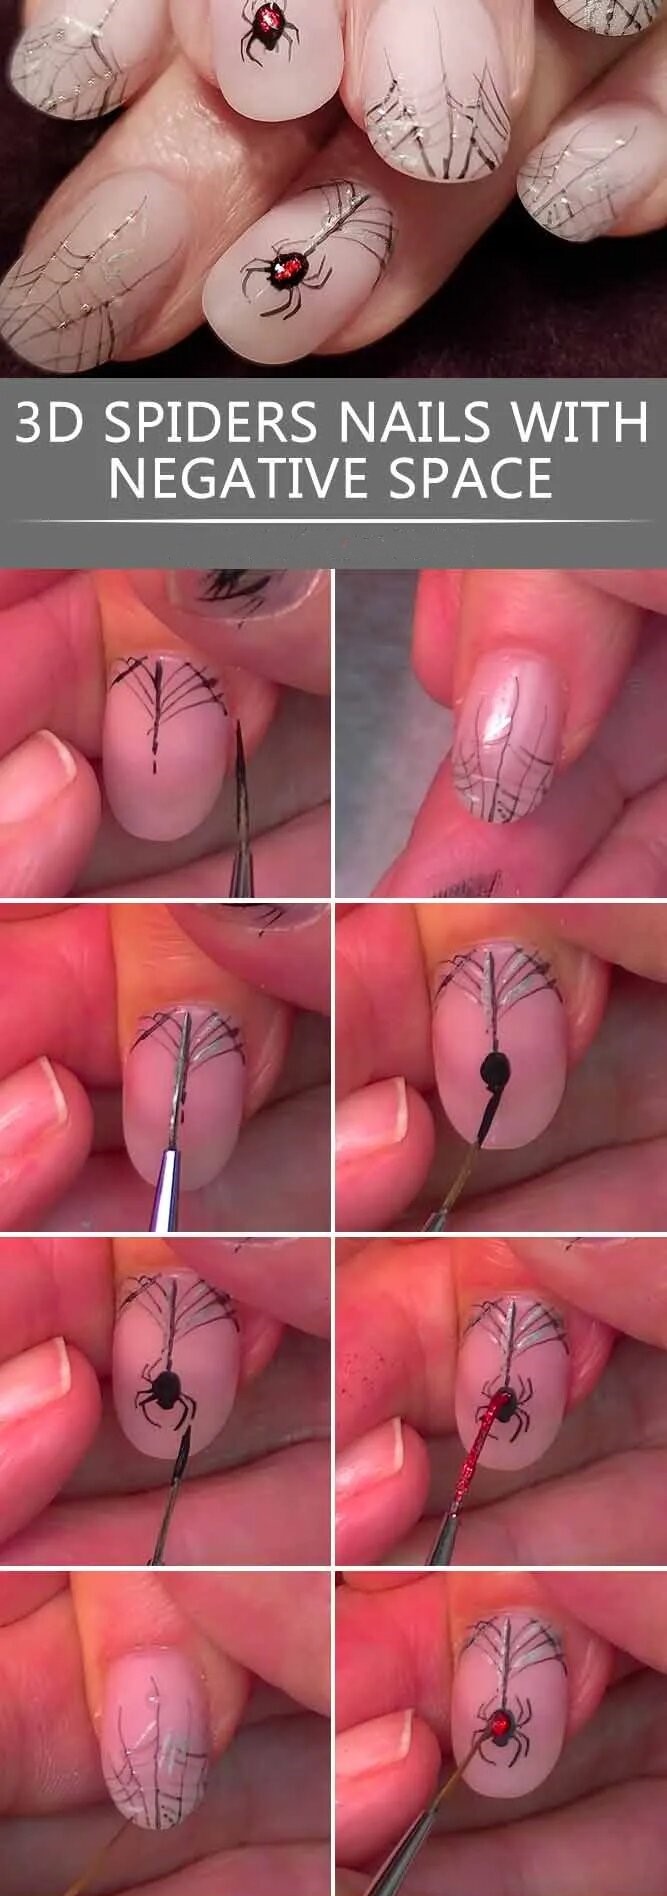
This design is perfect for adding a spooky touch to your Halloween look. Start by painting your nails with a base color of your choice, leaving some areas unpainted for the negative space effect. Then, using a dotting tool or toothpick, create small dots in black gel polish to represent the spider bodies.
Once the dots are dry, use a thin brush to add legs to each spider, extending them outwards from the bodies. Finish off the design with a clear top coat to seal in your spooky spiders and create stunning spider web nail art. This nail design is sure to impress and is surprisingly simple to achieve!
25.Graveyard Ombre Nails Art
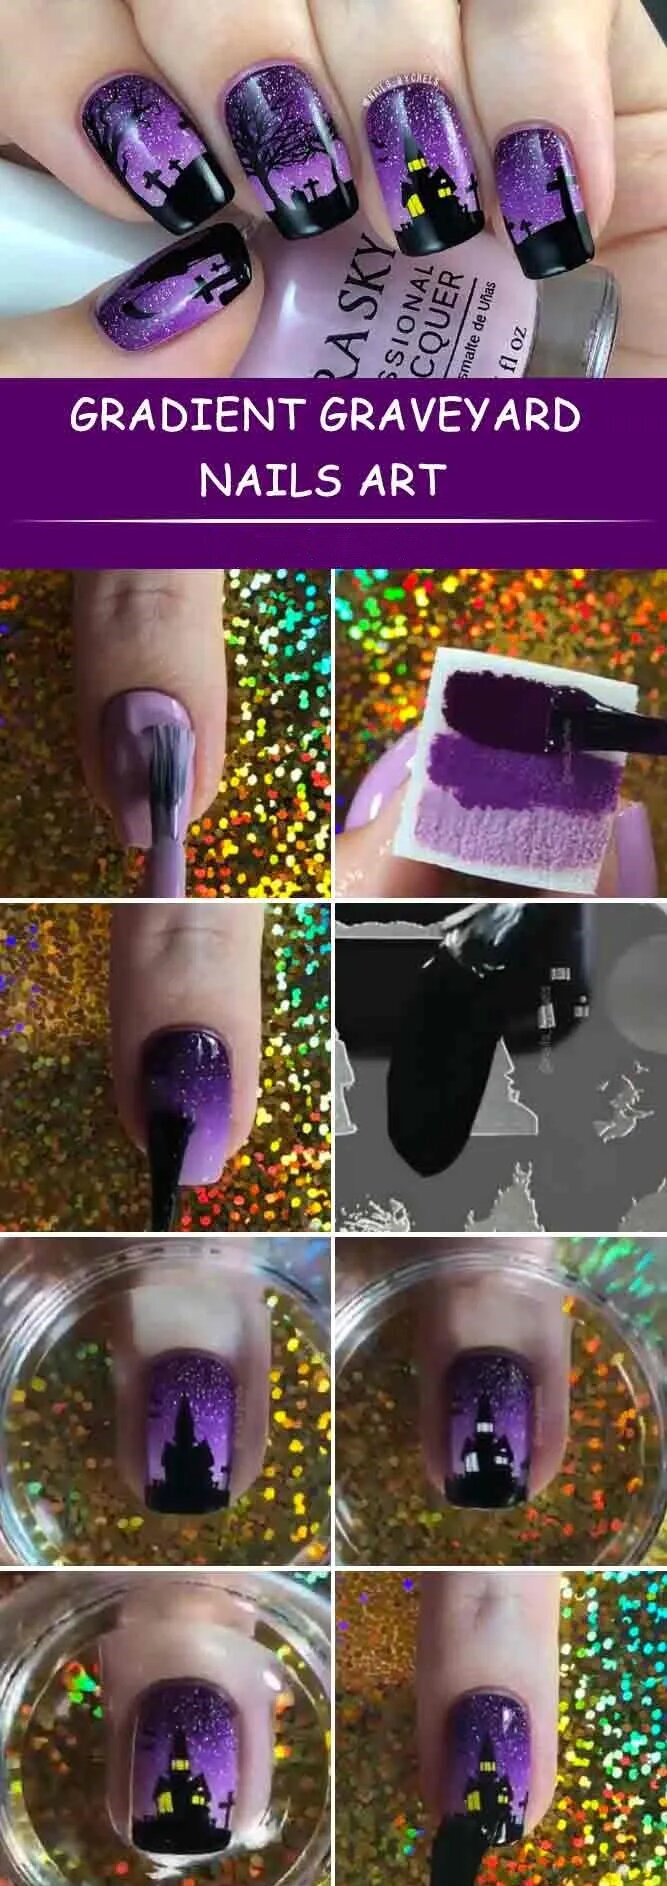
Creating a spooky and stylish Halloween nail design doesn’t have to be complicated. One fun and easy option is graveyard ombre nails. To achieve this look, paint your nails a dark, vampy color as the base. Then, using a makeup sponge, dab a lighter gray or white polish on the tips of your nails to create an ombre effect.
Once that has dried, use a thin nail art brush or toothpick to add tombstones and crosses in black polish on the accent nails. Finish off the design with tiny dots or lines representing stars in the night sky. This graveyard ombre nail art is a simple yet spooky way to celebrate Halloween and show off your creative flair.

