Glitter nail designs for short square nails offer a dazzling way to express yourself effortlessly, adding sparkle and sophistication without over-complicating your mani.
Short square nails are a modern classic, offering a neat and chic canvas. But sometimes, you want a little extra oomph, right? Adding glitter is the perfect way to elevate your look without needing complex skills. You might think glitter is tricky to work with, or only for special occasions, but I’m here to show you how easy and fun it can be to create gorgeous glitter nails on your short square tips!
We’ll dive into simple techniques, must-have tools, and a variety of dazzling designs that are perfect for beginners and busy bees alike. Get ready to make your nails shine!
Why Short Square Nails Love Glitter
Short square nails are incredibly versatile. Their straight edges and rounded corners offer a clean, polished look that’s universally flattering. When you add glitter to this shape, you get the best of both worlds: the understated elegance of a short nail and the eye-catching glamour of sparkle. Glitter can make short nails appear more elongated, drawing the eye and adding dimension. Plus, glitter hides minor imperfections like a pro!
Essential Tools for Your Glitter Mani
You don’t need a professional salon setup to create amazing glitter nails. Here are the basic tools that will make your DIY manicure a breeze:
- Base Coat: This protects your natural nail and helps your polish last longer.
- Top Coat: Crucial for sealing in glitter and ensuring a smooth, glossy finish.
- Glitter Polish: The star of the show! Comes in various sizes and colors.
- Fine-Tip Brush or Toothpick: For precise application and picking up individual glitter pieces.
- Tweezers: Handy for placing larger glitter elements.
- Nail File & Buffer: To shape your nails into that perfect square and smooth the surface.
- Orange Stick or Cuticle Pusher: For gently tidying up the edges.
- Rubbing Alcohol or Nail Polish Remover: For cleaning up any mistakes.
Simple Glitter Nail Designs for Short Square Nails: Step-by-Step
Let’s get creative! Here are some easy-to-follow designs perfect for short square nails.
1. The Classic Glitter Gradient (Ombre Effect)
This is perhaps the easiest and most popular way to incorporate glitter. It looks sophisticated and is super forgiving!
- Prep Your Nails: Start with clean, dry nails. Shape them into a neat square and gently buff the surface. Apply a base coat and let it dry completely.
- Apply Your Base Color: Paint your nails with your chosen solid color. This could be a nude, pastel, deep jewel tone, or even a sheer polish. Let it dry thoroughly. You might need two coats for full opacity.
- Create the Gradient: Dip your brush into your glitter polish. Start applying the glitter polish at the tip of your nail, concentrating the most glitter there.
- Blend Down: Gently brush or dab the glitter polish downwards towards the cuticle, thinning out the application as you go. The goal is to have the most glitter at the tip and gradually less towards the base, creating a seamless fade.
- Add Another Layer (Optional): If you want more intensity, wait for the first layer of glitter to dry slightly, then apply another layer, focusing more on the tip area again to build up the sparkle.
- Seal the Sparkle: Once completely dry, apply a thick, generous layer of top coat. This is vital to smooth out the textured glitter and prevent it from snagging.
2. The Dazzling Glitter Accent Nail
Want a pop of sparkle without going all-out? An accent nail is perfect!
- Prep and Base Coat: As always, start with clean, shaped nails and a base coat.
- Choose Your Accent Nail: Decide which nail(s) you want to be your glitter accent. The ring finger is a classic choice!
- Paint Remaining Nails: Paint all your non-accent nails with your desired solid color. Let them dry.
- Glitter Time!: On your accent nail, apply glitter polish. You can create a full glitter nail, a glitter tip, or even a glitter stripe. For a full glitter nail, simply apply the glitter polish all over. For a glitter tip, paint the tip of the nail with glitter polish, like a French manicure.
- Clean Up: Use a fine-tip brush dipped in nail polish remover to clean up any stray glitter or polish lines around the cuticle and sidewalls.
- Top Coat: Once dry, apply a top coat over all nails, including the accent nail, to seal everything in and add shine.
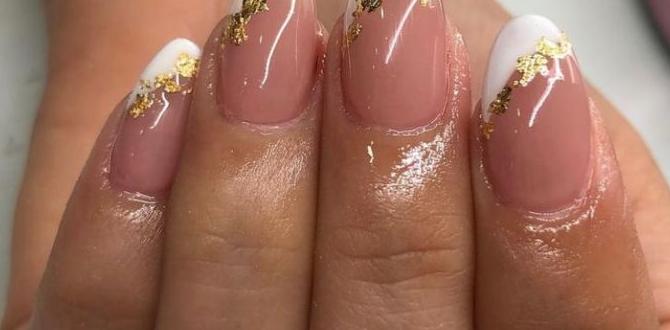
3. Glitter Tip French Manicure
A modern twist on a classic!
- Base and Color: Apply base coat, then paint nails with a sheer nude or pale pink polish. Let it dry.
- Glitter French Tip: Carefully paint a crisp line of glitter polish across the tip of each nail. Use a steady hand. For extra precision, you can use a thin nail art brush or even a small piece of tape as a guide (ensure the tape is firmly adhered to avoid lifting polish).
- Clean and Perfect: Clean up any mistakes with a fine brush and remover.
- Seal: Apply a clear top coat over all nails.
4. Glitter Placement for a Chic Look
This technique allows for more control and can create sophisticated, artful designs.
- Prep: Start with your base coat and your solid nail color, fully dried.
- Apply Top Coat (Strategy): Apply a layer of sticky top coat. This means applying a regular top coat but not letting it fully dry. It should still have a tacky surface. This is crucial for glitter adherence.
- Pick Up Glitter: Use a fine-tip brush or the tip of a wax pencil (often used for rhinestones) to pick up individual glitter pieces or a small cluster of glitter.
- Place Glitter: Carefully place the glitter onto the tacky top coat on your nail. You can create patterns like scattered dots, a single bold stripe, or outline a shape.
- Let it Set: Allow the glitter to adhere properly for a minute or two.
- Seal Tightly: Once the glitter is in place, apply a thick, generous layer of top coat. You might need two layers of top coat to completely encase the glitter and make your nail surface smooth.
Helpful Tip: For loose glitter, consider using a clear nail glue specifically designed for nail art as your “sticky” base instead of top coat. This offers exceptional hold before sealing with a top coat.
Glitter Nail Design Ideas for Short Square Nails
Short square nails are amazing canvases for glitter! Here are some ideas to get your creative juices flowing:
1. Subtle Sparkle: Micro Glitter
Micro glitters are tiny particles that create a shimmering, frosting-like finish rather than chunky flakes. They look incredibly chic and are perfect for a sophisticated look. Apply as a full glitter coat or a gradient.
2. Bold Statement: Chunky Glitter
These larger glitter pieces make a real impact. Use them for accent nails, glitter tips, or try placing larger flakes strategically for an artistic effect. They add fantastic texture!
3. Color Play: Holographic and Iridescent Glitter
Holographic glitter catches the light and reflects rainbow colors, while iridescent glitter shifts color depending on the angle. These add a magical, ethereal quality to any nail design.
4. Duo-Chrome Glitter
Similar to iridescent, duo-chrome glitter polishes feature two distinct colors that shift beautifully as you move your hand. They offer a surprising and captivating look.
5. Glitter with Negative Space
Leave parts of your nail bare (natural or base color only) and apply glitter strategically. This could be a glitter stripe, a glitter crescent moon at the base, or scattered holographic flecks over a sheer base. This design is modern and keeps the look light.
6. Glitter & Stamping
Use glitter polish as your base or for accent elements, then add stamped designs over the top for added complexity and fun. A fine glitter base can make stamped images pop!
7. Glitter French Tips
As mentioned, a glitter tip is a fantastic alternative to a classic white French tip. Try a fine silver glitter for a subtle shimmer, or a bold holographic glitter for a statement. You can even do a double line with a thin glitter line above a colored tip.
Choosing the Right Glitter Polish
Not all glitter polishes are created equal! Understanding the types can help you achieve your desired look:
| Type of Glitter Polish | Description | Best For | Application Tip |
|---|---|---|---|
| Fine Glitter (Micro Glitter) | Very small glitter particles, creates a shimmer or frosted effect. | Full nail coverage, subtle gradients, elegant looks. | Easy to apply evenly with the brush. Often looks smooth after one top coat. |
| Medium Glitter (Flakes) | Slightly larger, more distinct glitter pieces. | Accent nails, glitter tips, visible sparkle. | May require more top coat layers to smooth the texture. |
| Chunky Glitter (Hex or Large Flakes) | Large, noticeable glitter pieces in various shapes and sizes. | Bold statement nails, unique placement designs, maximum sparkle. | Best applied with tweezers for precise placement or dabbed on with a brush after a tacky top coat. Requires multiple top coats. |
| Glitter Suspension Base | Glitter suspended in a clear or colored base polish. | Versatile; can be used for full coverage, gradients, or as a topper. | Shake well before use. Can be applied directly or used to ‘paint’ with glitter. |
Tips for Maintaining Your Glitter Manicure
A beautiful glitter mani deserves to last! Here’s how to keep it looking fresh:
- Generous Top Coat is Key: As mentioned multiple times (because it’s that important!), don’t skimp on the top coat, especially over textured glitter. Two layers are often better than one. Look for quick-dry top coats to speed up the process.
- Avoid Harsh Chemicals: Glitter can be porous. Try to wear gloves when doing household chores involving water or harsh cleaning products.
- Gentle Filing: If you need to file your nails, be very gentle. Aggressive filing can sometimes catch on glitter pieces and lift the polish.
- Moisturize: Keep your cuticles and hands moisturized. Dry skin can make any manicure look older.
- Touch-Ups: If a few glitter pieces come off, you can often re-apply a tiny bit of clear polish or glitter glue to the spot and gently press the loose glitter back on, then seal with a top coat.
Is Glitter Bad for Your Nails?
Generally, no! When applied correctly over a base coat and sealed with a good top coat, glitter polish is perfectly safe for your natural nails. The key is proper application and removal. Avoid the urge to peel or scrape off glitter polish, as this can damage the nail surface. Opt for soaking your nails in nail polish remover to gently lift the polish.
For healthy nails, remember to take breaks between manicures to let your nails breathe. This is a good practice for any type of polish.
How to Remove Glitter Polish Easily
Glitter polish can be notoriously stubborn to remove. Don’t despair! Here’s the best method:
- Soak, Don’t Scrub: Saturate a cotton ball (or makeup pad) with acetone-based nail polish remover.
- Press and Hold: Place the saturated cotton ball firmly onto your glitter-covered nail and hold it there for about 30 seconds to a minute. This allows the remover to break down the polish and glitter.
- Wipe Away: Gently wipe the cotton ball across your nail in a downward motion. You may need to repeat this process a couple of times.
- Clean Up: For any remaining stubborn bits, you can use a fine-tip brush dipped in remover to gently clean around the edges and cuticles.
- Final Clean: Wash your hands and apply cuticle oil and hand cream.
Consider using foil wraps for removal if you find the cotton ball method challenging. Simply soak the cotton, place it on the nail, wrap with aluminum foil, and let it sit for a few minutes.
Frequently Asked Questions (FAQ)
Q1: Can I put glitter nail designs on very short nails?
Absolutely! Glitter is fantastic for short nails because it adds visual interest and can make them appear a bit longer. The key is choosing designs that complement the short shape, like a glitter tip or a subtle gradient. Avoid very large, sparse glitter pieces that might make short nails look cluttered.
Q2: Do I need a special base coat for glitter polish?
A regular base coat is fine to protect your nails. However, for applying loose glitter or chunky glitter pieces precisely, a tacky top coat or specialized nail glue acts as a better adhesive base before sealing. Standard glitter polishes typically adhere well to a regular base coat.
Q3: How do I prevent glitter from looking bumpy on my short square nails?
The secret is a generous top coat! Apply at least one thick layer of a good quality top coat, making sure to coat the entire nail surface, including the free edge. For chunky glitters, a second layer of top coat after the first has dried can help smooth everything out and create a seamless finish.
Q4: Can I mix different types of glitter in one design?
Yes, you can! Mixing fine glitter with chunky glitter can create a unique textured look. For example, you could layer a fine holographic glitter over a solid color and then add a few carefully placed larger glitter flakes on top. Just remember that mixing different sizes might require even more top coat to smooth everything out.
Q5: How long do glitter manicures typically last on short square nails?
With proper application, including a good base and top coat, glitter manicures on short square nails can last anywhere from 5-7 days, sometimes longer. Proper removal and regular moisturizing of your hands and cuticles will also help maintain the look and health of your nails.
Q6: Are there nail art tools specifically for glitter?
While you can use regular tools, some nail artists find tools like wax pencils (for picking up glitter), fine-tipped brushes (for detailed application and clean-up), and silicone-tipped tools (for smoothing and placing glitter) very helpful. However, toothpicks and tweezers are excellent beginner-friendly options!
Conclusion
Adding glitter to your short square nails is a simple yet incredibly effective way to boost your style and bring a touch of glamour into your everyday life. Whether you opt for a subtle shimmer, a bold gradient, or a playful glitter tip, these designs are achievable, fun, and guaranteed to make you smile every time you look at your hands.
Remember, nail art is all about self-expression. Play with colors, experiment with techniques, and most importantly, have fun with it! Your short square nails are the perfect canvas for a little bit of sparkle. So go ahead, embrace the shine, and let your nails do the talking!


