French Ombre Baby Boomer Nails: Essential Designs
French Ombre Baby Boomer nails offer a sophisticated, gradient manicure that blends a soft pink base with a milky white tip. This classic look is perfect for any occasion and is surprisingly achievable for beginners with the right techniques and understanding of essential designs. Learn how to master this elegant style for a flawless finish that enhances your natural beauty.
Hey beauty lovers! Are you ready to dive into one of the most chic and timeless nail trends out there? French Ombre Baby Boomer nails are everywhere, and for good reason! They’re elegant, flattering, and give off that incredibly polished vibe. But if you’ve ever looked at them and thought, “Wow, that looks complicated!” – don’t worry! I’m here to break down exactly what makes these nails so special and how you can rock them yourself. We’ll explore the simple beauty behind this design and some fun variations to make them uniquely yours. Get ready to feel inspired and confident to create your own stunning, gradient manicures!
—
What Exactly Are French Ombre Baby Boomer Nails?
Let’s start with the basics. When we talk about “French Ombre Baby Boomer nails,” we’re describing a modern twist on the classic French manicure. Instead of a stark white line at the tip, these nails feature a seamless, gradual blend – or ombre – of a soft, milky pink or nude base into a soft white at the tip. The “Baby Boomer” part refers to this gentle, hazy transition, hinting at the nostalgic, retro feel of the design. Think of it as a sophisticated, soft-focus version of the traditional french tip. It’s all about achieving that effortless, “your nails but better” look with a touch of subtle glamour.
—
Why Are They So Popular?
The enduring popularity of French Ombre Baby Boomer nails comes down to a few key factors:
Versatility: They are incredibly versatile. Whether you’re heading to a wedding, a job interview, or a casual brunch, these nails fit every occasion. They complement any outfit and skin tone, making them a go-to for so many.
Elegance & Sophistication: The soft gradient creates a naturally beautiful and refined look. They exude an understated elegance that’s always in style.
Flattering Appearance: The blend helps to elongate the nail bed, making fingers appear longer and more slender. The soft colors are universally flattering and create a clean, healthy-looking nail.
Timeless Appeal: Unlike trendier, fast-fashion nail designs, the French Ombre Baby Boomer style has a classic appeal that stands the test of time. They’re a safe yet stylish choice for anyone.
Beginner-Friendly Potential: While they look intricate, the technique can be learned and mastered by beginners, offering a rewarding DIY experience.
—
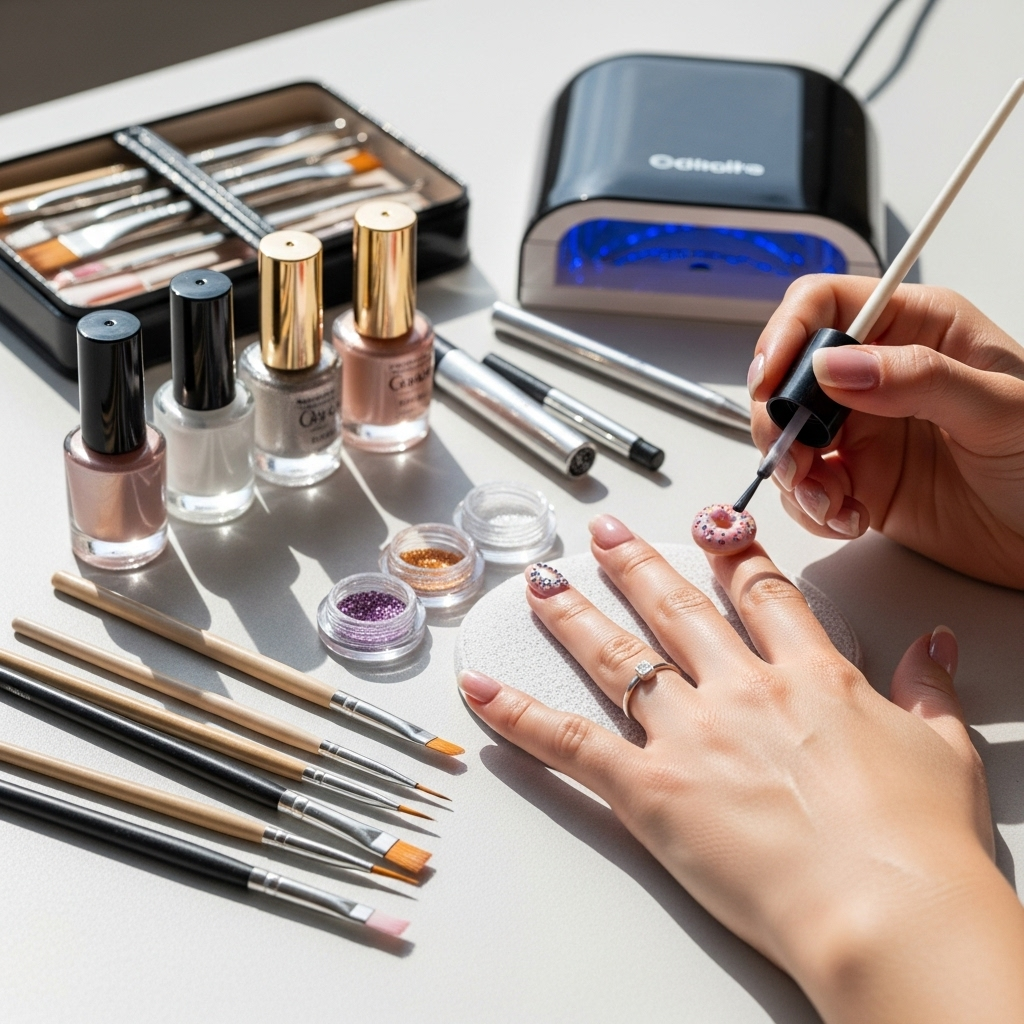
Essential Tools for Your French Ombre Baby Boomer Manicure
Before we get into the fun designs, let’s make sure you have the right gear! Having the proper tools makes the process so much smoother and leads to a much better result.
Nail Polish:
A sheer milky pink or nude base coat.
A milky white or sheer white polish for the tip.
A clear top coat for sealing and shine.
Application Tools:
Make-up sponge or beauty blender: This is your secret weapon for creating the perfect gradient. A regular makeup sponge works wonders!
Small brush (e.g., detailing brush, clean-up brush): For refining edges and cleaning up any mistakes.
Nail file and buffer: To shape your nails and prep the surface.
Cuticle pusher: To gently push back your cuticles for a clean canvas.
Optional (for longer-lasting results or acrylic/gel):
Nail primer and base coat (specifically for gel or acrylic).
UV/LED nail lamp (if using gel polish).
Nail tips or forms (if you want to add length).
Acrylic powder and monomer liquid (if doing acrylic versions).
Builder gel or hard gel.
—
Step-by-Step: Achieving the Classic French Ombre Baby Boomer Look (Gel Polish Method)
The gel polish method often yields the most durable and glossy results, and it’s adaptable for beginners. Here’s how you can create the classic look:
1. Prep Your Nails:
Start by ensuring your nails are clean and dry. Gently push back your cuticles using a cuticle pusher.
Shape your nails to your desired length and shape using a nail file.
Lightly buff the surface of your natural nails to remove any shine. This helps the polish adhere better.
Wipe away any dust with a lint-free wipe or alcohol.
2. Apply the Base Coat and First Color:
Apply a thin layer of your chosen sheer milky pink or nude gel polish.
Cure this layer under your UV/LED lamp according to the polish instructions (usually 30-60 seconds).
Apply a second coat of the pink/nude polish for better coverage and cure again.
3. Create the Ombre Effect:
This is where your makeup sponge comes in! Apply a stripe of the milky white polish and a stripe of the pink/nude polish side-by-side onto your makeup sponge.
Gently dab the sponge onto the tip of your nail, focusing the white towards the free edge and the pink/nude closer to the cuticle. You’ll want to dab the transition area multiple times to build up the color and blend.
Pro Tip: You might need to reapply the polish stripes to your sponge for each nail, or even for multiple applications on the same nail, to achieve the desired gradient intensity.
Don’t worry if it looks a little messy at first! We’ll clean it up.
4. Refine and Clean Up:
Using a small brush dipped in nail polish remover or alcohol, carefully clean up any polish that got onto your skin or cuticles. This step is crucial for a polished finish.
If needed: For a stronger blend, you can repeat the sponging process. You can also use a thin brush to paint a little more white polish onto the tip and gently feather it down towards the pink.
5. Apply Top Coat:
Once you’re happy with the gradient, apply a generous layer of your clear gel top coat, making sure to cap off the free edge of the nail to prevent chipping.
Cure the top coat under the UV/LED lamp.
Wipe off the tacky inhibition layer (if your top coat has one) with a lint-free wipe and alcohol.
If you’re using regular nail polish: The process is similar, but instead of curing, you’ll need to let each layer dry completely. Building up the ombre might take more patience with regular polish as it can dry quickly. A “gradient sponge” designed for nail art can also be very helpful here.
—
Variations on the French Ombre Baby Boomer Theme
The classic look is stunning, but there are so many ways to personalize your French Ombre Baby Boomer nails! Here are a few essential design variations to try:
1. The Almond Shape Elegance
The almond nail shape is a perfect canvas for the French Ombre Baby Boomer look. The gentle curve of an almond nail beautifully complements the soft gradient, creating an elongated and elegant silhouette. This shape enhances the “your nails but better” effect and is universally flattering, adding a touch of sophistication to everyday wear.
How to achieve it: Focus on a very smooth and subtle blend. The gradient should be soft enough that it doesn’t look stark against the natural curve of the almond shape. Ensure the white tip is not too thick.
2. Deep French Ombre (Reverse Ombre)
For those who love a bit more drama or a stronger contrast, the “deep French ombre” is fantastic. This involves extending the white or milky opaque color further down the nail, creating a more pronounced tip that still blends seamlessly into the pink. It’s a bolder take on the classic, offering a more defined French-like structure.
How to achieve it: When sponging or brushing on the white color, extend it further down the nail. You can also use a fine nail art brush to paint a slightly thicker white curve at the tip and then gently feather the edge down to meet the pink base color.
3. Subtle Color Infusion Ombre
Want to add a hint of color? Subtle color infusions are a beautiful way to personalize your Baby Boomer nails. Instead of just pink and white, consider adding a whisper of a pastel shade.
Examples:
Rose Gold Ombre: Blend a rose gold shimmer or a very sheer rosy polish into the white tip.
Lavender Mist Ombre: Introduce a soft lavender hue into the pink base before creating the white ombre.
Peachy Keen Ombre: Use a sheer peachy polish for the base, blending into white.
How to achieve it: Apply your chosen sheer colored polish as the base instead of plain pink. Then, proceed with creating the white ombre as usual. You can also lightly sponge a very sheer colored glitter polish over the finished pink and white blend for an added shimmer.
4. Glitter & Chrome Accents
Glitter and chrome are fantastic for adding a touch of sparkle and modern flair to your Baby Boomer nails.
Glitter Gradient: Apply a fine glitter polish (silver, gold, or iridescent) over the white tips, or create a separate glitter gradient that blends into the white. You can also place glitter strategically near the cuticle or on accent nails.
Chrome Dust: After curing your gel top coat (before wiping the inhibition layer), gently rub chrome powder over the white tips for a holographic or metallic sheen. This creates a stunning, futuristic effect.
How to achieve it: For glitter, either sponge it on with the white, or apply it precisely with a brush to the tips. For chrome, use a dedicated chrome applicator and follow the manufacturer’s instructions carefully – it typically involves rubbing the powder onto a sticky gel surface.
Resources: For tips on applying chrome powder, you can find helpful guides from reputable beauty supply stores like Sally Beauty’s blog.
5. Matte Finish Twist
Switching your glossy top coat for a matte one can completely transform the look of your French Ombre Baby Boomer nails. A matte finish gives a sophisticated, velvety texture that’s incredibly chic and modern, especially with the subtle gradient.
How to achieve it: Simply apply a matte gel top coat instead of the standard glossy one. Ensure the gradient is well-executed, as a matte finish can sometimes highlight imperfections more than a glossy one.
—
Application Techniques: Mastering the Blend
The key to beautiful French Ombre Baby Boomer nails lies in the blending technique. Here are a few methods and tips to help you perfect that seamless gradient:
Sponging Technique
This is the most popular and often easiest method for beginners.
How it works: You apply your base color and white color in stripes onto a makeup sponge. Then, you dab the sponge onto the nail to transfer and blend the colors.
Tips for success:
Use a clean side of the sponge for each nail if possible.
Dab gently and evenly. You might need several passes to build up the color intensity.
Reapply color stripes to the sponge as needed.
Clean up edges immediately with a brush dipped in alcohol or nail polish remover.
Stroking/Feathering Technique (with a Brush)
This method requires a bit more control but can be very precise.
How it works: Apply your pink/nude base coat. Then, using a thin, clean brush (or a brush slightly dampened with monomer if using acrylic, or alcohol if using gel/regular polish), gently feather the edge of the white polish where it meets the pink.
Tips for success:
Use a high-quality, fine-tipped brush.
Work with a polish that isn’t too thick or too thin.
Control the pressure you apply to create thin, wispy strokes.
This is great for touch-ups or refining ombre created by sponging.
Building with Layers (Gel/Acrylic)
For the most seamless and durable ombre, particularly with gel or acrylic, you can build the gradient in layers.
How it works: Apply your pink/nude base color. Then, either strategically place white product (gel or acrylic) at the tip and gently blend it down with a brush, or use a slightly opaque white polish and a fine brush to paint the French tip, then blend the edge. You can then encapsulate the entire nail with a clear top coat or builder gel.
Tips for success:
Work in thin layers.
Use the right brushes for the product you’re using.
Patience is key! Let each layer cure (if needed) and ensure your blending is smooth before adding the next.
—
Common Issues and How to Fix Them
Even the most experienced nail enthusiasts run into minor hiccups! Here are some common problems and easy fixes for your French Ombre Baby Boomer nails:
Issue: Streaky or Uneven Ombre
Fix: If using a sponge, try dabbing a bit more firmly and evenly. If using a brush, gently feather the edges again with thin strokes. Applying another thin layer of the base color and then re-doing the ombre with the sponge can also help. Ensure polish isn’t too old or too thin.
Issue: White Tip Too Thick or Chunky
Fix: Use a clean-up brush dipped in alcohol or nail polish remover to gently shave off and refine the harsh edge. For gel or acrylic, this can often be filed down before applying the top coat.
Issue: Transition Line Too Harsh
Fix: If the blend between pink and white looks like two distinct colors, you need more blending. Lightly go over the line with a clean brush and a tiny bit of the pink polish, or re-sponge lightly over the area. A sheer white polish for the tip can also help create a softer transition than a fully opaque one.
Issue: Polish on Cuticles/Skin
Fix: This is where your clean-up brush is your best friend! Dip it in nail polish remover or alcohol and carefully trace along your cuticle line to remove any excess polish before curing or drying. Clean up immediately after application.
Issue: Bubbles in the Polish
Fix: Bubbles usually occur when polish is applied too thickly or is old and gummy. Try applying thinner coats and ensure your polish is fresh. If you see a bubble, it’s best to remove that coat and reapply. Shaking polish bottles can also introduce bubbles; try rolling them gently between your hands to mix.
—
Maintaining Your French Ombre Baby Boomer Nails
Once you’ve achieved that perfect gradient, you’ll want to keep them looking fabulous!
Wear Gloves: Protect your nails (and your manicure!) by wearing gloves when doing household chores like washing dishes or cleaning. Harsh chemicals are the enemy of polish.
Moisturize: Keep your hands and cuticles hydrated with a good cuticle oil or hand cream. Healthy cuticles mean a better-looking nail base.
Avoid Harsh Use: Try not to use your nails as tools to open things or pry. This can lead to chipping and lifting.
Regular Touch-ups: For regular polish, keep a matching pink and white polish handy for minor chips.
* For Gel/Acrylic: These are more durable, but if you notice any lifting or chipping, it’s best to get them professionally filled or removed to prevent further damage.
—
Table: Comparing French Ombre & Classic French Manicure
| Feature | French Ombre Baby Boomer Nails | Classic French Manicure |
| :——————— | :——————————————— | :—————————————— |
| Tip Transition | Soft, gradual blend (gradient) | Sharp, defined white line |
| Color Palette | Pink/nude base with hazy white tip | Pink/nude base with crisp white tip |
| Overall Look | Soft, natural, sophisticated, modern | Clean, structured, classic, bold |
| Application Diff. | Can be trickier to blend perfectly | Easier to achieve a crisp line |
| Longevity (Gel) | Excellent | Excellent |
| Best For | Everyday wear, special occasions, subtle elegance | Formal events, timeless look, polished style |
—
Frequently Asked Questions (FAQ)
Q1: Can I do French Ombre Baby Boomer nails at home?
A1: Absolutely! With the right tools, like a makeup sponge, and a little practice, you can achieve stunning French Ombre Baby Boomer nails right at home. It’s a rewarding DIY manicure.
Q2: How long do French Ombre Baby Boomer nails typically last?
A2: If done with gel polish and proper application, they can last 2-3 weeks. Regular nail polish might last 5-7 days depending on wear and care.
Q3: Is the Baby Boomer trend difficult to master?
A3: It might take a few tries to perfect the ombre blend, but it’s considered one of the more achievable “advanced” nail art looks for beginners. The key is patience and using a sponge!