Ethnic pattern accent nails are a vibrant and stylish way to add a unique flair to your manicure. These designs, inspired by global cultures, are surprisingly easy to create and elevate any look, making them an essential trend for self-expression.
Ever look at your nails and think, “Something’s missing”? You’re not alone! Sometimes, a solid color just doesn’t capture your vibe. You want a little more sparkle, a little more story. That’s where ethnic pattern accent nails come in. They’re a fantastic way to show off your personality and appreciation for diverse art. Don’t worry if you’re new to nail art; I’m here to guide you through creating these stunning looks. We’ll cover everything from picking patterns to applying them with ease. Get ready to transform your nails into miniature works of art!
What Are Ethnic Pattern Accent Nails?
Ethnic pattern accent nails are a nail art trend that draws inspiration from traditional and cultural designs found all over the world. Think geometric motifs from Native American art, intricate paisley from India, bold tribal symbols, or delicate floral patterns from various Asian cultures. These designs are typically applied to one or two accent nails on each hand, rather than all ten. This creates a focal point and adds a touch of sophisticated artistry without overwhelming the overall look. It’s a beautiful way to celebrate diversity and incorporate global aesthetics into your personal style.
Why Are They So Popular?
The surge in popularity of ethnic pattern accent nails can be attributed to several factors. Firstly, they offer a unique and eye-catching alternative to traditional manicures. People are increasingly seeking ways to express their individuality, and these designs provide a creative canvas. Secondly, the globalized world we live in has exposed us to a wealth of diverse cultural art, sparking an appreciation for its beauty and intricate details. Finally, DIY nail art has become more accessible, with a plethora of tools and tutorials available, empowering individuals to experiment with more complex designs from the comfort of their homes. These nails are as much about personal style as they are about cultural appreciation.
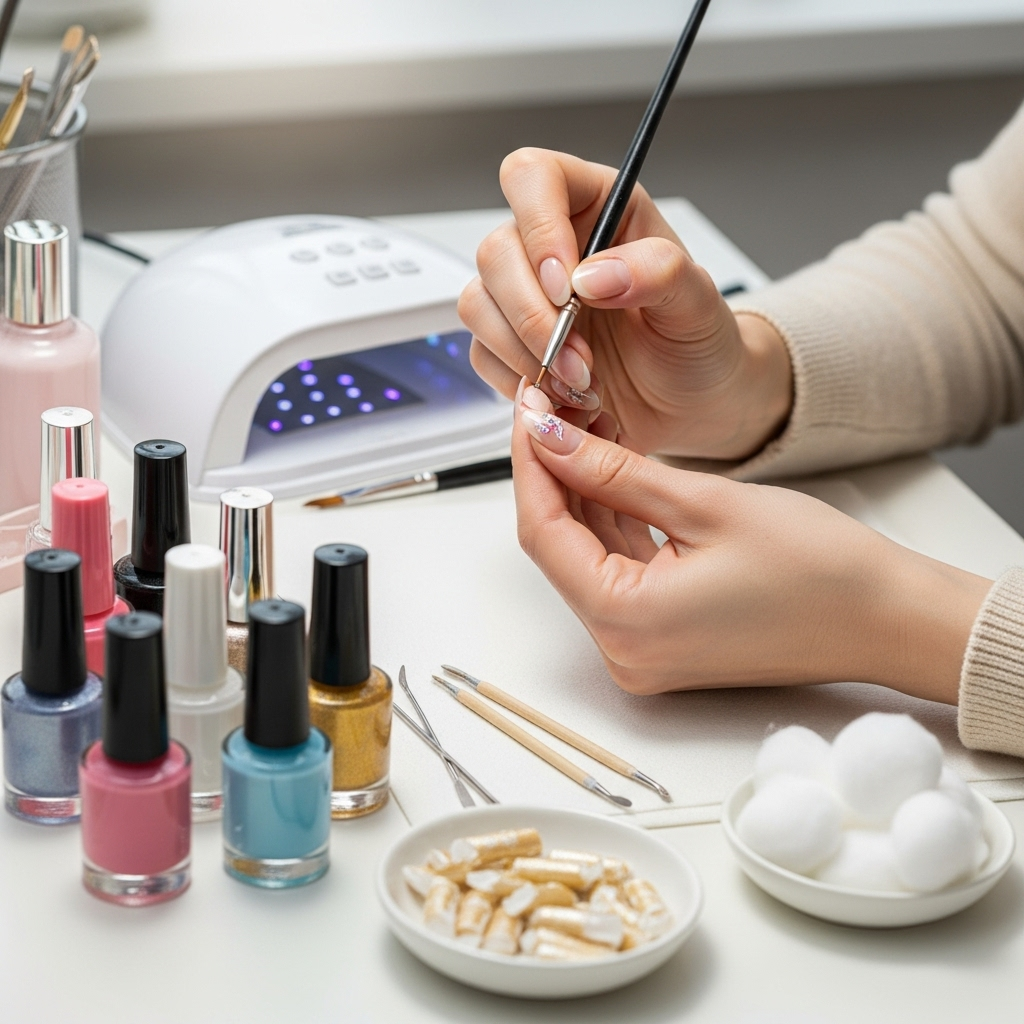
Essential Tools for Ethnic Pattern Accent Nails
Creating beautiful ethnic pattern accent nails doesn’t require a professional salon setup. With a few essential tools, you can achieve stunning results right at home. Here’s what you’ll need to get started:
- Base Coat: This protects your natural nails from staining and helps your polish adhere better.
- Top Coat: This seals your design, adds shine, and helps your manicure last longer.
- Nail Polish Colors: Choose a few colors that complement each other and the pattern you want to create.
- Fine-Tipped Nail Art Brushes: These are crucial for drawing intricate lines and details. A set with various tip sizes is ideal.
- Dotting Tools: These have small metal balls at the ends and are perfect for creating dots, swirls, and small repeating elements.
- Nail Art Pens or Polish with Fine Applicators: For super fine lines and detailed work, these are incredibly user-friendly.
- Stencils or Nail Stickers: If you’re a beginner or short on time, these can make intricate patterns much easier to achieve.
- Tweezers: Especially useful for picking up and placing small nail art elements like rhinestones or delicate stickers.
- Nail Polish Remover and Cotton Swabs/Pads: For cleaning up any mistakes and removing polish.
- Cuticle Pusher/Orange Stick: To neatly push back your cuticles for a clean base.
- Nail File and Buffer: To shape your nails and create a smooth surface.
Having these basic tools will equip you to tackle a wide range of ethnic pattern designs. Remember, practice makes perfect, so don’t be discouraged if your first attempt isn’t flawless!
Choosing Your Inspired Ethnic Patterns
The beauty of ethnic pattern accent nails lies in their diverse inspiration! You can find patterns that resonate with your heritage, your travel dreams, or simply designs you find aesthetically pleasing. Here are some popular sources of inspiration:
- Tribal Prints: Bold geometric shapes, zigzags, and symmetrical designs often found in African, Native American, and Polynesian cultures.
- Moroccan Designs: Intricate geometric mosaics, star patterns, and arabesques.
- Indian Motifs: Paisley (mango shape), intricate floral patterns, and henna-inspired swirls.
- Aztec and Mayan Art: Sharp geometric lines, stepped patterns, and serpent-like figures.
- Japanese Patterns: Seigaiha (waves), Asanoha (hemp leaf), and floral motifs like cherry blossoms.
- Scandinavian Designs: Simple geometric shapes and folk art-inspired motifs.
- Bohemian (Boho) Style: Often a mix of various cultural elements, incorporating feathers, mandalas, and free-flowing patterns.
To choose your pattern, consider the colors you love, the overall style you’re going for, and the intricacy you feel comfortable with. Online searches for “ethnic nail art inspiration,” “tribal nail designs,” or “Moroccan patterns” can yield a wealth of ideas. You can also look at textiles, pottery, or jewelry for inspiration. Remember to select patterns that are achievable with your current skill level, especially when you’re starting out.
Step-by-Step Guide to Creating Ethnic Pattern Accent Nails
Ready to create your own stunning ethnic pattern accent nails? Follow these simple steps. We’ll focus on a general approach that can be adapted to many designs.
Step 1: Prepare Your Nails
A good manicure starts with well-prepped nails. This step ensures your polish and designs last longer and look their best.
- Remove Old Polish: If you have any polish on, remove it completely with nail polish remover.
- Shape Your Nails: File your nails to your desired shape. Consider a shape that complements the patterns you plan to use – sharper shapes can sometimes enhance geometric designs.
- Buff the Surface: Gently buff the surface of your nails with a buffer to create a smooth canvas and remove any natural oils. This helps polish adhere better.
- Cleanse: Wipe your nails with a lint-free cloth dipped in nail polish remover or rubbing alcohol to remove any dust or oil.
- Apply Base Coat: Apply one thin layer of base coat and let it dry completely. This is vital for protecting your nails from staining and making the colors pop.
Step 2: Apply Your Base Color
Choose a solid color for your nails that will serve as the background for your accent nail design. This could be a neutral tone, a bold contrasting color, or a color that complements your chosen ethnic pattern. Apply two thin coats of your chosen nail polish, allowing each coat to dry thoroughly between applications. Ensure smooth, even coverage.
Step 3: Design Your Accent Nails
This is where the magic happens! For this guide, we’ll assume you’re using nail art brushes or pens for a drawn design. If you’re using stickers or stencils, follow the product instructions.
- Plan Your Design: Look at your inspiration image. Decide which nail(s) will be your accent nail(s).
- Start with Larger Elements: If your design has larger shapes or bold lines, start with those. For example, if you’re doing a geometric tribal pattern, draw the main shapes first using a nail art brush or pen.
- Add Details: Once the larger elements are in place and dry, add finer details. This could be smaller lines, dots, or fill-ins. Use your fine-tipped brushes or nail art pens for precision.
- Use Dotting Tools: Dots are fantastic for ethnic patterns! Use your dotting tools to create small, evenly spaced dots or to fill in areas. You can also connect dots to form lines or shapes.
- Create Symmetry: Many ethnic patterns rely on symmetry. Try to mirror your design on both sides or ensure repeating elements are consistent.
- Color Blocking: If your pattern involves distinct color areas, carefully paint within the lines or use small brushes to switch colors precisely.
- Allow Drying Time: This is crucial! Let each color and each small section of your design dry completely before adding more polish or attempting to draw over it. This prevents smudging.
- Clean Up Mistakes: Keep a cotton swab or orange stick dipped in nail polish remover handy. You can use it to carefully clean up any stray lines or smudges before the polish dries completely.
Step 4: Add Finishing Touches (Optional)
Once your hand-painted design is dry, you can add extra embellishments if you like.
- Rhinestones or Studs: Carefully place small gems or studs onto your design using a detail brush dipped in top coat or specialized nail glue. Tweezers are helpful here.
- Glitter: A touch of glitter can add sparkle. You can apply it over specific parts of the design or all over the accent nail.
Step 5: Seal the Deal with a Top Coat
Once your accent nail designs are completely dry, apply one or two thin layers of a good quality top coat. Be sure to cap the free edge of your nails by running the brush along the tip. This seals in your design, adds a glossy finish, and prevents chipping. Let it dry thoroughly.
And there you have it! Stunning ethnic pattern accent nails created by you!
Advanced Techniques and Tips
Ready to elevate your ethnic nail art game? Here are some advanced tips and techniques to try once you’ve mastered the basics:
- Ombre Backgrounds: Instead of a solid base color, try a subtle ombre fade on your accent nails before adding the ethnic pattern.
- Stamping Plates: Invest in nail stamping plates that feature ethnic designs. These are incredibly efficient for complex patterns. You’ll need a stamper, scraper, and stamping polish.
- Water Decals: These tiny, thin stickers can be soaked off their backing and applied to the nail. They offer intricate designs with minimal effort.
- Mixing Textures: Combine matte and glossy finishes, or use metallic polishes alongside creamy ones for added depth.
- 3D Elements: For the truly adventurous, consider using acrylic powders or gels to create raised patterns on your accent nails.
- Color Theory: Experiment with different color palettes. Consider color complements for bold contrasts or analogous colors for a harmonious look. Understanding basic color theory can make your designs pop.
- Freehand Mastery: Practice drawing basic shapes repeatedly. The more you practice freehand drawing, the more confident you’ll become with intricate patterns.
For those interested in the science behind nail health and polish adhesion, resources like the FDA’s page on cosmetic products offer valuable insights into nail care ingredients and safety. Understanding how nail polish works at a basic level can even help you achieve better application.
Maintaining Your Ethnic Pattern Accent Nails
You’ve put in the effort to create beautiful ethnic pattern accent nails, so you’ll want them to last! Here’s how to keep them looking fresh:
- Wear Gloves: When doing household chores, gardening, or anything involving prolonged water exposure, wear rubber gloves. Water can weaken the bond between polish and nail, leading to chips.
- Avoid Harsh Chemicals: If possible, avoid using your nails as tools to open cans or scrape things. This can lift the polish and damage your design.
- Reapply Top Coat: Every 2-3 days, apply another thin layer of top coat over your entire manicure. This will refresh the shine and provide extra protection, especially on your accent nails.
- Moisturize: Keep your cuticles and hands moisturized with cuticle oil and hand cream daily. Healthy cuticles make for a neat-looking manicure.
- Be Gentle: Treat your nails with care. Avoid tapping them on hard surfaces or picking at the polish.
With a little care, your ethnic pattern accent nails can stay looking fabulous for a week or even longer!
Pros and Cons of Ethnic Pattern Accent Nails
Like any trend, ethnic pattern accent nails have their advantages and disadvantages. It’s good to know what to expect:
| Pros | Cons |
|---|---|
| Unique & Stylish: Offer a distinctive and artistic look. | Time-Consuming: Intricate designs can take time to create. |
| Self-Expression: Allows for showcasing cultural appreciation and personal style. | Requires Practice: Freehand designs may take practice to perfect. |
| Versatile: Can be adapted to various occasions and outfits. | Smudging Risk: Wet polish is prone to smudging, especially with detail work. |
| DIY Friendly: Many designs can be achieved at home with basic tools. | Tool Investment: Good quality nail art brushes and tools can add up. |
| Attention-Grabbing: Creates a conversation starter and a memorable manicure. | Potential for Mistakes: Cleanup is essential but can be fiddly. |
Understanding these points will help you decide if ethnic pattern accent nails are the right choice for you and how to approach them for the best experience.
Inspiration Gallery: Diverse Ethnic Patterns
Let’s dive into some visual inspiration! These examples showcase the incredible diversity and beauty of ethnic patterns you can adapt for your nails.
Geometric Tribal
Imagine bold zigzags, chevrons, and triangles in contrasting colors like black and white, or earth tones. This style often uses thick lines and clear, defined shapes. Excellent for a modern, edgy look.
Paisley & Indian Motifs
Flowing paisley shapes, intricate floral tendrils reminiscent of henna art, or small, repeated traditional Indian patterns. Often in rich jewel tones like burgundy, emerald, or sapphire, or classic black and gold.
Moroccan Lattice & Stars
Think of intricate geometric windows and starbursts. These patterns can be delicate and complex, often in shades of blue, white, terracotta, or metallic gold. They bring an exotic and sophisticated feel.
Bohemian Mandalas
Circular, symmetrical designs that often resemble a spiritual or cosmic diagram. Mandalas can range from simple to incredibly detailed, fitting a Free-spirited, artistic vibe.
Asian Floral & Wave Patterns
Delicate cherry blossoms, stylized maple leaves, or the iconic Seigaiha (Japanese waves). These can be elegant and minimalist or richly detailed, offering a sense of tradition and calm.
When seeking inspiration, don’t limit yourself to just pre-made nail art images. Look at traditional textiles, art history, and cultural decor to find patterns that speak to you. A quick search on platforms like Pinterest or Instagram using terms like “cultural nail art,” “geometric nail designs,” or specific region names (e.g., “Maasai patterns nails”) will yield a treasure trove of ideas.
Frequently Asked Questions (FAQ)
Q1: What are the easiest ethnic patterns for beginners?
A1: For beginners, start with simple geometric shapes like dots, stripes, or chevrons. Tribal patterns with bold, straight lines are also good. Using nail art stickers or stencils is an excellent way to achieve intricate designs with minimal drawing skill.
Q2: How do I make my detailed nail art last longer?
A2: The key is proper prep and a good top coat. Ensure your nails are clean, apply a base coat, and let each layer of polish and design dry completely. Always finish with at least two thin layers of a high-quality, quick-drying top coat, and be sure to cap the free edge of your nails.
Q3: Can I use regular nail polish for ethnic patterns?
A3: Yes, absolutely! While gel polish offers longer wear and a harder finish, regular nail polish is perfectly suitable for creating ethnic patterns. You just need the right tools like fine-tipped brushes and patience for drying time.
Q4: My designs keep smudging. What am I doing wrong?
A4: Smudging usually happens when you try to add a new layer of polish before the previous one is fully dry. Be patient! Even if it looks dry, wait a few extra minutes, especially for thicker lines or multiple colors. Also, avoid touching your nails for at least an hour after your top coat is dry.
Q5: What if I don’t have professional nail art brushes?
A5: Don’t worry! You can achieve great results with household items or affordable alternatives. A toothpick can be used for dots, a regular thin paintbrush (that you don’t mind using only for nails) can be trimmed to a fine point, and some nail polishes come with very fine applicators perfect for detail. Nail art pens are also a budget-friendly option.