Elegant lace nail art for brides offers a delicate, romantic touch, enhancing bridal beauty with timeless sophistication. Discover essential styles perfect for your wedding day, from classic French tips to intricate floral patterns, all achievable for beginners with simple techniques and the right tools.
Planning your wedding day is all about the little details that make you feel absolutely radiant. And guess what? Your nails are a super important part of that picture! We all want that perfect bridal manicure that complements our gown and adds a touch of magic. But finding that ideal design can feel a bit overwhelming, right? Don’t worry, I’ve got your back! We’re going to dive into the most beautiful and elegant lace nail art styles that are totally beginner-friendly. Get ready to feel inspired and empowered to create stunning nails that will make your big day even more special. Let’s get those fingers looking fabulous!
Your Ultimate Guide to Elegant Lace Nail Art for Brides
As Nailerguy, I know how much joy a stunning manicure can bring, especially on a day as significant as your wedding. Lace nail art is the epitome of bridal elegance – it’s subtle, romantic, and incredibly chic. It mirrors the delicate beauty of lace found on wedding dresses, veils, and even jewelry, creating a cohesive and breathtaking look. Whether you’re a complete beginner or just looking for fresh ideas, this guide is designed to make achieving gorgeous lace nail art simple and fun. We’ll explore the most popular and accessible styles, what you’ll need, and how to create them step-by-step.
Why Choose Lace Nail Art for Your Wedding?
Lace nail art is a timeless choice for brides for many reasons:
Romantic Appeal: Lace inherently evokes feelings of romance, tradition, and delicate beauty, perfectly aligning with the aesthetic of a wedding.
Versatility: It can be adapted to countless wedding themes, from vintage and classic to modern and minimalist.
Sophistication: It adds an understated elegance that doesn’t overpower your bridal look but rather enhances it.
Personalization: Lace patterns are incredibly adaptable, allowing for unique designs that reflect your personal style.
Photogenic: Delicate details like lace nail art look stunning in wedding photos, adding an extra special touch to your close-ups.
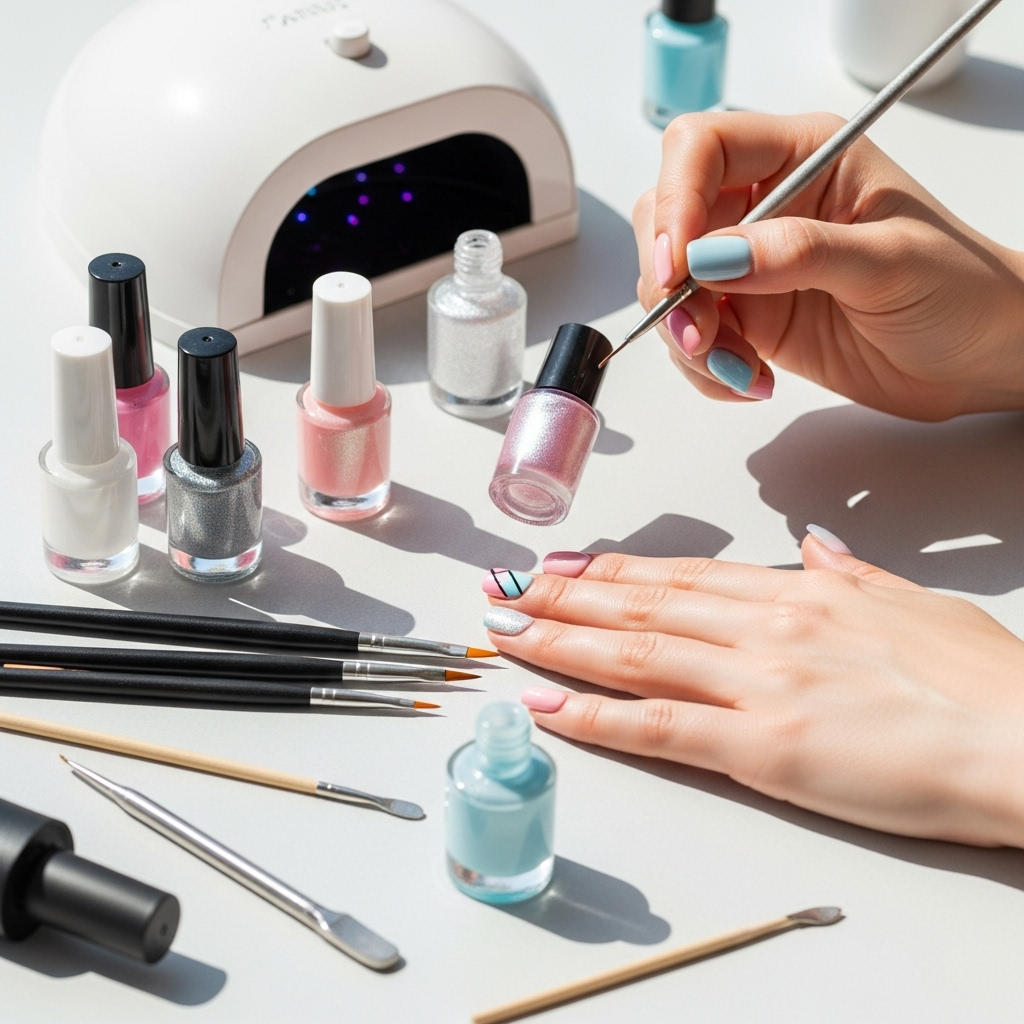
Essential Tools for Lace Nail Art Beginners
Don’t be intimidated by the intricate look of lace! With a few key tools, you can easily recreate these designs at home.
Must-Have Nail Art Supplies:
Base Coat: Essential for protecting your natural nails and ensuring your polish adheres smoothly.
Top Coat: Seals your design, adds shine, and prevents chipping.
Nail Polish Colors: White, cream, nude, or soft pastels are popular for a bridal look. Black can also be used for a dramatic contrast.
Fine-Tip Nail Art Brush: A detailer brush with very fine bristles is crucial for drawing delicate lines and dots.
Dotting Tool: Perfect for creating small, precise dots that can be used to form lace patterns or fill in designs.
Nail Polish Remover & Cotton Swabs: For cleaning up any mistakes.
Optional: Stencils or Decals: For an even easier, foolproof application of lace patterns.
Optional: White Gel Pen: Great for drawing clean, crisp lace lines on a colored background.
Essential Lace Nail Art Styles for Brides-to-Be
Let’s explore some beginner-friendly and absolutely stunning lace nail art styles that will make your bridal manicure unforgettable.
Style 1: The Classic French Tip with a Lace Twist
This is a fantastic way for beginners to incorporate lace. It’s a sophisticated update on a beloved classic.
The traditional French manicure gets a romantic upgrade with delicate lace detailing along the white tip. It’s subtle, elegant, and surprisingly easy to achieve.
How to Achieve It:
1. Prep Your Nails: Start with clean, shaped nails. Apply a base coat and let it dry completely.
2. Apply Base Color: Paint your nails with your chosen nude, sheer pink, or milky white polish. Apply two coats for an opaque finish if needed. Let dry thoroughly.
3. Create the French Tip: Use a steady hand and a fine-tip brush to paint a classic white smile line on the tip of each nail. Alternatively, use a French tip guide sticker for a cleaner line.
4. Add the Lace Detail: Once the white tip is dry, use your fine-tip nail art brush and white polish (or a gel pen) to draw a delicate lace pattern over the white tip and slightly onto the nail bed. Think small dots connected by thin lines, swirling patterns, or tiny ‘v’ shapes. You can also add a few tiny dots along the cuticle line.
5. Seal It: Apply a generous layer of top coat to protect your beautiful lace design.
Style 2: Delicate All-Over Lace Overlay
This style makes a statement while still maintaining a light and ethereal feel.
Imagine a delicate veil draped over your nails – that’s the magic of an all-over lace overlay. It’s sophisticated and truly bridal.
How to Achieve It:
1. Base Color: Apply your preferred bridal shade (nude, blush, or a soft white) and let it dry completely.
2. Create the Lace: Using a very fine-tip brush and white or cream polish:
Start by drawing small dots along the edge of your nail, near the cuticle or tip.
Connect these dots with thin, delicate lines to create a lace-like effect.
You can draw small floral motifs, intricate swirls, or checkerboard patterns with fine lines.
Focus on creating a thin, airy pattern rather than a solid design.
3. Alternatively, use Lace Stencils or Decals: For a foolproof method, apply a nail stencil and carefully paint over the lace design with white polish. For an even easier approach, use pre-made lace nail decals and apply them over your base color. Follow the product instructions closely.
4. Finish: Once the lace design is dry (or decals are in place), apply a protective top coat.
Style 3: The Lace Accent Nail
If you prefer a more minimalist approach, focus the lace design on just one or two nails.
This is a perfect blend of subtle elegance and modern style, allowing the lace detail to shine without being overwhelming.
How to Achieve It:
1. Manicure the Nails: Apply your chosen base color to all nails. For the accent nail (usually the ring finger), you can use the same color or a slightly contrasting shade for added visual interest.
2. Design the Accent Nail: On your chosen accent nail(s), use your fine-tip brush and contrasting polish to create your lace pattern. Popular options include:
A corner lace detail, starting from one side of the cuticle and extending outwards.
A delicate vine or floral pattern meandering across the nail.
A simple lacy border along the tip or side.
3. Embellish (Optional): You can add a tiny rhinestone or a pearl near the cuticle to enhance the accent nail.
4. Seal: Apply top coat to all nails.
Style 4: Dotty Lace – The Beginner’s Best Friend
This technique uses dots to create the illusion of lace, making it incredibly accessible for beginners.
This charming technique uses strategically placed dots to form intricate lace patterns, proving that beautiful nail art doesn’t require expert freehand skills.
How to Achieve It:
1. Base Application: Apply your base polish color and let it dry completely.
2. Dotting Time: Dip your dotting tool into white or cream nail polish.
3. Create the Pattern:
Start by placing dots close together.
Then, place dots slightly further apart.
Connect these dots with extremely thin lines drawn using your fine-tip brush.
Think of creating small clusters or scattered floral shapes using dots.
You can also create a symmetrical pattern by dividing the nail into sections and filling them with dotted lace elements.
4. Final Touch: Once dry, seal with a top coat.
Style 5: Elegant Lace with Pearls or Rhinestones
This style takes lace nail art to a new level of bridal luxury.
Combine the delicate beauty of lace with the shimmering elegance of pearls and rhinestones for a truly show-stopping bridal manicure.
How to Achieve It:
1. Lace Base: Create any of the lace nail art styles mentioned above on a few accent nails.
2. Add Embellishments: While the top coat is still slightly wet (or use a strong nail glue for precision), carefully place tiny pearls or small rhinestones strategically within or alongside your lace design. Popular placements include the cuticle area, the tips of lace swirls, or at the intersection of lines.
3. Secure: Apply a thin layer of top coat around the embellishments, being careful not to cover them completely if you want to maintain individual shine. For pearls, it’s often best to just apply top coat to the surrounding nail.
4. Reinforce: For extra security, a tiny dot of nail glue can be used under each pearl or rhinestone before applying.
Choosing Your Wedding Nail Color Palette
While white and cream are classic for lace designs, don’t be afraid to explore other beautiful options that complement your wedding theme and skin tone.
Popular Bridal Nail Color Combinations:
Classic White/Cream Lace: Timeless and elegant, perfect for traditional weddings.
Nude/Blush Pink with White Lace: Soft, romantic, and universally flattering.
Sheer Pink with Silver or White Lace: Ethereal and delicate, ideal for a fairy-tale wedding.
Champagne/Gold with Ivory Lace: Luxurious and warm, suited for elegant, modern weddings.
Pastel Blue or Lavender with White Lace: A subtle hint of color for a unique touch.
Black Lace on a Nude/Sheer Background: For the bride wanting a bolder, edgier, yet still sophisticated look.
Tips for Flawless Application (Especially for Beginners!)
Achieving a perfect bridal manicure is all about patience and a few smart tricks.
Start Simple: Don’t try to replicate the most complex design on your first attempt. Begin with the dotting technique or a simple accent nail.
Thin Coats are Key: Apply polish in thin, even coats. It dries faster and looks smoother, which is vital for detailed work.
Clean Up Mistakes Instantly: Keep a small brush dipped in nail polish remover handy. Clean up any smudges or stray lines immediately for a crisp finish.
Let Polish Dry: This is crucial! Ensure each layer is completely dry before adding the next, especially when drawing fine lines over a base color or tip. Waiting around 2-5 minutes between coats is usually sufficient.
Practice Makes Perfect: Try out your chosen design a week or two before the wedding. This helps you get comfortable with the tools and technique.
Invest in a Good Fine-Tip Brush: A quality brush can make all the difference. Look for one with very fine, precise bristles.
Consider Gel Polish: If you’re looking for a manicure that lasts through the honeymoon, consider using gel polish and a UV/LED lamp. Gel polish also creates a perfect smooth surface for detailed art and is often more durable. However, it does require a specific removal process. For DIY gel, ensure you follow all safety guidelines, such as those provided by the FDA on UV device safety.
Lace Nail Art Designs for Different Wedding Styles
Your bridal style should extend to your nails! Here’s how to match your lace manicure to your wedding theme.
| Wedding Style | Recommended Lace Nail Art | Color Palette Ideas |
|---|---|---|
| Classic & Traditional | French Tip with Lace Overlay, Full Coverage Delicate Lace | White, Ivory, Cream, Soft Beige |
| Vintage & Romantic | Dotty Lace, All-Over Lace with Pearls | Blush Pink, Dusty Rose, Cream, Champagne |
| Modern & Minimalist | Lace Accent Nail (simple corner detail), Geometric Lace | Nude, Sheer Pink, Soft Gray with White or Silver Lace |
| Bohemian & Free-Spirited | Floral Lace Motifs, Lace with subtle glitter accents | Earthy Tones, Muted Pastels, Ivory |
| Glamorous & Chic | Lace with Rhinestones, Bold lace patterns on a dark base | Gold, Silver, Deep Red (for subtle detail), Black (for contrast) |
Maintaining Your Bridal Lace Nails
To ensure your beautiful lace nails stay perfect for your big day (and honeymoon!), follow these simple maintenance tips:
Wear Gloves: When doing household chores like washing dishes or cleaning, wear gloves to protect your nails from harsh chemicals and excessive moisture.
Moisturize: Keep your hands and cuticles hydrated by using cuticle oil and hand cream regularly. Healthy cuticles contribute to the overall polished look.
Avoid Hard Surfaces: Try not to use your nails as tools to open things or scrape surfaces.
Touch-Ups: If you notice any minor chips or wear, especially on the lace details, a tiny touch-up with your fine brush and polish can work wonders.
* Top Coat Refresh: For week-long wear, you can gently reapply a thin layer of clear top coat every 2-3 days to add extra shine and protection.
Lace Nail Art Decals: The Ultimate Beginner Hack
If freehand painting feels too daunting, nail art decals are your best friend! They are pre-designed lace patterns that you simply apply to your nails. They come in various styles and are incredibly easy to use, guaranteeing a flawless, professional-looking finish.
How to Use Lace Nail Decals:
1. Prep: Apply your base coat and colored polish as usual. Ensure the polish is completely dry.
2. Cut & Peel: Carefully cut out the desired lace decal from the sheet and peel off the protective plastic backing (if applicable).
3. Apply: Gently place the decal onto your nail. For water decals, you’ll typically soak them briefly in water before applying. Follow the specific product instructions.
4. Smooth: Lightly press the decal onto the nail to ensure it’s adhering smoothly and there are no air bubbles.
5. Seal: Apply a good quality top coat over the entire nail, ensuring the edges of the decal are fully sealed.
Frequently Asked Questions about Bridal Lace Nail Art
Q1: Are lace nails suitable for all wedding dress styles?
Yes! Lace nails are incredibly versatile. Their delicate nature makes them a perfect complement to classic ballgowns, romantic A-line dresses, modern minimalist styles, and even bohemian gowns. The key is in the color palette and complexity of the lace design.
Q2: What is the easiest way to do lace nail art for beginners?
The easiest methods are using nail art decals or a dotting tool to create simple dotted lace patterns. Stencils also offer a foolproof way to achieve clean lace designs without freehand drawing.
Q3: How long does lace nail art take to do?
A simple lace accent nail can take as little as 15-20 minutes to paint. More intricate all-over lace designs, especially if you’re a beginner, might take 30-45 minutes or longer. Using decals significantly speeds up the process.
Q4: Can I do lace nail art with regular nail polish, or do I need gel?
You can absolutely create beautiful lace nail art with regular nail polish! While gel polish offers increased durability and a smoother surface for detailed art, regular polish works perfectly, especially with the right tools and techniques. Just ensure each layer dries completely.
Q5: How do I prevent my lace nail art from smudging?
Allow each layer of polish to dry thoroughly before proceeding. Use thin coats of polish, and be patient between steps. Clean up any mistakes gently with a fine brush dipped in nail polish remover. A good quality top coat is essential for sealing the design and preventing smudges.
Q6: What’s the difference between lace nail art and French tip lace?
French tip lace is a specific style where the lace pattern is applied primarily onto or around the white French tip of the nail for a decorative effect. General lace nail art can cover the entire nail, be part of an accent design, or appear in various patterns anywhere on the nail bed.
Your Dream Bridal Nails, Achieved!
And there you have it – your comprehensive guide to elegant lace nail art for brides! From classic French tips with a delicate twist to beginner-friendly dotting techniques and the ultimate hack with decals, achieving a sophisticated and romantic bridal manicure is well within your reach. Remember, your wedding day is about celebrating YOU, and your nails should reflect your personal style and make you feel beautiful and confident.
Don’t be afraid to practice, experiment with colors that resonate with your wedding theme, and most importantly, have fun with the process. You have all the tools and styles you need to create breathtaking nails that will add that perfect, sweet finishing touch to your bridal ensemble. Here’s to happy nails and a magical wedding day!