Easy snowflake nail design for winter! Learn how to create beautiful, icy nail art with simple steps perfect for beginners. Get chic winter nails effortlessly with just a few tools and your favorite polishes.
Winter is a magical time, and what better way to capture its enchanting spirit than with some dazzling snowflake nail designs? You might think intricate nail art is reserved for professionals, but I’m here to show you how to create stunning snowflake manicures right at home. This guide is all about making winter nail art accessible and fun for everyone, especially if you’re just starting out. We’ll break down simple techniques, suggest easy-to-find tools, and guide you through creating a look that’s as unique as a snowflake itself. Get ready to embrace the chill with nails that sparkle!
Why Snowflake Nails Are a Winter Must-Have
Snowflakes are more than just frozen water; they’re tiny wonders of nature, each one perfectly unique. This natural artistry translates beautifully to manicures, offering a sophisticated yet playful way to celebrate the winter season. Imagine your nails adorned with delicate patterns that evoke frosted windowpanes, glistening snow, and cozy winter nights.
The appeal of snowflake nails lies in their versatility. They can be subtle and elegant for everyday wear or bold and festive for holiday parties. Plus, they instantly bring a touch of winter magic to your overall look. Whether you love a minimalist vibe or a more glamorous statement, this design can be adapted to your personal style. So, let’s dive into how you can achieve this effortless winter beauty!
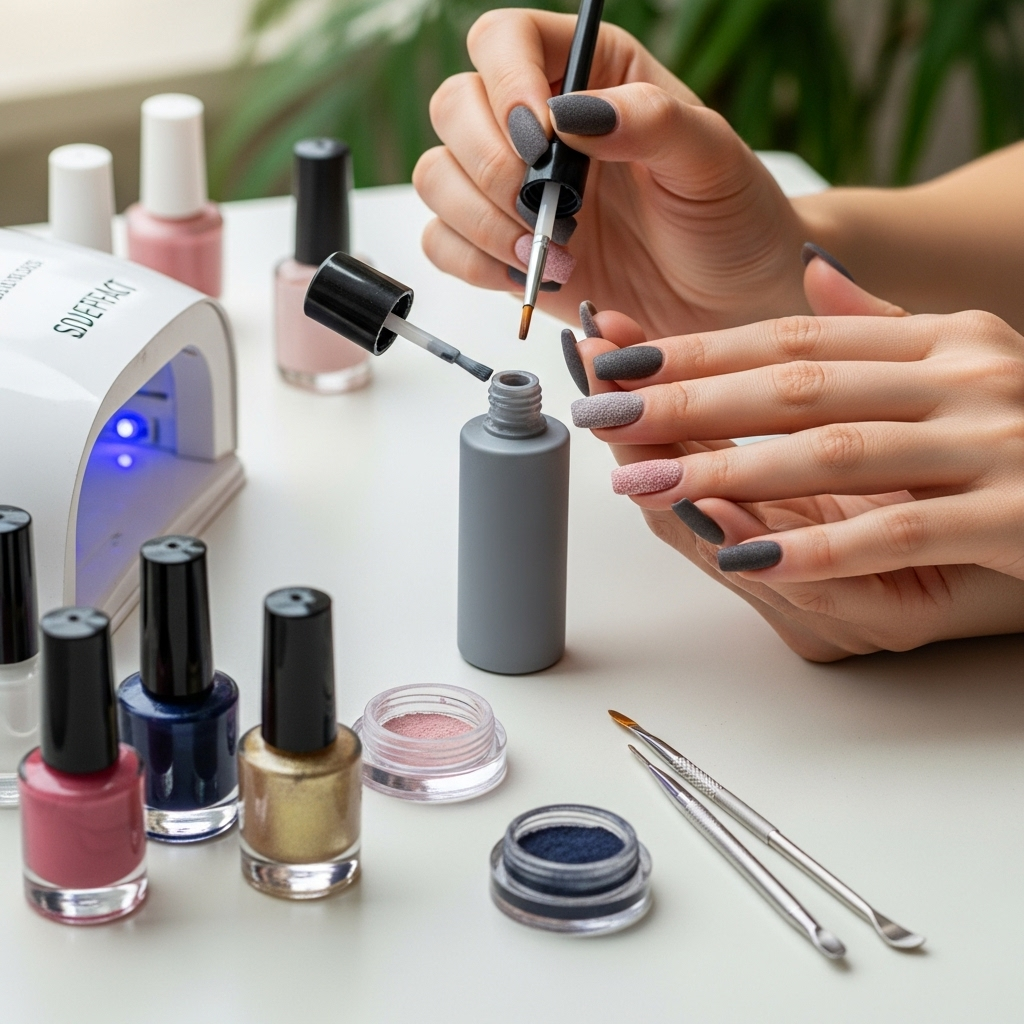
Getting Started: Your Snowflake Nail Art Toolkit
You don’t need a whole nail salon in your house to create gorgeous snowflake nails. A few key items will set you up for success. Think of this as your starter pack for winter nail artistry!
Here are the essential tools and materials you’ll need for your easy snowflake nail design:
Base Coat: This is crucial for protecting your natural nails and ensuring your polish lasts longer.
Top Coat: Seals your design and adds a beautiful shine.
Base Color Polish: White, light blue, pale gray, or even a deep navy are fantastic choices for a wintery backdrop.
Accent Color Polish: White or silver is perfect for the snowflakes themselves on darker backgrounds, or a dark blue/black for snowflakes on a white or light background.
Fine-Tipped Nail Art Brush or Dotting Tool: A fine brush allows for precision, while a dotting tool with a small bead end is great for creating basic snowflake shapes.
Toothpick (Optional): Can be used in a pinch to draw fine lines or spread polish.
Nail Polish Remover and Cotton Swabs: For cleaning up any mistakes – because we all make them!
Patience and a willingness to experiment! This is the most important part.
Tool Spotlight: Choosing Your Precision Instrument
Deciding between a nail art brush and a dotting tool often depends on the specific kind of snowflake you want and your personal comfort level.
Fine-Tipped Nail Art Brush: For detailed, intricate snowflake patterns, a brush is your best friend. Look for synthetic bristles that are firm enough to hold their shape but flexible enough for delicate strokes. Many brands offer specialized nail art brushes, but even a clean, fine-tipped eyeliner brush can work wonders in a pinch.
Dotting Tool: This is perhaps the easiest tool for beginners. Dotting tools come with different-sized ball tips. For snowflakes, you’ll want one with a smaller tip. These are excellent for creating the basic shape of a snowflake by making dots and then connecting them, or for adding small embellishments.
You can find affordable nail art brush sets and dotting tools at most beauty supply stores or online retailers. Experimenting with both will help you discover your preferred method for creating those perfect winter wonders.
Step-by-Step: Creating Your Easy Snowflake Nail Design
Ready to get your hands (and nails!) busy? Follow these simple steps to create beautiful snowflake designs that will make your nails gleam with winter charm.
Preparation is Key
1. Clean and Shape: Start with clean, dry nails. Push back your cuticle gently and trim any excess. File your nails into your desired shape.
2. Apply Base Coat: Apply one layer of base coat to each nail. This protects your nail and helps your polish adhere better. Let it dry completely.
3. Apply Base Color: Paint your nails with your chosen base color. Two thin coats are usually better than one thick one for a smooth, opaque finish. Ensure each coat is fully dry before moving to the next.
Crafting the Snowflake
Here’s where the fun begins! We’ll cover a couple of easy methods for creating snowflakes.
Method 1: The Simple Dotting Tool Snowflake
This is perfect for absolute beginners and creates a charming, minimalist snowflake.
1. Get Your Snowflake Polish Ready: Have your white or silver polish (or your contrasting color) open and ready.
2. Dip Your Dotting Tool: Dip the small ball end of your dotting tool into the polish. You only need a small amount.
3. Create the Center Dot: Gently place a small dot of polish in the center of your nail. This will be the core of your snowflake.
4. Add the Rays: Without adding more polish, make four quick strokes or “rays” extending from the center dot. Think of a plus sign (+), then add a bit more to each line to create a star-like shape.
5. Add Smaller Dots: Now, dip your dotting tool again. Add three smaller dots along each of the four rays you just created.
6. Refine (Optional): If you have a very fine brush, you can very gently drag the edges of the dots to create sharper points or connect segments, but don’t worry too much about perfection!
7. Let it Dry: Allow the snowflake design to dry completely before moving on. This is super important to avoid smudging.
Method 2: The Simple Brush Stroke Snowflake
This method gives you a bit more control and a slightly more realistic snowflake shape.
1. Prepare Your Polish and Brush: Have your accent color polish open. Dip your fine-tipped nail art brush into the polish, ensuring you have a small amount on the tip.
2. Start with a Center Dot: Place a single dot of polish in the center of your nail.
3. Draw Straight Lines (Rays): From the center dot, gently draw four fine lines outwards, like the spokes of a wheel. Aim for them to be roughly equal in length and spacing.
4. Add Branching Lines: Go back to your center dot. From the midpoint of each of the four main lines, draw a short, diagonal line outwards. This creates the classic 6-pointed snowflake shape.
5. Add Details (Optional): You can add tiny dots at the end of each line or along the lines for extra flair.
6. Repeat and Dry: Repeat on other nails as desired. Let your artwork dry thoroughly.
Method 3: Stamping (Even Easier!)
If you want to skip the freehand drawing altogether, nail stamping is an amazing option.
1. Gather a Stamping Plate: You’ll need a stamping plate with snowflake designs (available online and at beauty stores).
2. Use Stamping Polish: Stamping polish is more opaque and formulated for this purpose.
3. Scrape and Stamp: Apply the stamping polish over the desired snowflake etching on your plate, scrape off the excess polish with a stamper scraper, and then immediately roll your stamper over the design to pick it up.
4. Transfer to Nail: Gently roll the stamper onto your nail where you want the snowflake to appear.
5. Seal: Once dry, apply your top coat.
Finishing Touches
1. Apply Top Coat: Once your snowflake designs are completely dry, apply a thin layer of clear top coat. This will seal your design, prevent chipping, and add a beautiful glossy finish. Be careful not to drag the brush too much and smudge your artwork.
2. Clean Up: Use a small brush dipped in nail polish remover to clean up any polish that got onto your skin around the nails.
Snowflake Design Variations: Beyond the Basics
Once you’ve mastered the basic snowflake, why not play around with different looks? You can easily adapt this design to suit any mood or occasion.
Color Play
Classic contrast: White snowflakes on a deep navy, black, or dark teal background are incredibly chic and make the snowflakes pop.
Icy pastels: Light blues, lavenders, or pale pinks as a base with white or silver snowflakes create a soft, ethereal winter look.
Metallics: Silver snowflakes on a black base, or gold snowflakes on a deep red or emerald green, add a touch of festive glamour.
Iridescent toppers: Apply a subtle iridescent top coat over your base color before adding snowflakes for a magical, shimmery effect.
Placement and Patterns
Accent Nail: Focus all your snowflake designs on one or two accent nails, keeping the rest of your nails a solid color.
All-Over Sprinkle: Create small, scattered snowflakes across all your nails for a delicate, all-over winter effect.
Large Feature Snowflake: Paint one large, detailed snowflake on each nail as a statement piece.
Mix and Match: Combine different sizes and styles of snowflakes on different nails for a dynamic look.
Adding Sparkle
Glitter Gradient: Apply a glitter polish towards the tips of your nails before adding snowflakes for a subtle sparkle.
Rhinestone Accents: Add a tiny rhinestone to the center of a snowflake for extra bling, especially for holiday events.
Iridescent Flakes: Gently embed a few iridescent flakes strategically around your snowflakes.
Temperature-Sensitive Polish
For a truly magical effect, consider using temperature-sensitive nail polish. These polishes change color based on your body heat or ambient temperature. Imagine your base color shifting from a deep winter blue to a lighter icy shade, with your snowflakes remaining a contrasting color, for a dynamic and mesmerizing manicure. Many brands offer stunning color-shifting polishes that can serve as a unique base for your snowflake designs.
Pro Tips for Flawless Snowflake Nails
Even easy designs can benefit from a few expert tricks. Implementing these tips will help you achieve salon-worthy results every time you do your nails.
Thin Layers are Your Friends: Always apply polish and nail art in thin, even layers. This helps prevent smudging and ensures quicker drying times.
Patience with Drying: This is probably the most important tip! Allow each layer of polish and each snowflake design to dry completely before applying the next step or top coat. A quick-drying spray or drops can be a lifesaver here.
Clean Your Brush/Tool Often: Between each dot or stroke, wipe your nail art brush or dotting tool clean with polish remover (or even just on a piece of paper or lint-free wipe) to avoid creating muddy colors or unwanted blobs.
Practice on Nail (a.k.a. Fake Nails): Before you tackle your actual nails, practice the snowflake designs on artificial nail tips. This allows you to get the hang of the technique without the pressure of making mistakes on your manicure.
Don’t Aim for Perfection (Especially at First): Real snowflakes are irregular! Embrace the unique character of your hand-painted designs. They will have charm precisely because they’re not machine-made.
Control Your Polish Flow: Make sure there isn’t too much polish on your brush or dotting tool. For brushes, wipe off excess polish on the rim of the bottle. For dotting tools, a quick dab on a flat surface can remove excess. The surface tension of the polish can affect how it flows, so less is often more.
Seal the Deal: A good quality top coat is non-negotiable. Not only does it protect your art, but it also adds that professional, high-gloss finish that makes your nails look polished and finished.
Maintaining Your Winter Manicure
Once your beautiful snowflake nails are complete, you want them to last, right? A little care goes a long way in keeping your winter wonderland manicure looking fresh.
Avoid Harsh Chemicals: Wear gloves when doing chores like washing dishes or cleaning. Harsh chemicals can break down nail polish and shorten the life of your manicure.
Moisturize Regularly: Keep your hands and cuticles hydrated with a good hand cream or cuticle oil. Healthy cuticles lead to healthier-looking nails and can help prevent polish from chipping at the edges. A popular method for intense hydration involves using cuticle oil, which can be applied daily.
Be Gentle: Avoid using your nails as tools. Don’t try to pry things open or scrape surfaces with them. This is a surefire way to chip or break your polish.
Touch-Ups: If you notice a small chip or a slight imperfection, don’t despair! You can often touch up small areas with a bit of your accent polish and a fine brush, then seal it with another dab of top coat.
Frequently Asked Questions About Snowflake Nail Designs
Here are some common questions beginners have about creating their own snowflake nail art.
Q1: What’s the easiest way to draw a snowflake if I have shaky hands?
A1: The dotting tool method is fantastic for shaky hands! Instead of freehand drawing, you’re making dots. You can also use nail stamping plates specifically designed for snowflakes – they offer perfect, crisp designs every time with minimal effort.
Q2: Can I use regular nail polish for my snowflake designs, or do I need special polish?
A2: You can absolutely use regular nail polish! For freehand designs, any nail polish will work as long as it’s not too thick. If you’re trying nail stamping, using a dedicated stamping polish is highly recommended because it’s more opaque and pigmented, ensuring a clean transfer.
Q3: How long does it take for snowflake nail art to dry?
A3: Drying time varies depending on the polish formula and how thickly you apply it. For nail art, it’s crucial to let each design layer dry completely before adding more or a top coat. This can take anywhere from 5 to 15 minutes for each small detail, so be patient! Using a quick-dry top coat or drops can significantly speed up the final drying process.
Q4: My snowflakes smudge easily. What am I doing wrong?
A4: The most common reason for smudging is not letting the polish dry completely between steps. Make sure your base color is dry, and then let each drawn snowflake element dry thoroughly before you move on or apply a top coat. Also, ensure you’re using a light touch when applying the top coat; don’t press down too hard or swipe too aggressively.
Q5: What are nail art pens, and are they good for making snowflakes?
A5: Nail art pens are like markers for your nails, filled with polish and designed with a fine tip for drawing. They can be excellent for beginners because they offer more control than a brush and are less reliant on dipping into a polish bottle. Many pens work well for creating simple snowflake lines and details.
Q6: How many snowflakes should I put on each nail?
A6: This is entirely up to your personal preference! For a classic look, one prominent snowflake per nail can be very elegant. For a more festive or whimsical feel, you might opt for several smaller, scattered snowflakes across the entire nail. There’s no right or wrong number – experiment to find the look you love!
Q7: Can I use gel polish for snowflake designs?
A7: Yes, you absolutely can! Gel polish offers exceptional durability and shine. For snowflakes with gel, you’ll typically paint your base color and cure it. Then, you’ll use gel art paints or gel polish with a fine brush to create your snowflakes and cure each layer or the final design. Be mindful that gel polish requires a UV/LED lamp for curing.
Conclusion: Embrace Your Inner Ice Queen!
There you have it! Creating stunning snowflake nail designs for winter is not only achievable but also a wonderfully creative way to express your style and embrace the season’s beauty. From the simplest dotting tool technique to more intricate brush strokes, these easy methods empower you to bring winter magic right to your fingertips.
Remember, the most important tools are your creativity and willingness to try. Don’t be afraid to experiment with colors, placements, and even combine techniques. Whether you’re aiming for a subtle icy shimmer or a bold, statement-making manicure, these snowflake designs offer endless possibilities. So grab your polishes, get creative, and let your nails tell a beautiful winter story. Happy painting, nail lovers!