Dot accent nail designs are your secret weapon for adding a touch of chic sophistication to your manicure. They’re incredibly easy to create, perfect for beginners, and offer endless stylish possibilities for everyday elegance.
Ever wished your nails could look effortlessly polished without spending hours at the salon or struggling with complicated designs? You’re not alone! Many of us love the idea of trendy nail art but find it intimidating or time-consuming. That’s where simple yet stunning dot accent nail designs come in. They’re your go-to for adding flair to your nails with minimal fuss. Ready to master this easy technique and elevate your nail game? Let’s dive in!
Why Dot Accent Nails Are a Beginner’s Best Friend
Dot accent nails are a game-changer for a few simple reasons. They’re incredibly versatile, allowing you to express your personal style without needing a steady hand for intricate lines or elaborate patterns. Plus, they’re super forgiving! A tiny imperfection is barely noticeable when you’re working with dots.
Think of it this way: you can achieve a sophisticated look that says “I have my life together” with just a few thoughtful dots. They add just enough detail to make your manicure pop, whether you’re heading to work, a casual brunch, or a special evening out. They prove that you don’t need to be a nail art pro to have chic nails!
The Magic of the Dot: Versatility and Style
The humble dot is surprisingly powerful. It can be used to create a minimalist statement, a playful pattern, or a chic, classic look. Whether you prefer a single, strategically placed dot or a constellation of them, the effect is undeniably stylish. This simplicity is what makes them so appealing for anyone looking for quick, effective nail art.
From delicate, barely-there accents to bold, graphic statements, the dot accent nail design can adapt to any occasion and personal aesthetic. It’s a small detail that makes a big impact, offering a polished finish that’s both modern and timeless. Ready to get started? Let’s gather what you’ll need.
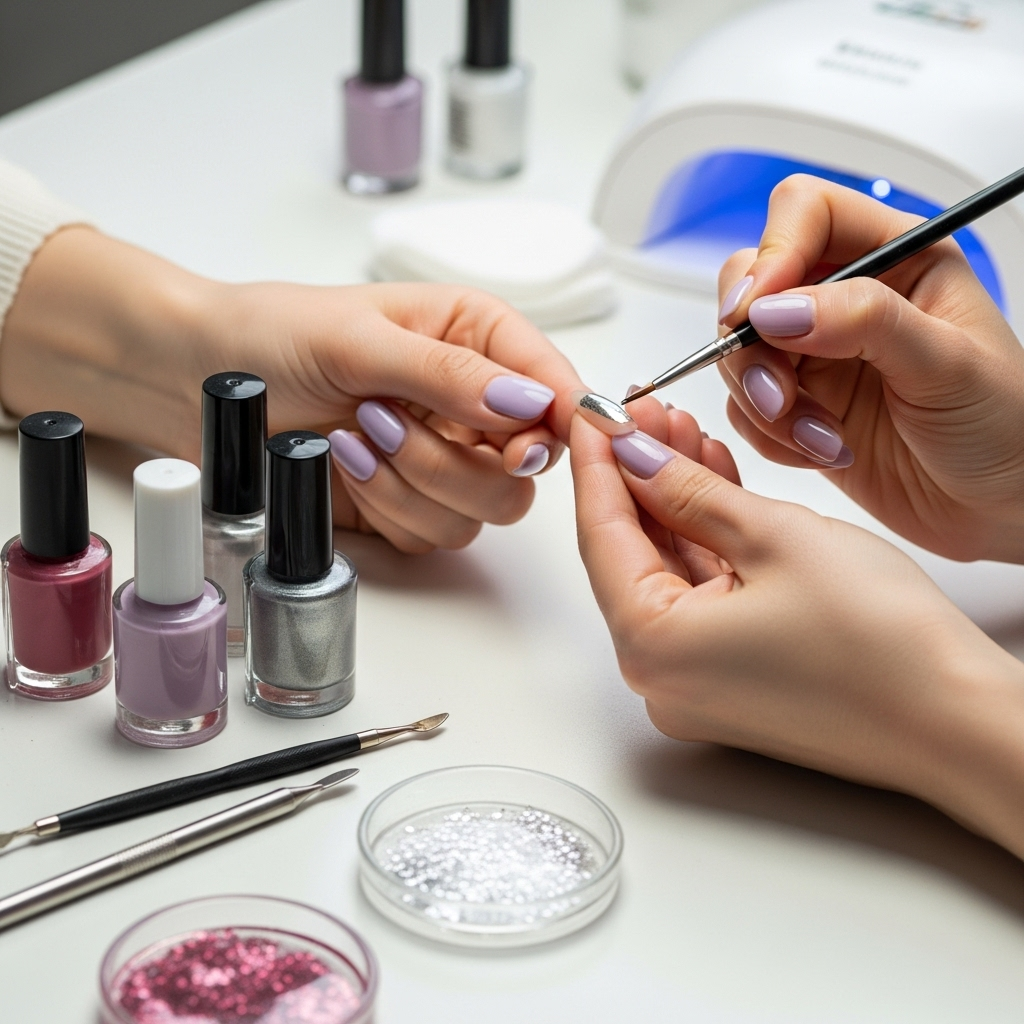
What You’ll Need: Your Dotting Toolkit
You don’t need a professional nail salon’s worth of equipment to create beautiful dot accent nails. In fact, you probably have most of these items already! Here’s a quick rundown of the essentials:
- Nail Polish: Your base color(s) and your accent dot color(s).
- Dotting Tools: These are specialized tools with a small ball at the end. They come in various sizes, which is perfect for creating dots of different diameters.
- Toothpick or Ballpoint Pen: A great alternative if you don’t have dotting tools. The tip of a toothpick or the ball of a pen that still has ink can work wonders.
- Top Coat: To seal your design and add shine.
- Base Coat: To protect your natural nails and ensure your polish lasts longer.
- Nail Polish Remover and Cotton Swabs: For cleaning up any mistakes.
A Closer Look at Dotting Tools
Dotting tools are fantastic because they offer precision and consistency. They typically come in sets with multiple sizes, allowing you to create everything from tiny, delicate dots to larger, more prominent ones. This variety is key to achieving different looks, from subtle accents to more intricate patterns. Many beauty supply stores and online retailers carry them, and they are quite affordable. You can find ergonomic dotting tools designed for comfort, which can be helpful for longer manicures.
If you’re on a tight budget or want to try dotting without investing in new tools, a fine-tipped toothpick or even the tip of an emptied ballpoint pen can be surprisingly effective. Just be sure the toothpick tip is relatively smooth to avoid snagging and to create a clean dot.
Step-by-Step: Creating Your Dot Accent Nails
Let’s get down to the fun part – actually making those chic dots! These steps are designed to be super simple, so you can achieve a salon-worthy look right at home.
- Prep Your Nails: Start with clean, dry nails. Apply a base coat to protect your natural nails and create a smooth surface for polish application. This also helps your manicure last longer!
- Apply Base Color: Paint your nails with your chosen base polish. Make sure to apply thin, even coats for the best results. Let this dry completely. This is crucial – if your base color is still wet, your dots might smudge.
- Get Your Polish Ready: Place a small drop of your accent polish onto a clean, flat surface like a piece of foil or a plastic palette. This makes it easy to dip your dotting tool into the polish.
- Apply Your Dots:
- Dip the tip of your dotting tool (or toothpick) into the accent polish. You only need a small amount on the tip.
- Gently touch the tip of the tool to your nail where you want the dot to appear.
- Lift the tool straight up. You should have a clean, crisp dot!
- Pro Tip: If the dot isn’t perfect, use a cotton swab dipped in nail polish remover to gently clean it up before the polish dries.
- Create Your Design: Place dots in your desired pattern. You can do a single dot on each nail, a few dots scattered playfully, a neat row, or even try a simple flower shape by arranging multiple dots.
- Let it Dry: Allow your dots to dry completely. This might take longer than you think, especially if you’ve applied generous dots or multiple layers. Patience is key here!
- Apply Top Coat: Once everything is dry, apply a generous layer of top coat. This seals your design, adds a beautiful shine, and protects your manicure from chipping.
- Clean Up: Use a small brush or cotton swab dipped in nail polish remover to clean up any polish that got onto your skin around the nails for a super neat finish.
Troubleshooting Common Dotting Issues
Even with simple designs, little hiccups can happen. Here’s how to fix them:
- Dots are too big/small: Use different-sized dotting tools or the tip of a toothpick for smaller dots and a larger applicator for bigger ones.
- Dots are uneven: Practice makes perfect! Ensure you’re using consistent pressure when applying the dot and lifting the tool straight up.
- Polish is clumping on the tool: Wipe excess polish off the tip of your tool before applying it to the nail.
- Dots are smudging: Make sure your base coat is 100% dry before you start dotting. If dots smudge while you’re applying them, gently clean and reapply.
Chic Dot Accent Nail Design Ideas for Every Style
The beauty of dot accent nails lies in their incredible versatility. You can keep it simple or get creative! Here are a few fun ideas to inspire your next manicure:
Minimalist & Modern
For a clean, sophisticated look, think understated elegance. This is perfect for those who love subtle details.
- Single Dot Focus: Apply a single, perfectly placed dot on one accent nail (like your ring finger) against a nude or sheer base. Use a contrasting color for the dot for a subtle pop.
- Tiny Constellations: Scatter a few very small dots across a neutral or pastel base. Think delicate and airy.
- Line Detailing: Place a few small dots in a neat vertical or horizontal line on an otherwise bare nail.
Playful & Pretty
Add a touch of fun and whimsy to your nails! These designs are great for weekends or when you want to showcase your playful side.
- Polka Party: Classic polka dots are easy to achieve with dotting tools. Vary the size and spacing for a dynamic look.
- Gradient Dots: Start with a larger dot at the cuticle and gradually make them smaller as you move towards the tip of the nail.
- Color Blocking with Dots: Paint each nail a different solid color and then add a small dot of a complementary color to each.
Elegant & Glamorous
Elevate your dot game for special occasions or when you want to feel extra fancy. These designs add a touch of luxury.
- Metallic Accents: Use metallic polishes (gold, silver, rose gold) for your dots against a deep jewel tone or classic red.
- Pearlized Dots: Lightly dab a pearlescent polish to create a subtle shimmer that catches the light beautifully.
- French Tip with a Dot: Instead of a traditional French tip, create a thin line of dots along the free edge of your nail.
Seasonal & Themed
Dot designs are perfect for adapting to holidays or seasons. Get creative with your color choices and placement!
- Halloween Spooky Eyes: On a black or orange base, add two dots for eyes and a smaller one for a nose.
- Winter Snowflakes: Use white or silver dots on a dark blue base to mimic falling snow.
- Summer Fun Fruits: Create strawberry dots with red polish and a small green dot on top, or watermelon slices using pink dots with small black seeds.
Choosing Your Colors: A World of Possibilities
The color combinations are where the real fun begins! Don’t be afraid to experiment. Here are some tips for picking colors that complement each other:
- Neutrals with a Pop: Black, white, grey, nude, or navy bases look stunning with bright accent dots (think coral, teal, or pink).
- Monochromatic Magic: Use different shades of the same color family for a sophisticated, tonal effect. For instance, a light blue base with navy dots, or a blush pink base with a deeper rose dot.
- Contrasting Colors: Pair colors that are opposite each other on the color wheel for a bold statement. Think blue and orange, or purple and yellow.
- Metallics for Glam: Gold, silver, and rose gold dots can instantly elevate any base color, making it feel more luxurious.
Understanding Nail Polish Finishes and Dotting
The finish of your nail polish can dramatically change the look of your dot accent designs. It’s worth considering how different finishes will interact:
| Finish Type | Description | Effect on Dot Designs |
|---|---|---|
| Cream/Opaque | Smooth, solid color with no shimmer or glitter. This is the most common type. | Provides a clean, bold dot. Works well with any base color. Offers great coverage making it easy to see the dot. |
| Shimmer/Pearl | Contains fine particles that give a subtle, iridescent sheen. | Adds a delicate, softly glowing effect to the dots. Can be harder to see on lighter bases, but beautiful on darker ones. |
| Glitter | Contains larger, reflective particles for a sparkly finish. | Creates extremely eye-catching, festive dots. Might be slightly trickier to get a perfectly uniform dot shape due to the glitter pieces. |
| Matte | Absorbs light, giving a non-shiny, velvety finish. | Results in a sophisticated, modern look. Can sometimes make dots appear slightly smaller due to the lack of light reflection. |
When choosing your polishes, consider mixing finishes for added interest. For example, a cream base with metallic polka dots, or a matte base with glossy dots. This adds depth and dimension to your nail art.
Nail Care Tips for Lasting Dot Designs
To make your beautiful dot accent nails last as long as possible, a little extra care goes a long way. Proper nail preparation and maintenance are key:
- Hydration is Key: Keep your cuticles moisturized with cuticle oil. Dry, flaky cuticles can make even the most perfect manicure look unfinished. Applying cuticle oil daily can significantly improve the health and appearance of your nails and surrounding skin. You can learn more about effective cuticle care from resources like the American Academy of Dermatology.
- Wear Gloves: When doing chores, especially washing dishes or cleaning, wear rubber gloves. Harsh chemicals and prolonged water exposure can break down the nail polish and lead to chipping.
- Be Gentle: Avoid using your nails as tools. Don’t try to pick things up with your fingertips or open cans. This can cause chips and breaks, undermining your hard work.
- Refresh Your Top Coat: Every few days, apply an extra layer of top coat. This reinforces the protective layer and helps maintain shine, extending the life of your manicure.
Dot Accent Nail Designs vs. Other Nail Art
Let’s compare dot accent nails to other popular nail art techniques to highlight why they’re such a fantastic choice, especially for beginners.
Dot Accent Nails vs. Freehand Lines
Creating clean, straight lines freehand can be challenging and requires significant practice and a very steady hand. Dotting, on the other hand, uses a ball-shaped applicator which makes achieving uniform circles much easier. Even if a dot isn’t perfectly round, it often still looks intentional and stylish. The precision needed for lines is far greater than for dots.
Dot Accent Nails vs. Stickers/Decals
Nail stickers and decals are indeed easy to apply, but they can sometimes look less natural or professional. They might lift at the edges over time, and customization is limited to what’s available in the sticker pack. Dot accent nails, however, offer complete creative control over size, color, placement, and density, all using readily available polish.
Dot Accent Nails vs. Stamping
Nail stamping can produce intricate and beautiful designs relatively quickly, but it requires specific tools like stamping plates, stamper, and scraper. There’s a bit of a learning curve to get clean transfers, and the designs are dictated by the available stamping plates. Dotting is far more accessible and allows for truly unique, handcrafted designs.
Overall, dot accent nail designs strike a perfect balance between ease of execution, creative freedom, and a polished, professional-looking finish, making them a top choice for many.
Frequently Asked Questions About Dot Accent Nail Designs
What is the easiest nail art for beginners?
Dot accent nail designs are widely considered one of the easiest nail art techniques for beginners. They require minimal tools and a simple application process, offering great results with little practice.
How do I make my dots symmetrical?
For symmetry, ensure you are using the same size dotting tool for each dot. Dip the tool into the polish the same amount each time and apply consistent, gentle pressure to the nail. Practicing on paper first can also help you gauge pressure and dot size.
Can I use regular pens or markers for nail art dots?
While you can improvisationally use the ballpoint tip of a pen or even a fine-tip toothpick, dedicated nail art pens or dotting tools offer better control and smoother polish application, leading to cleaner dots. Regular markers are generally not recommended as they can contain harsh chemicals and won’t apply polish smoothly.
How many dots should I put on a nail?
This is entirely up to your preference! For a minimalist look, one or two dots per nail are perfect. For a more traditional polka dot effect, you can cover the nail with evenly spaced dots. Consider the size of the dots and your nail length when deciding on density.
My dots are not coming out clean; what am I doing wrong?
This can happen if you have too much polish on your dotting tool, or if you’re pressing too hard and dragging the tool. Try using just a tiny bead of polish on the tip of your tool and gently dabbing it onto the nail. Lift the tool straight up cleanly. Also, ensure your polish isn’t too thick or too thin.
How long do dot accent nails typically last?
With proper application, including a good base and top coat, and careful wear, dot accent nails can last anywhere from 7 to 14 days. Regular application of top coat every few days can help extend their life.
Can I mix and match dot accent designs on different nails?
Absolutely! Mixing and matching is a great way to add more interest to your manicure. You could have solid color nails on some fingers and dot accent designs on others, or even different dot patterns on each nail. It’s all about personal expression!
Conclusion: Your Effortless Chic Starts Here
And there you have it! Dot accent nail designs are more than just a trend; they’re a gateway to effortless chic and creative self-expression for everyone, especially beginners. With just a few simple tools and a little bit of polish, you can transform your nails into tiny works of art that look anything but basic. Whether you’re aiming for minimalist elegance for your workday or a playful splash of color for the weekend, dots are your secret weapon.
Remember, nail art is all about having fun and expressing yourself. Don’t be afraid to experiment with colors, patterns, and placements. Each set of nails you paint is a chance to showcase your unique style and boost your confidence. So go ahead, grab those polishes, and start dotting your way to chic! You’ve got this!