The global pandemic has forced us to stay indoors and practice social distancing. As a result, many of our daily routines and activities have been put on hold, including our regular trips to the nail salon.
However, being stuck at home does not mean sacrificing our beauty and self-care routines. It presents the perfect opportunity to unleash our creativity and experiment with new DIY nail ideas. Anyone can achieve salon-worthy nails at home with simple tools and spare time.
We have compiled a list of over 20 super easy and fun DIY nail ideas that every girl should try while stuck at home. So, whether you’re looking for a new hobby or want to elevate your at-home self-care game, these DIY nail ideas will inspire and impress you. Let’s dive in and discover the art of DIY nails.
1.Realistic Amethyst Nail Art
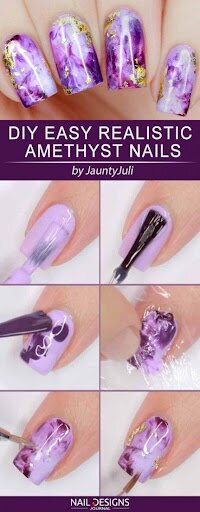
Realistic amethyst nail art has gained popularity as a trendy way to add vibrant color to your nails. To create this stunning look, apply a solid base color. Then, using a thin brush, carefully shape the amethyst design on each nail. Blend different shades of purple to achieve a realistic and captivating effect.
For some extra sparkle, consider adding glitter or rhinestones to enhance the overall look. The best part is that this DIY nail art is perfect for beginners and can be easily done at home, allowing you to unleash your creativity and experiment with different colours and designs.
2.Watermelon Nail Art
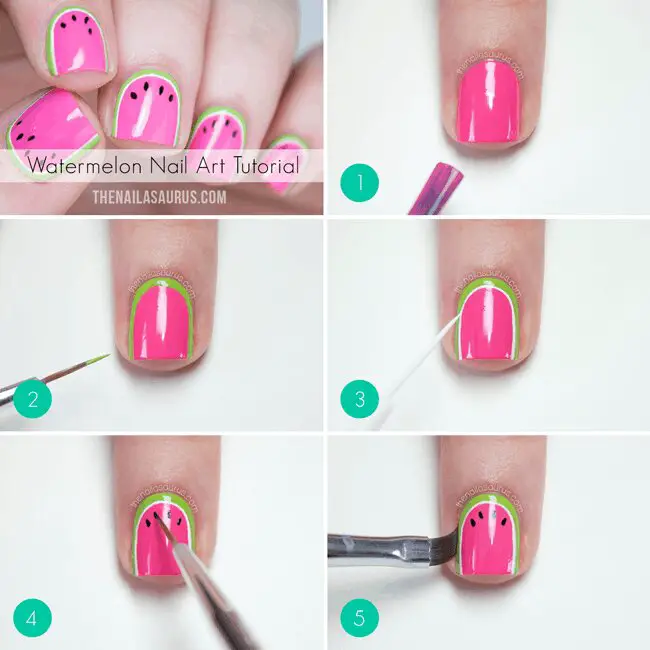
Create a fun and summery look with watermelon nail art. Start by applying a light green base colour to represent the rind. Then, draw small black seeds on each nail using a thin brush or toothpick. Finally, use a bright red polish for the tip of your nails to mimic the juicy watermelon flesh. This playful design is perfect for adding some cheerfulness to your at-home self-care routine.
3.Blue Nails With Silver Glitter Accent
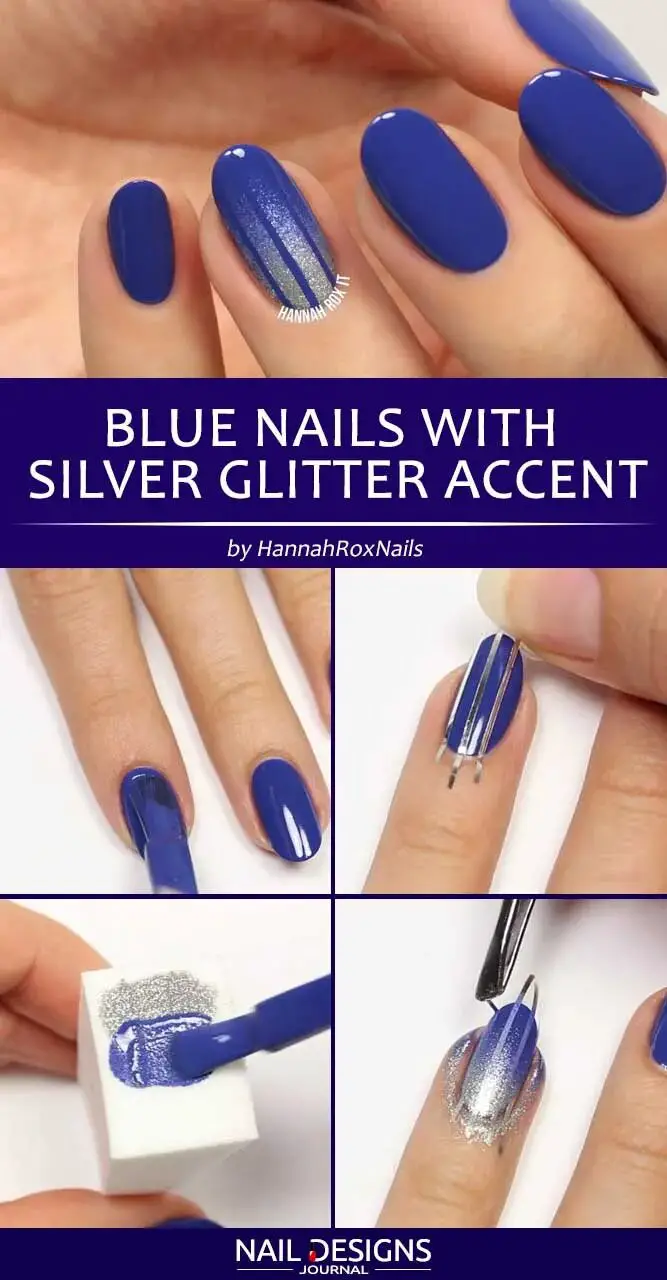
Start by applying a base coat of blue polish and allowing it to dry completely. Grab a small brush or toothpick once the base coat is dry and dip it into silver glitter polish. Apply the glitter to the tips of your nails, creating an eye-catching accent.
Let the glitter dry before finishing off with a top coat. This will seal in the design and give your nails a shiny finish. Feel free to experiment with different shades of blue and types of glitter for a unique and personalized look that suits your style.
4.Cute Easy Nail Designs For A Romantic Date
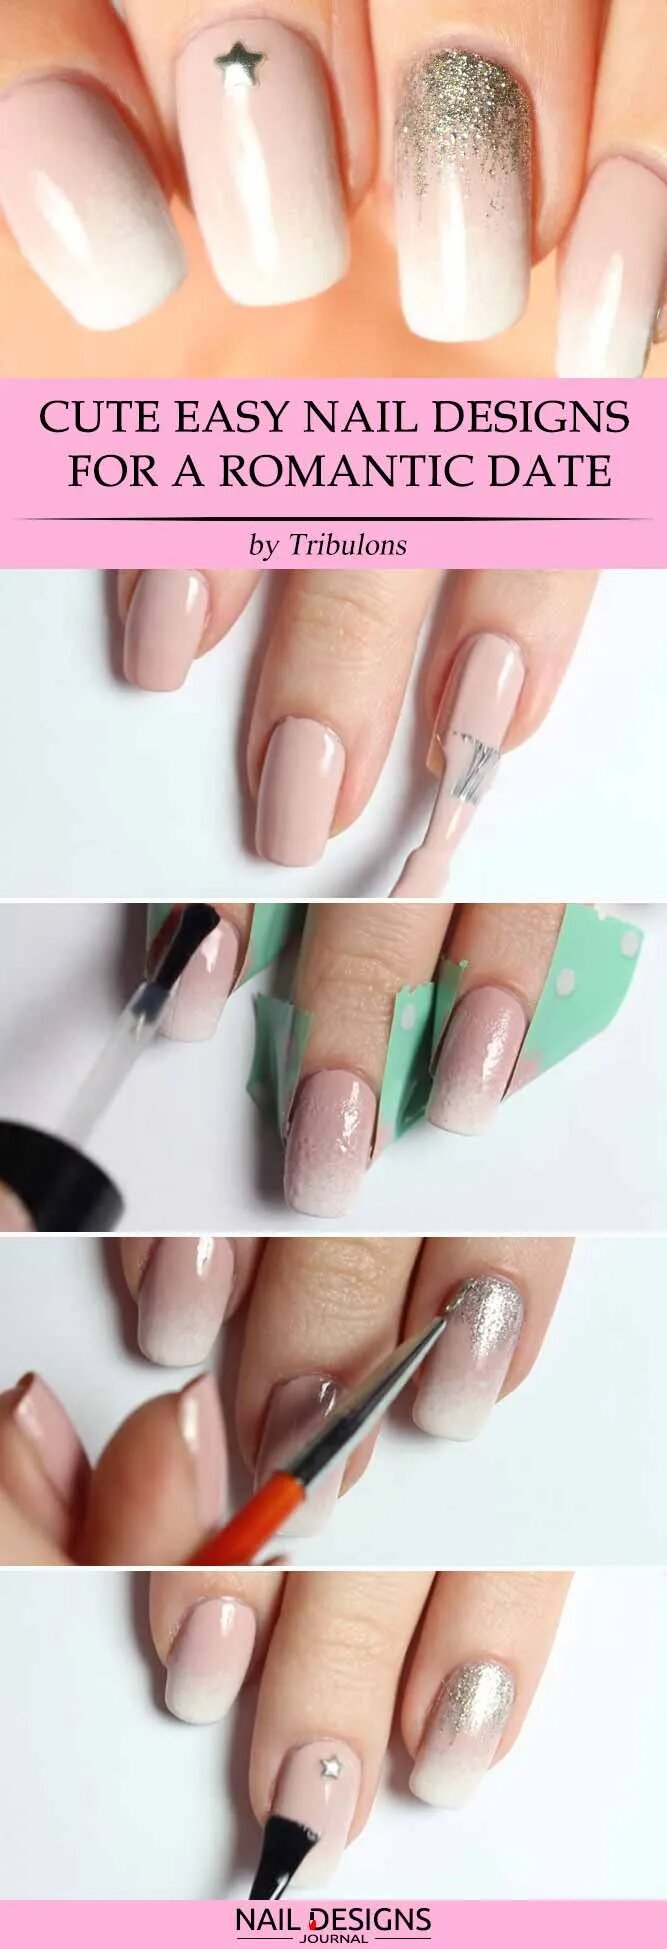
Create a romantic look with soft pastel nail colours. Adding a sparkle to your nails can elevate your manicure for a special occasion. For a cute and flirty look, try a heart-shaped nail design. Painting your nails in a classic red shade can give you a timeless, romantic vibe.
Another easy and adorable nail art idea is to experiment with nail stickers. These can be a fun and effortless way to add flair to your nails. From delicate flowers to intricate designs, there are endless possibilities with nail stickers.
5.Magical Sky – Easy Nail Art
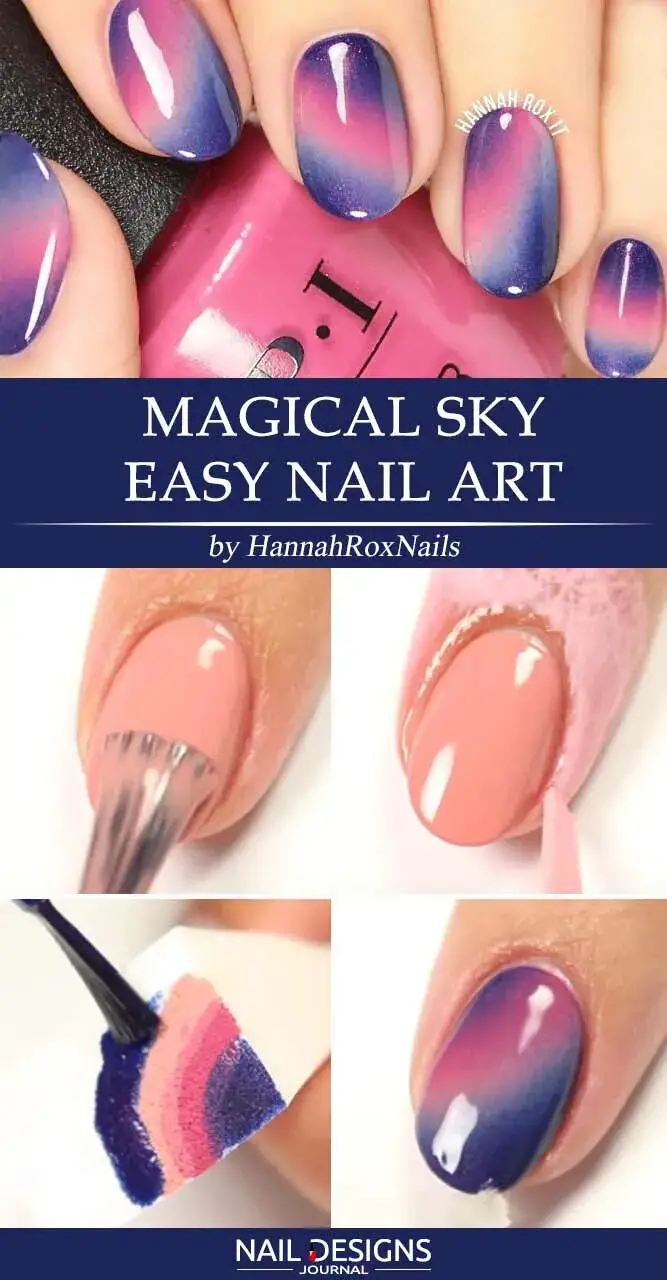
Create a mesmerizing nail design inspired by the enchanting night sky. Explore the celestial realm with nail polish shades of blue, purple, and silver, capturing the ethereal beauty of the heavens. Enhance your celestial-inspired nails by adding glitter or foil accents that mimic shimmering stars, elevating your nail art to new heights of magic.
Magical Sky – Easy Nail Art opens up a world of possibilities for expressing your individuality through your nails. Whether you want to add a touch of whimsy to your everyday style or make a statement for a special occasion, this nail art idea is the perfect way to showcase your creativity. So grab your favourite nail polishes, channel your inner artist, and embark on a celestial nail journey that will leave you starstruck.
6.Nail Designs With Tropical Flowers
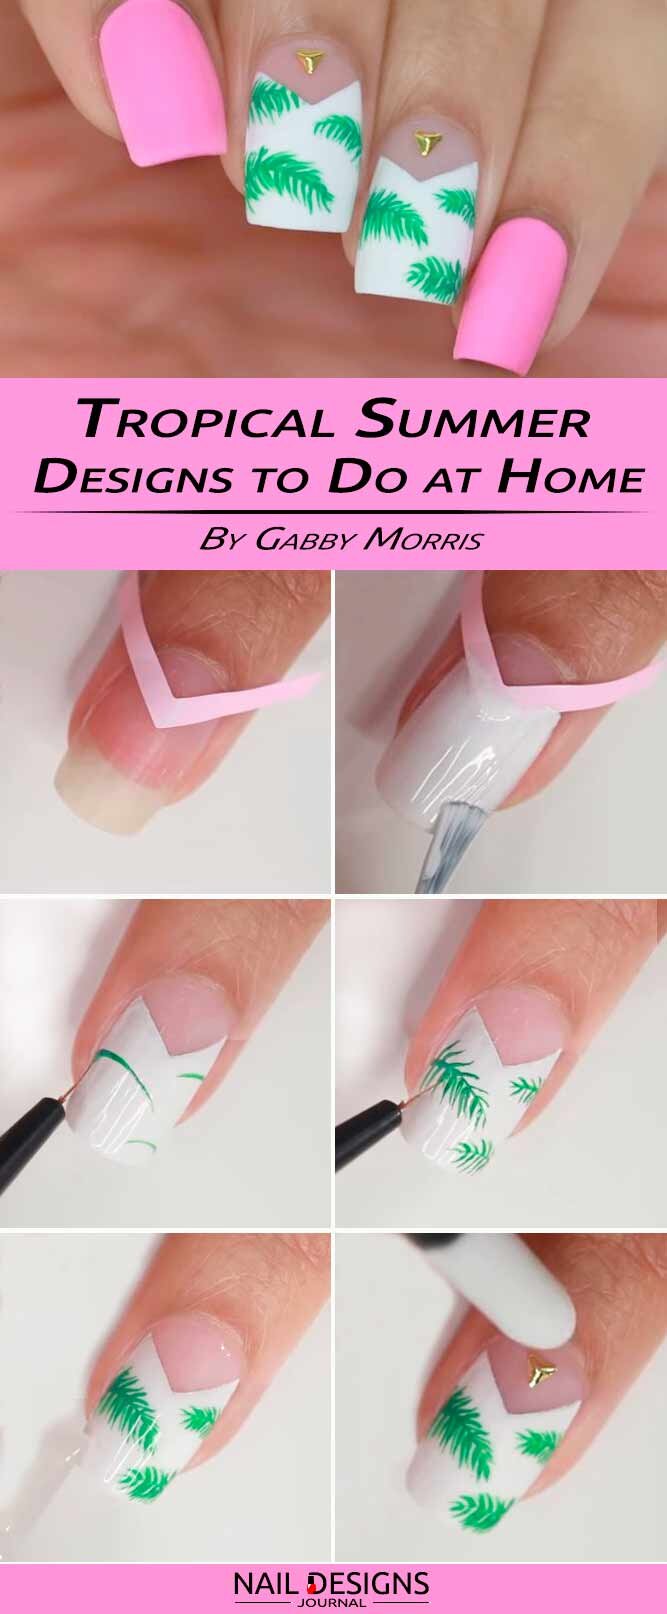
Create a stunning tropical nail design by drawing inspiration from the vibrant hues of lush, colourful flowers. Embrace the tropical spirit using nail polishes in coral, teal, and yellow shades. Experiment with floral nail stickers, nail stamping, or hand-painted flowers to bring your tropical vision to life.
To complete the tropical theme, consider adding leaf or palm tree accents. These small details can make a big impact and transport you to a tropical paradise.
7.Easy Water Marble Floral Nail Art
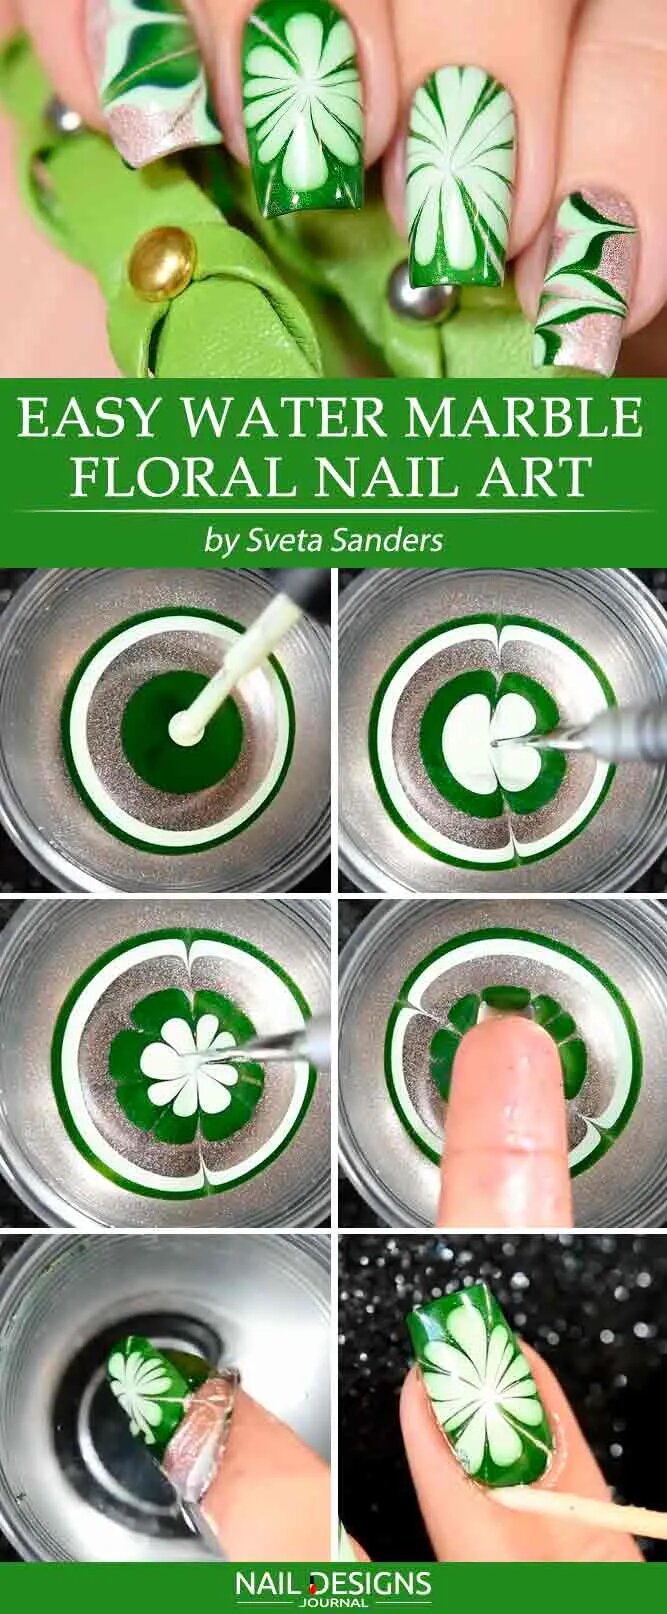
Create a stunning nail design using the water marbling technique. Experiment with different color combinations to achieve a floral look. Use a toothpick or nail art brush to swirl the nail polish in the water, creating beautiful and abstract flower patterns on your nails. Seal your nail art with a top coat for long-lasting wear. The easy water marble floral nail art is a fantastic way to add a touch of creativity to your DIY nail routine.
8.Black And Pink Gorgeous Nail Ideas
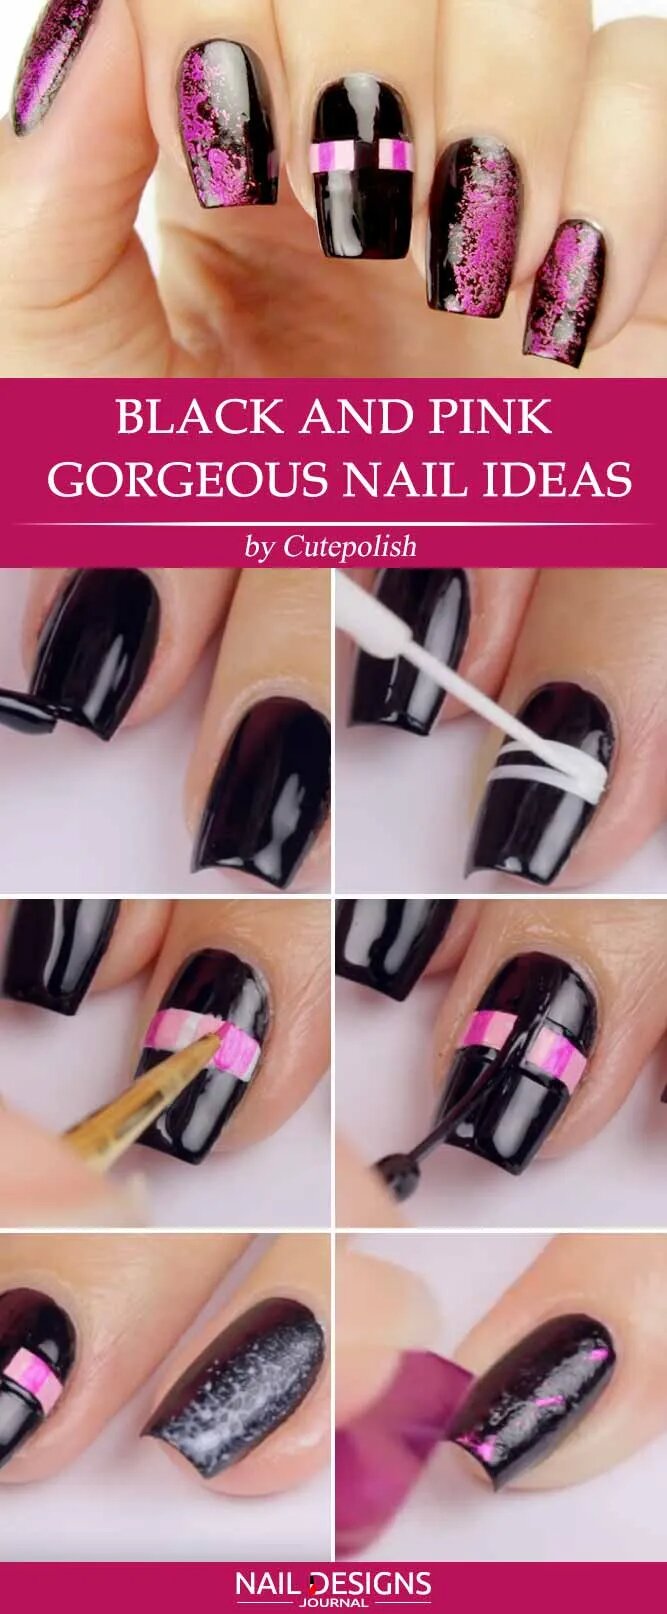
Combine black and pink nail polish to create a stylish, eye-catching design. Experiment with nail shapes like stiletto or coffin to enhance the look. Try incorporating geometric patterns, stripes, or colour blocking for a modern and trendy vibe. Consider embellishing your nails with rhinestones, studs, or nail foil to add glamour. Finish off your gorgeous black and pink nails with a glossy top coat for a polished and professional finish.
9.Quick Dotticure Nail Art To Do At Home
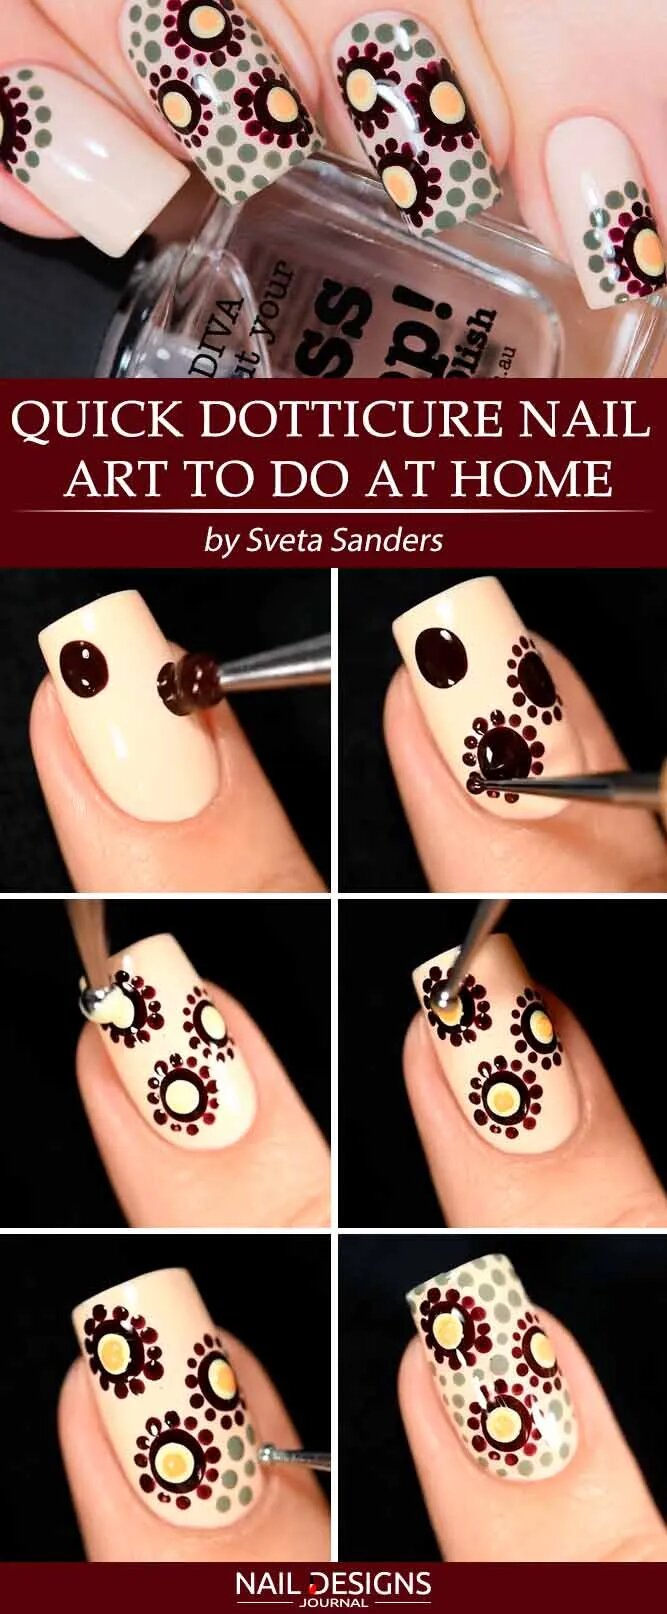
Create playful and fun nail art at home with a simple tool like a dotting tool or a bobby pin. All you need is a variety of nail polish colours to experiment with different dotted designs. The possibilities are endless, whether you want to try a classic polka dot pattern, create random dots, or even showcase simple and elegant nail art designs using dots.
10.Super Cute Floral Nail Art
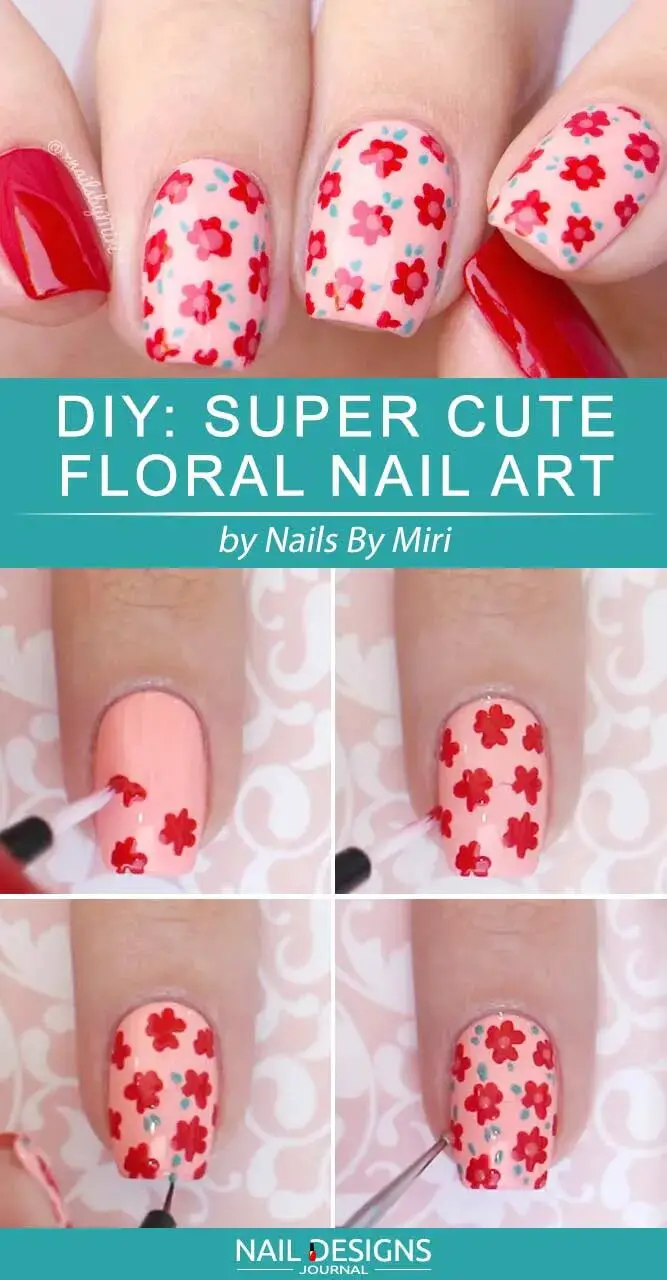
Creating this floral nail art is a great way to express your style and add flair to your manicure. Start by applying a base coat to protect your nails and ensure that the design stays put. Then, choose your favourite nail polish colours for the petals and centres of the flowers. Use a thin brush or dotting tool to carefully create the flower shapes on your nails. To create various looks, you can experiment with different flower styles, such as daisies, roses, or sunflowers.
11.Pretty Nude Nails Tutorial
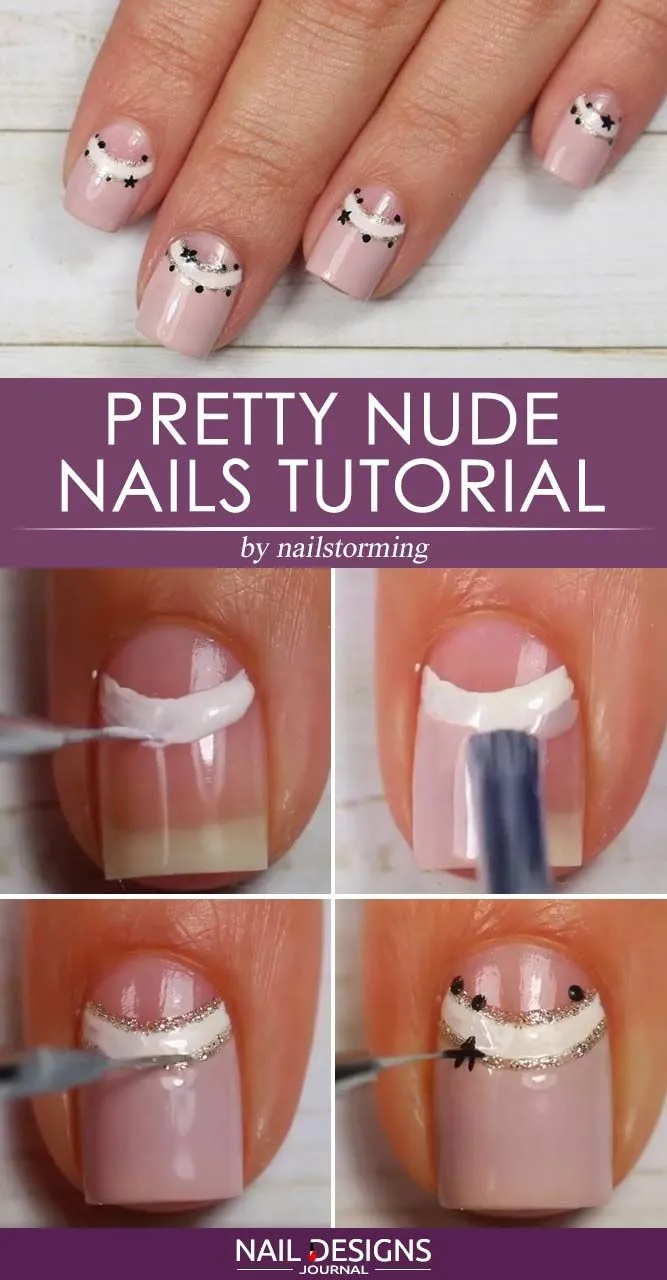
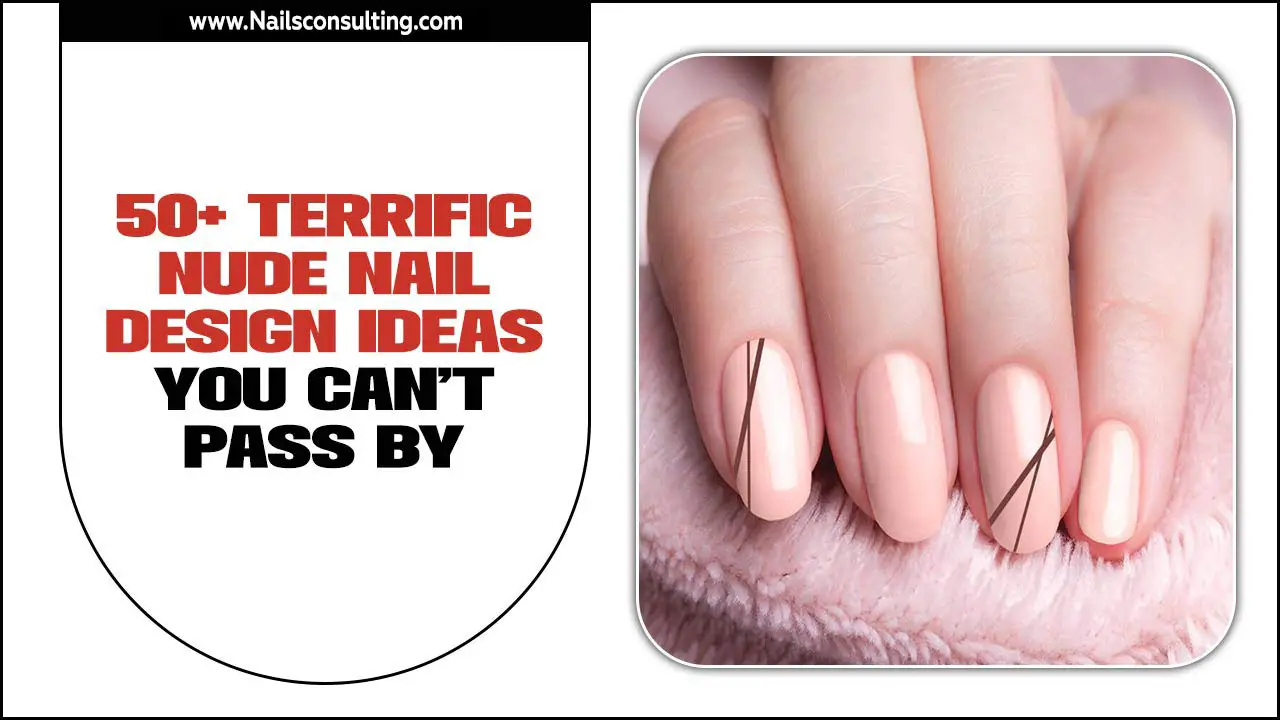
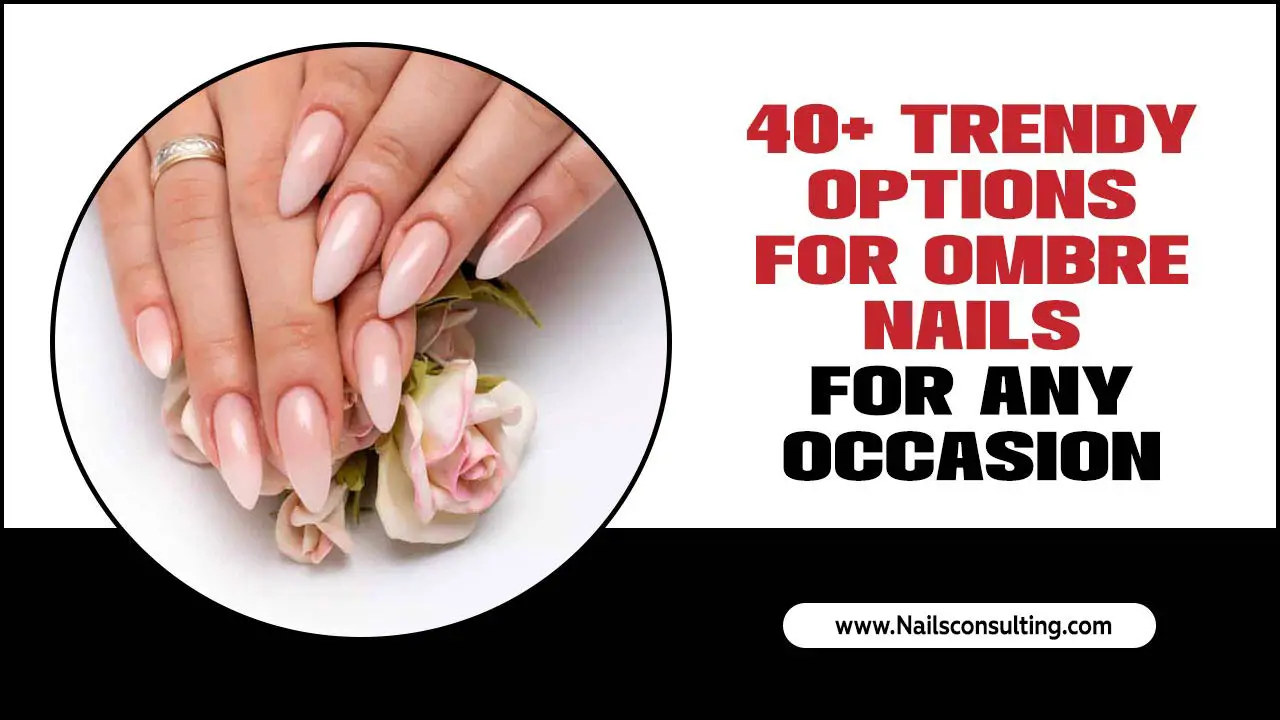
Achieving a pretty nude nail look is classic and versatile, making it a perfect choice for DIY enthusiasts. To get started, it’s important to prep your nails with a base coat before selecting a nude polish shade that complements your skin tone. Applying two coats of polish, allowing each coat to dry completely, will ensure a smooth and even finish. Finish off with a top coat for an extra touch of shine and protection.
12.Elegant Burgundy Fishtail Nails

Achieving an elegant and sophisticated look with burgundy nail polish is a great idea. You can create a fishtail nail pattern using either tape or nail vinyl for a clean and precise design. Experimenting with nail shapes like almond or oval can enhance the overall aesthetic. Consider incorporating gold foil, glitter, or nail gems to add a touch of luxury. And don’t forget to seal your nail art with a high-shine top coat for a salon-worthy finish.
13.Neon Rainbow Dotticure Nail Designs
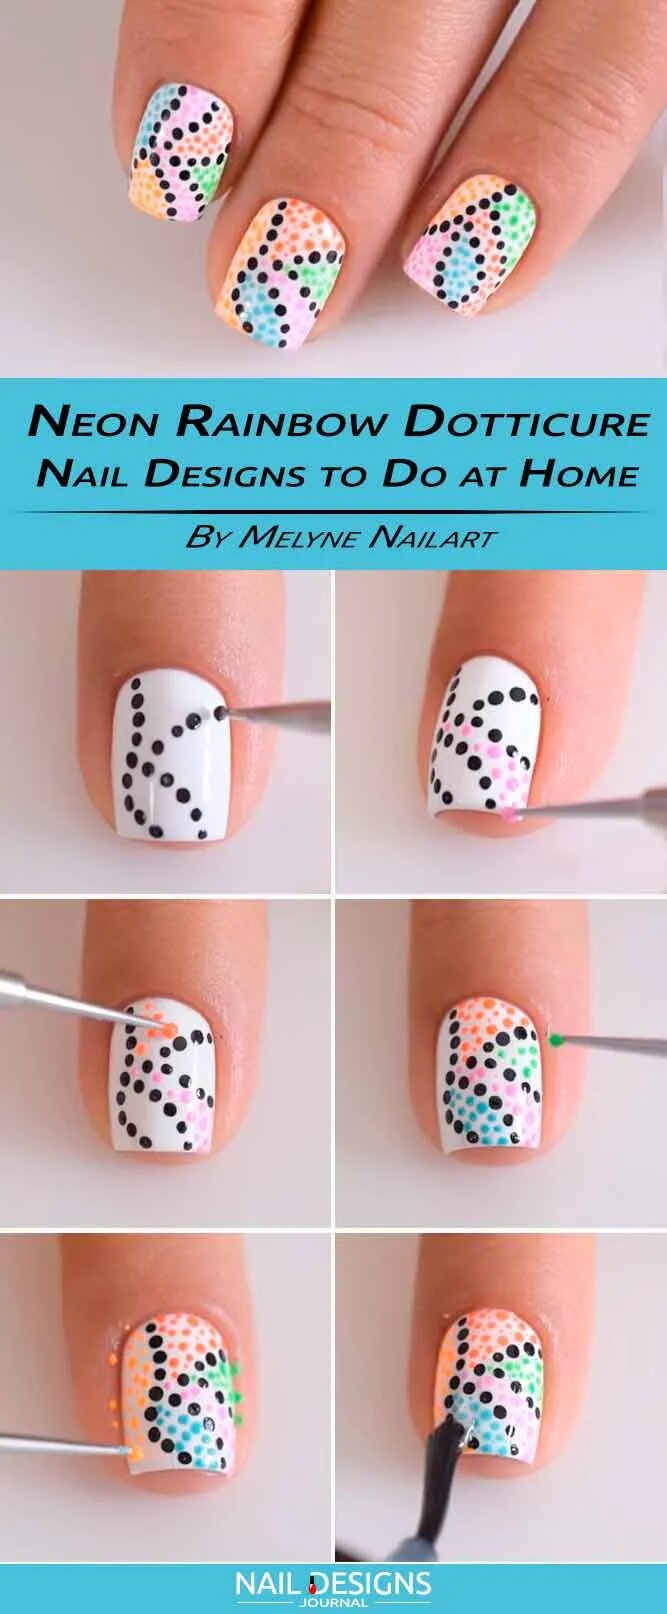
Create a vibrant and playful nail design by using neon nail polish. With the help of dotting tools or even a bobby pin, you can easily create a stunning rainbow of dots on your nails. Don’t be afraid to mix and match different neon colors, such as pink, green, yellow, and orange, to create a truly eye-catching look.
Once you’ve finished creating your dotticure, apply a glossy top coat to make the neon colors pop. Whether attending festivals, parties, or simply going about your everyday life, this neon rainbow dotticure nail design will turn heads and make a statement.
14.Beautiful Roses
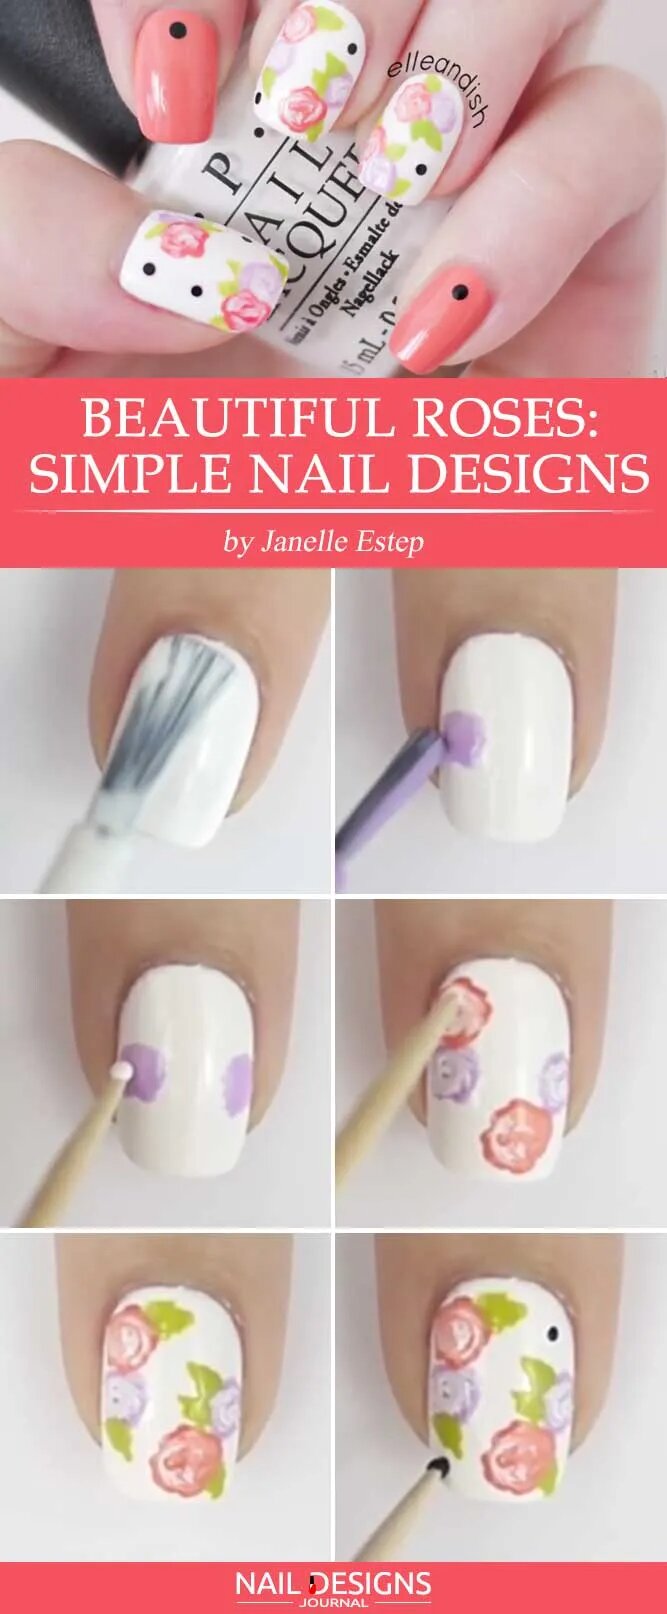
Create a romantic and delicate nail art inspired by beautiful roses. Experiment with shades of soft pinks, reds, or whites to create the perfect rose petals on your nails. Use nail art brushes or toothpicks to paint the roses and add intricate details. Incorporate green nail polish or nail foil for the leaves and stems to give your roses a realistic touch. Finish off your nail art with a top coat to ensure it lasts and stays beautiful for a long time.
15.Realistic Amethyst Nails
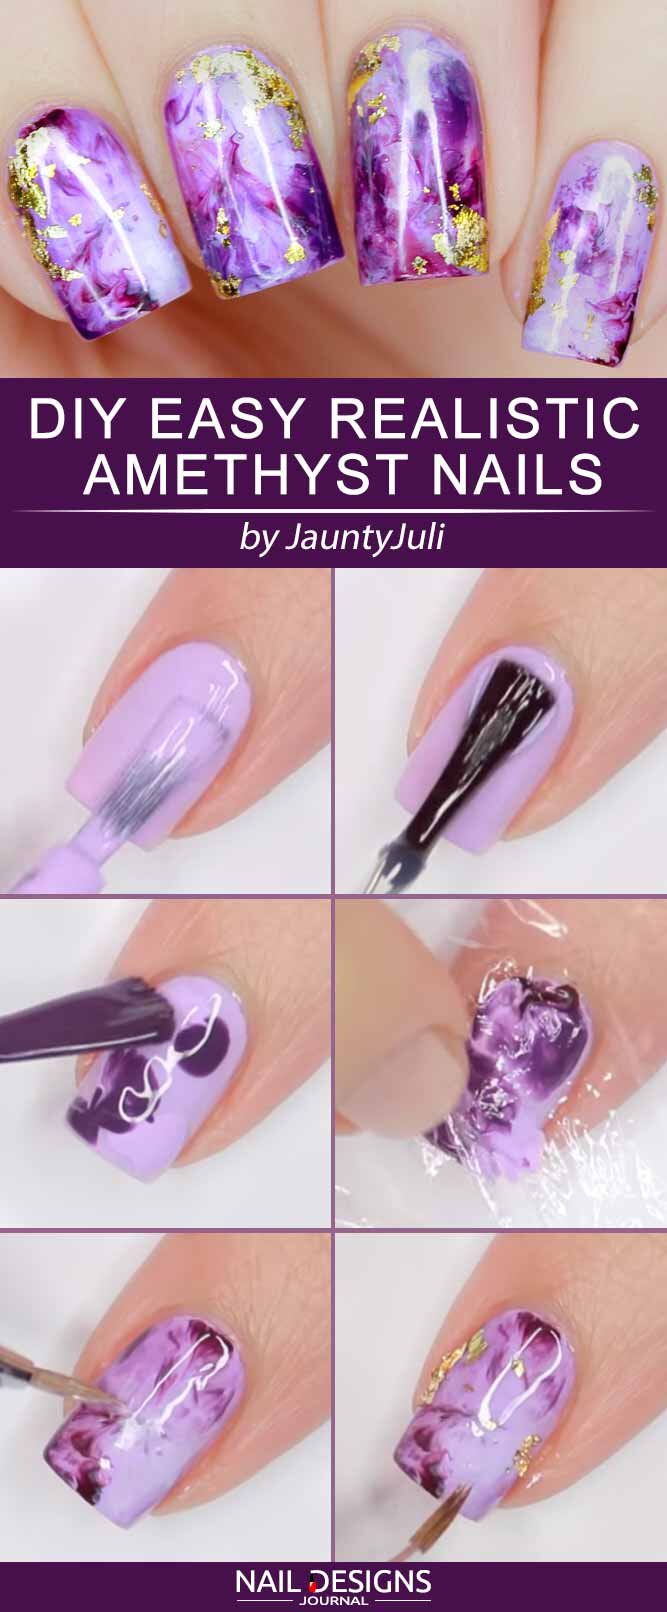
To begin, gather all the necessary materials, including a base coat, a deep purple nail polish, a small brush or dotting tool, a fine-tipped nail art brush, and a top coat. Start by applying a base coat to protect your nails and ensure long-lasting wear. Once dry, apply two coats of the deep purple nail polish, allowing each layer to dry completely.
Next, it’s time to create the intricate amethyst designs. Using a small brush or dotting tool, carefully apply dots or small strokes of a lighter purple shade to imitate the intricate patterns found in real amethyst crystals. Vary the size and placement of the dots to create a natural and realistic effect. Finally, seal your stunning amethyst nails with a glossy top coat to protect the design and add a luxurious finish.
16.Black Nails With Gold Stripes
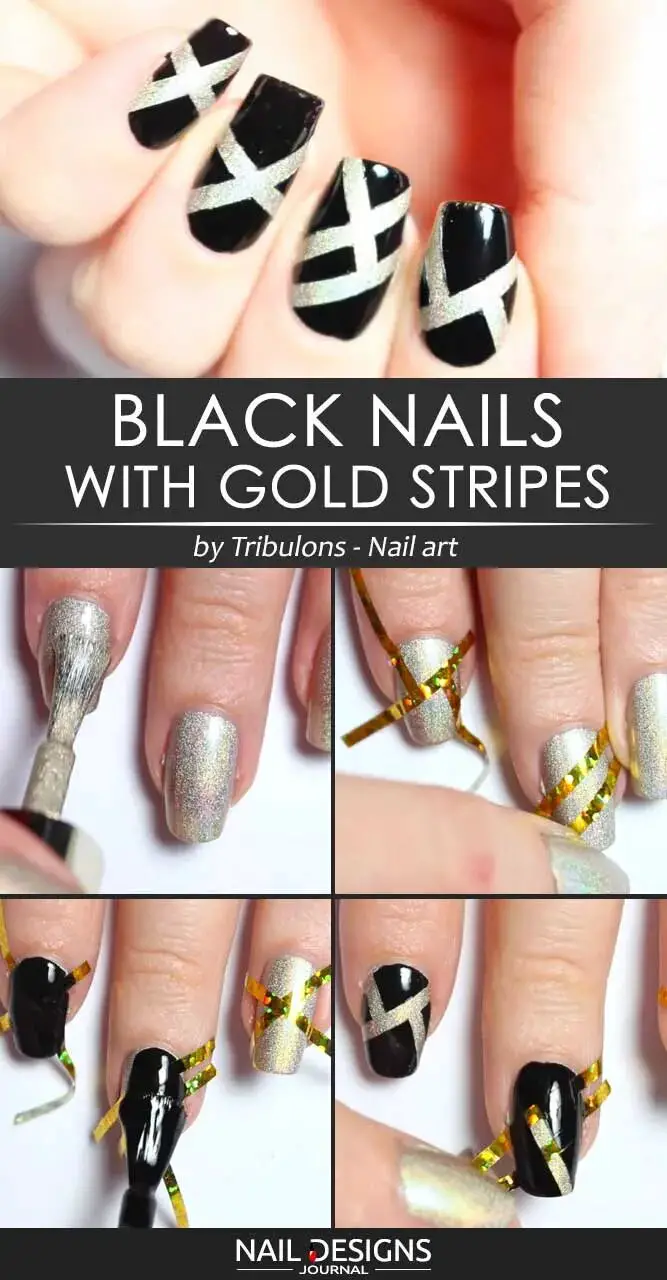
For a chic and sophisticated look, try black nails with gold stripes. Start by applying a base coat to protect your nails. Once dry, paint your nails black using a black nail polish. Allow the polish to dry completely.
Next, using a thin nail art brush or striping tape, carefully create vertical or horizontal lines on your nails using gold nail polish. You can experiment with different thicknesses and patterns to suit your preference. Once you’re satisfied with the design, seal it with a top coat for long-lasting shine and protection.
17.Plaid Nails Tutorial
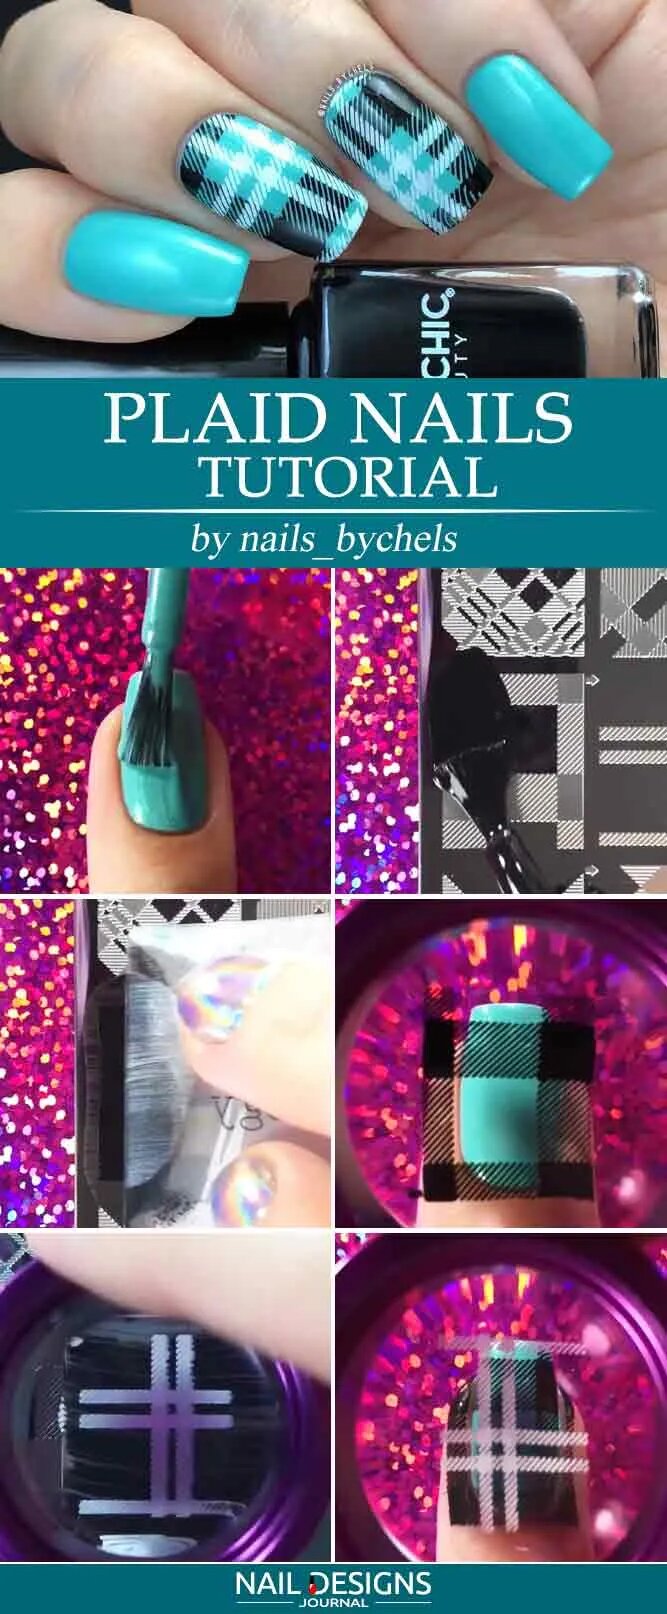
Create a trendy and stylish plaid nail design with this easy tutorial. Incorporate a classic pattern into your nail art for a fun and festive look. Plaid nails are a fashion-forward idea that will make you stand out. Follow this step-by-step tutorial to achieve flawless plaid nails for any occasion.
This tutorial will take your nail game to the next level, and it’s perfect for beginners. Start by painting your nails with a base colour of your choice. Then, using thin strips of masking tape, create a grid-like pattern on your nails.
Apply different nail polish shades over the tape to create the plaid effect. W carefully remove the tape once the polish is dry to reveal the crisp plaid design. Finish off with a top coat to seal your design and add shine. Plaid nails are an awesome idea for those looking to try something new. They are easy to do and require minimal tools.
18.Camouflage Nail Art Tutorial
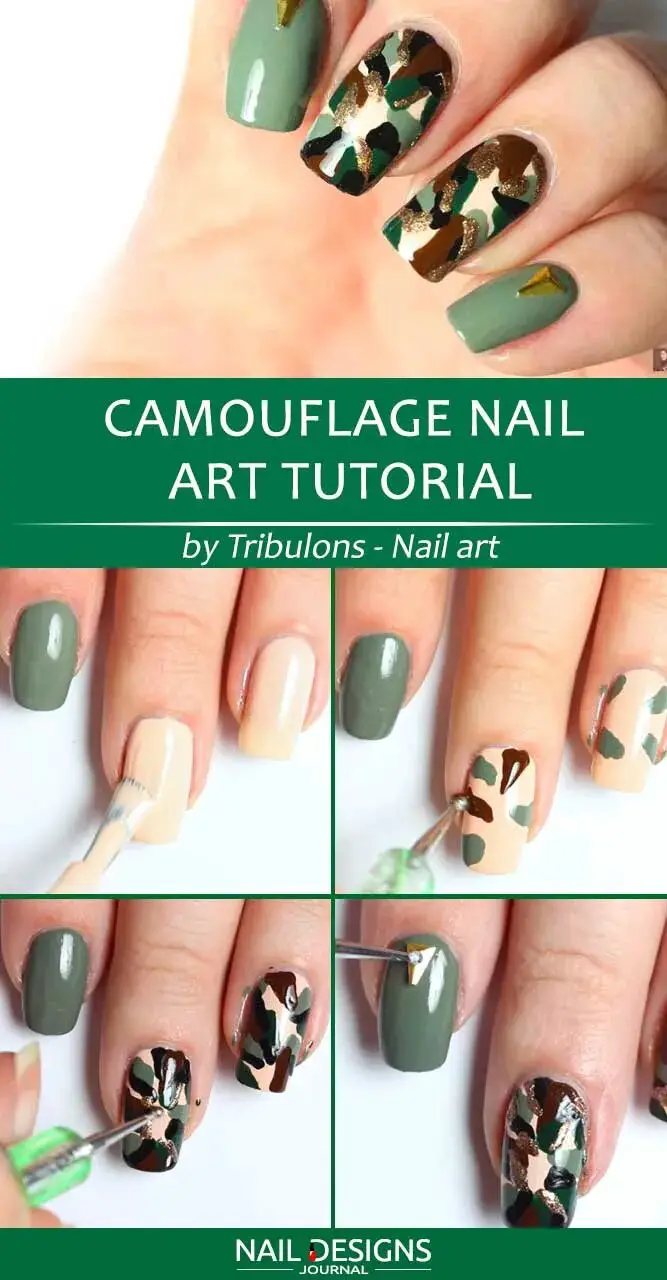
This tutorial will walk you through the steps to create a cool camouflage design on your nails using simple tools. Start by applying a base coat to protect your nails and help the polish adhere better. Then, choose two or three colours that you want to use for your camouflage pattern.
Using a small brush or toothpick, create irregular shapes and lines with different colors, overlapping them to mimic the look of camouflage. Once you’re happy with the design, let it dry and finish with a top coat for added shine and longevity.
19.Simple Matte Ombre Nails
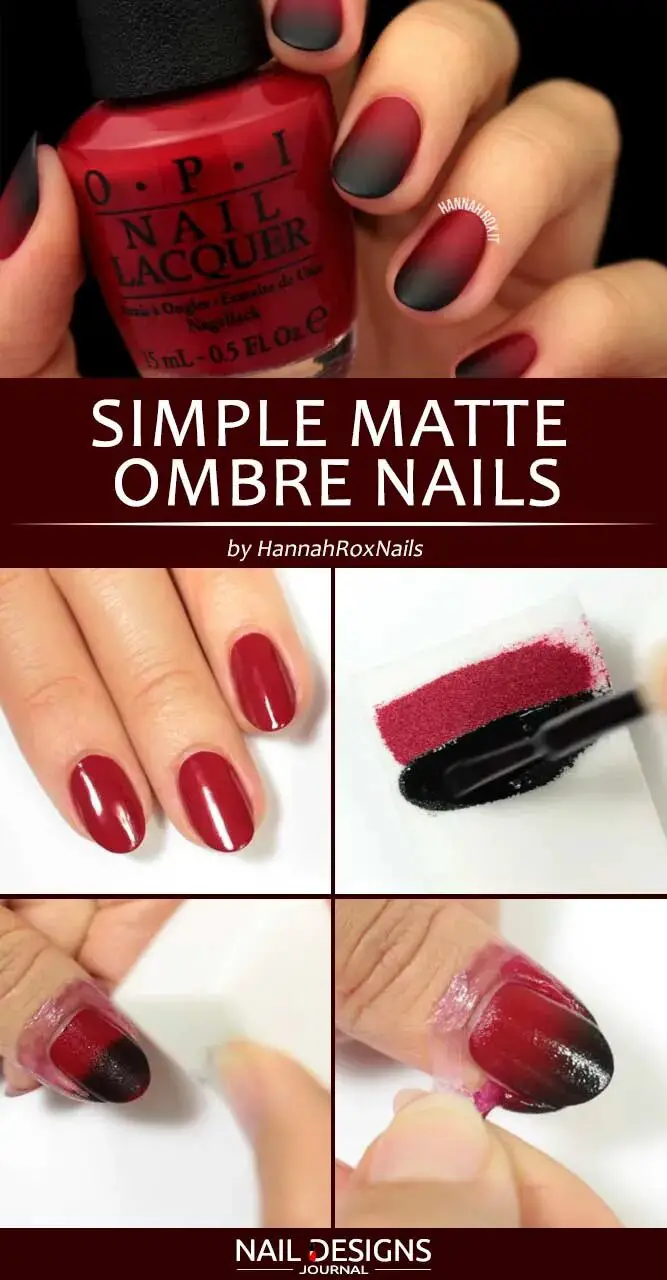
Matte ombre nails have become popular for DIY nail enthusiasts looking for a trendy and low-maintenance option. When creating this nail design, choosing a colour palette that suits your style is important. The options are endless, whether you prefer soft pastels or bold jewel tones. You only need a matte topcoat to achieve a smooth and chip-resistant finish. Applying this topcoat will enhance the overall look of your matte ombre nails and ensure their durability.
20.Red Flowers Nail Art
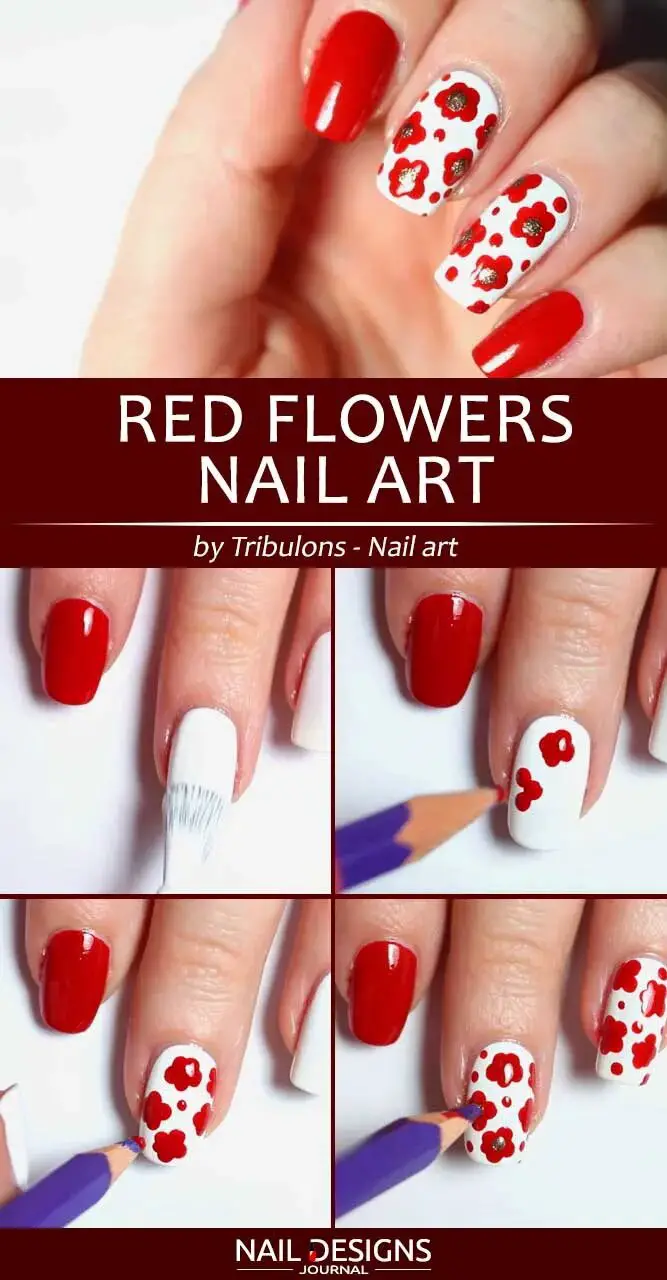
Red flower nail art is a super easy and eye-catching design that every girl should try while stuck at home. Whether you’re a beginner or a nail art pro, this design can be achieved with just a few simple steps. Apply a red base coat to your nails and let them dry completely.
Then, using a dotting tool or a toothpick, use white or black polish to create small dots in the shape of flowers on each nail. Finally, add some green leaves or stems to complete the look. This fun and floral design will brighten your day and give you something beautiful to show off during your next video call or social media post. So grab your favourite red polish and get creative with red flowers nail art.
21.Perfect Nails With Animal Print
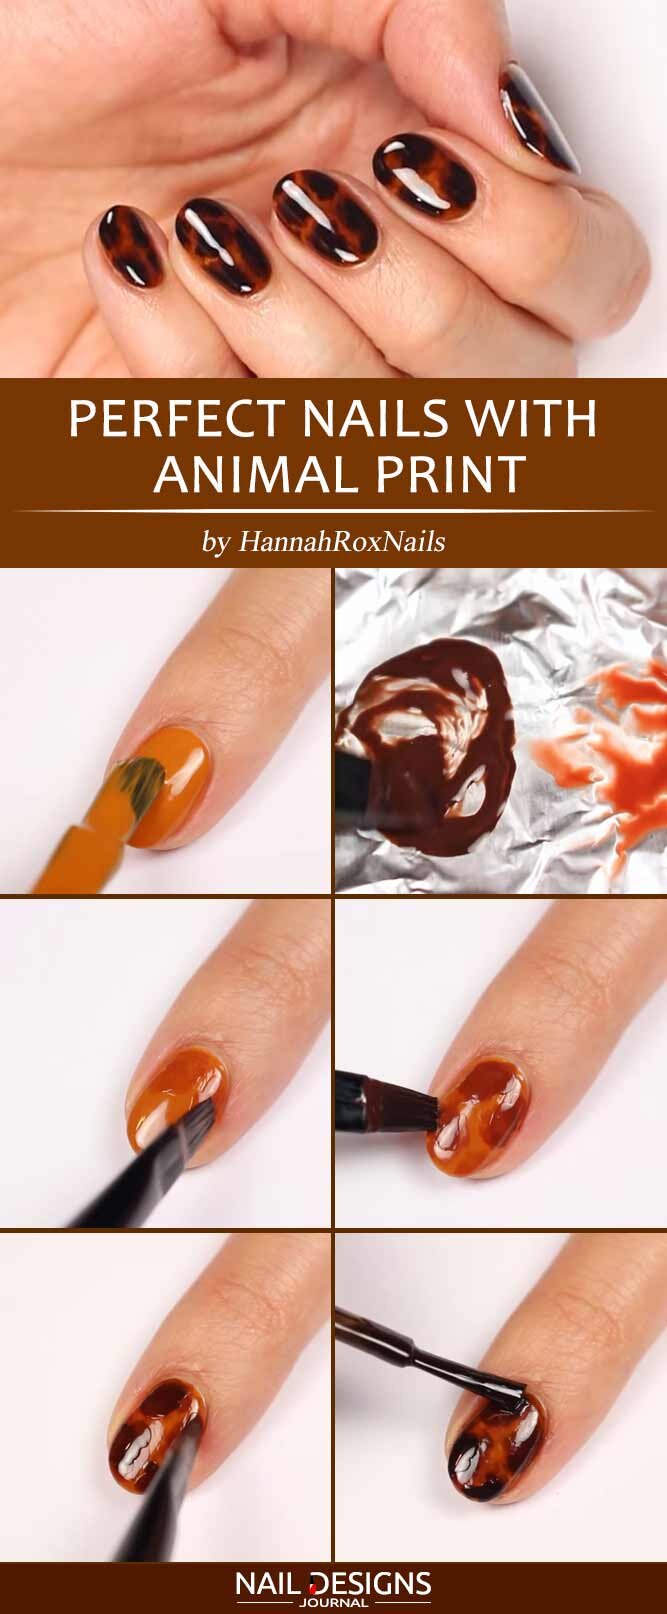
Animal print nails are a fun and trendy way to excite your at-home manicure. Whether you prefer leopard spots, zebra stripes, or snakeskin patterns, there are plenty of options. Apply a base coat to protect your natural nails to achieve the perfect animal print nails.
Then, choose a base color that complements the animal print design you want to create. Once your base color is dry, use a thin nail art brush or a toothpick dipped in a contrasting color to create the animal print pattern. You can also use nail stickers or stamping plates for an easier application. Finish off with a top coat to seal your design and add shine.
22.Super Easy Half Moon Nails Art
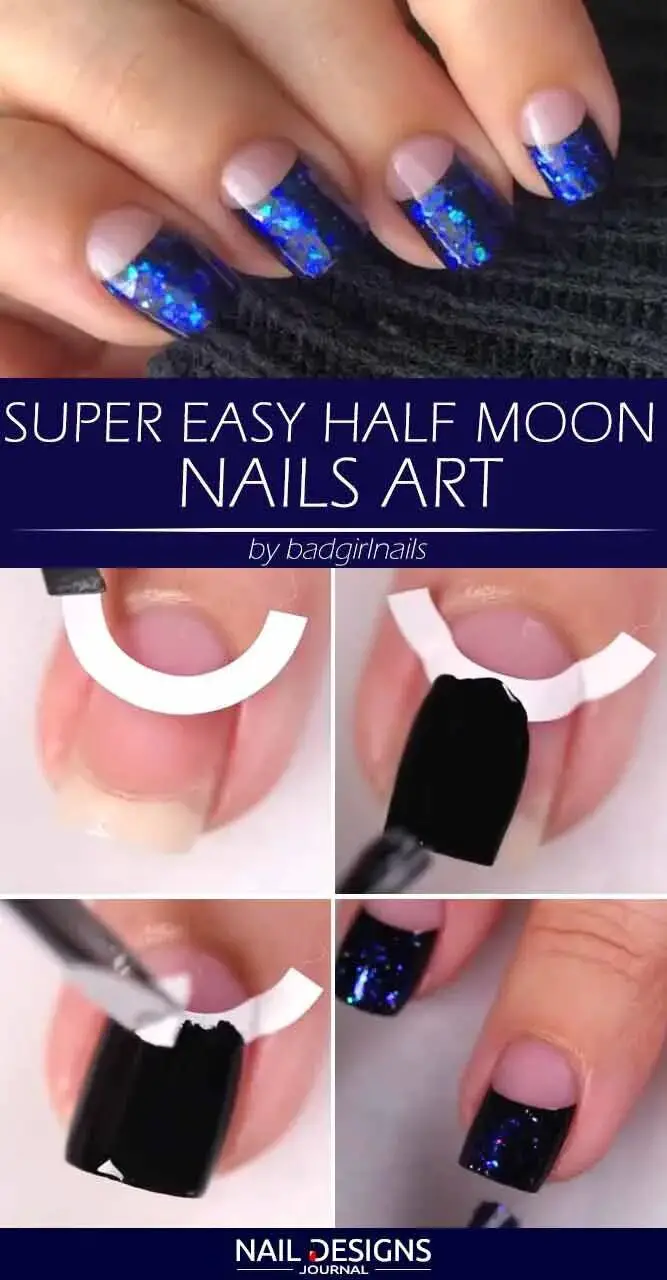
Achieving a super easy half-moon nail art is simpler than you may think. This classic design can be created in just a few easy steps. To start, gather some round stickers or nail stencils. These will guide you to achieve the perfect half-moon shape on your nails. Begin by applying the stickers at each nail’s base, exposing the top portion.
Next, take your desired nail polish colour and paint the uncovered part of your nails. Be sure to wait for your nails to dry before gently peeling off the stickers completely. Once removed, the result will be a beautiful half-moon design that adds a touch of elegance to your manicure.
23.Glitter Purple Nails Tutorial
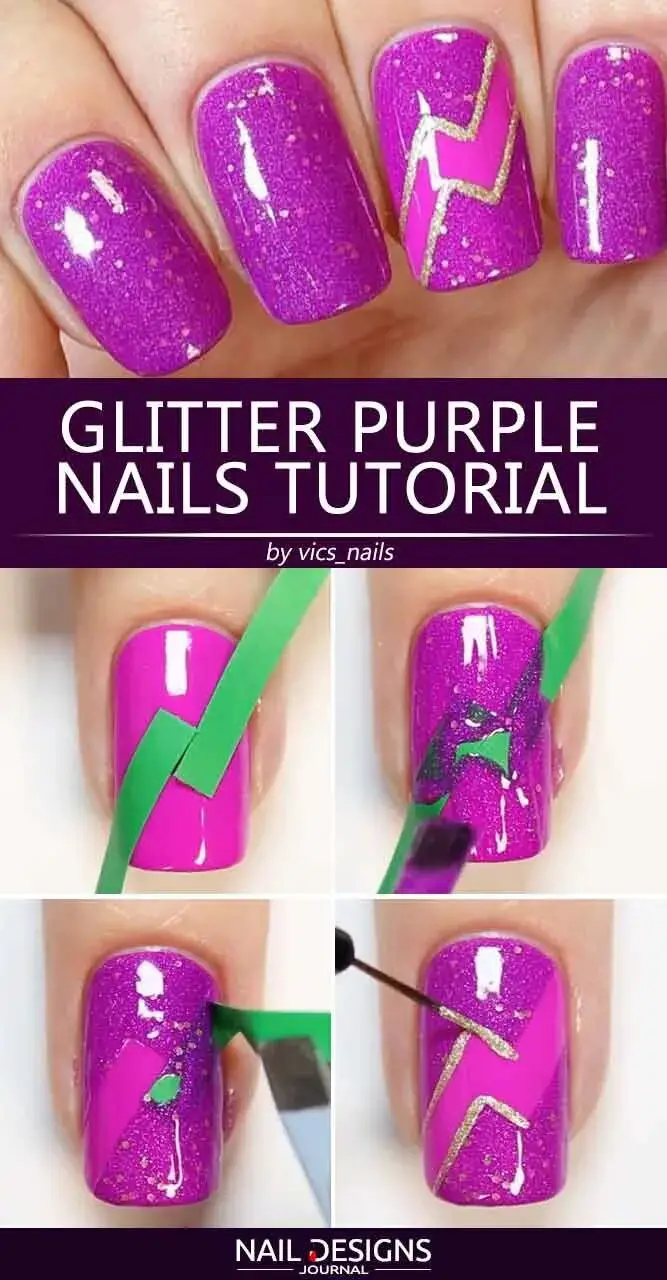
Start by prepping your nails – clean them, file them into your desired shape, and apply a base coat to protect your natural nails. Next, choose a vibrant purple nail polish and apply two thin coats for full coverage.
Once the polish is dry, it’s time for the fun part – adding the glitter! Use a small brush or toothpick to apply the glitter polish in a gradient or ombre effect, starting from the base of your nails and fading towards the tips. Allow the glitter to dry completely before sealing everything with a glossy top coat.
24.Galaxy Gradient Nails
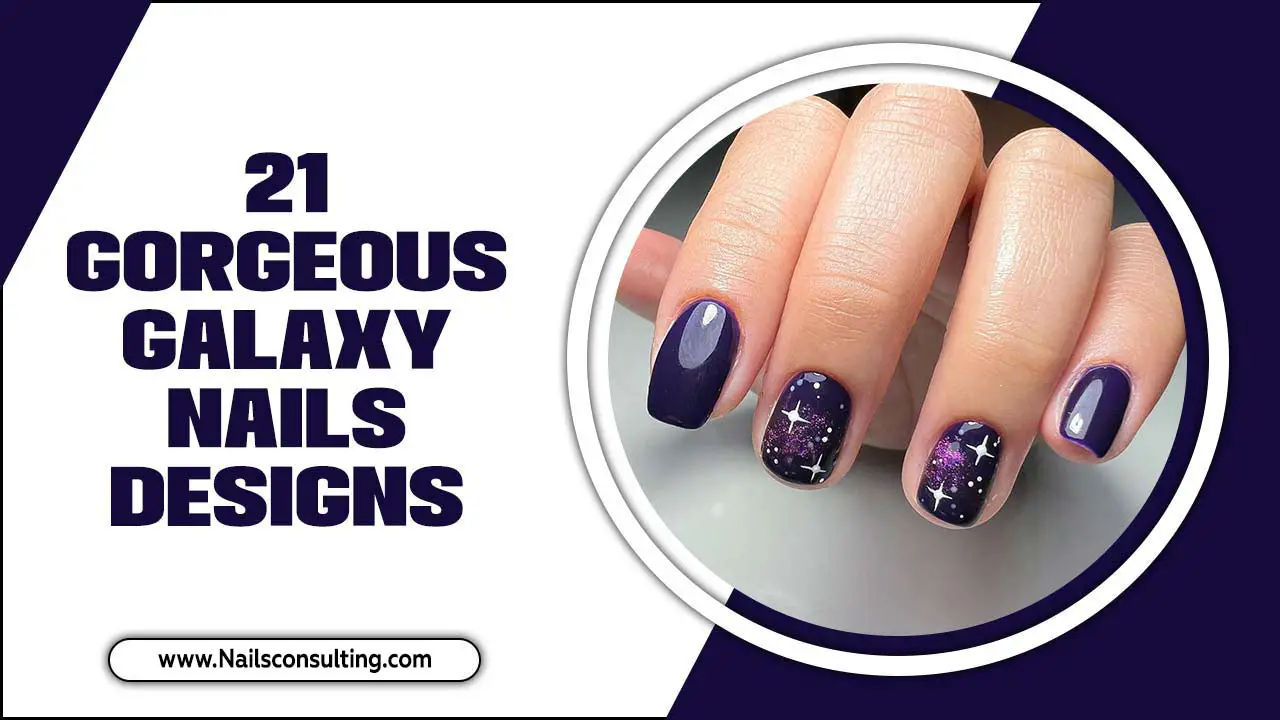
Galaxy gradient nails offer a celestial touch to your fingertips and enjoyably. By blending shades of blue, purple, and black nail polish, you can create a mesmerizing gradient effect that mimics the galaxy’s vastness. Consider incorporating glitter or rhinestones into your design to add a touch of sparkle.
Use a toothpick or small brush to create star and galaxy shapes using white or silver nail polish for an extra cosmic touch. This intricate detailing will reveal the galaxy’s magical beauty on your nails. Finally, seal your design with a clear topcoat to ensure a long-lasting finish.
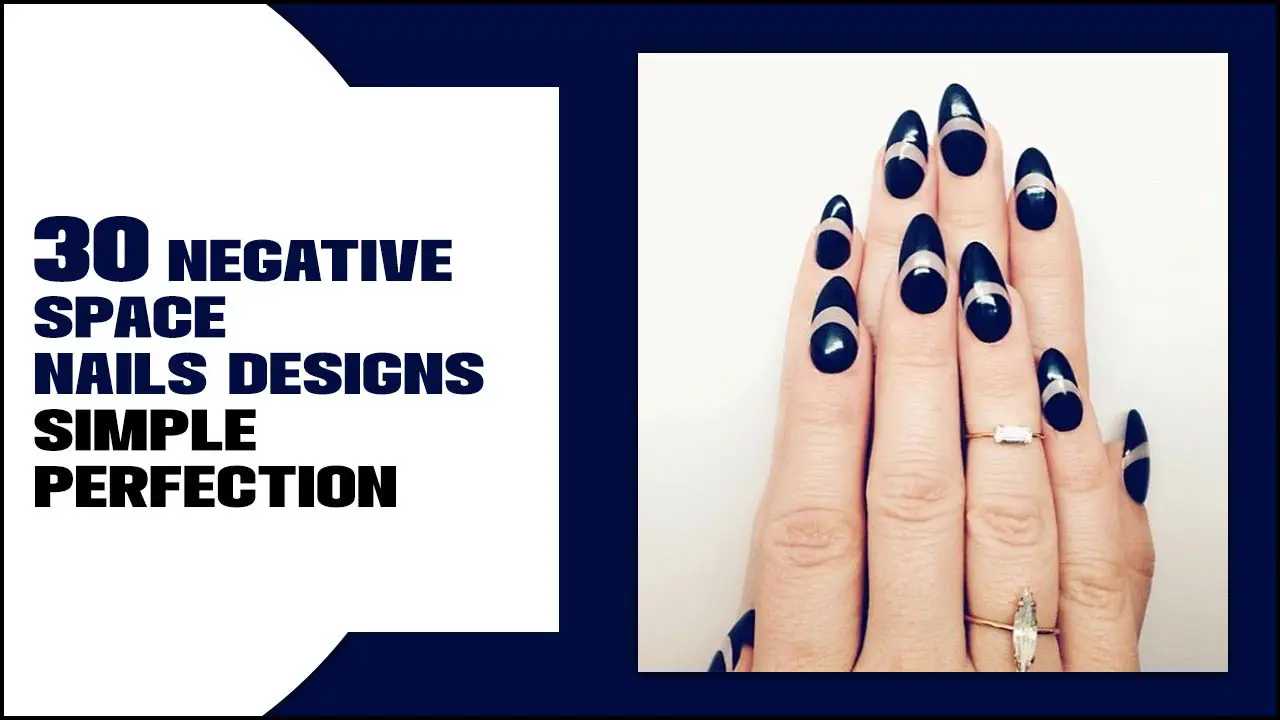
25.Geometric Nail Art With Negative Space
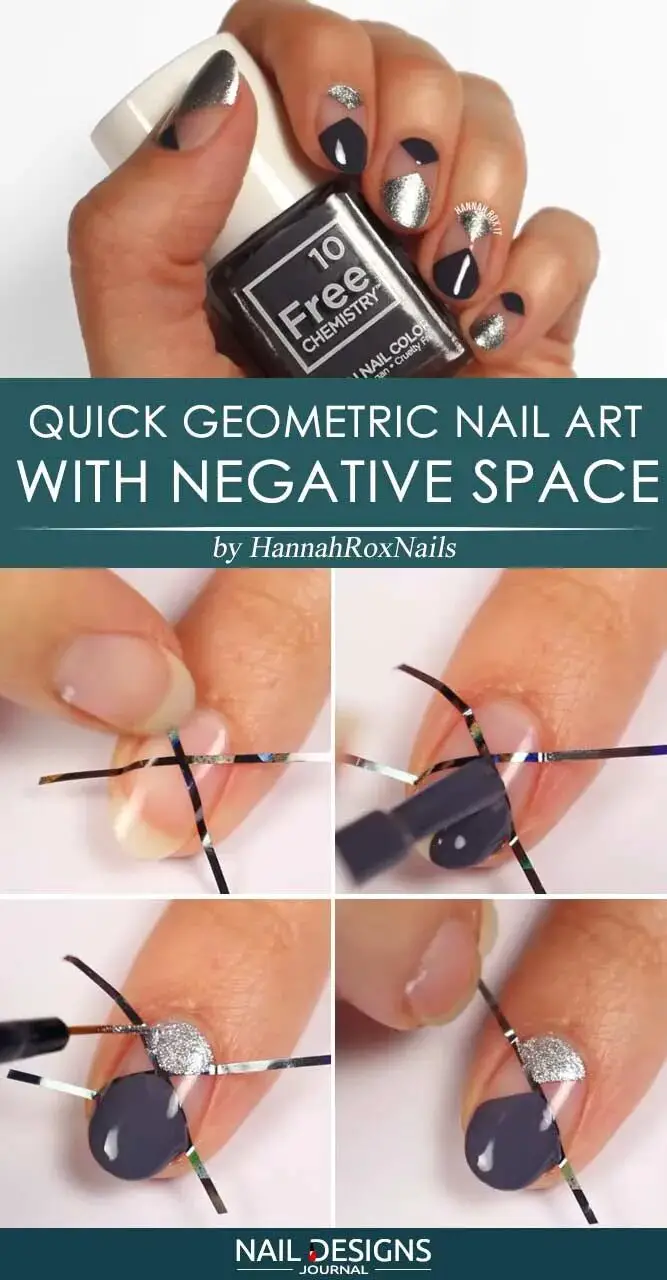
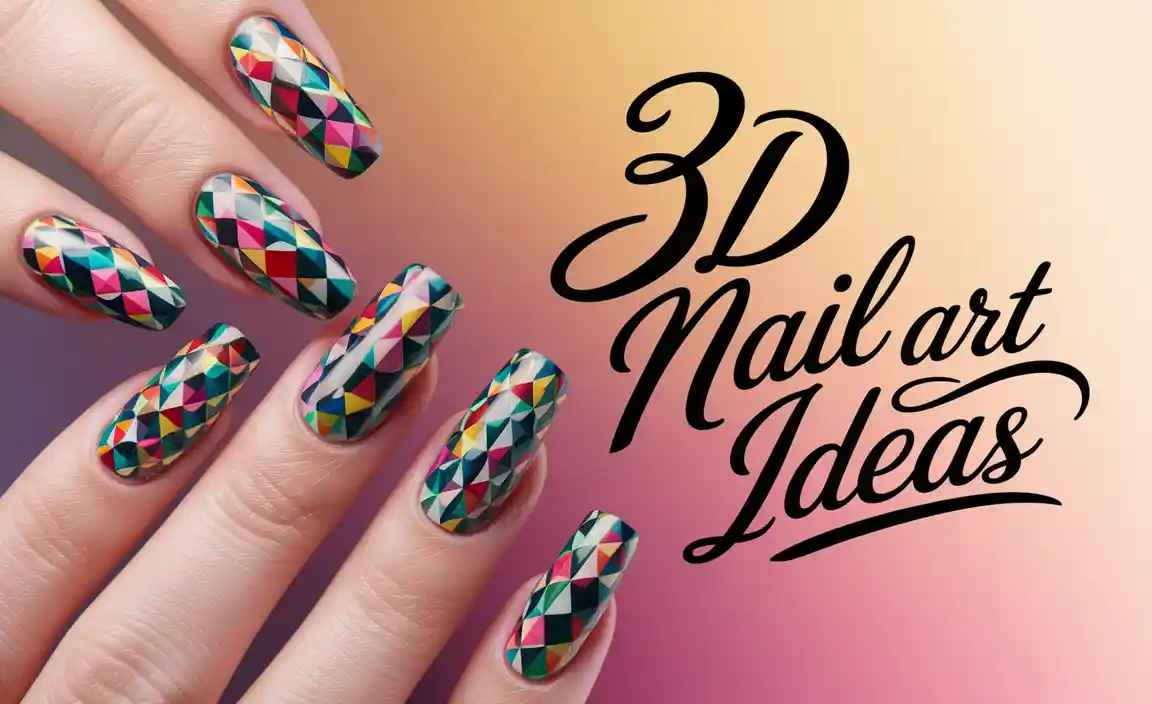
Geometric nail art with negative space is a trendy and super easy DIY nail idea that every girl should try while stuck at home. This design involves creating geometric shapes on your nails using tape or nail art stickers and exposing parts of your natural nail to create a chic and modern look.
You don’t need fancy tools or professional skills to achieve this look. You only need some tape, different nail polish colours, and a steady hand. You’ll be amazed at the professional-looking results you can achieve right from the comfort of your own home.
26.Two-Toned Nails Tutorial
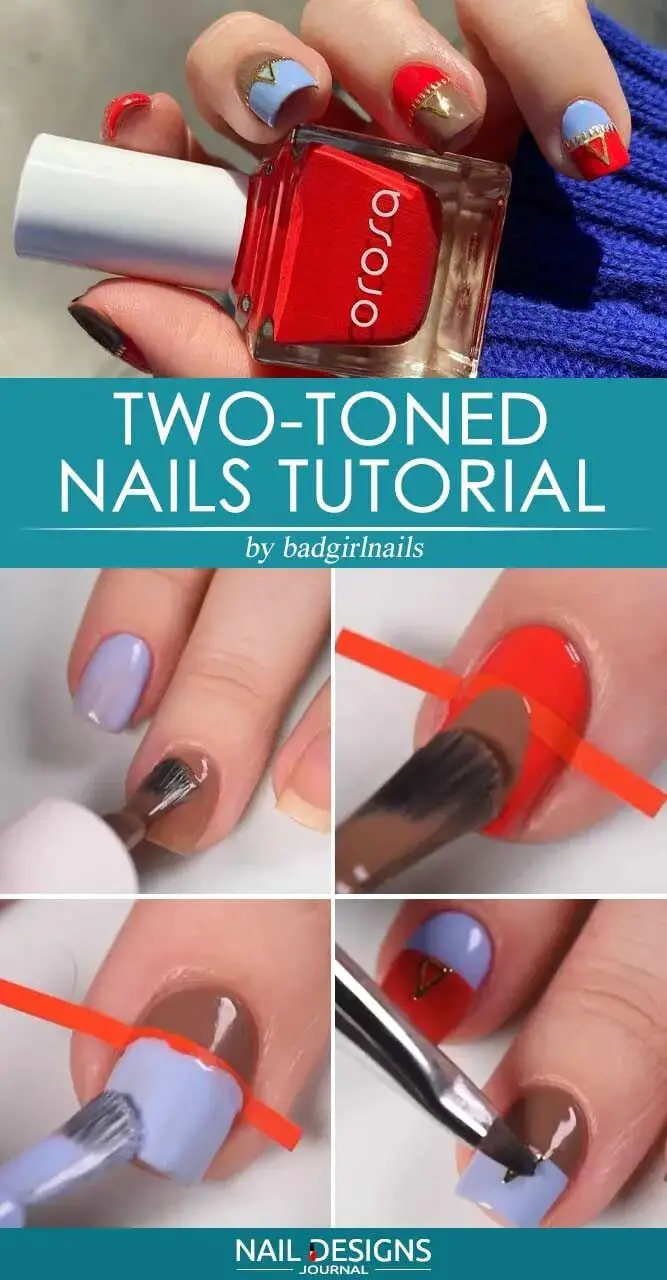
Two-toned nails are a fun and trendy DIY nail art idea that every girl should try while stuck at home. This tutorial will guide you through the steps to achieve this stylish look. Start by choosing two nail polish colors that complement each other. Apply a base coat to protect your nails and allow them to dry completely.
Next, paint one color on half of your nail, starting from the base and stopping in the middle. Use a steady hand or tape to create clean lines. Once dry, apply the second color to the other half of your nail, overlapping slightly with the first color. Finish off with a top coat for added shine and protection.

