The best DIY nail art for busy moms? Embrace simple, quick designs like minimalist dots, single accent stripes, or subtle glitter fades. You can achieve gorgeous, stylish nails in minutes with minimal effort and readily available tools, proving that beauty and a packed schedule can absolutely coexist!
Life as a mom is a beautiful whirlwind, but that doesn’t mean your nails have to take a backseat. Finding time for intricate nail art can feel like a distant dream. Many moms worry that a demanding schedule means sacrificing self-care or settling for plain polish. But what if I told you that stunning, on-trend nail art is totally achievable, even on your busiest days? Get ready to discover simple, creative, and totally doable DIY nail art designs that will make your hands look fabulous without adding stress to your already full plate. Let’s transform those nails into little works of art, effortlessly!
Why DIY Nail Art is a Busy Mom’s Best Friend
Let’s be honest, between school runs, meal prep, laundry, and endless cuddles, finding an hour (or more!) for a professional manicure is often a luxury we just can’t afford. Yet, we all love the feeling of having beautiful nails. That’s where DIY nail art swoops in! It’s not just about saving money; it’s about reclaiming a bit of you-time on your own terms. You can do it while the kids nap, during your (rare) quiet evening, or even a quick touch-up in the carpool line. The magic of DIY is its flexibility – fitting it into your life, not the other way around.
Plus, the satisfaction of creating something beautiful with your own hands is seriously rewarding. It’s a small act of self-expression that can boost your mood and confidence. And the best part? You don’t need to be a professional artist. We’re talking about super-easy techniques that look impressive but take mere minutes to master. Ready to ditch the polish chips and embrace some effortless chic?
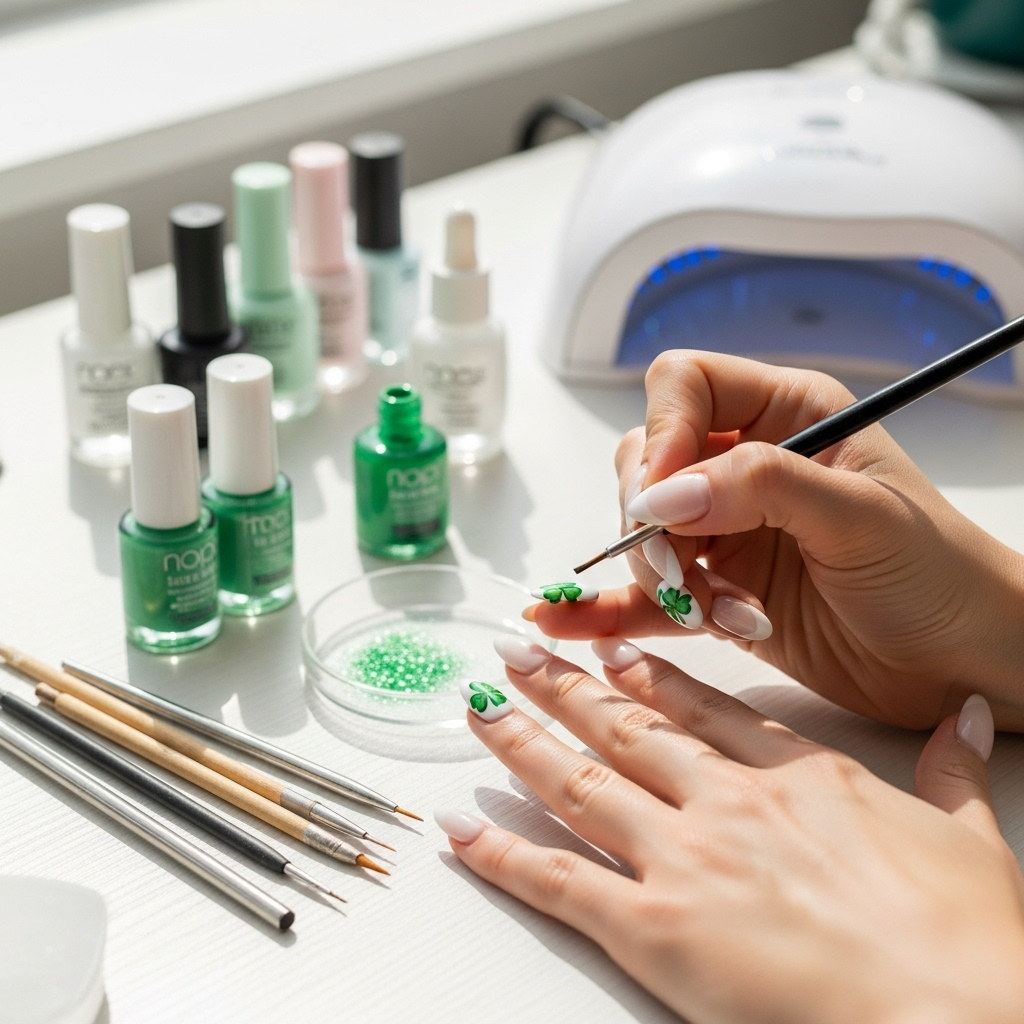
Essential Tools for Your Quick Nail Art Kit
You don’t need a whole salon at home to create amazing nail art. A few key tools can unlock a world of creative possibilities. Having these handy will make your DIY sessions a breeze and help you achieve salon-worthy results without the salon price tag. Think of this as your starter pack – you can always add more as you get hooked!
- Base Coat: This is non-negotiable! It protects your natural nails from staining and helps your polish adhere better, making it last longer. Look for a good quality, quick-drying formula.
- Top Coat: Just as important as the base coat. A good top coat seals your design, adds shine, and prevents chips and smudges.
- Nail Polish Remover & Cotton Pads: For tidying up mistakes and cleaning nails before polishing.
- Dotting Tools: These come with various-sized metal balls on the end. They’re perfect for creating dots, flowers, and even simple abstract designs. You can often find them in sets of 5 for just a few dollars.
- Thin Striping Brush: A brush with very fine bristles is fantastic for drawing clean lines, French tips, or even delicate swirls. Don’t be intimidated; it’s easier than it looks!
- Toothpick or Orange Stick: Your trusty multitasker! Use the pointed end for tiny details or to carefully clean up polish around your cuticles. An orange stick is also great for pushing back your cuticles.
- Washi Tape or Craft Tape: This is a secret weapon for creating sharp, clean lines and geometric patterns. It’s readily available at craft stores and easy to use. For nail art, look for thinner tapes.
- Glitter Polish: A quick swipe of glitter polish can instantly dress up any manicure and hide minor imperfections.
- Dot Stickers or Small Rhinestones: For quick embellishments that add a touch of sparkle and dimension.
Most of these can be found online or at drugstores for very little cost. Building your kit is part of the fun, and you’ll be surprised how versatile these simple tools are!
Effortless DIY Nail Art Designs for the Time-Strapped Mom
Ready to dive into some super-easy designs? These are perfect for beginners and can be done in just a few minutes. Remember, perfection isn’t the goal; having fun and feeling a little bit more polished is!
1. The Speedy Minimalist Dot
This is perhaps the easiest and most chic nail art design out there. It’s sophisticated, modern, and takes literally seconds per nail.
- Step 1: Prep. Apply your base coat and let it dry completely. Then, apply one or two coats of your favorite nail polish color. Let this dry until it’s just tacky, not fully dry.
- Step 2: Dot it! Dip the tip of your dotting tool (or a toothpick!) into a contrasting polish color. Gently press the dotting tool onto your nail to create a perfect little dot. You can place one in the center, off to the side, or create a small cluster of dots.
- Step 3: Repeat. Clean your dotting tool and repeat on any other nails you desire. One accent nail is usually plenty for a subtle look!
- Step 4: Seal. Apply a quick-drying top coat to seal your design.
Mom Hack: Use a metallic or glitter polish for the dots to add instant glam. A single dot near the cuticle or at the tip of the nail is incredibly elegant.
2. The Chic Accent Stripe
A single stripe can add a graphic edge to a plain manicure. It’s all about precision, but even a slightly wobbly line can look artsy!
- Step 1: Prep. Apply base coat, your main polish color, and let it dry to a tacky finish.
- Step 2: Stripe Time. Dip your thin striping brush or a toothpick into a contrasting polish. Carefully draw a single, straight line across the nail. You can place it horizontally near the tip, vertically from cuticle to tip, or diagonally.
- Step 3: Clean Up (Optional but Recommended). If you’re a bit wobbly, use your orange stick with a tiny bit of nail polish remover to carefully sharpen the edges of your stripe.
- Step 4: Seal. Apply your top coat.
Mom Hack: If freehanding lines is stressing you out, use a small piece of washi tape! Apply the tape where you don’t want polish, paint over it, and then carefully peel the tape away while the polish is still slightly wet. This creates a super crisp line.
For more on geometric designs, check out this guide on creating clean lines from Nailpro Magazine.
3. The Subtle Glitter Fade (Ombre)
This technique is forgiving and adds a touch of sparkle without being over the top. It’s perfect for masking a bit of regrowth or if your manicure is a day or two old!
- Step 1: Base. Apply your base coat and one or two coats of your main polish color. Let it dry completely.
- Step 2: Glitter Application. Take a glitter polish. Start by applying it densely at the tip of your nail.
- Step 3: Fade Up. Use your brush to gently “sweep” or “dab” the glitter polish upwards towards the cuticle, feathering it out so there are fewer glitter particles as you move down the nail. The idea is to create a gradient effect.
- Step 4: Add More (If Needed). If you want more glitter, gently dab more glitter polish onto the tip and fade it up again. The goal is a smooth transition from opaque glitter at the tip to bare nail or a hint of color at the cuticle.
- Step 5: Seal. Apply a protective top coat. You might need two coats of top coat to smooth out the texture of the glitter.
Mom Hack: This technique looks fantastic with almost any color. Try a nude or pastel base with a silver or gold glitter for a sophisticated look, or go bold with a dark base and jewel-toned glitter.
4. The Trendy Half-Moon Mani
This vintage-inspired look is back and surprisingly simple to achieve. It adds a modern twist to a classic manicure.
- Step 1: Prep. Apply base coat and one or two coats of your main polish color. Let it dry completely.
- Step 2: Position the Guide. Take a small circular sticker (like reinforcement labels for paper) or a circular stencil. Carefully place it on your nail, right above the cuticle, to act as a guide for the moon shape.
- Step 3: Paint the Moon. Using a contrasting polish color, carefully paint the area above the sticker, creating the rounded “moon” shape. If you don’t have stickers, you can try to freehand a curved line using a thin brush, aiming for the base of your nail.
- Step 4: Remove and Dry. While the second color is still slightly wet, carefully peel off the sticker. Let the polish dry completely.
- Step 5: Seal. Apply your top coat.
Mom Hack: For an even simpler version, skip the sticker and just paint a crescent shape with a thin brush near your cuticle using a metallic or glitter polish. It’s abstract and chic!
5. The Quick “Polish Dipped” Effect
This is for when you really want a pop of color but have zero time. It’s a bold statement that feels very high-fashion.
- Step 1: Base. Apply your base coat and let it dry.
- Step 2: Polish Application. Take a vibrant, opaque nail polish. Carefully paint just the tips of your nails with this color. Think of it like a modern French tip, but with a thicker, more “dipped” appearance. You can make the “dip” short and sharp or longer and more rounded.
- Step 3: Let it Dry. Let this layer dry completely.
- Step 4: Add a Second Coat (Optional). If needed, apply a second coat to ensure opacity.
- Step 5: Seal. Apply a clear top coat over the entire nail, including the colored tips, to blend and protect.
Mom Hack: Try this with a subtle nude or milky white polish for a minimalist look, or go all out with a neon or metallic for a statement. This hides any imperfections in your natural nails beautifully!
Nail Care Habits for Busy Moms
Great nail art starts with healthy nails. Even with limited time, a few consistent habits can make a big difference in how your nails look and feel, helping your DIY art last longer and look its best.
Hydration is Key: Dry, brittle nails chip and break easily. Keep a small tube of cuticle oil or hand cream in your purse, by your computer, or near your bedside table. Apply it whenever you remember – especially after washing your hands. Look for ingredients like jojoba oil, vitamin E, or shea butter. According to the American Academy of Dermatology, keeping your nails and cuticles moisturized is crucial for overall nail health.
- Gentle Filing: Always file your nails in one direction, not back and forth. This prevents weakening and splitting. Use a fine-grit file.
- Cuticle Care: Instead of cutting your cuticles (which can lead to infection), gently push them back after a shower or soaking your hands using an orange stick or cuticle pusher.
- Protective Polish: Always wear a base coat before applying color. This protects your nails from staining and provides a smoother surface for polish.
- Quick Hand Washing & Drying: After washing your hands, make sure to dry them thoroughly. Excess moisture can weaken nails.
- Nighttime Routine: Before bed, apply a rich hand cream and massage it into your hands and nails. Consider wearing cotton gloves overnight for an extra boost of moisture.
Quick Comparison: Nail Art Tool Essentials
Here’s a handy table to see what you might want to grab first for your DIY nail art adventures:
| Tool | Primary Use | Ease of Use (Beginner) | Estimated Cost |
|---|---|---|---|
| Dotting Tools | Creating various sized dots, simple patterns | Very Easy | $3 – $10 (for a set) |
| Thin Striping Brush | Drawing clean lines, details | Easy to Moderate | $2 – $7 |
| Toothpick/Orange Stick | Tiny dots, cleanup, cuticle care | Very Easy | < $1 (often free with polish) |
| Washi Tape/Craft Tape | Creating sharp geometric lines | Easy | $2 – $5 (per roll) |
| Glitter Polish | Adding sparkle, accents, gradients | Very Easy | $3 – $10 |
| Stickers (Dot/French Tip Guides) | Precise shapes, guides for patterns | Very Easy | $1 – $5 (per pack) |
Troubleshooting Common DIY Nail Art Mishaps
Even the simplest designs can sometimes go awry. Don’t get discouraged! Here are a few common issues and how to fix them.
Problem: Smudged Polish.
Solution: This usually happens when you touch your nails too soon.
- Quick Fix: If it’s a minor smudge, quickly dip a clean brush (or toothpick edge) in a tiny bit of polish remover and gently smooth it out. Then, top coat immediately and try not to touch it again! For bigger smudges, you might need to repaint the nail and try again.
- Prevention: Always set aside 5-10 minutes after your last top coat to let your nails dry undisturbed. Be mindful of your hands!
Problem: Wobbly Lines or Dots.
Solution: It happens to the best of us!
- Quick Fix: Use a fine-tipped brush or the corner of a toothpick dipped in polish remover to carefully neaten the edges of your lines or dots. You can also go over a slightly wobbly line with a second, more precise stroke if you’re using a striping brush.
- Prevention: Rest your hands on a stable surface. Use light pressure. For lines, try drawing them in one continuous motion rather than dotting along.
Problem: Polish Not Drying.
Solution: Some polishes, especially darker or glittery ones, can take longer to set.
- Quick Fix: Apply a fast-drying top coat. These often contain quick-dry agents that help set the polish. You can also try running your nails under cool (not cold!) water for a minute or two after the top coat.
- Prevention: Apply polish in thin coats. Thick coats take much longer to dry and are more prone to smudging.
Problem: Polish Streaky.
Solution: This often occurs with lighter or jelly-finish polishes.
- Quick Fix: A good coat of shimmering or glitter top coat can often camouflage streaks. If it’s very noticeable, repaint the nail with another thin, even coat.
- Prevention: Ensure your base coat is smooth. Apply polish evenly, and avoid over-brushing. A good quality top coat can also help smooth out minor streakiness.
FAQ: Your Busy Mom Nail Art Questions Answered
Q1: How do I make my DIY nail art last longer?
A: Always start with a good base coat, apply polish in thin, even layers, and finish with a high-quality, quick-drying top coat. Reapply your top coat every 2-3 days for extra protection.
Q2: I have very short nails. Can I still do nail art?
A: Absolutely! Short nails are perfect for minimalist designs like single dots, small accent stripes, or even just a chic matte top coat. Small details often look best on shorter nails.
Q3: What’s the quickest way to remove nail polish?
A: Soak a cotton pad or ball with 100% acetone polish remover, press it onto your nail for about 10-15 seconds