Nail art has become increasingly popular in recent years, with more and more people turning to their fingertips to express their creativity and individuality.
However, the intricate and intricate designs may seem daunting and difficult for those new to nail design. That’s where these 18 easy step-by-step tutorials for different nail designs come in. Whether you’re a seasoned nail art pro or a beginner just dipping your toes into the world of nail art, these tutorials will guide you through each step to create stunning and unique designs.
So, prepare your nail polishes and follow along as we break down each design into simple, easy-to-follow steps. Get ready to elevate your nail game with these 18 easy tutorials for different nail designs step-by-step.
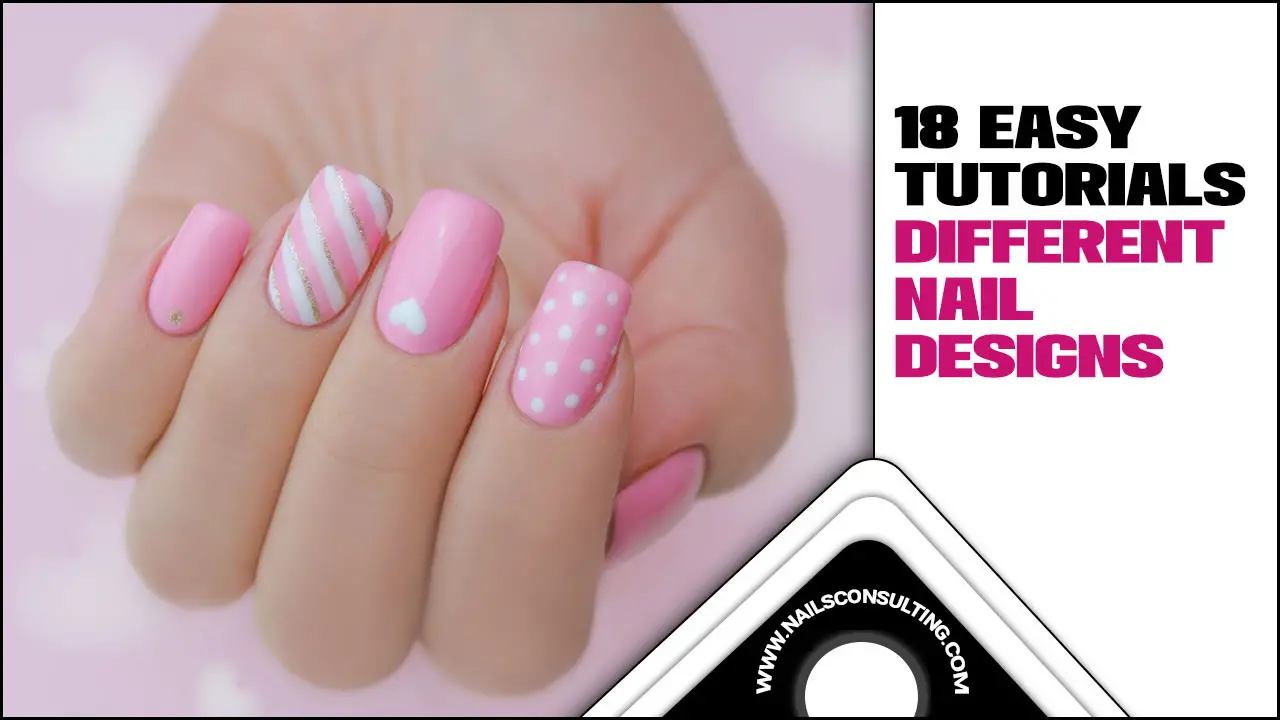
1.Beauty Purple Nails Tutorial
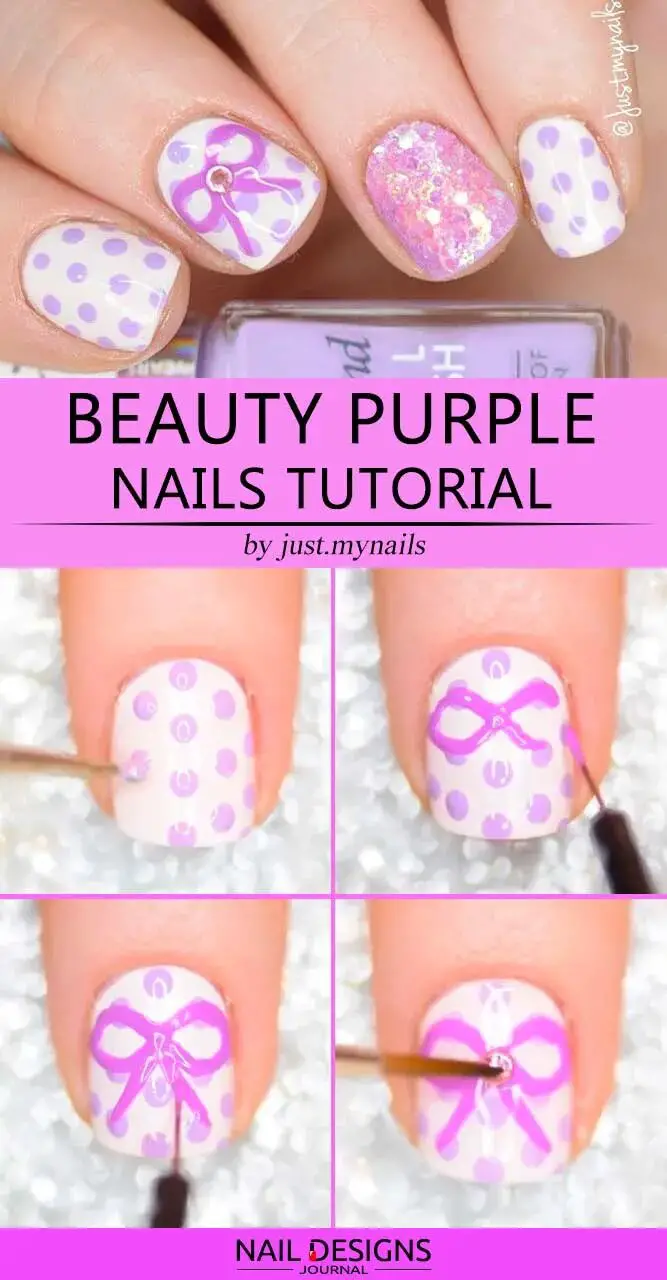
If you want to add a pop of colour to your nail game, a beautiful purple nail tutorial is just what you need. This step-by-step guide will walk you through achieving stunning purple nails that will turn heads. Prepping your nails and applying a base coat to ensure long-lasting wear.
Then, choose your desired shade of purple polish and carefully apply it to each nail, covering the entire surface. Once the polish has dried, use a thin brush or dotting tool to get creative with nail art designs such as ombre effects or delicate floral patterns. Finish off with a glossy top coat for added shine and protection. With this beautiful purple nail tutorial, you’ll be rocking a fabulous and eye-catching manicure in no time.
2.Animal Art Different Nail Designs
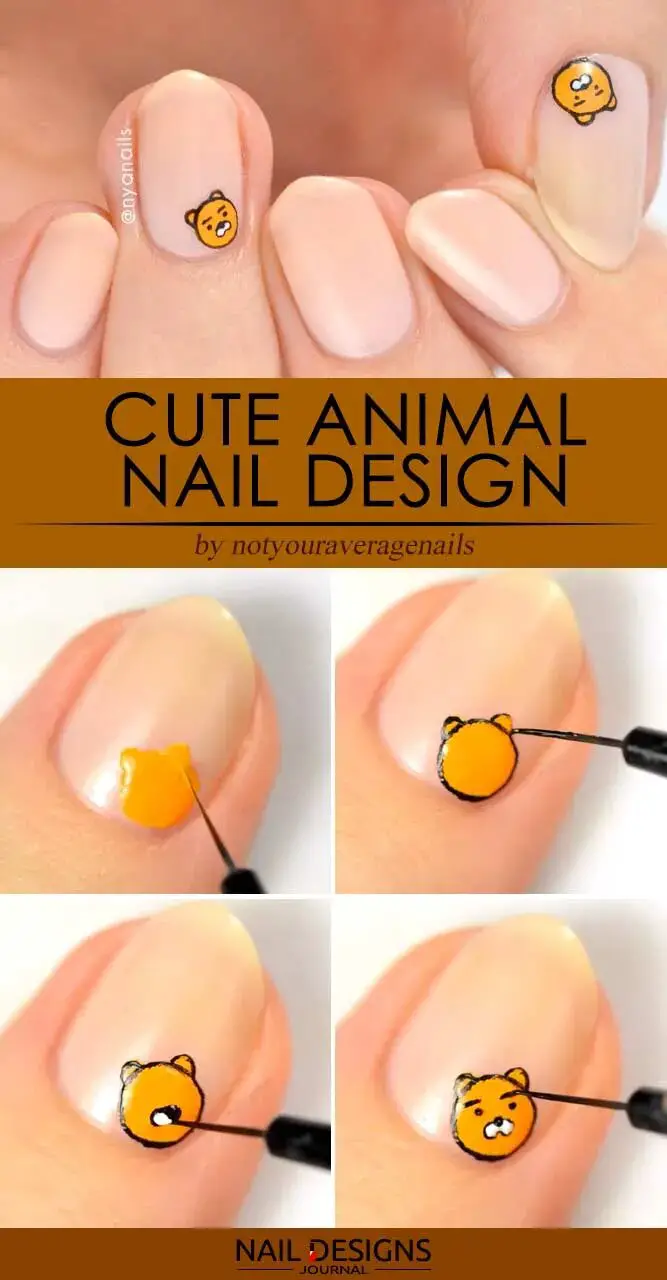
- Start by applying a base coat to protect your nails.
- Once the base coat is dry, apply two coats of neutral nail polish as the base color.
- Using a thin brush or a toothpick, create small animal prints, such as leopard spots or zebra stripes, on each nail using black nail polish.
- Add some detail using white or metallic colours to create outlines or accents on the animal prints.
- Finish with a top coat to seal and protect your design. Show off your unique animal art nails.
3.Dotticure Nails With Negative Space
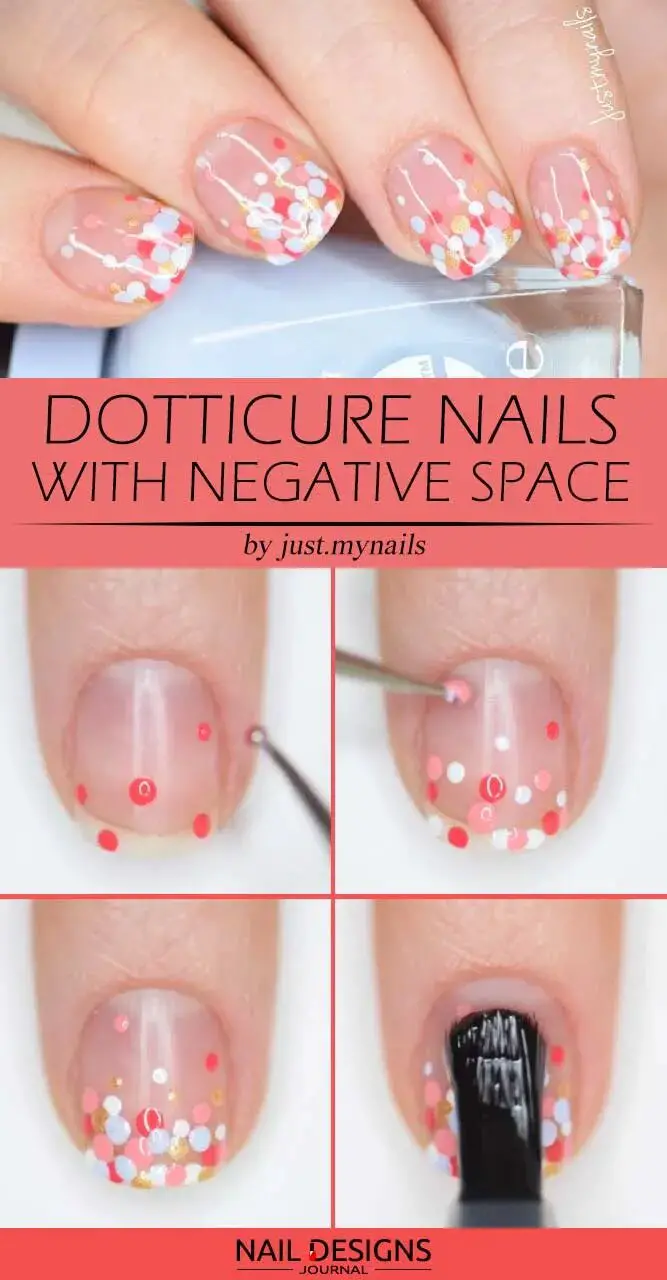
Creating dotticure nails with negative space is a trendy and fun way to elevate your nail game. This design combines the classic polka dot pattern with negative space, resulting in a modern, minimalist look. To achieve this design, apply a base coat to protect your nails.
Then, using a dotting tool or the end of a bobby pin, create small dots on your nails in various sizes and colors. Leave some areas of your nails blank to create a negative space effect. Once you have achieved the desired design, seal it with a top coat for long-lasting wear. Dotticure nails with negative space are versatile and can be customized to suit any occasion or personal style.
4.Nails Design With Golden Stripes
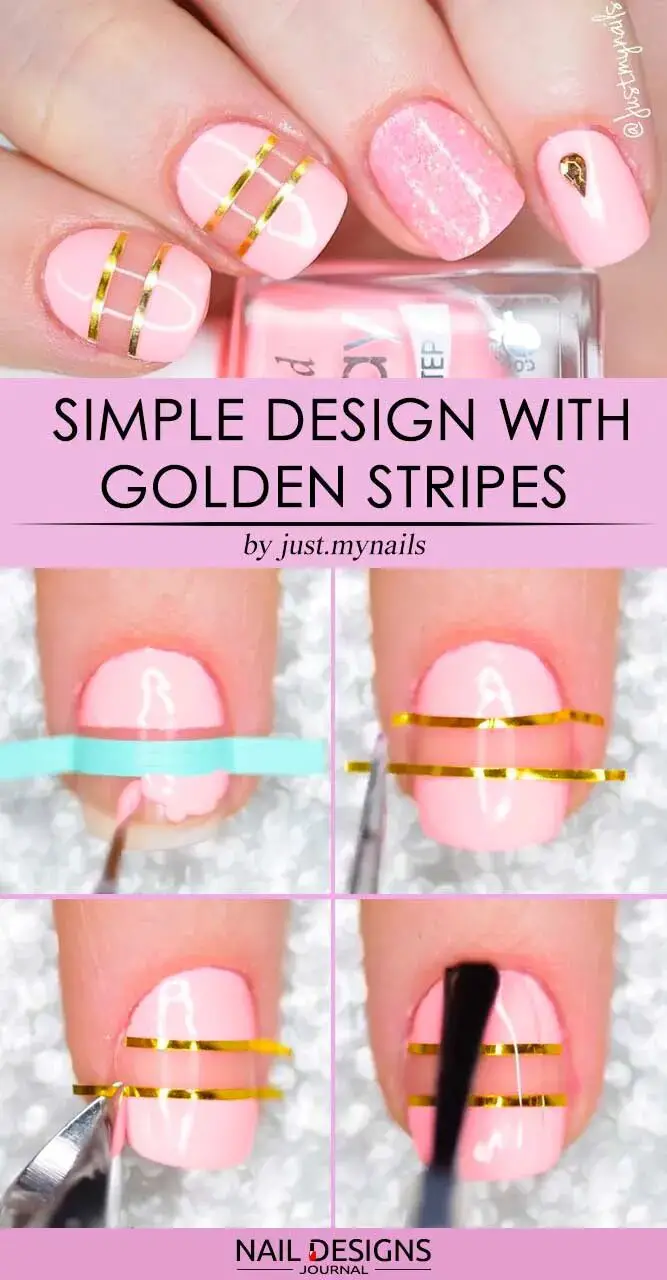
Start by applying a base coat to protect your nails and allow it to dry completely. Next, choose a base color that complements the gold stripes – a classic nude or black works well. Once your base color is dry, take a striping brush or a thin nail art brush dipped in gold polish and carefully create straight lines across your nails.
You can experiment with different patterns and thicknesses of the stripes for a unique look. Finish off with a top coat to seal in your design and give it a glossy finish. With just a few easy steps, you’ll have gorgeous nails that are sure to turn heads.
5.Mermaid Nail Art Tutorial
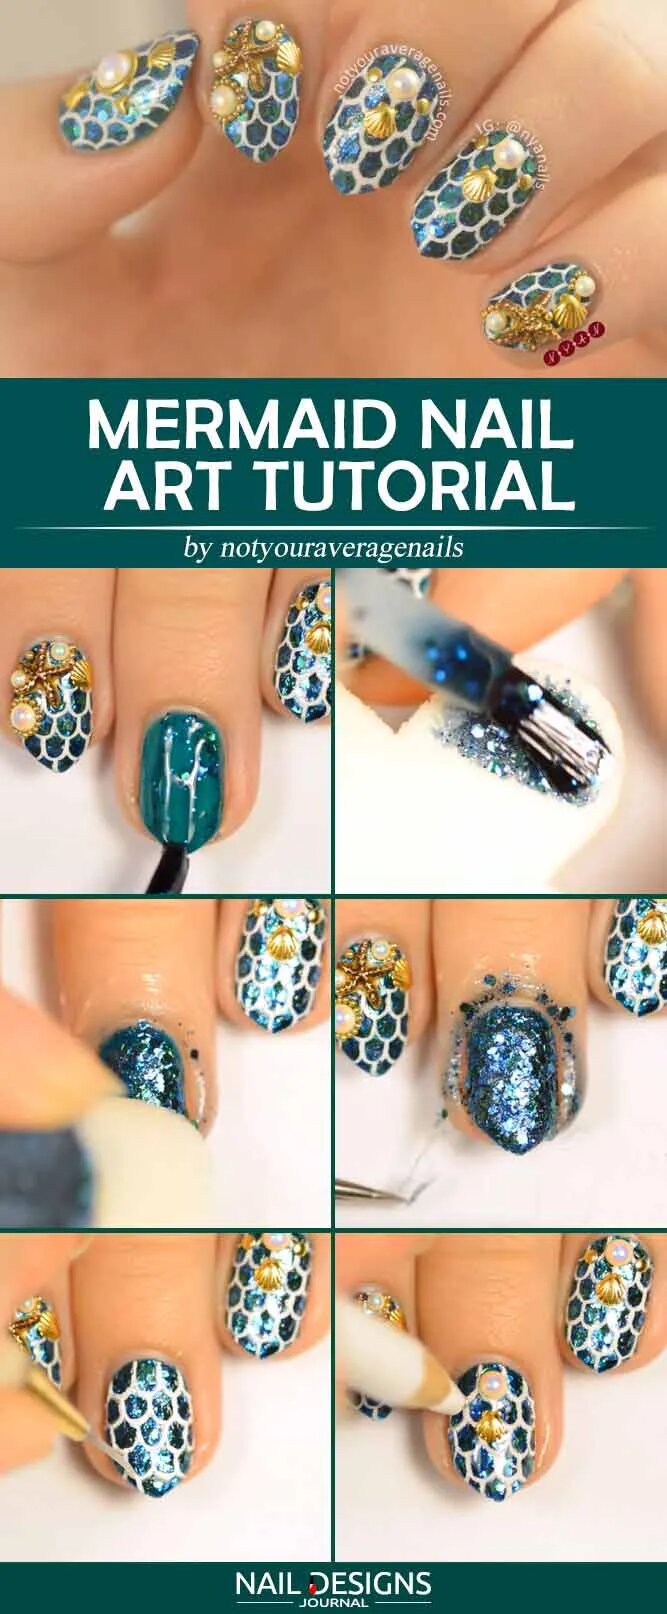
If you want to add a touch of whimsy and fantasy to your nail game, then mermaid nail art is the perfect choice. With its beautiful blend of vibrant colors and shimmery accents, this design will make you feel like you’re swimming in an underwater paradise.
To achieve this look, start by applying a base coat and let it dry completely. Then, choose a base color that resembles the ocean, such as a light blue or teal shade. Once your base color is dry, use a thin brush or a toothpick to create scales on your nails using shades of green or other complementary colors.
Add iridescent glitter or rhinestones for extra sparkle, and finish off with a top coat to seal in your mermaid masterpiece. With some patience and practice, you’ll have stunning mermaid nails that will make a splash wherever you go.
6.Sweet Blue Waterfall Nails Art
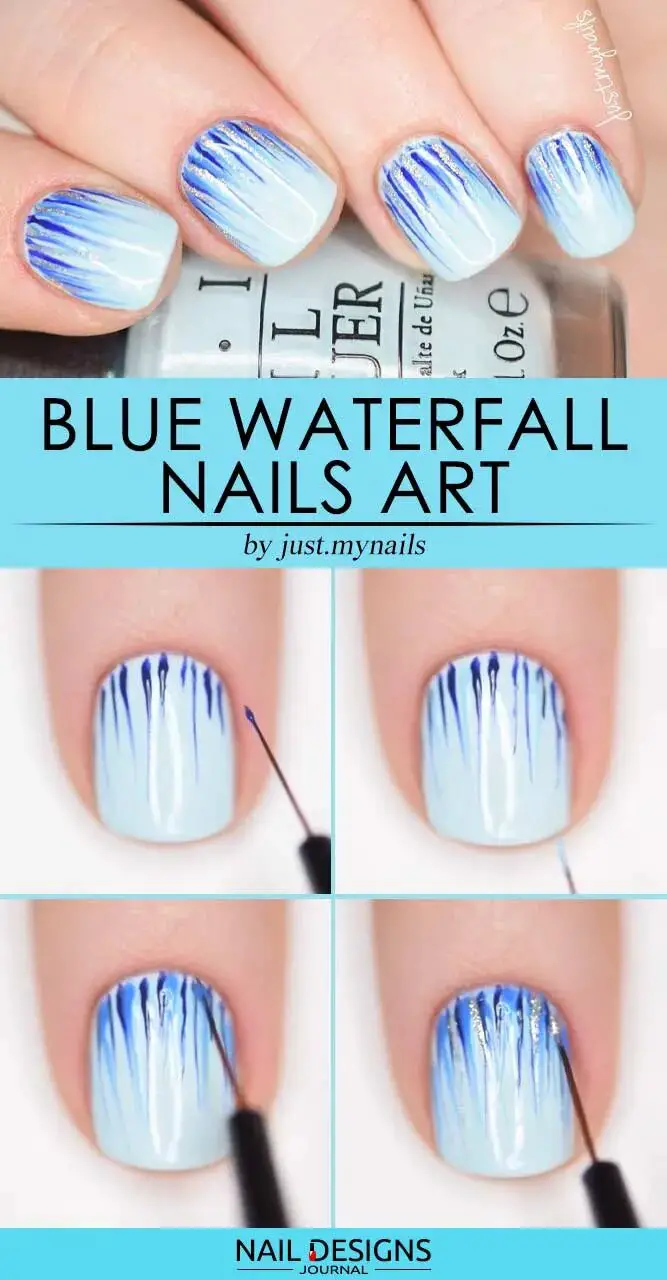
- Start by applying a base coat to protect your nails.
- Apply a light blue nail polish as the base color and let it dry.
- Using a thin striping brush, create vertical lines with darker blue shades, resembling a waterfall effect.
- Finish with a top coat to seal and protect your design. Enjoy your sweet blue waterfall nail art.
7.Neon Abstract On Black Matte Nails
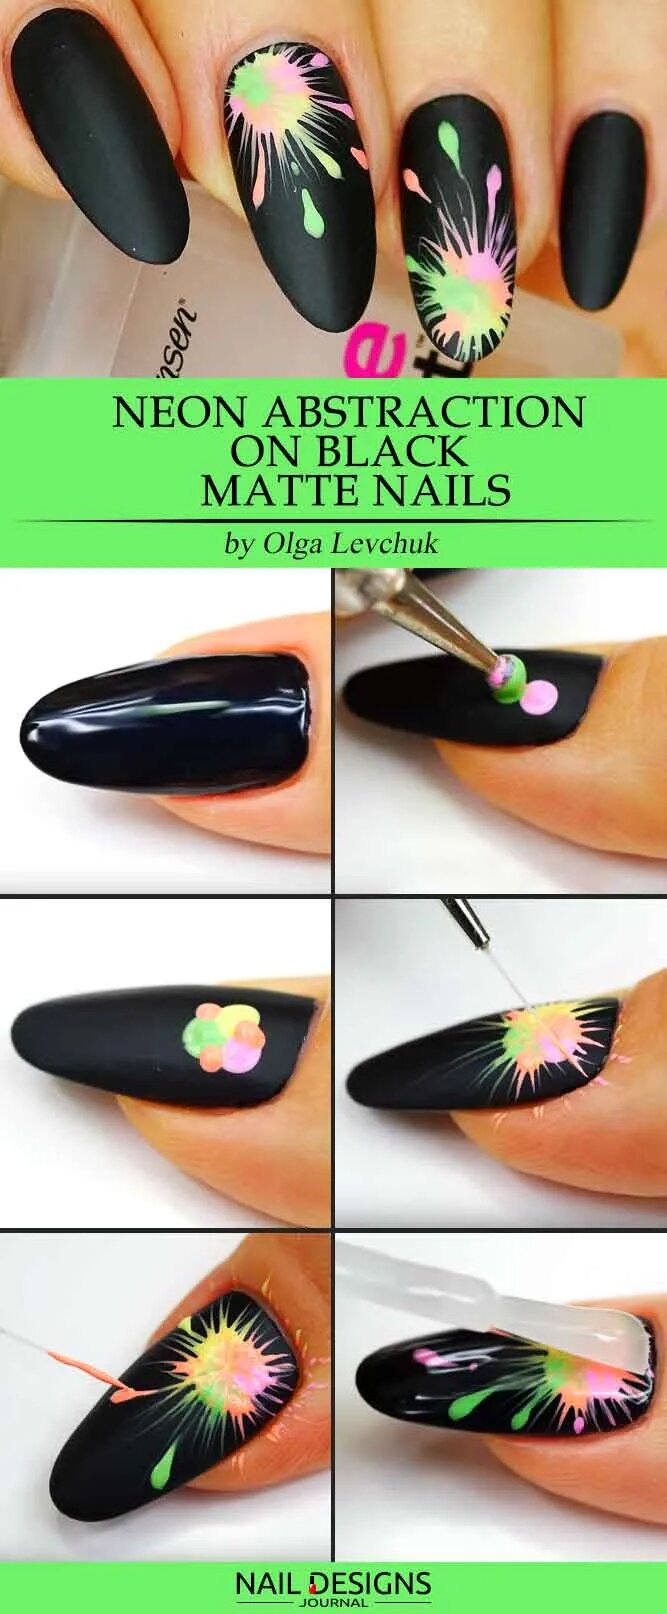
The neon abstract on black matte nails combines neon’s vibrant and electrifying colors with the sleekness of a black matte base. To achieve this look, apply a base coat to protect your nails. Then, paint your nails with a black matte polish and let them dry completely.
Once dry, use a thin brush or a dotting tool to create abstract shapes and lines using neon colors of your choice. Allow the design to dry before applying a glossy top coat to seal in the vibrant colors. With this stunning nail design, you’ll be sure to turn heads and make a statement wherever you go.
8.Colourful Dots On Matte Black Nails
- Start by applying a base coat to protect your nails.
- Apply a matte black nail polish as the base color and dry it.
- Using a dotting tool, create colorful dots on each nail for a playful and vibrant look.
- Finish with a top coat to seal and protect your design. Enjoy your colorful dots on matte black nails.
Create a vibrant and playful nail design by adding colorful dots to a chic matte black base. Express your creativity with this step-by-step tutorial using a dotting tool for a whimsical and elegant manicure.
9.Rose Quartz Nails With Gold Tips
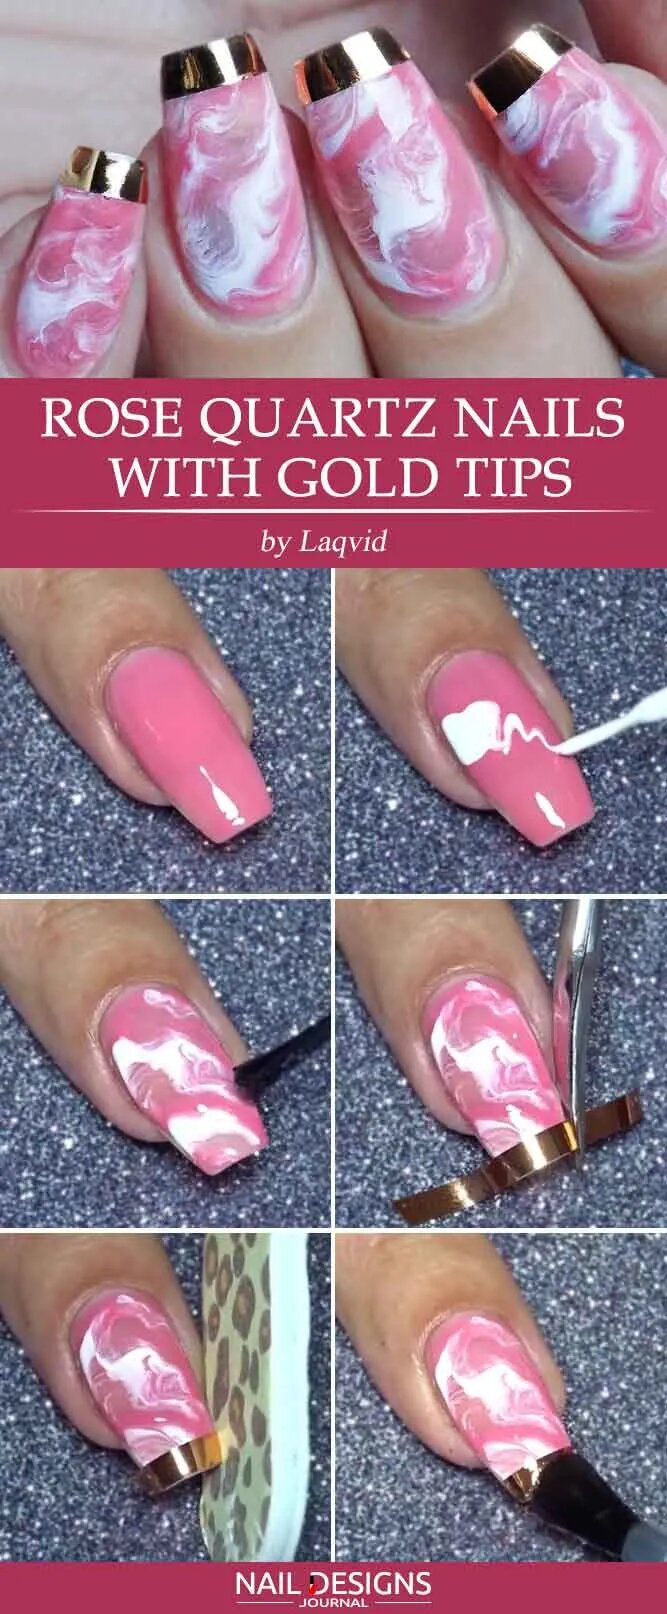
Creating rose quartz nails with gold tips is a trendy and elegant nail design you can easily achieve at home. Start by applying a base coat to protect your nails. Then, using a soft pink nail polish, paint your nails with two coats for a solid base color.
Next, dip a thin brush or toothpick into a metallic gold nail polish. Gently create small dots or lines at the tips of your nails to mimic the look of gold tips. Allow the design to dry completely before applying a top coat to seal in your beautiful rose quartz nails with gold tips. This stunning nail design is perfect for any occasion and will make your nails stand out.
10.Twinkle Hearts Design With Nail Stencils
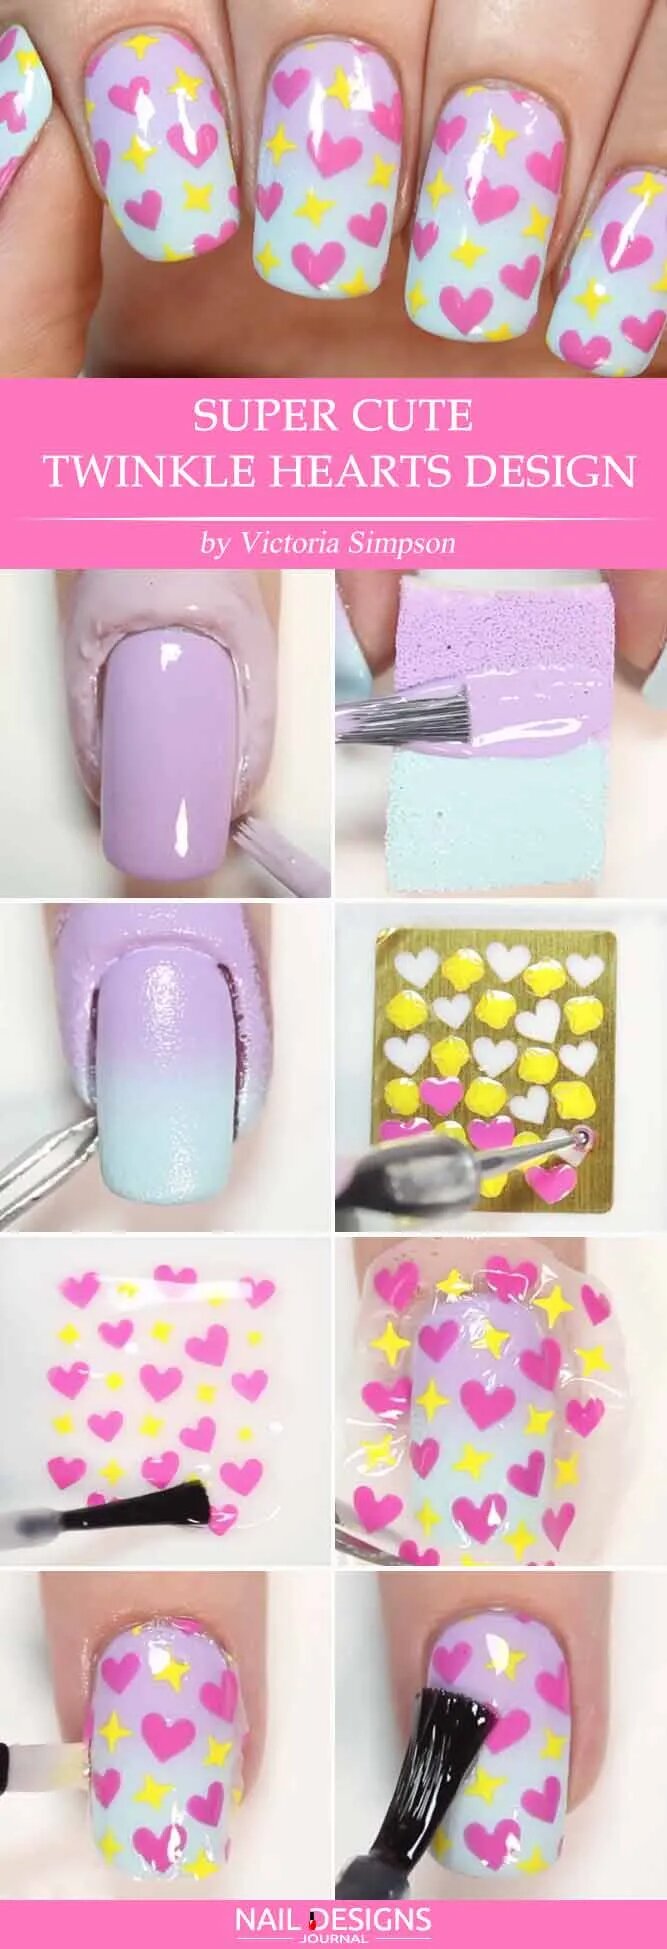
- Start by applying a base coat to protect your natural nails.
- Once the base coat is dry, choose a light color for the background of your design and apply two coats for full coverage.
- Next, place a heart-shaped nail stencil near the tip of your nail and press it down firmly to ensure it stays in place.
- Using a contrasting color, carefully paint over the stencil, covering the entire heart shape.
- While the polish is still wet, gently peel off the stencil to reveal a perfect heart shape on your nail.
- Repeat steps 3-5 on all your nails until you have achieved the desired twinkle hearts.
- Allow the design to dry completely before applying a top coat to seal and protect your beautiful nail art.
11.Easy Dry Marble Nails With Stamp
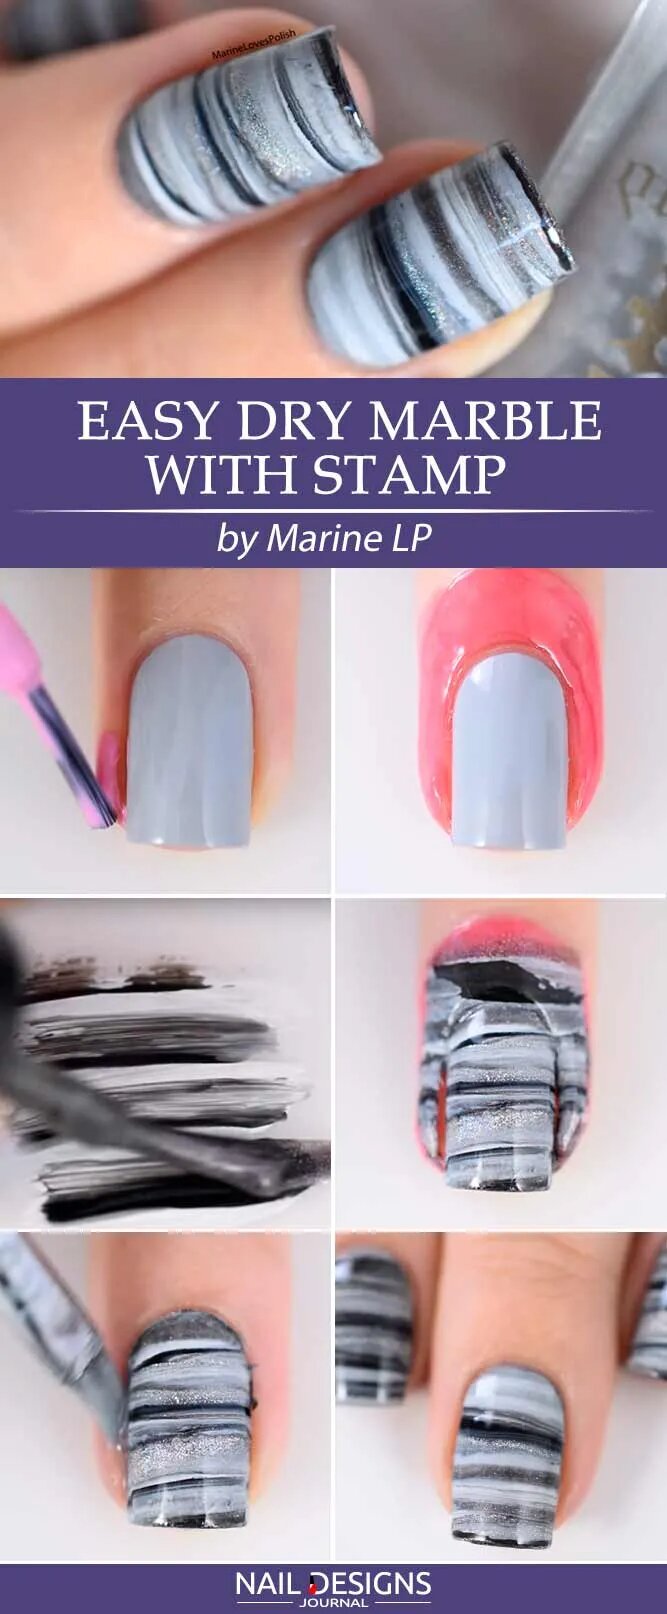
Creating dry marble nails with a stamp is an easy and fun way to achieve a unique and eye-catching nail design. To start, choose two or three nail polish colors that you want to use for the marble effect. Apply a base coat to protect your nails and let them dry completely. Then, apply a thin layer of one of the nail polish colors.
Before it dries, use a stamping tool to create marbled patterns by pressing it onto the wet nail polish. Repeat this step with the other colors as desired. Once you are happy with the marble effect, seal it with a top coat for a long-lasting finish. With these simple steps, you can create stunning dry marble nails with a stamp right at home.
12.The Star Nails Designs
If you want to add glamour to your manicure, star nail designs are a great option. Depending on your preference and skill level, these designs can be simple or intricate. Apply a base coat to protect your nails to create a basic star design. Then, carefully draw a small star shape on each nail using a thin brush or a toothpick dipped in nail polish.
You can keep it minimal with just one star per nail, or get creative and add multiple stars in different sizes and colors. Finish off with a top coat to seal your design and ensure long-lasting wear. With these easy steps, you’ll have stunning star nails that will make a statement.
13.Gradient Chevron Nails With Vinyls
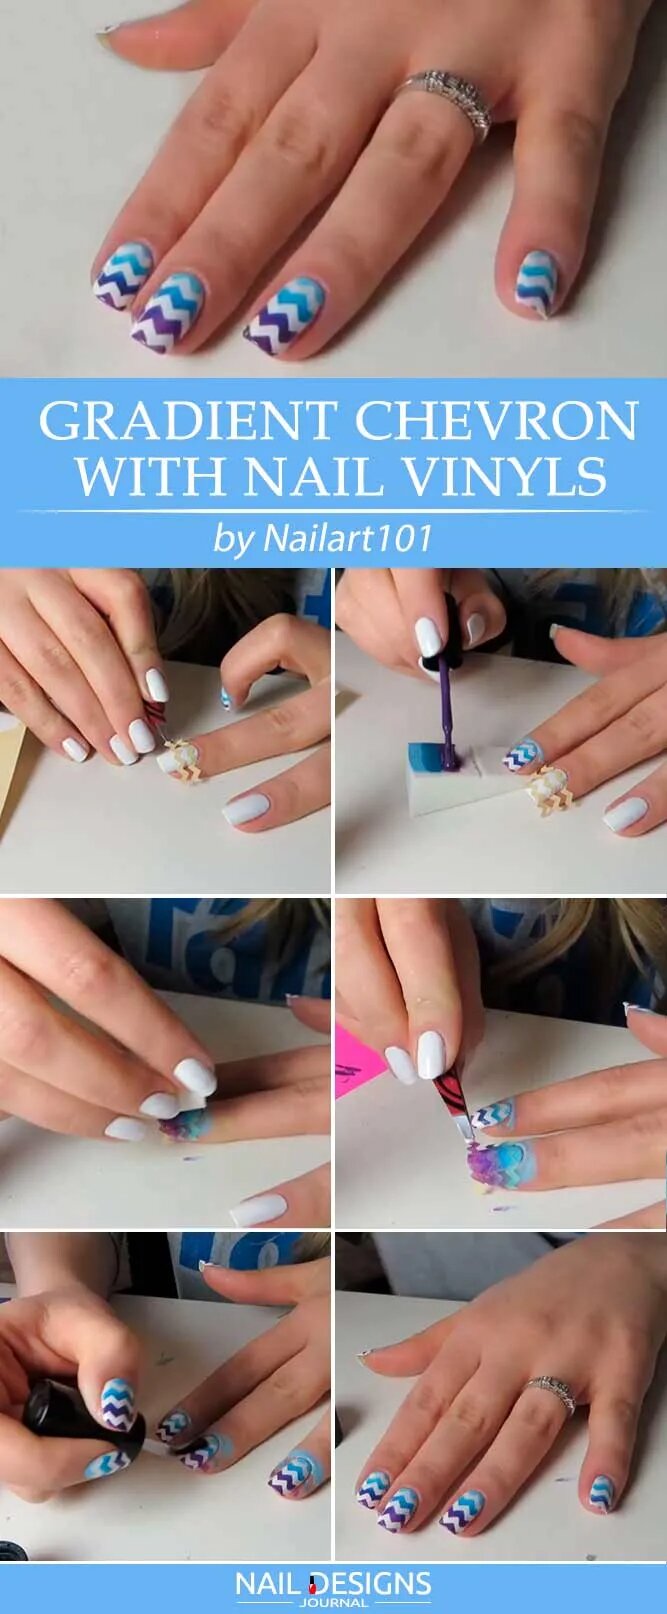
To achieve this look, apply a base coat to protect your nails. Once dry, apply two coats of your chosen base color and allow them to fully dry. Next, place chevron-shaped vinyls on your nails, ensuring they are securely adhered. Then, using a makeup sponge or a nail sponge, dab on a lighter shade of nail polish in a sweeping motion from the tip of the nail toward the cuticle.
Repeat this step with a darker polish, blending it into a lighter shade for a gradient effect. Finally, carefully remove the vinyls while the polish is still wet to reveal clean lines. Finish with a top coat for added shine and protection. With this easy tutorial, you can create stunning gradient chevron nails that will surely turn heads.
14.Stylish Nail Art With Stripes
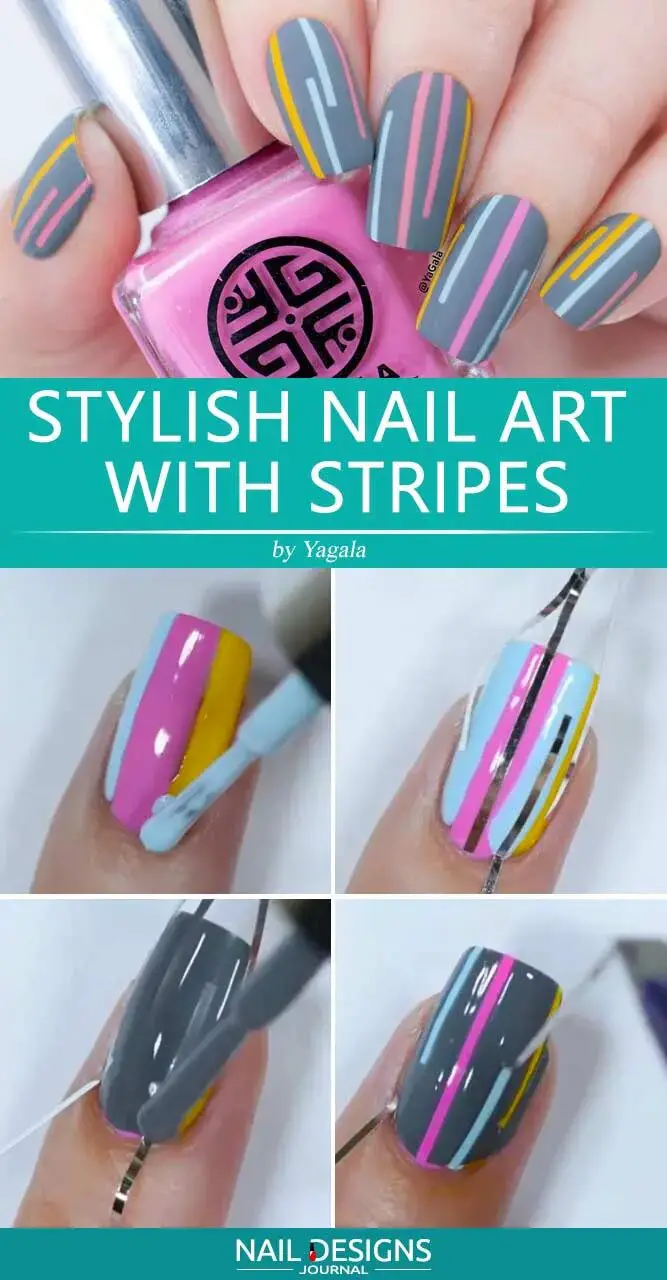
Apply a base coat to protect your nails to create stylish nail art with stripes. Once dry, choose two contrasting nail polish colors. Carefully draw vertical or horizontal stripes on each nail using a thin striping brush or a toothpick. You can create different widths and patterns to make it more interesting.
Allow the stripes to dry completely before applying a top coat for added shine and protection. With this simple tutorial, you’ll have stylish striped nails quickly.
15.Pretty Lace Nail Art
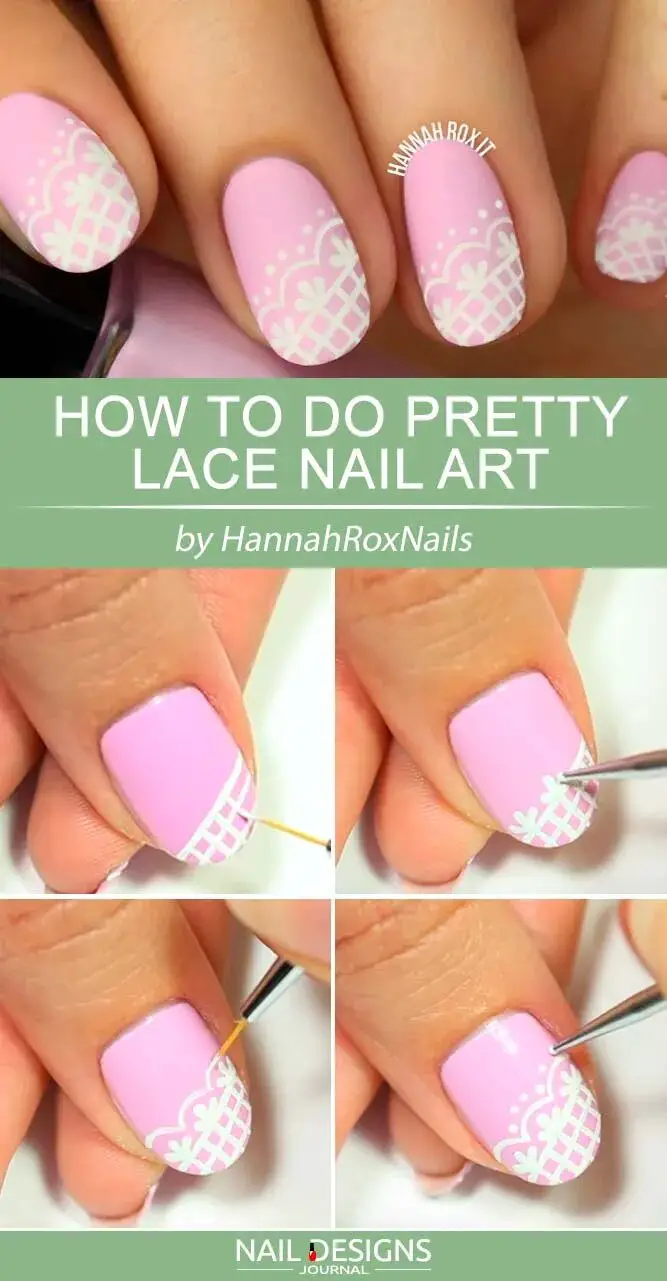
To create pretty lace nail art, start by applying a base coat to protect your nails. Once dry, choose a light-colored polish as the base color. Next, cut out small pieces of lace fabric or use lace nail stickers and place them on your nails. Press gently to ensure they adhere well.
Then, apply a contrasting nail polish color over the lace fabric/stickers and carefully remove them while the polish is still wet. Finish with a top coat for a glossy finish. With this tutorial, you can achieve elegant lace nail art quickly.
16.Crystal Watermelon Nail Art
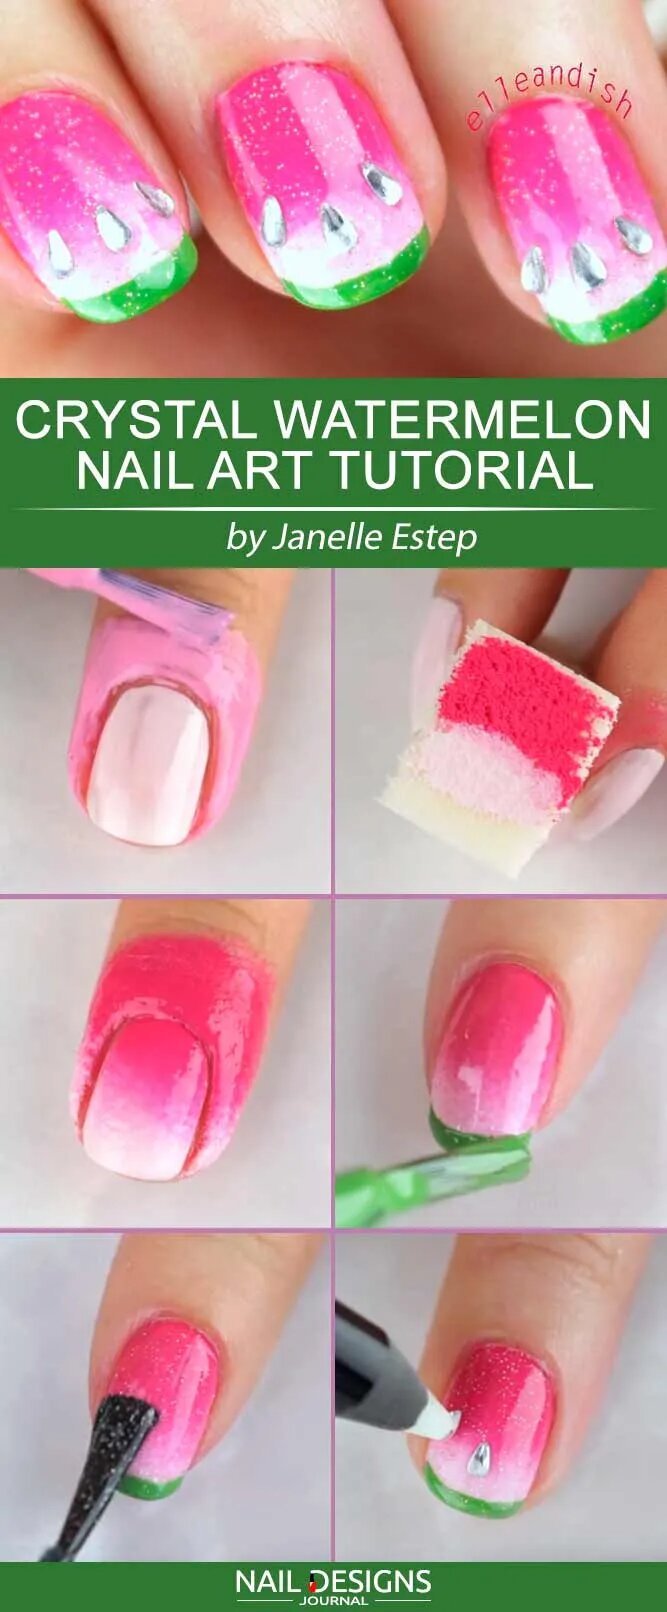
To create crystal watermelon nail art, apply a base coat to protect your nails. Once dry, paint your nails with a light green polish for the watermelon rind. Then, use a thin brush or a toothpick to create black seeds on the tip of each nail. Next, use a thin brush or a toothpick to create a diagonal line with red polish for the watermelon flesh. Add white polish on top of the red line for a juicy effect. Finish with a top coat for added shine and protection.
17.Nude Nails And Blobbicure Mix
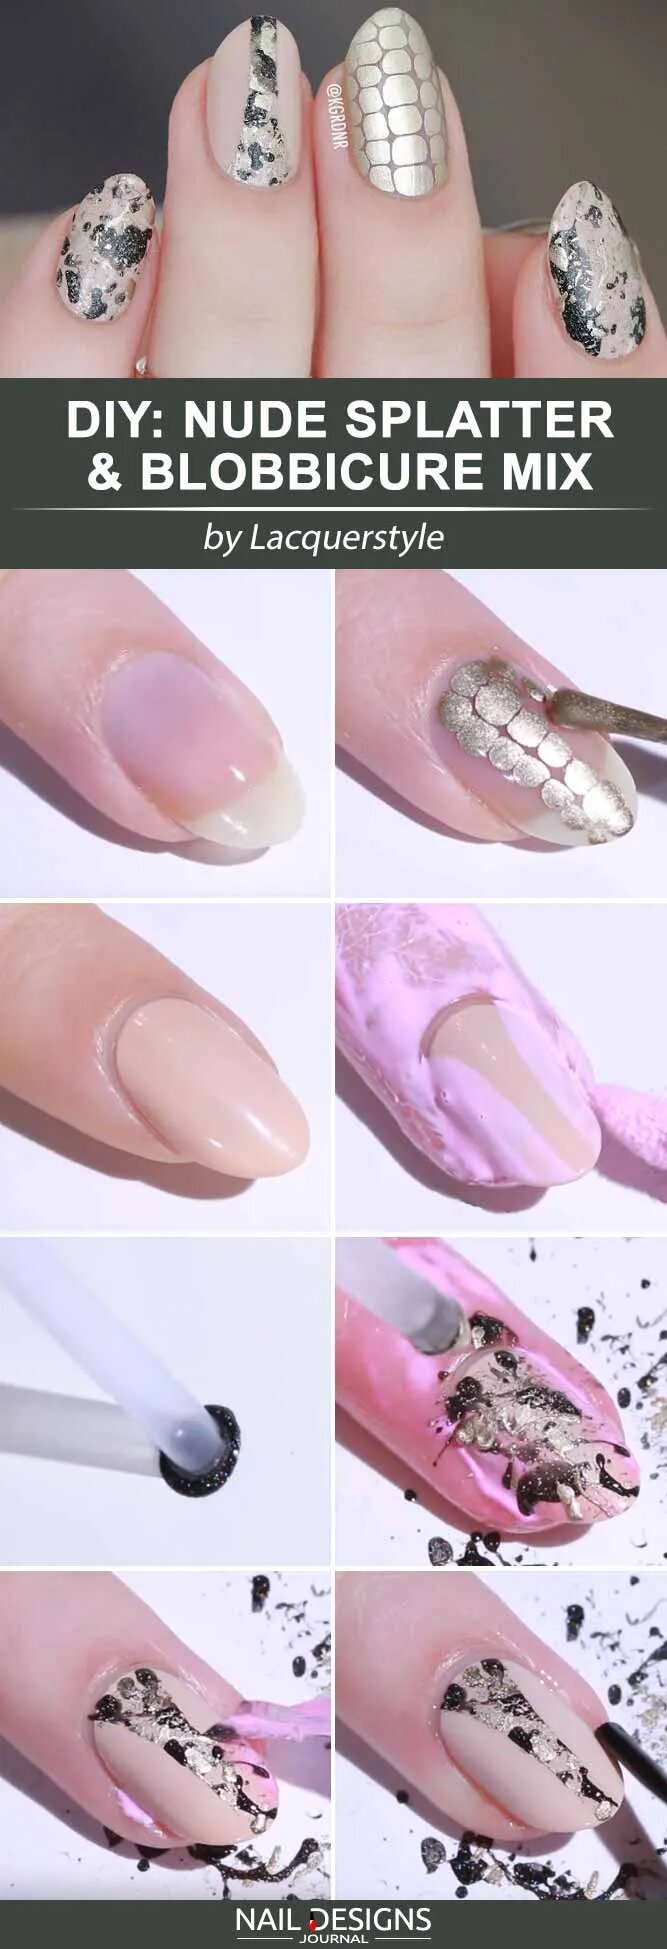
To create nude nails and blobbicure mix, start by applying a base coat to protect your nails. Once dry, choose a nude or flesh-toned polish as the base color. Apply two coats for full coverage. Next, choose a contrasting color for the blobbicure effect.
Using the polish brush, apply small blobs randomly on each nail. Allow the blobs to spread and merge with the base color naturally. Finish with a top coat for a glossy finish. This tutorial will give you trendy nude nails with a fun twist.
18.Leopard Print Nail Art In Soft Colors
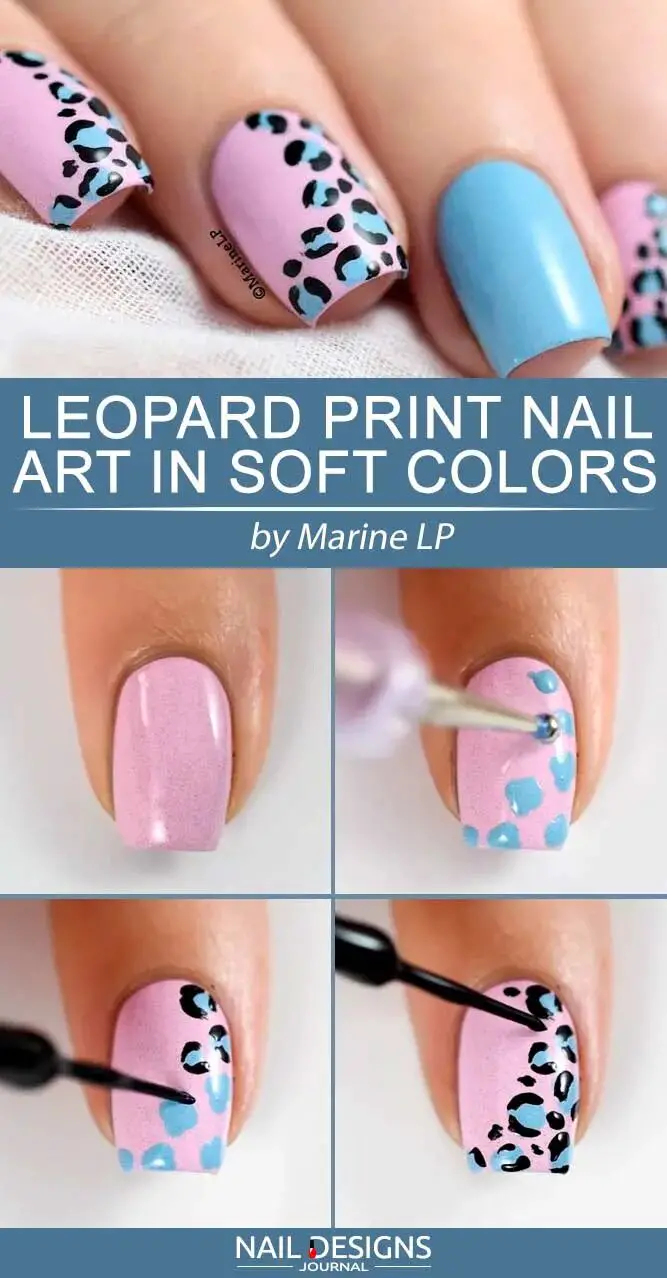
Leopard print nail art is a trendy and fun design that can add a touch of wildness to your manicure. Apply a base coat to protect your nails to achieve this look in soft colours. Then, choose two or three complementary pastel shades for the leopard spots. Using a thin brush or a dotting tool, create random irregular shapes on your nails with different colours.
These shapes can vary in size and be placed anywhere on the nail. Once you’ve finished creating the spots, use a thin brush dipped in black nail polish to outline them and add detail. Finally, finish with a glossy top coat to seal your design and give it a polished look.
19.White Minimal Chevron Nail Art
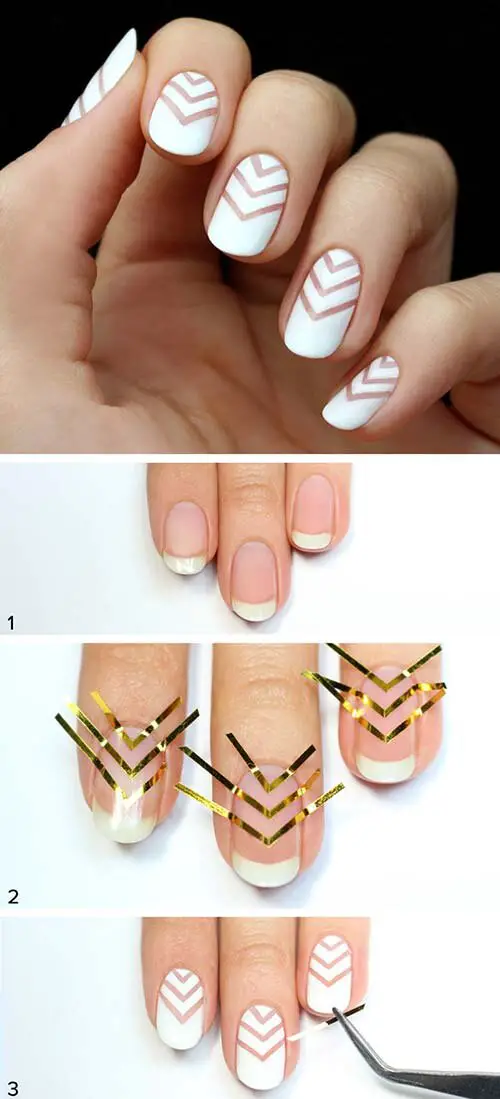
To create a white minimal chevron nail art, start by applying a base coat to protect your nails. Once dry, apply two thin coats of white polish to achieve full coverage. Using a chevron nail vinyl or stencil, place it on your nail and ensure it is securely adhered.
Apply a contrasting color polish over the stencil in a smooth, even stroke. Carefully remove the stencil while the polish is still wet for clean lines. Repeat this step on all nails and finish with a top coat for a sleek and minimalist look.
20.Strawberry Fields Forever Nails
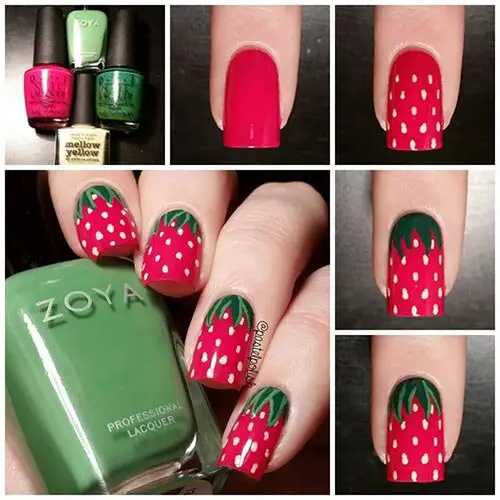
To achieve the Strawberry Fields Forever nail design, start by applying a base coat to protect your nails. Then, paint your nails a vibrant red color as the base. Once dry, use a dotting tool or toothpick to create small black seeds on each nail. Next, take a green nail polish and draw curved lines at the tip of each nail to represent the strawberry leaves. Finish with a top coat for a glossy finish and enjoy your fruity manicure.

