Nail art has become a popular trend in recent years, with more and more people opting for creative and stylish nail designs.
The possibilities for nail art are endless, from simple polka dots to intricate floral patterns. However, achieving these designs can seem intimidating and time-consuming. Our 20 easy tutorials come in here. We will show you how to do cute nail designs that will up your nail game in no time.
Whether you’re a beginner or a seasoned pro, these tutorials will guide you step-by-step to create stunning nail art that will leave everyone in awe. We have carefully curated a diverse range of designs, including minimalistic ones for those who prefer a subtle look and bold and vibrant designs for those who want to make a statement. So, dust off your nail polish collection and elevate your nail game with these easy and fun tutorials.
1.Easy Cat Nails Art
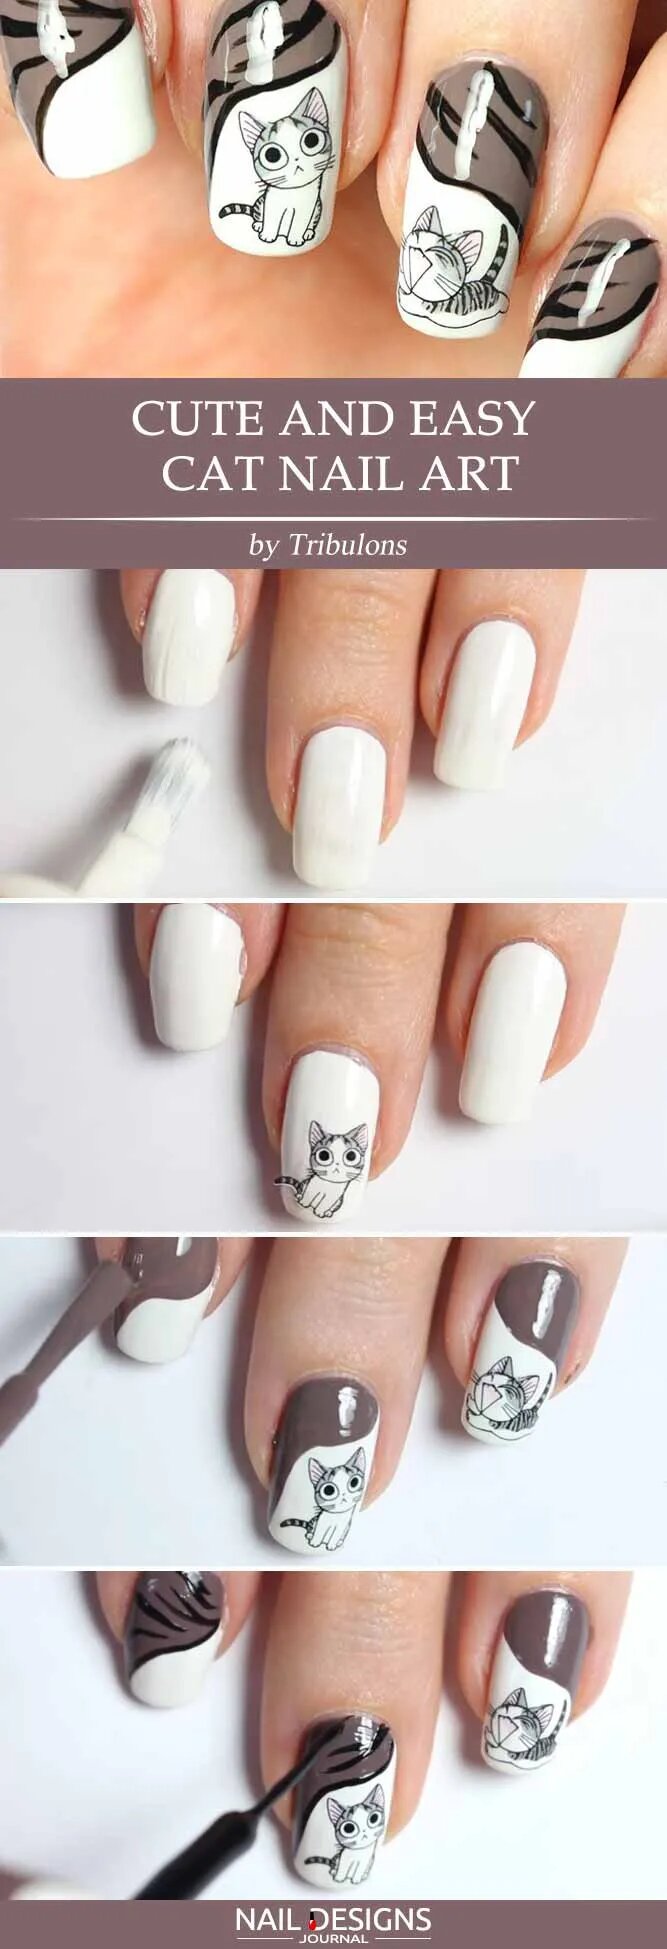
Cat nail art is a fun and playful way to add personality to your manicure. Whether you’re a fan of bold and colorful designs or prefer something more subtle, there are plenty of options. Paint your nails in a base color to create a cat nail design.
Then, using a thin brush or dotting tool, add the details of the cat’s face, such as the eyes, nose, and whiskers. You can also get creative and add other elements like paw prints or a little mouse. Finish off with a clear top coat to seal your design and give it a glossy finish.
2.Triangle Nail Design Without Any Specific Tools
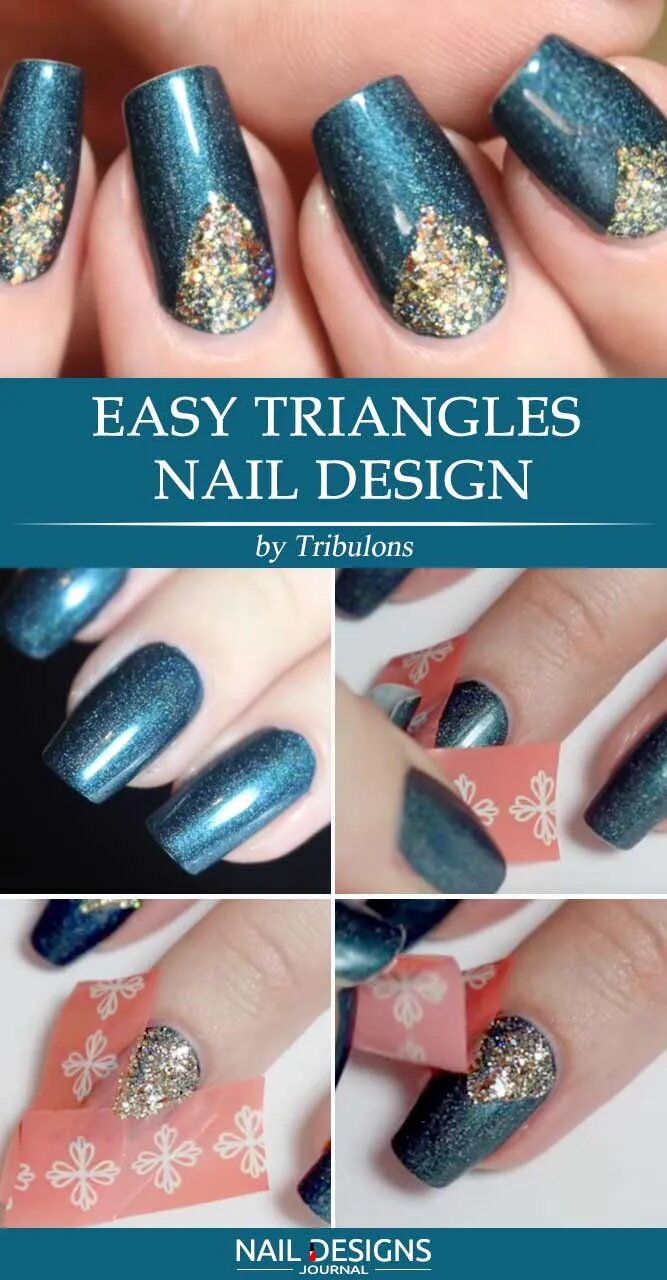
Creating a triangle nail design without specific tools is easier than you might think. All you need are simple steps and basic nail polish colors. Start by applying a base coat to protect your nails and allow them to dry completely.
Next, choose two contrasting colors for your triangle design. Using the brush from one of the nail polish bottles, create a small triangle shape near the base of your nail. Fill in the triangle with one color and let it dry.
Then, using a small brush or even a toothpick, create smaller triangles inside the larger triangle using the second color. Allow everything to dry before applying a top coat to seal in your design. With just a little patience and creativity, you can easily achieve a cute triangle nail design without fancy tools.
3.French Tip Nails With Polka Dots
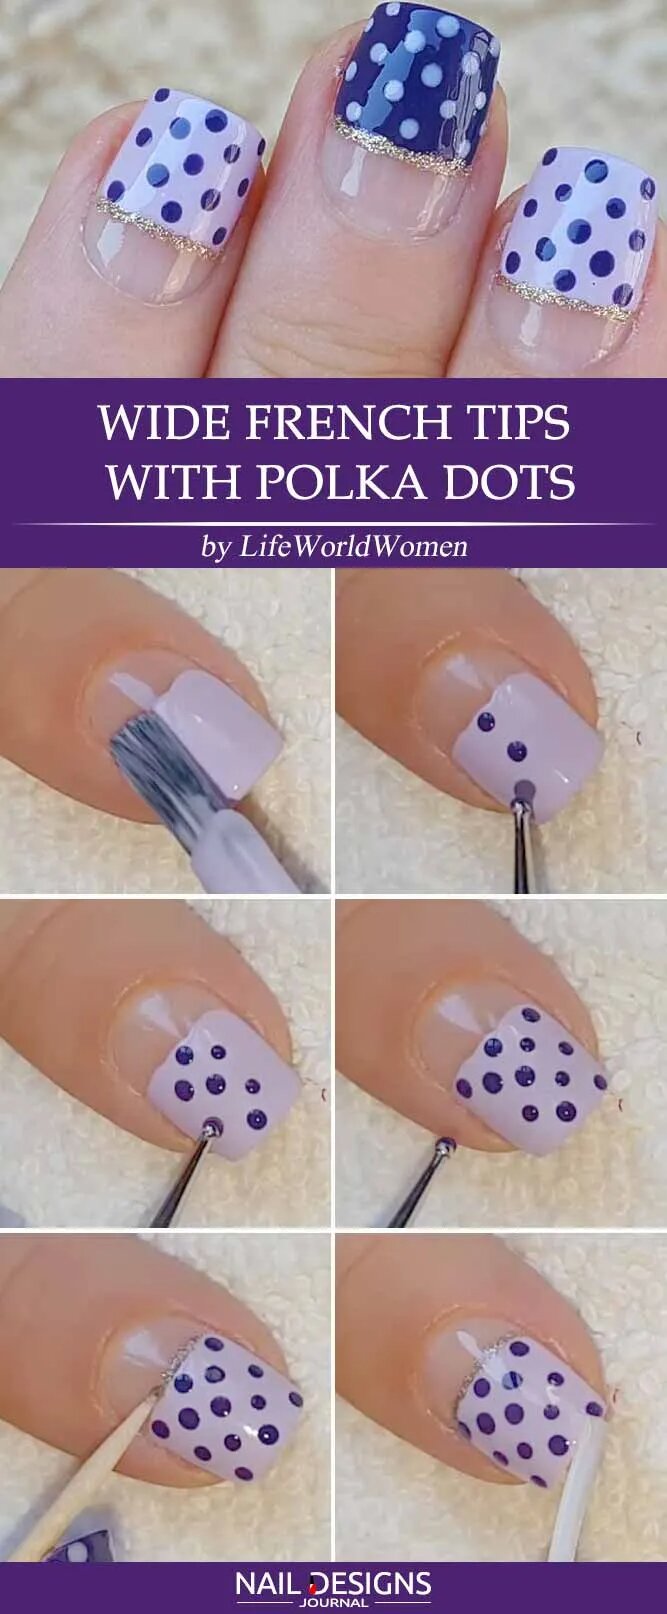
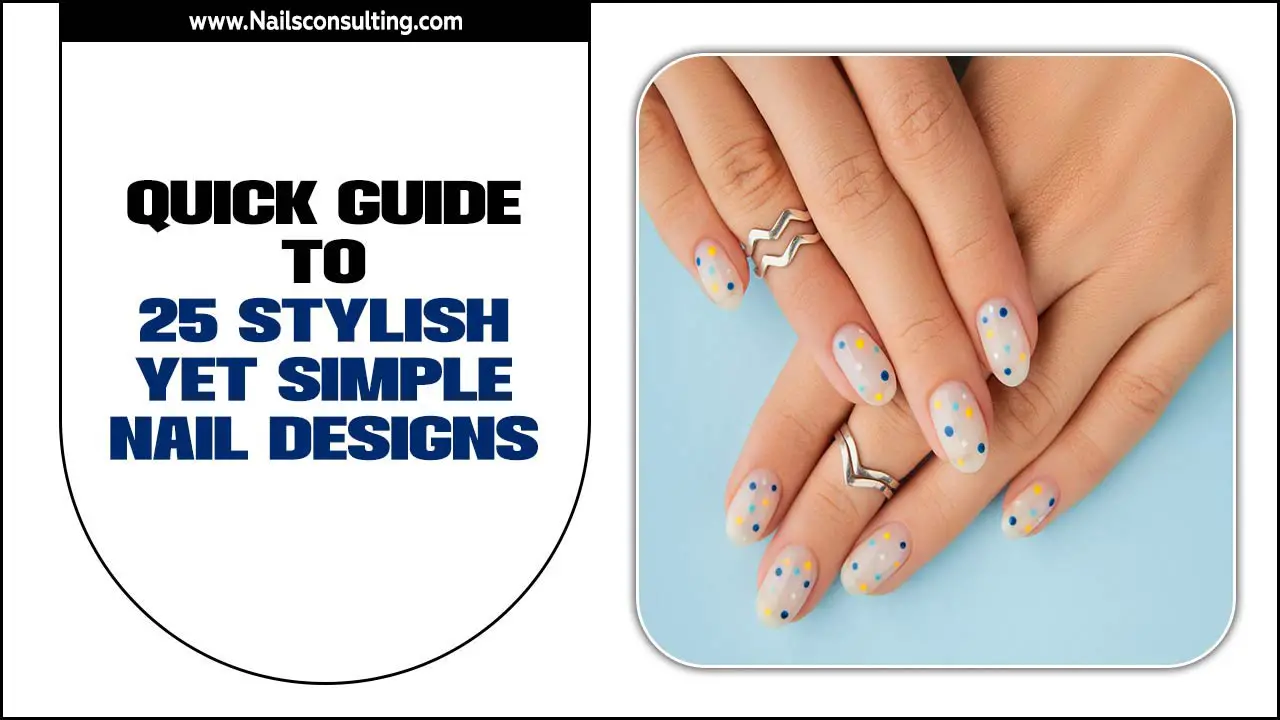
Creating French tip nails with polka dots is a fun and easy way to up your nail game. Apply a base coat to protect your nails to achieve this cute design. Then, using white nail polish, create the classic French tip by painting a diagonal line across the top of each nail. Once the white polish has dried, dip a dotting tool or toothpick into a colored nail polish of your choice.
Gently dot the colored polish along the edge of the white tip, creating a polka-dot pattern. You can vary the size and placement of the dots for a playful look. Finally, finish off with a top coat to seal your design and add shine. With this simple tutorial, you’ll have adorable French tip nails with polka dots in no time!
4.Simple Glittery Nail Tutorial
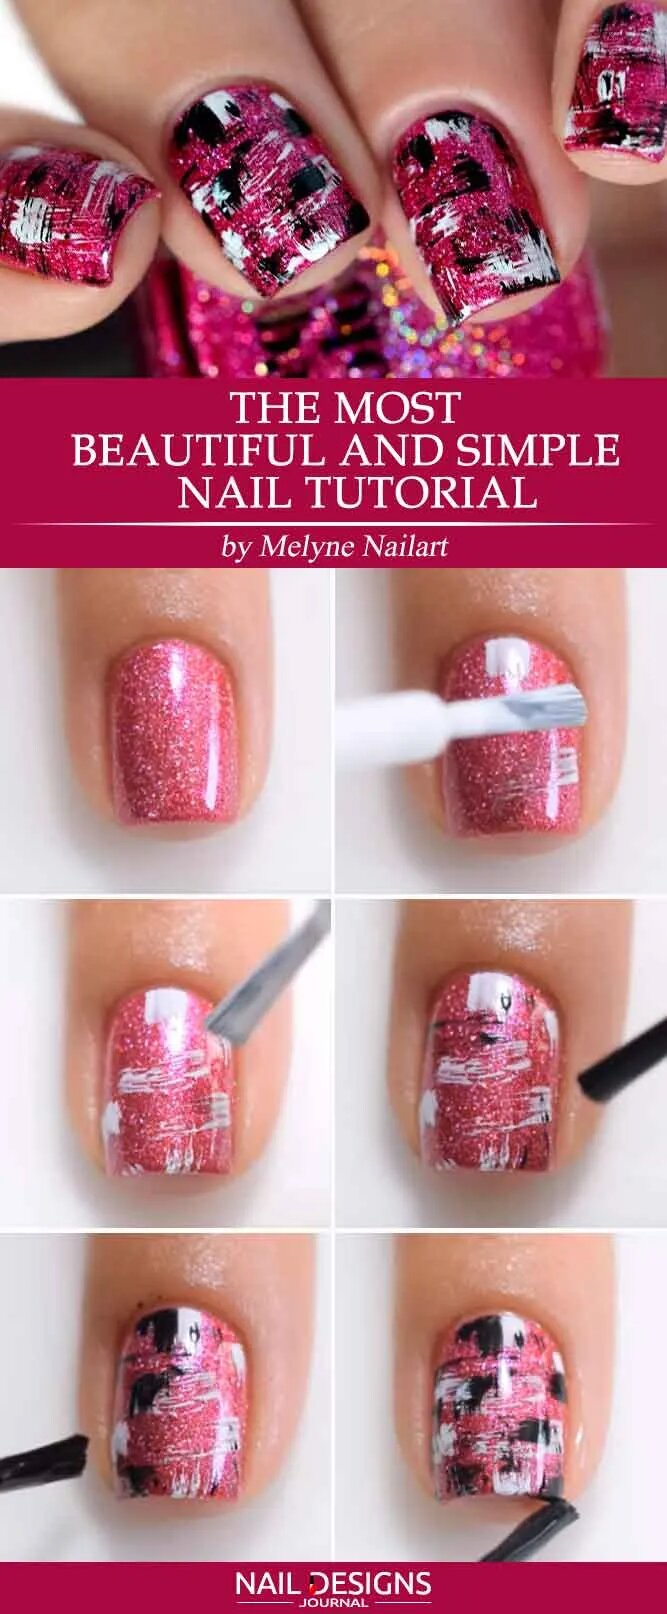
First, start by applying a base coat to protect your nails. Once dry, choose a base color for your nails and apply two coats for full coverage. Next, apply glitter nail polish to the tips of your nails in a diagonal pattern. You can use a thin brush or tape to create clean lines.
Allow the glitter polish to dry completely before applying a top coat to seal in the design and add shine. And there you have it – an easy and adorable glittery nail design that will make you stand out.
5.Nail Designs With Stamping Marble
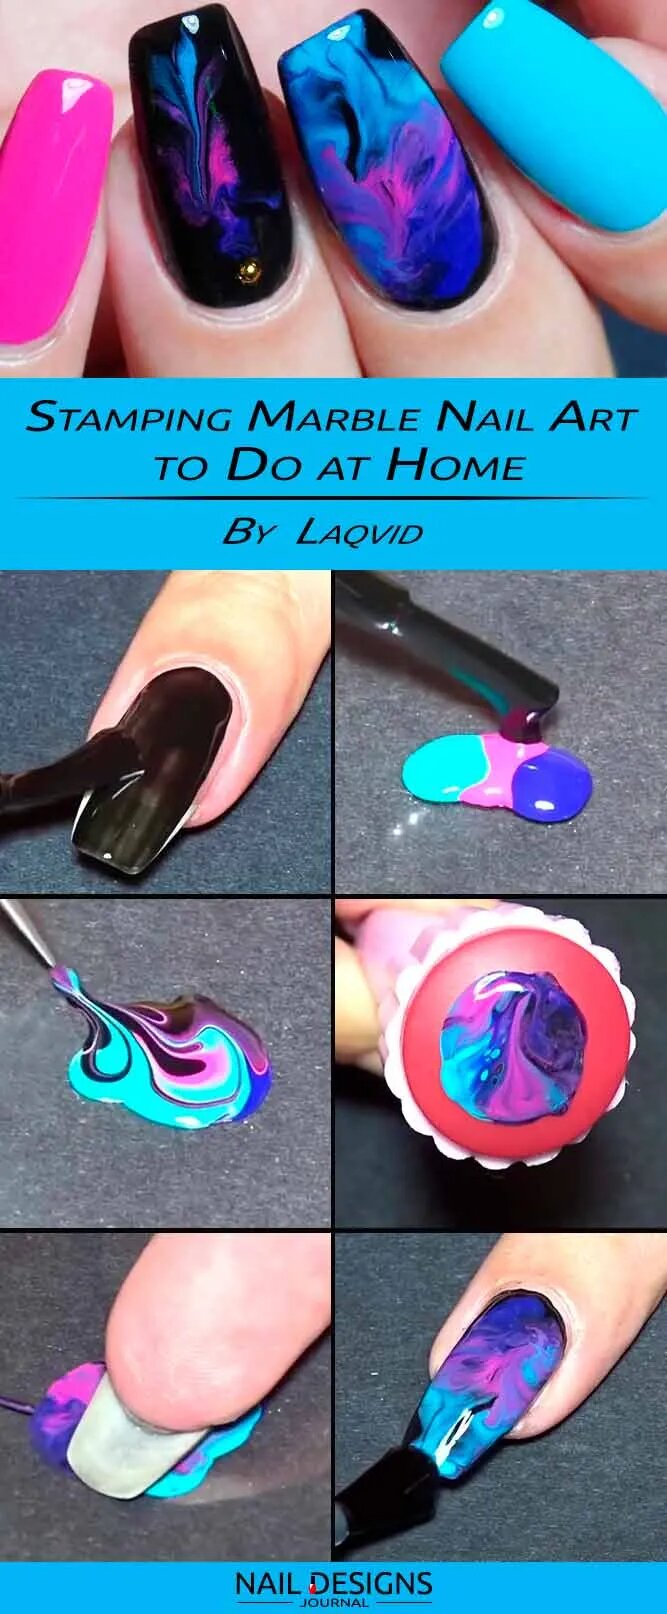
Stamping marble nail designs is a fun and easy way to up your nail game. This technique allows you to create intricate and unique marble patterns on your nails using stamping plates and special nail polish. To achieve this look, apply a base coat to protect your nails.
Then, apply a light-colored polish as your base color. Once dry, choose a stamping plate with a marble pattern you like and apply a contrasting nail polish color to the design. Use a scraper to remove excess polish from the plate, then quickly press the stamper onto the design and transfer it onto your nails in a rolling motion. Finish with a clear top coat to seal in your design and add shine.
6.Cute Nails Designs, Holo French Style
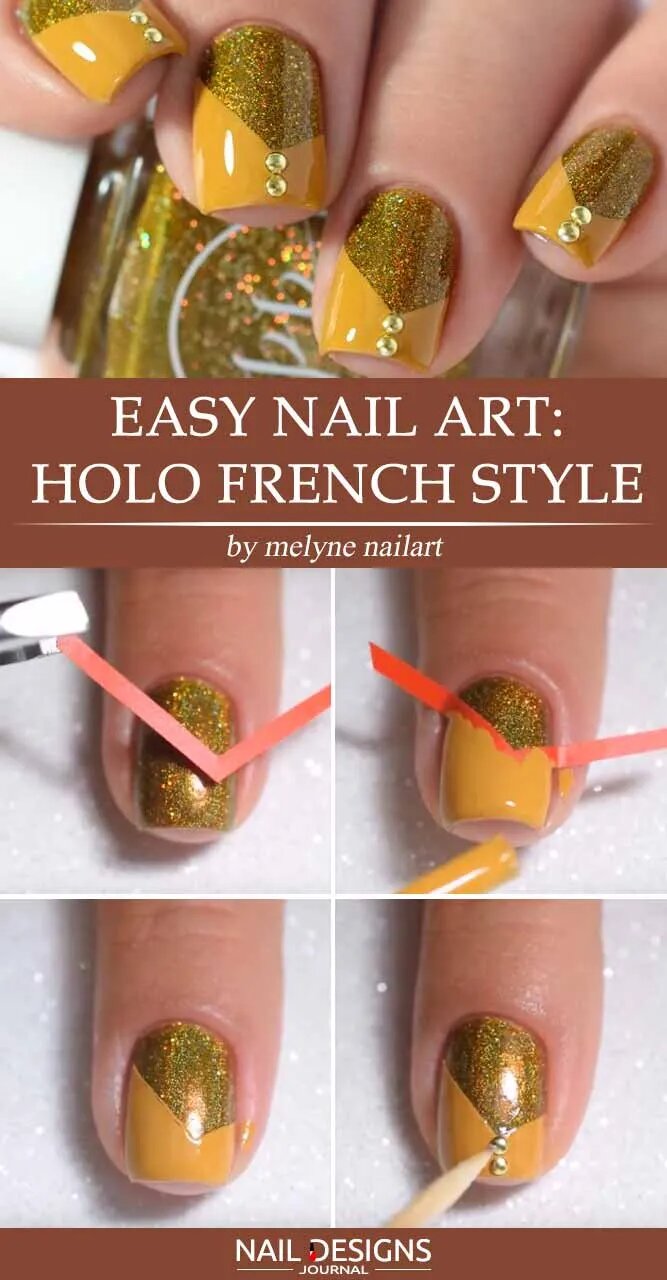
One popular style that adds a touch of glamour is the Holo-French style. This design combines the classic French manicure with holographic accents for a fun and trendy look. Apply a base coat to protect your nails to achieve this cute nail design. Then, paint the tips of your nails with a light pink or nude polish, creating the traditional French manicure look.
Once dry, use holographic nail polish or holographic nail foil to add some sparkle and shine to the tips of your nails. Finish off with a clear top coat to seal your design and give it a glossy finish. With this easy tutorial, you’ll be rocking cute and trendy Holo French nails in no time.
7.Gradient Stamping Nails Design
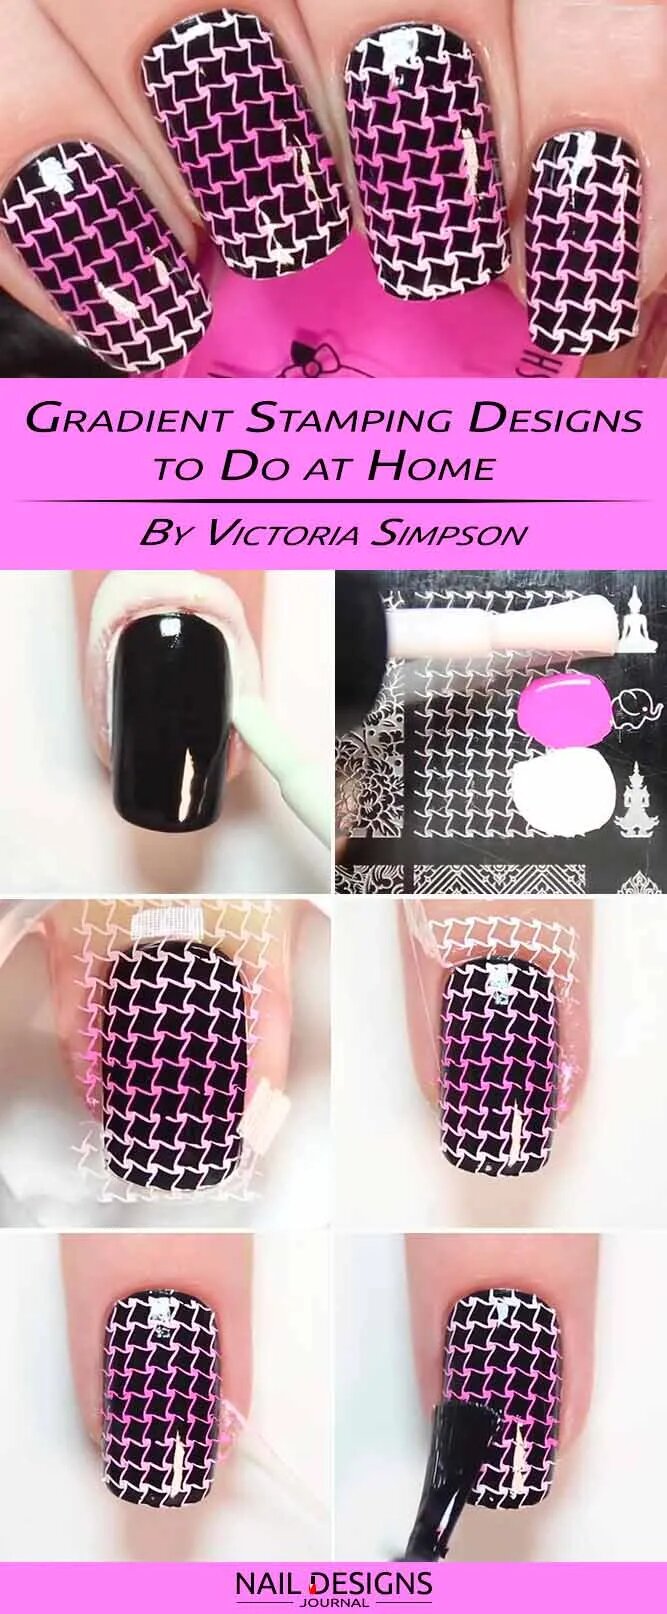
Gradient stamping is a popular nail design technique that instantly elevates your manicure game. This design involves creating a gradient effect using multiple colors and stamping it onto your nails for a unique, eye-catching look. Select two or more nail polish shades that complement each other well to achieve this design.
Apply the lightest shade as your base color and let it dry completely. Next, apply the different shades in a gradient pattern onto a stamping plate, blending them where they meet. Use a stamper to transfer the gradient design onto your nails, aligning it properly for a seamless look. Finish off with a clear top coat to seal in the design and add shine.
8.Cute Blue Nails Designs
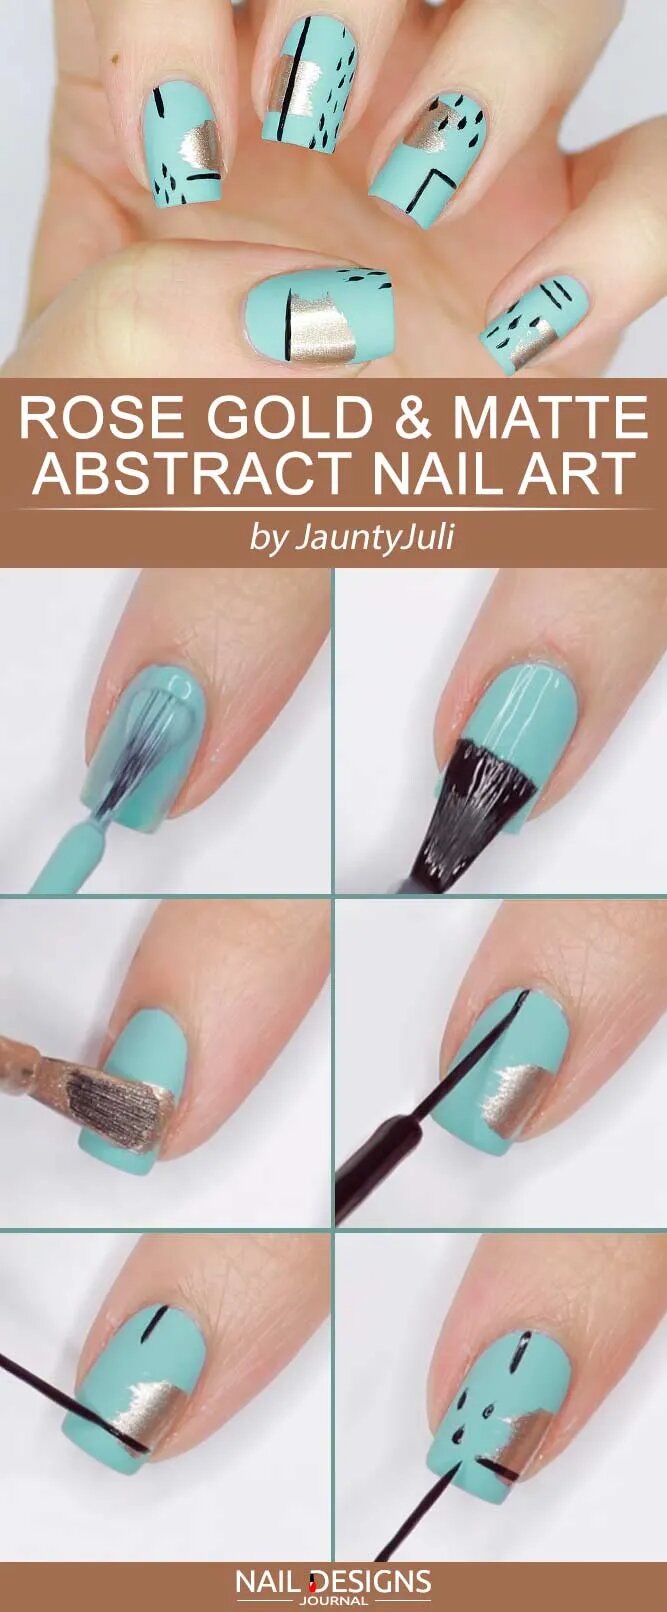
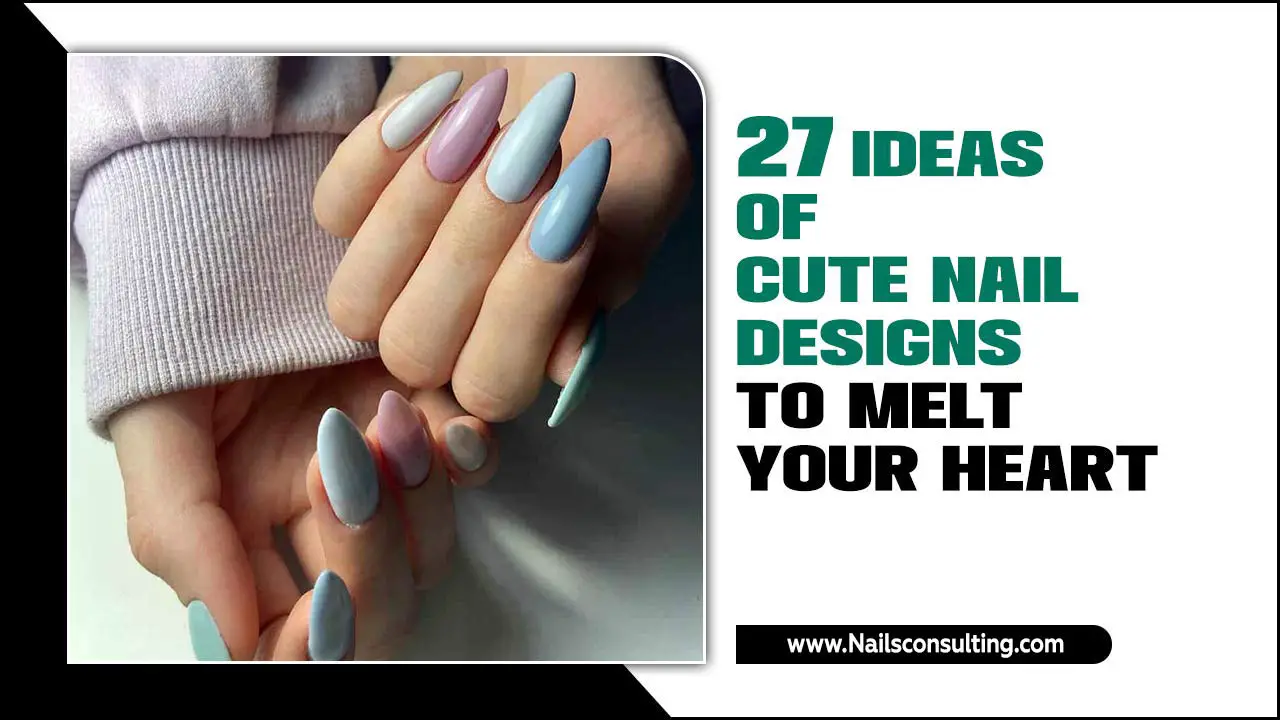
Blue is a versatile, trendy color that can add fun to any manicure. From classic blue hues to vibrant turquoise shades, there are endless possibilities for cute blue nails. You can opt for a simple, elegant, solid blue look or get creative with patterns like polka dots, stripes, or cute little blue flowers. Whatever design you choose, these cute blue nails will make a stylish statement and elevate your nail game to the next level.
9.DIY For Beginners, 3D Nail Art
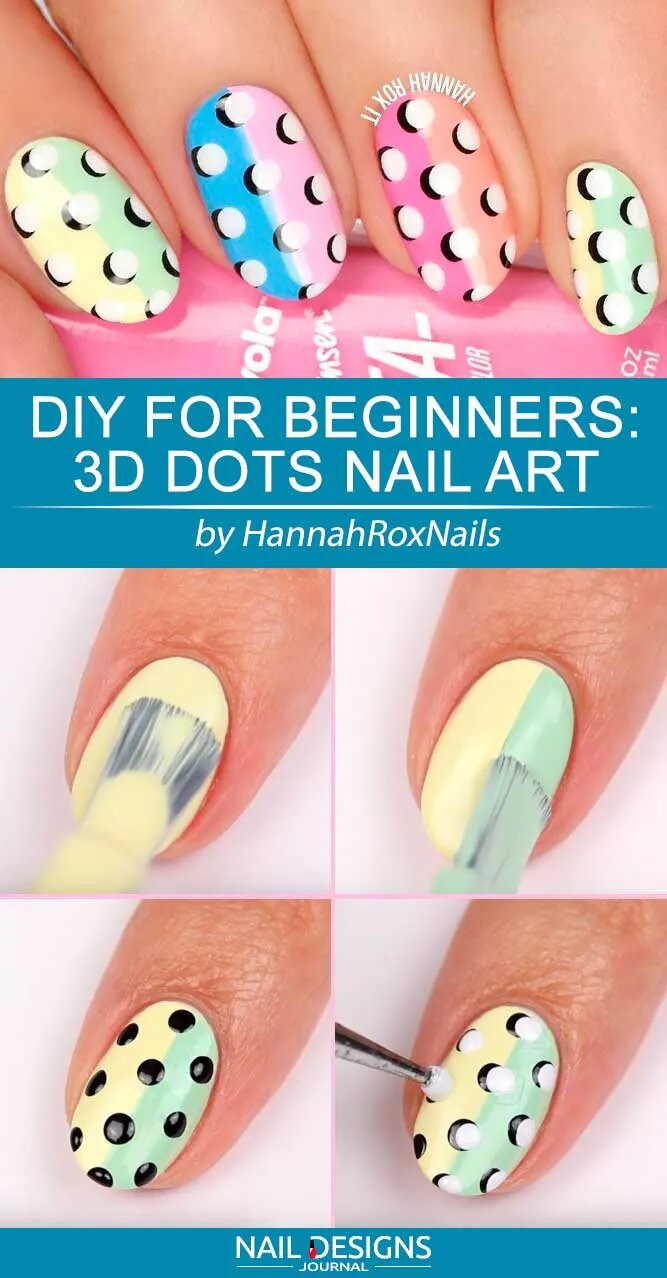
trying out some cute 3D nail art designs can be a fun and creative way to do so. While it may seem daunting initially, you can achieve stunning results right at home with a little practice and patience. Here are some easy steps to get started with DIY 3D nail art:
- Prep Your Nails: Start trimming and shaping your nails to your desired length and shape. Then, gently push back the cuticles and buff the surface of your nails to create a smooth canvas.
- Apply A Base Coat: Apply a thin layer of base coat to protect your natural nails and help the polish adhere better.
- Choose Your Design: Select the 3D design you want to create. This could be flowers, bows, gems, or any other design that catches your eye.
- Prepare The Materials: Gather all the necessary materials for your chosen design, such as acrylic powder or gel, brushes, dotting tools, or any other tools you may need.
- Start Creating: Using a brush or tool that suits your design needs, create the 3D elements on your nails. Take your time and build up the layers gradually for better control and precision.
- Cure Or Dry: Depending on your materials, you may need to cure them under a UV lamp or simply let them air dry.
- Seal It In: Once your 3D design is complete and fully dried or cured, apply a top coat to seal the design and add shine.
Remember, practice makes perfect! Don’t be discouraged if your first attempts don’t happen as planned. With time and practice, you’ll become more.
10.Cute Nails Designs- Sweet Glittery Look
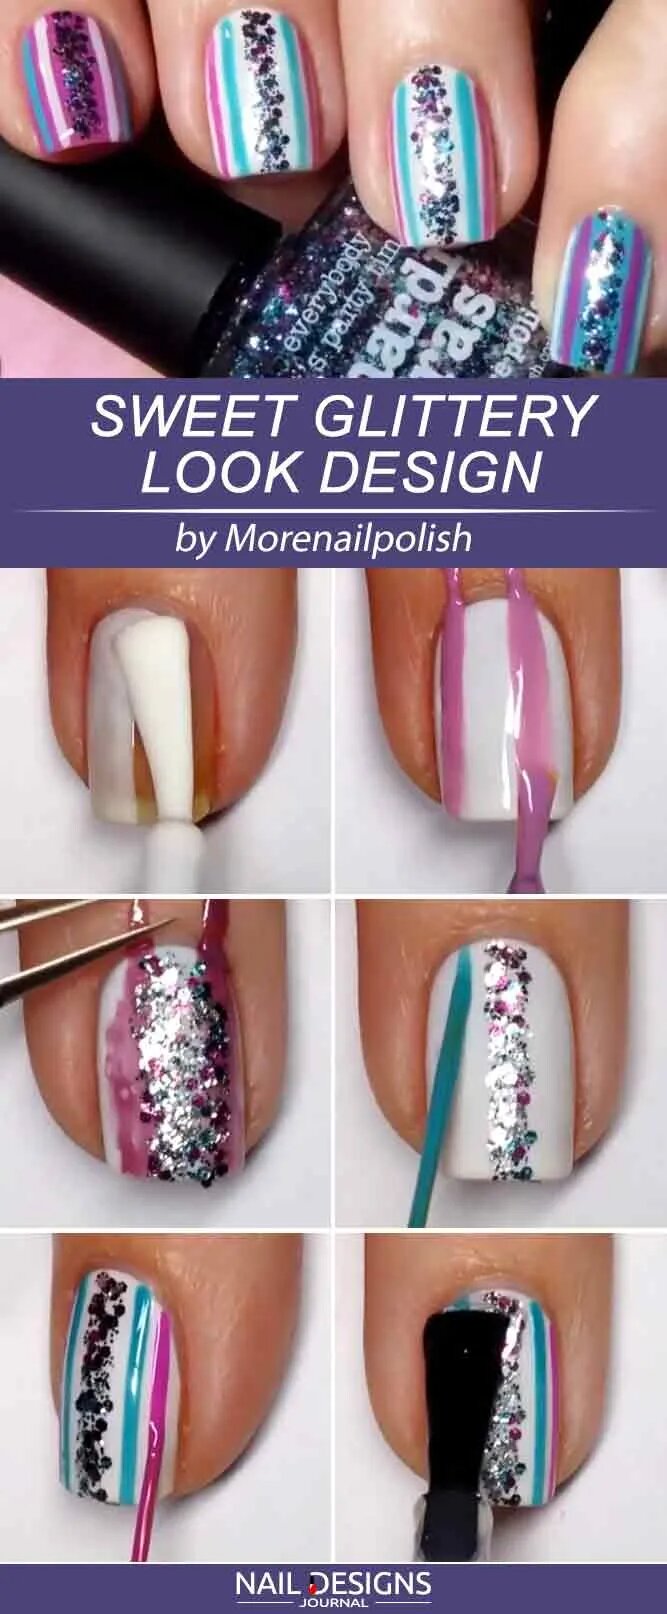
There are many beautiful nail designs to choose from. A popular option is to start with a base color to create a glitter gradient effect and then add glitter polish to the tips of your nails. It creates a subtle yet eye-catching sparkle that is perfect for any occasion.
Another beautiful design is to create a polka dot pattern using different colored nail polish. Simply use a dotting tool or the end of a bobby pin to create evenly-spaced dots on your nails. Finish with a clear top coat for added shine and longevity. With these cute nail designs, you’ll turn heads and show off your creative side in no time!
11.Cute Confetti Sprinkle Nails
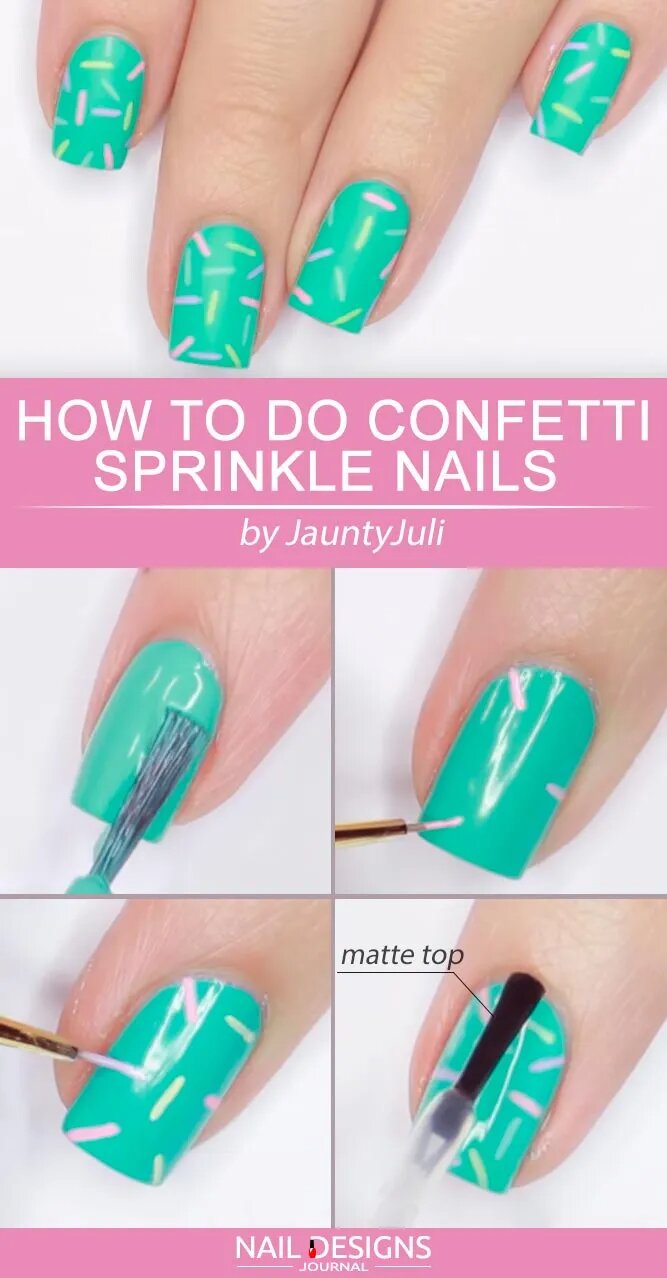
Want to up your nail game with a cute and fun design? Look no further than confetti sprinkle nails! This adorable nail design is perfect for adding color and whimsy to your look. To achieve this look, apply a base coat to protect your nails. Then, choose a neutral or light-colored polish as your base color.
Once the base color is dry, use a toothpick or small dotting tool to create sprinkles using different colored polishes. You can make them different sizes and shapes to mimic real confetti. Finish off with a top coat for added shine and longevity.
12.Trippy Polka Dot Nail Art
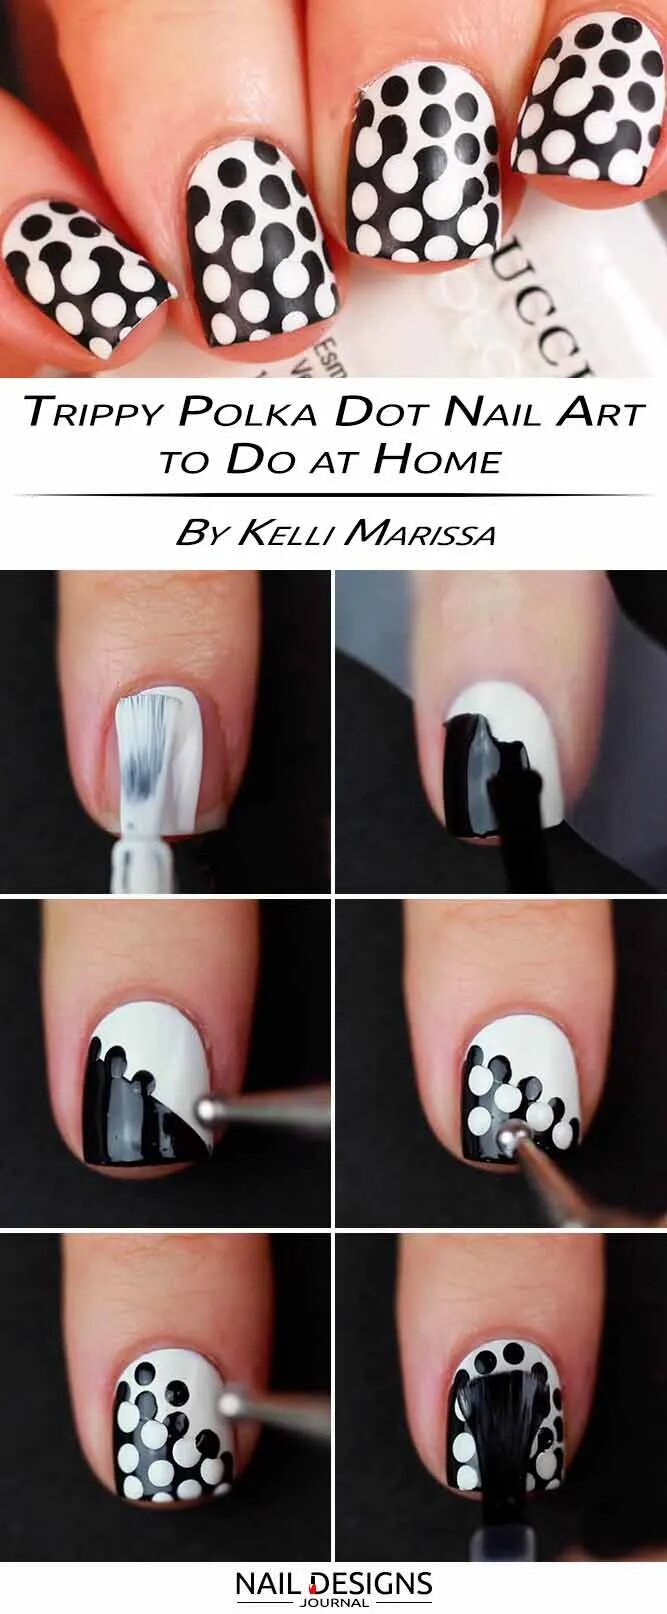
This fun and playful design is perfect for adding color to your nails. To achieve this look, apply a base coat to protect your nails. Next, choose two contrasting nail polish colors – the base color and the polka dots. Once your base color is dry, use a dotting tool or the end of a bobby pin to create evenly spaced-dots on each nail.
You can create different shapes and patterns with dots to add an extra touch of creativity. Finish with a top coat to seal your design and ensure it lasts. Trippy polka dot nail art is a simple yet eye-catching design that will turn heads and make your nails stand out.
13.Blobicure Nails Designs
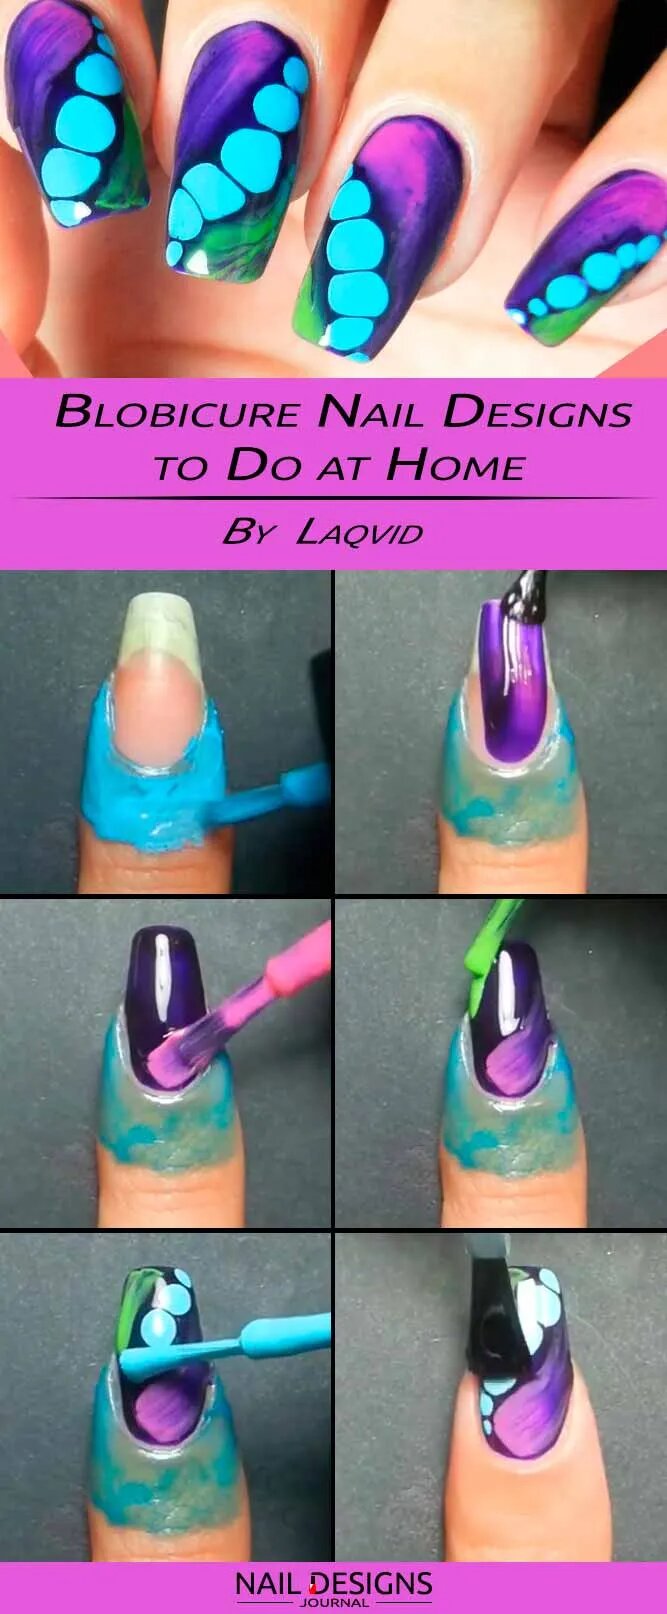
One trendy nail design that can easily improve your nail game is the obscure. This fun and playful design involves creating a raised, textured effect on the nails by applying blobs of polish onto a base color. To achieve this look, apply a base coat to protect your nails.
Then, choose two contrasting colors – one for the base and one for the blobs. Apply the base color and let it dry completely. Next, use a dotting tool or a toothpick to create small blobs of the second color on top of the base color. Allow the blobs to partially dry before gently pressing down on them with a sponge or makeup sponge to create the textured effect. Finish off with a top coat to seal your design and give it a glossy finish.
14.Easy Nail Designs With Quilted Texture
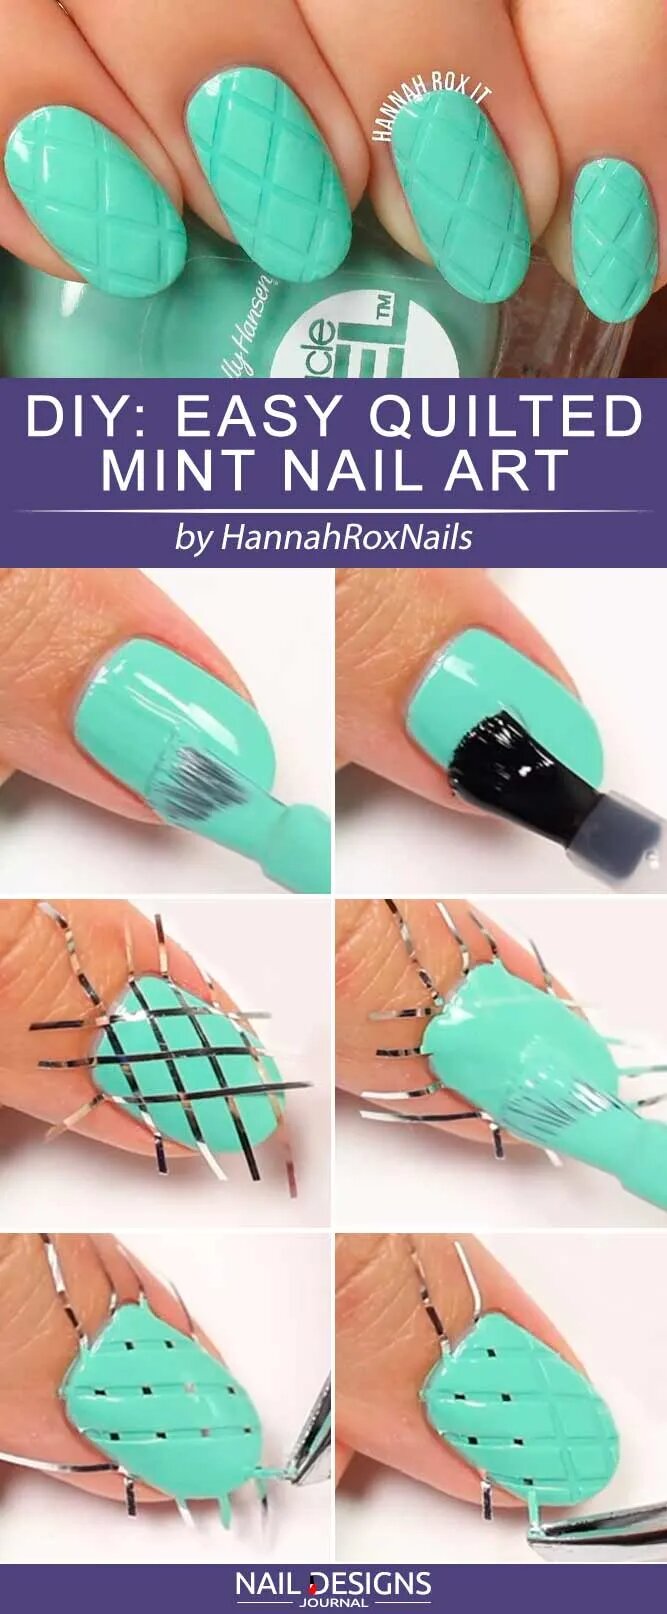
Adding a quilted texture to your nail designs is a fun and unique way to up your nail game. To achieve this look, apply a base coat to protect your nails. Then, choose two contrasting nail polish colors – one for the base and one for the quilted design.
Apply the base color and let it dry completely. Next, use a thin brush or a toothpick dipped in the second color to create small lines in a crisscross pattern on each nail. For an extra touch of glam, you can even add rhinestones or glitter to the center of each quilted section. Finish off with a top coat to seal your design and give it a glossy finish.
15.Easy Terrazzo Art
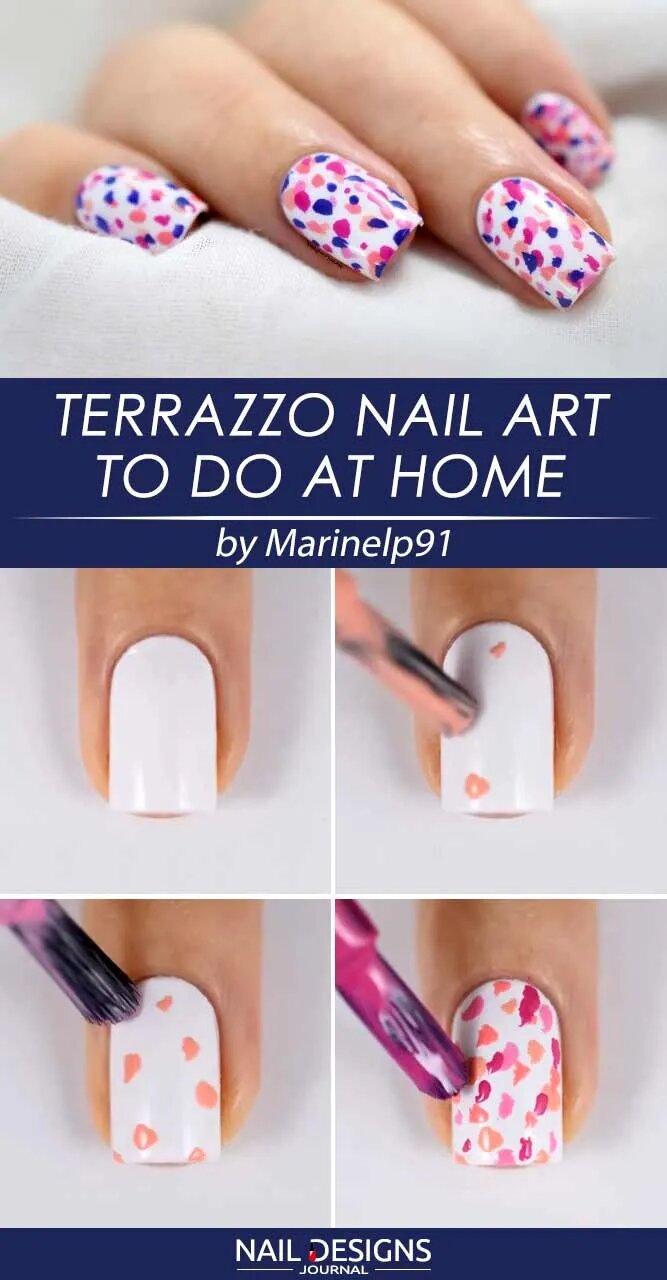
Terrazzo nail art is a trendy and playful design that can elevate your nail game. This tutorial will guide you to achieve cute terrazzo nails at home. Start by applying a base coat to protect your nails. Then, choose a neutral color as the base for your terrazzo design.
Using a small brush or toothpick, create random shapes and lines with different colored nail polishes to mimic the terrazzo look. Don’t worry about making them perfect – the beauty of terrazzo is its imperfect and abstract nature. Once you’re satisfied with your design, seal it with a top coat to make it last longer.
16.Diy 3d Nails Art Tutorial
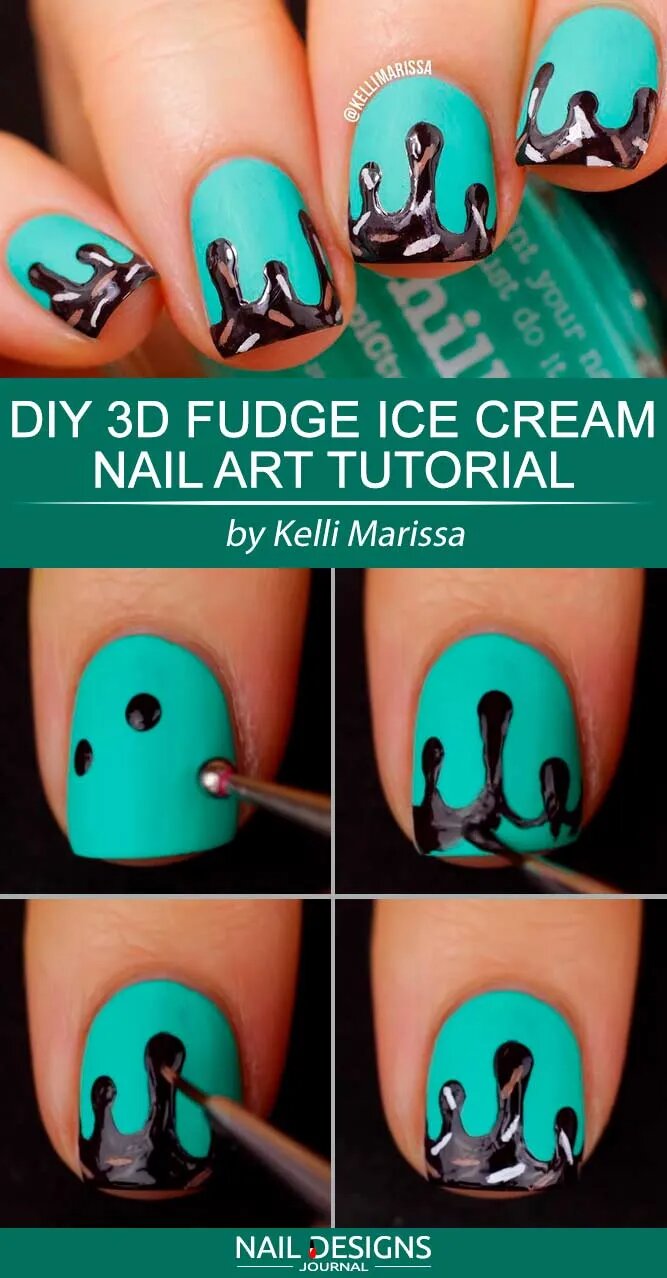
This tutorial will walk you through the steps to create stunning and unique designs to make your nails stand out. First, gather all the necessary supplies, including a base coat, colored nail polish, a top coat, small gems or beads, and nail glue.
Start by applying a base coat to protect your nails. Once dry, apply your chosen colored polish and let it dry completely. Next, use a dotting tool or toothpick to apply nail glue to the desired pattern or shape on your nails. Gently press the gems or beads onto the glue and let them dry. Finish with a top coat to seal your design and give it a glossy finish.
17.Cute Geometric Nails
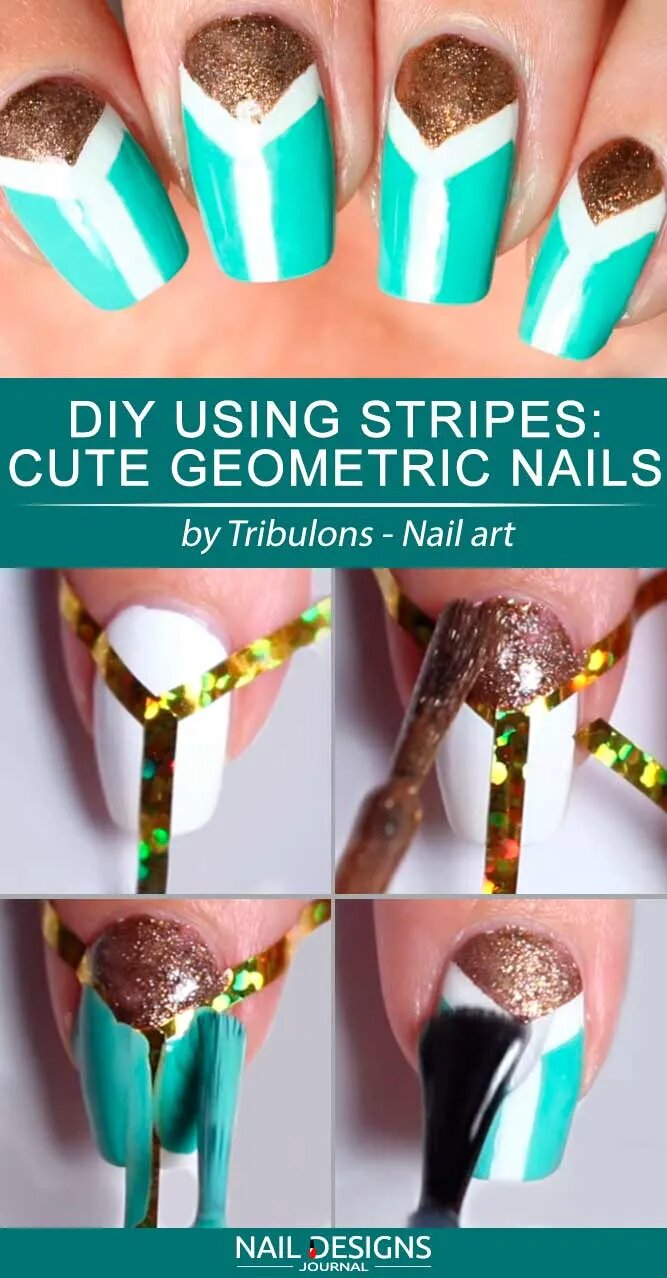
Geometric designs can range from simple lines and shapes to more intricate patterns, allowing you to get as creative as possible. To achieve cute geometric nails, apply a base coat and choose two or three contrasting nail polish colors.
Then, use thin striping tape or nail art brushes to create your desired geometric shapes and patterns on each nail. Once your design is complete, finish off with a top coat for a glossy and long-lasting finish.
18.Rainbow Nails Art Tutorial
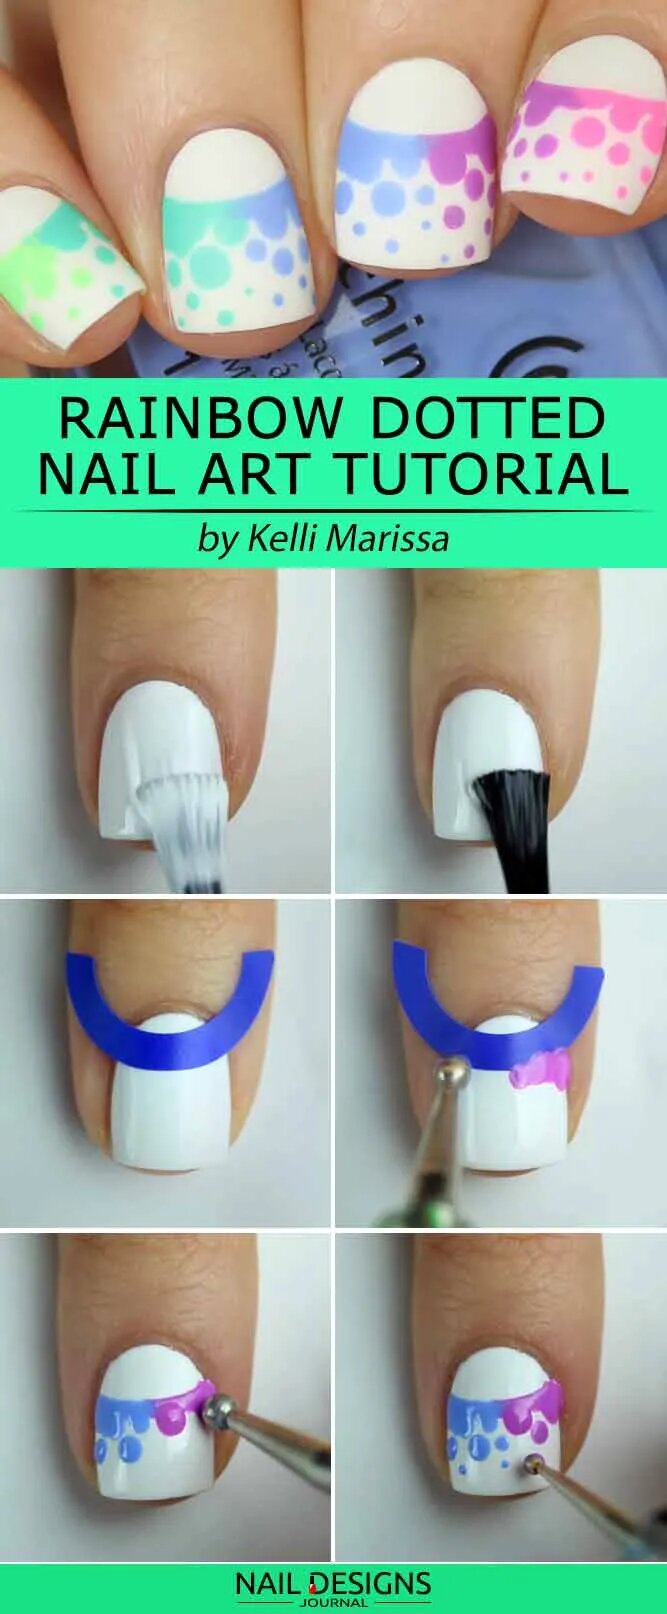
This tutorial will guide you in creating a vibrant and eye-catching rainbow design on your nails. Start by applying a white base coat to make the colors pop, then use a thin brush or a toothpick to draw thin lines of different colors across each nail. Repeat this process with all the rainbow colours until your nails are filled with beautiful stripes of color. Finish off with a clear top coat to seal your design and give it a glossy finish.
19.Holo Nails
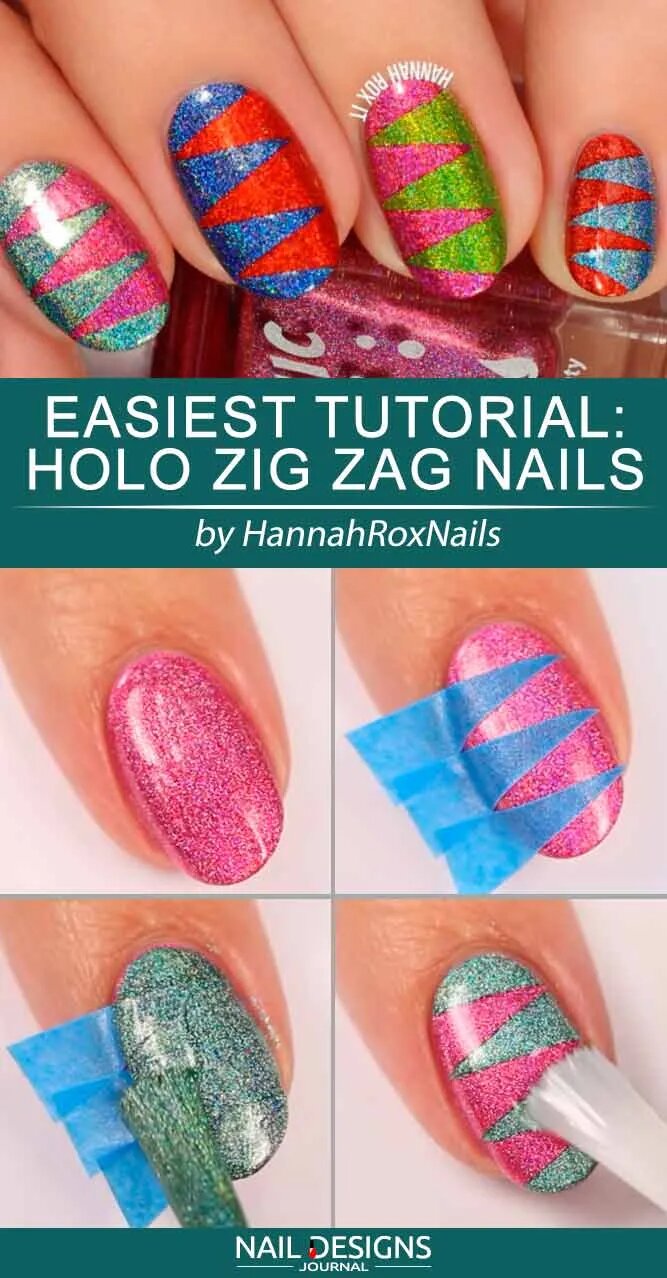
Holo nails are a fun and trendy way to up your nail game. This design incorporates holographic or iridescent nail polish to create a mesmerizing and eye-catching effect. To achieve holo nails, apply a base coat to protect your nails.
Once dry, apply a thin layer of holographic nail polish to cover the entire nail. Allow this layer to dry before applying a second coat for maximum impact. Finish off with a top coat to seal the design and add shine. Holo nails are perfect for adding sparkle and pizzazz to any outfit or occasion.

