Color splash accent nails add a vibrant pop of personality to your manicure by featuring colorful designs on just one or a few nails. They’re a fun way to experiment with bold colors and artistic touches without overwhelming your entire look, making them perfect for beginners wanting to elevate their nail game with ease and style.
Ever feel like your nails are a little… plain? You love color, inspiration, and a touch of fun, but diving headfirst into complicated nail art feels a bit daunting. That’s where accent nails come in! Specifically, color splash accent nails are your secret weapon for a trendy, eye-catching manicure that’s surprisingly easy to achieve. They’re a fantastic way to inject personality and artistic flair without needing to be a pro artist. Get ready to transform your nails into mini masterpieces!
Are you looking for easy ways to spice up your everyday manicure? Want to try out bold colors and fun designs without a lot of fuss? Color splash accent nails are the perfect solution! They are the ideal canvas for showing off your creative side with minimal effort. We’ll explore some of the most popular and beginner-friendly color splash accent nail designs, along with tips to make them look amazing. Let’s get those nails looking fab!
What Are Color Splash Accent Nails?
Color splash accent nails are a manicure technique where you choose one or a few nails on each hand to be the “accent” nails. These accent nails are decorated with a vibrant, multi-colored design, a stark contrast to the solid color or simpler finish on your other nails. Think of it as a little splash of artistic fun right on your fingertips! It’s a popular trend because it offers a playful yet sophisticated way to wear bright colors and creative patterns.
The beauty of color splash accent nails lies in their versatility. You can go with subtle splatters, bold abstract strokes, or intricate color blocking. This approach is fantastic for beginners because you don’t need to perfectly execute a complex design on all ten nails. You can focus your artistic energy on just one or two nails, making the process less intimidating and more enjoyable.
Why Choose Color Splash Accent Nails?
There are so many reasons why color splash accent nails are a hit, especially for those new to nail art:
- Easy to Master: Many color splash techniques rely on abstract patterns, meaning perfection isn’t the goal. It’s all about embracing the “splash”!
- Showcases Creativity: You can mix and match colors and styles to perfectly reflect your mood or outfit.
- Budget-Friendly: You’re using less polish and potentially fewer specialized tools compared to full-nail art.
- Trendy Appeal: Color splash designs are consistently seen on social media and in salons, proving their stylish staying power.
- Focus on Detail: It allows you to experiment with fun details without the pressure of committing them to every single nail.
Essential Tools & Supplies for Color Splash Accent Nails
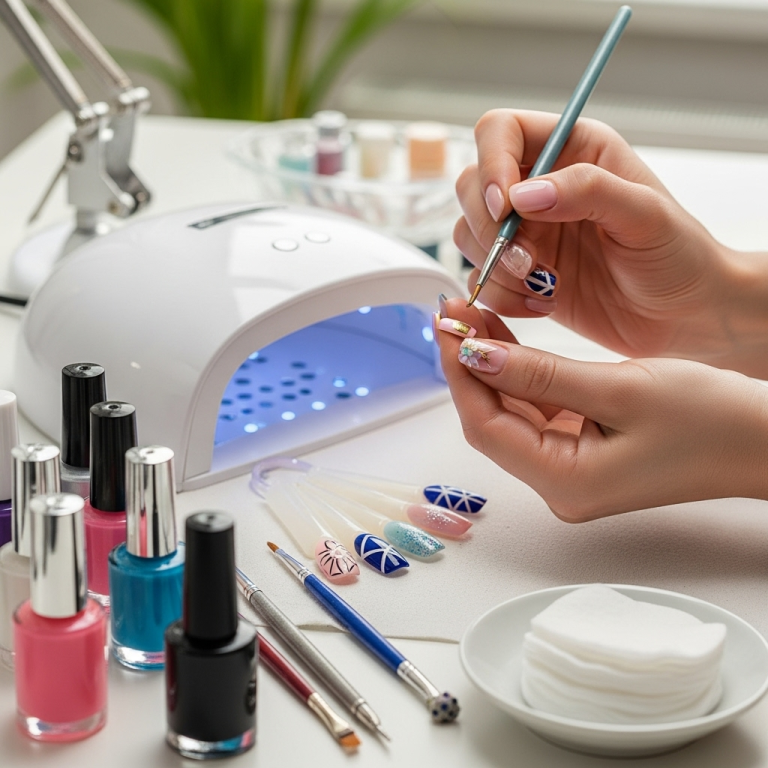
Before we jump into the fun designs, let’s gather your nail art toolkit. You don’t need a professional salon setup to create stunning color splash accent nails. Here are the basics:
- Base Coat: Protects your natural nails and helps polish adhere better.
- Top Coat: Seals your design, adds shine, and helps it last longer.
- Nail Polish: Your chosen base color and a variety of vibrant colors for the splash.
- Thin Nail Art Brush or Dotting Tool: Essential for creating precise lines, dots, or abstract shapes. You can find these at most beauty supply stores. For a more authentic “splash” look, a stiff, angled brush can also work wonders.
- Toothpick or Orange Stick: Handy for cleaning up edges or making small adjustments.
- Nail Polish Remover: For quick cleanups and mistakes.
- Cotton Pads/Balls: To apply the remover.
- Optional: Glitter Polish: For an extra bit of sparkle.
- Optional: Striping Tape: If you want to create super clean geometric splashes.
Having the right tools makes the process smoother and the results more polished. Don’t worry if you don’t have every single item; you can often improvise with household items for beginner attempts!
Beginner-Friendly Color Splash Accent Nail Designs
Ready to get creative? These designs are perfect for beginners and can be adapted endlessy. We’ll focus on techniques that are forgiving and deliver high impact!
Design 1: The Abstract Splatter
This is the quintessential color splash look! It’s intentionally messy and incredibly chic.
How to achieve it:
- Prep: Start with clean, dry nails. Apply your favorite base coat and let it dry completely.
- Base Color: Apply one or two coats of your chosen base color (e.g., white, black, nude, or a soft pastel). Let it dry fully.
- The Splatter: Dip a stiff detail brush (or even an old toothbrush!) into a vibrant nail polish color. Hold it a few inches above your accent nail and flick the bristles with your finger to splatter the polish onto the nail. Repeat with 2-3 different colors, layering them for a dynamic effect. Don’t aim for perfection; uneven splatters look more realistic!
- Clean Up: Use a small brush dipped in nail polish remover to carefully clean up any stray splatters around your nail.
- Seal It: Apply a generous layer of top coat to smooth out any texture and add shine.
Tip: Experiment with different distances and flicking techniques to control the size and density of your splatters. Lighter colors over a dark base, or vice versa, create the most contrast.
Design 2: The Watercolor Wash
This technique creates a soft, artistic blend of colors, like a painted watercolor masterpiece.
How to achieve it:
- Prep: Apply base coat and your chosen base color to your accent nails, and ensure they are completely dry.
- Apply First Color: Paint a patch of your first watercolor color onto the accent nail.
- Blend with Top Coat: Quickly apply a thin layer of clear top coat over the wet color.
- Add Second Color: While the top coat is still wet, use a thin brush to apply a second color next to or slightly overlapping the first. The wet top coat will help the colors bleed and blend softly into each other.
- Continue Blending: Add a third color if desired, and use your brush (cleaned between colors, or a separate brush for blending) to gently guide the edges where colors meet.
- Clean Up & Seal: Clean up the edges with a brush and polish remover. Then, apply a final layer of clear top coat to lock in the blended look.
Tip: Work quickly! The blending happens while the top coat is wet. If your colors dry, they won’t meld as smoothly.
Design 3: The Geometric Color Block
For a cleaner, more modern take on the color splash, geometric blocks are fantastic.
How to achieve it:
- Prep: Base coat and base color applied and dried on your accent nails.
- Apply Tape: Carefully place striping tape diagonally, horizontally, or into abstract shapes across your accent nail. Press down firmly to ensure no polish seeps underneath.
- Paint First Section: Paint one section with a bold color. Let this polish dry completely.
- Remove Tape: Gently peel off the striping tape.
- Apply Second Tape: Place new striping tape over the dry painted section and onto your base color, creating a new section to paint.
- Paint Second Section: Apply a different pop of color to this new section. Let it dry completely before peeling off the tape.
- Clean Up & Seal: Tidy up any edges and apply a top coat.
Tip: Use tweezers to handle the delicate striping tape. Ensure each layer of polish is fully dry before applying the tape for the next section to get sharp, clean lines.
Design 4: The Gradient Drip
This mimics dripping paint, but with a beautiful, blended gradient effect.
How to achieve it:
- Prep: Base coat and base color applied and dried on your accent nails.
- Apply Ombre/Gradient: Create a simple gradient effect on the accent nail. You can do this by painting stripes of 2-3 colors next to each other on a makeup sponge and dabbing it onto the nail, or by using a brush to blend colors directly on the nail with a bit of top coat.
- Create the Drip: Once your gradient is dry, use a fine-tipped nail art brush and a contrasting color (or a darker shade from your gradient) to paint thin, drippy lines starting from the cuticle area down towards the free edge of the nail.
- Clean Up & Seal: Clean up any messy drips with a brush and remover. Apply a good top coat to seal everything in.
Tip: For a softer drip, use a sheer polish or a slightly diluted polish. You can also add small dots at the ends of the drips for a more pronounced effect.
Design 5: The “Paint Stroke” Accent
This design mimics broad, artistic paint strokes. It’s wonderfully forgiving!
How to achieve it:
- Prep: Base coat and base color applied and dried on your accent nails.
- Load Your Brush: Dip a flat, slightly stiffer brush into one of your chosen “splash” colors. You want a good amount of polish on the brush, but not so much that it’s dripping everywhere.
- Apply the Stroke: Press the brush onto the accent nail and drag it across in a sweeping motion to create a bold, expressive stroke. Think about angle and pressure to vary the stroke’s thickness.
- Add More Strokes: Repeat with 1-2 other colors, layering them over or next to the first stroke. Allow slight overlap for a natural blend.
- Clean Up & Seal: Tidy up the edges and apply your top coat to give it that perfect glossy finish.
Tip: Don’t be afraid to use a bit of pressure to splay the brush bristles for wider strokes, or use the edge of the brush for thinner ones. The goal is movement and energy!
Applying Color Splash Designs: Step-by-Step Visual Guide (Conceptual)
While actual visuals aren’t possible here, imagine this: You have your nails painted a soft, solid beige. Your accent nail (let’s say your ring finger) is ready. You grab a bright coral polish and your thin brush. You paint a swooping, abstract line starting from the side of the nail, curving slightly upwards. Then, you grab a turquoise polish and add a smaller, slightly overlapping stroke next to it. Finally, maybe a touch of bright yellow peeking from underneath. You step back, see the vibrant, playful mix of colors on that one nail, and smile. That’s the magic of color splash! The contrast with your neutral base makes it pop. A good clear top coat seals the deal, making it look like you just walked out of a trendy nail art studio.
Maintaining Your Color Splash Accent Nails
Once your beautiful color splash accent nails are complete, a little care will help them last:
- Reapply Top Coat: Every 2-3 days, apply a fresh layer of top coat to the accent nails (and all nails) to keep the shine vibrant and protect the design.
- Moisturize: Keep your hands and cuticles moisturized with a good cuticle oil or hand cream. Dry skin can make any manicure look less than perfect.
- Be Gentle: Avoid using your nails as tools – like opening cans or scraping labels. This is key for any manicure’s longevity.
- Gloves for Chores: Wear rubber gloves when washing dishes or cleaning with harsh chemicals to protect your polish from damage.
Following these simple steps will help ensure your creative accent nails stay looking fresh and fabulous for as long as possible.
Common Mistakes and How to Avoid Them
Even with simple designs, a few common pitfalls can crop up.
| Common Mistake | How to Avoid It |
|---|---|
| Polish is still wet when applying tape. | Always ensure each layer of polish is completely dry before applying striping tape for clean lines. Patience is key! |
| Overcrowding the accent nail. | Remember, it’s an accent. A few well-placed colors and shapes are more impactful than overwhelming the nail. Less is often more. |
| Messy cleanup around the cuticles. | Keep a fine-tipped brush dipped in nail polish remover nearby. Gently trace around your cuticles and the sides of your nails for a clean finish. For very precise cleanup, consider a specialized cuticle cleanup pen. |
| Using too much product on tools. | When splattering or painting strokes, start with a moderate amount of polish on your brush or tool. You can always add more, but it’s harder to take away excess. |
| Forgetting to seal the design. | A good quality top coat is crucial! It not only adds shine but also protects your artwork from chipping and fading. Don’t skip this step. |
| Trying to do too much on the first try. | Start with the simplest designs (like basic splatters) and gradually work your way up. Focus on one or two accent nails first. |
Color Splash Inspiration & Trends
The world of color splash is constantly evolving! Here are a few trending ideas and ways to find inspiration:
- Neon Dreams: For summer or a bold statement, neon pinks, greens, and oranges are sizzling.
- Pastel Palooza: Soft lavenders, mint greens, baby blues, and pale yellows create a dreamy, ethereal look.
- Monochromatic Magic: Use different shades of the same color family (e.g., light blue, medium blue, navy) for a sophisticated, subtle splash.
- Metallic Accents: Combine matte colors with metallic gold, silver, or rose gold for a touch of glam.
- Glitter Overload: Apply glitter polish over your color splashes for extra sparkle or use it as one of your splash colors.
Where to find more inspiration:
- Pinterest: Search “color splash nails” or “abstract accent nails” for thousands of ideas.
- Instagram: Follow nail artists and hashtags like #colorsplashnails #nailartaddict #accentnails.
- Beauty Blogs & Magazines: Many online publications feature the latest nail trends.
Remember, the best trend is the one that makes you feel confident and beautiful!
Frequently Asked Questions (FAQ)
Q1: Do I need to be an artist to do color splash accent nails?
A: Absolutely not! Many color splash designs are abstract and meant to look “messy” in a stylish way. The goal is more about fun colors and visual interest, not perfect lines. Beginners can easily achieve great results!
Q2: How long do color splash accent nails usually last?
A: With a good base coat, quality polish, and a strong top coat, color splash accent nails can last anywhere from 5 to 10 days, depending on your daily activities and how well you care for them.
Q3: Can I use any kind of nail polish for the splash effect?
A: While most regular nail polishes work well, some users find that slightly thicker polishes or polishes with good opacity create more impactful splashes. Experiment with what you have!
Q4: What’s the easiest way to clean up polish mistakes?
A: The easiest way is to use a small, flat brush (like a tiny eyeshadow brush or a dedicated nail art cleanup brush) dipped in nail polish remover. Gently trace around the edges of your nail and cuticles to remove any stray polish.
Q5: Can I do color splash on natural and artificial nails?
A: Yes! Color splash accent nails look great on both natural nails and artificial nails like acrylics or gel extensions. The application method might vary slightly for artificial nails, but the design principle remains the same.
Q6: Should the base color be opaque or sheer?
A: Both can work! An opaque base color will make your splash colors pop vibrantly. A sheerer base can create a softer, more diffused look, especially if you’re aiming for a watercolor effect.


