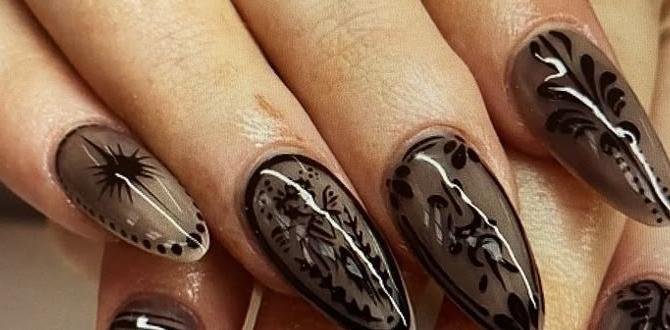
Black matte and glossy contrast nails offer a chic, modern look by playing with two distinct finishes, creating depth and intrigue. This style is surprisingly simple to achieve at home, delivering a sophisticated aesthetic that’s both edgy and elegant. Learn how to master this genius nail art trend for a salon-worthy manicure.
Nail art can sometimes feel a little… well, much. You see those intricate designs and wonder if you’ll ever be able to achieve that level of polish. But what if I told you that one of the most striking nail trends right now is actually super easy to do yourself? We’re talking about the magic of black matte and glossy contrast nails! This look is all about combining two textures on your nails to create a seriously cool vibe. It’s sophisticated, a little bit edgy, and surprisingly simple to master. Get ready to transform your nails with this genius style that looks like you just stepped out of a high-fashion magazine, but you’ll have done it all from your comfy couch!
Why Black Matte and Glossy Contrast Nails Are a Genius Style
Ever feel like your manicure is missing that extra oomph? That’s where the brilliance of contrast comes in. Black matte and glossy finishes play off each other in a way that’s visually stunning. The matte surface absorbs light, giving a velvety, deep black appearance, while the glossy finish reflects light, creating a high-shine, lacquered look. This interplay makes your nails look dynamic and sophisticated. It’s a subtle yet powerful way to elevate a classic black manicure into something truly special.
The Allure of Texture Play
Think about it: we love the feel of soft fabrics mixed with smooth leather, or a matte finish on a phone case contrasted with a glossy screen. The same visual and tactile satisfaction applies to nails. The matte black provides a sophisticated, understated backdrop, while strategically placed glossy elements add pops of shine, drawing the eye and creating a captivating illusion of depth. This contrast is what makes the style so captivating and modern, offering a fresh take on a timeless color.
Simplicity Meets Sophistication
The best part? This look doesn’t require advanced nail art skills. You can achieve stunning results with just a couple of key products and a little patience. It’s the perfect DIY project for anyone looking to add a touch of high-end style to their everyday look without a trip to the salon. We’ll break down exactly how to get this chic design, step-by-step.
Getting Started: What You’ll Need
Before we dive into the fun part, let’s gather our supplies. Don’t worry, you probably have most of these already!
Base Coat: Essential for protecting your natural nails and helping your polish last longer.
Black Nail Polish: You’ll need a good quality black polish. A creme finish works best as it provides a solid, opaque base.
Matte Top Coat: This is key to achieving that velvety, non-shiny finish.
Glossy (Shiny) Top Coat: Your regular, high-shine top coat will do the trick here.
Detailing Tools (Optional but recommended):
Thin Nail Art Brush: For creating precise lines or shapes with the glossy polish.
Dotting Tools: For creating perfect dots.
Stencils/Stickers: For easy, clean designs if you prefer.
Nail Polish Remover & Cotton Pads: For any little oops moments or for cleaning up edges.
Orange Stick or Cuticle Pusher: For cleaning up the cuticle area.
Choosing Your Black Polish
Not all black polishes are created equal! For this design, a classic creme finish black polish is ideal. It gives a solid, opaque base that will beautifully contrast with the matte finish. Avoid polishes with glitter or shimmer for the base color, as these can interfere with the smooth matte transformation.
The Magic of Matte Top Coats
Matte top coats are readily available now and are a game-changer for nail art. They instantly transform any color into a sophisticated matte finish. When you apply this over a dried glossy color, it mutes the shine and gives that unique, velvety texture.
For more tips on choosing the right nail polish for your needs, check out this resource on nail polish types.
Step-by-Step Guide: Mastering the Black Matte + Glossy Contrast
Ready to create your masterpiece? Follow these simple steps for a flawless finish.
Step 1: Prep Your Nails
Clean: Start with clean, dry nails. Remove any old polish.
Shape: File your nails into your desired shape. Square, almond, or stiletto – all look fabulous with this design!
Cuticle Care: Gently push back your cuticles using an orange stick or cuticle pusher. This gives you a clean canvas to work on.
Apply Base Coat: Apply a thin, even layer of your favorite base coat. Let it dry completely. This step is crucial for preventing staining and extending the life of your manicure.
Step 2: Apply the Base Color (Glossy Black)
First Coat: Apply a thin, even coat of your chosen black nail polish. Try to get as close to the cuticle as possible without touching the skin.
Second Coat: Once the first coat is almost dry, apply a second coat for full opacity.
Dry Thoroughly: Let this glossy black polish dry completely. This is super important! If it’s not dry, the matte top coat might lift the color or create a muddy finish. Patience is key here.
Step 3: Create the Matte Effect
Apply Matte Top Coat: Once your glossy black base is bone dry, apply a thin, even layer of your matte top coat over all of your nails.
Watch the Magic: You’ll see the shine instantly disappear, replaced by a beautiful, velvety matte finish.
Dry Completely: Let the matte top coat dry fully according to the product’s instructions.
Step 4: Add Your Glossy Contrasting Elements
This is where you get creative! You can add glossy elements to some nails, or just one accent nail. Here are a few popular ideas:
Idea A: The Glossy Accent Nail
Choose an Accent Nail: Select one nail on each hand (usually the ring finger) to be your glossy accent nail.
Apply Glossy Top Coat: Carefully apply your regular glossy (shiny) top coat only to this accent nail.
Be Precise: Try to outline the shape of the nail perfectly. You can also use a thin brush to create a specific design on this nail.
Allow to Dry: Let the glossy top coat dry completely.
Idea B: Glossy Lines or Shapes
Use a Nail Art Brush: Dip a very fine nail art brush into your glossy (shiny) top coat. Alternatively, use a dotting tool.
Create Designs: Gently draw thin lines, dots, swirls, or geometric shapes over the matte black surface. You can create French tips with a glossy line, polka dots, or abstract patterns.
Precision is Key: Work slowly and deliberately. If you make a mistake, you can try to clean it up with a tiny bit of nail polish remover on a fine brush before it fully dries, or simply apply another layer of matte top coat on the mistake area once dry and try again.
Dry Thoroughly: Let these glossy details dry completely.
Idea C: The Half-Moon or French Tip
Freehand: If you’re feeling brave, freehand a glossy tip or a half-moon shape at the base of the nail using your shiny top coat and a fine brush.
Using Guides: For a cleaner line, you can use nail vinyls or tape. Apply the vinyl over your matte nail, paint the desired shape with glossy top coat, and carefully peel away the vinyl while the polish is still slightly wet.
Dry: Allow the glossy elements to dry.
Step 5: Final Seal (Optional but Recommended)
Protect Your Art: Once all your glossy elements are completely dry, you can apply another very thin layer of your regular glossy top coat over the entire nail. This helps to seal in your design and protect it from chipping, especially over the matte areas.
Or Seal with Matte: Alternatively, if you want to keep the entire nail matte except for specific glossy details, you can skip this step or carefully apply a tiny bit of glossy top coat only to the glossy parts. For most, sealing the entire nail with a thin layer of glossy top coat creates a beautiful, subtle contrast between the main matte finish and the intended glossy details without making the whole nail shiny.
Step 6: Clean Up and Moisturize
Clean Edges: Use your orange stick wrapped with a tiny bit of cotton dipped in nail polish remover to clean up any polish on your skin around the nail.
Hydrate: Apply cuticle oil and hand cream to nourish your skin and cuticles. This gives your manicure a polished, finished look.
Popular Black Matte + Glossy Nail Designs
The beauty of this trend lies in its versatility. Here are some ideas to inspire your next manicure:
The Classic French Tip Upgrade
Instead of a white tip, opt for a glossy black French tip over a matte black base. It’s subtle, chic, and incredibly sophisticated.
The Half-Moon Chic
Paint a perfect glossy half-moon shape at the base of your nail (the cuticle area) while the rest of the nail is matte black. This draws attention to the nail’s natural curve.
Glossy Geometric Patterns
Use a fine brush to paint sharp, clean lines, squares, or triangles in glossy black over your matte base. This gives a modern, architectural feel.
The “Ombre” Effect
This is a bit more advanced, but you can create a subtle gradient where the tip of the nail gradually becomes glossy while the base remains matte.
Abstract Artistry
Let your inner artist loose! Create random splatters, swirls, or abstract shapes with glossy polish on your matte canvas.
Tables: Comparing Finishes and Application Tips
Let’s break down the differences between matte and glossy finishes and some handy application tips.
Matte vs. Glossy Finishes
| Feature | Matte Finish | Glossy Finish |
| :————– | :——————————————— | :————————————————– |
| Appearance | Velvety, non-reflective, deep color absorption | Shiny, highly reflective, lacquered look |
| Light | Absorbs light | Reflects light |
| Texture | Smooth, sometimes slightly chalky | Smooth, slick |
| Durability | Can be prone to scuffing if not sealed | Generally durable, but can show scratches |
| Application | Best applied over fully dried polish | Standard top coat application |
| Effect | Sophisticated, subdued, modern | Classic, high-shine, glamorous |
Application Tips for Best Results
| Tip | Description |
| :————————– | :—————————————————————————————————————————————————————————————————- |
| Clean Nails are Crucial | Always start with clean, dry nails. Remove all traces of old polish. |
| Thin Coats are Best | Apply polish in thin, even layers. This prevents bubbling and ensures faster drying times. Multiple thin coats are better than one thick coat. |
| Let it Dry! | This cannot be stressed enough. Ensure each layer (base coat, color, matte top coat, glossy details) is completely dry before applying the next. Use a quick-dry spray or allow ample air-drying time. |
| Work in Good Lighting | Good lighting helps you see where you’re applying polish and spot any imperfections. |
| Steady Hands | For detailed work, rest your elbow on a stable surface to steady your hand. Breathe! Small, controlled movements are key. |
| Clean Up Mistakes | Keep nail polish remover and a fine brush handy for immediate clean-up of any stray polish on your skin. |
| Seal Your Work | A final top coat (either glossy or matte, depending on your desired overall look) can help protect your design and extend its wear. |
Keeping Your Contrast Nails Looking Sharp
Your gorgeous black matte and glossy contrast nails will last longer with a little care.
Daily Maintenance
Avoid Harsh Chemicals: Wear gloves when doing dishes, cleaning, or using harsh chemicals. These can strip the polish and dull the matte finish.
Be Gentle: Treat your nails with care. Avoid using them as tools (e.g., to open cans).
Oil Up: Regularly apply cuticle oil to keep your nails and the surrounding skin hydrated and healthy. This also helps maintain the integrity of the polish.
Refreshing Your Manicure
If you notice the glossy parts losing their shine or the matte parts looking a bit dull after a week or so, you can give them a refresh.
For Glossy Parts: Apply another thin layer of glossy top coat specifically to the areas that need a boost.
For Matte Parts: If the matte finish starts to look scuffed or less vibrant, you can carefully apply a very thin layer of matte top coat over just the matte areas. Be cautious not to touch any existing glossy elements with the matte top coat, or it will dull them.
This careful touch-up can extend the life of your manicure and keep it looking freshly done for longer.
Common Questions About Black Matte + Glossy Contrast Nails
Here are some answers to frequently asked questions about this trendy nail style.
Q1: Can I achieve this look without a special matte top coat?
While a dedicated matte top coat is the easiest and most effective way to get a true matte finish, some brands offer matte nail polishes in black. However, these might not provide the same contrast potential. Using a matte top coat over a glossy black base is the standard and best method for this specific trend.
Q2: How long does this type of manicure typically last?
With proper application and care, black matte and glossy contrast nails can last anywhere from 7 to 14 days. The durability depends on your nail type, how well you prepped your nails, the quality of your polishes, and how gently you treat your hands.
Q3: Is it difficult to apply the glossy details precisely?
It can take a little practice, but it’s very achievable! Using a thin nail art brush or dotting tool, and working slowly with a steady hand are key. Don’t be afraid to use nail guides or stencils if freehanding is too challenging at first. Many beginners find success with this.
Q4: Can I use other colors besides black for this contrast effect?
Absolutely! While black is a classic and very popular choice, this contrast technique works beautifully with deep blues, burgundy, emerald green, or even a sophisticated grey. You could even try a matte base with glossy white designs for a different vibe.
Q5: Will the matte finish chip easily?
Matte finishes can sometimes be more prone to scuffing or showing wear than glossy finishes. Applying a thin layer of a glossy top coat over the entire nail (after the glossy designs are dry) can help seal and protect both the matte and glossy elements, offering a bit more chip resistance. However, always be mindful of your nails.
Q6: How do I clean up mistakes when applying the glossy details?
The best way to clean up mistakes is immediately! Have a small brush (like a liner brush or an old, clean makeup brush) dipped in nail polish remover ready. Gently sweep away any polish that got where you didn’t want it before it dries. For dried mistakes, you might need to carefully reapply the matte top coat to the affected area and try again.
For more in-depth nail care tips, the American Academy of Dermatology Association offers excellent advice on maintaining healthy nails.
Conclusion: Embrace Your Inner Nail Artist!
You’ve got the power to achieve stunning, high-fashion nails right at home! Black matte and glossy contrast nails are a testament to how simple techniques can yield incredibly sophisticated results. This trend is all about playing with textures and creating a look that’s both modern and timeless.
Remember, nail art is all about self-expression and having fun. Don’t be afraid to experiment with different designs, shapes, and placements of your glossy elements. Whether you opt for a subtle French tip, a bold geometric pattern, or a free-flowing abstract design, the interplay of matte and glossy finishes will always add that extra touch of genius.
So, grab your polishes, set aside some time, and get ready to impress yourself and everyone around you with your beautifully crafted contrast nails. Happy painting!


